علامة تبويب العناصر القابلة للتقدير في دفتر التقديرات
Note
تمت ترجمة هذه الوثيقة باستخدام الترجمة الآلية المدعومة بالذكاء الاصطناعي. تُقدَّم الترجمات «كما هي» على وضعها القائم دون أي ضمان بشأن دقتها. تُعد النسخة الإنجليزية من هذا المحتوى هي المصدر الرسمي والمعتمد.
تعرض طريقة عرض العناصر القابلة للتقدير كل العناصر القابلة للتقدير في مقررك الدراسي. يمكنك عرض تواريخ الاستحقاق وحالة التقدير وفئات العناصر. ويمكنك أيضًا نشر التقديرات وضبط حساب التقدير الكلي للمقرر الدراسي.
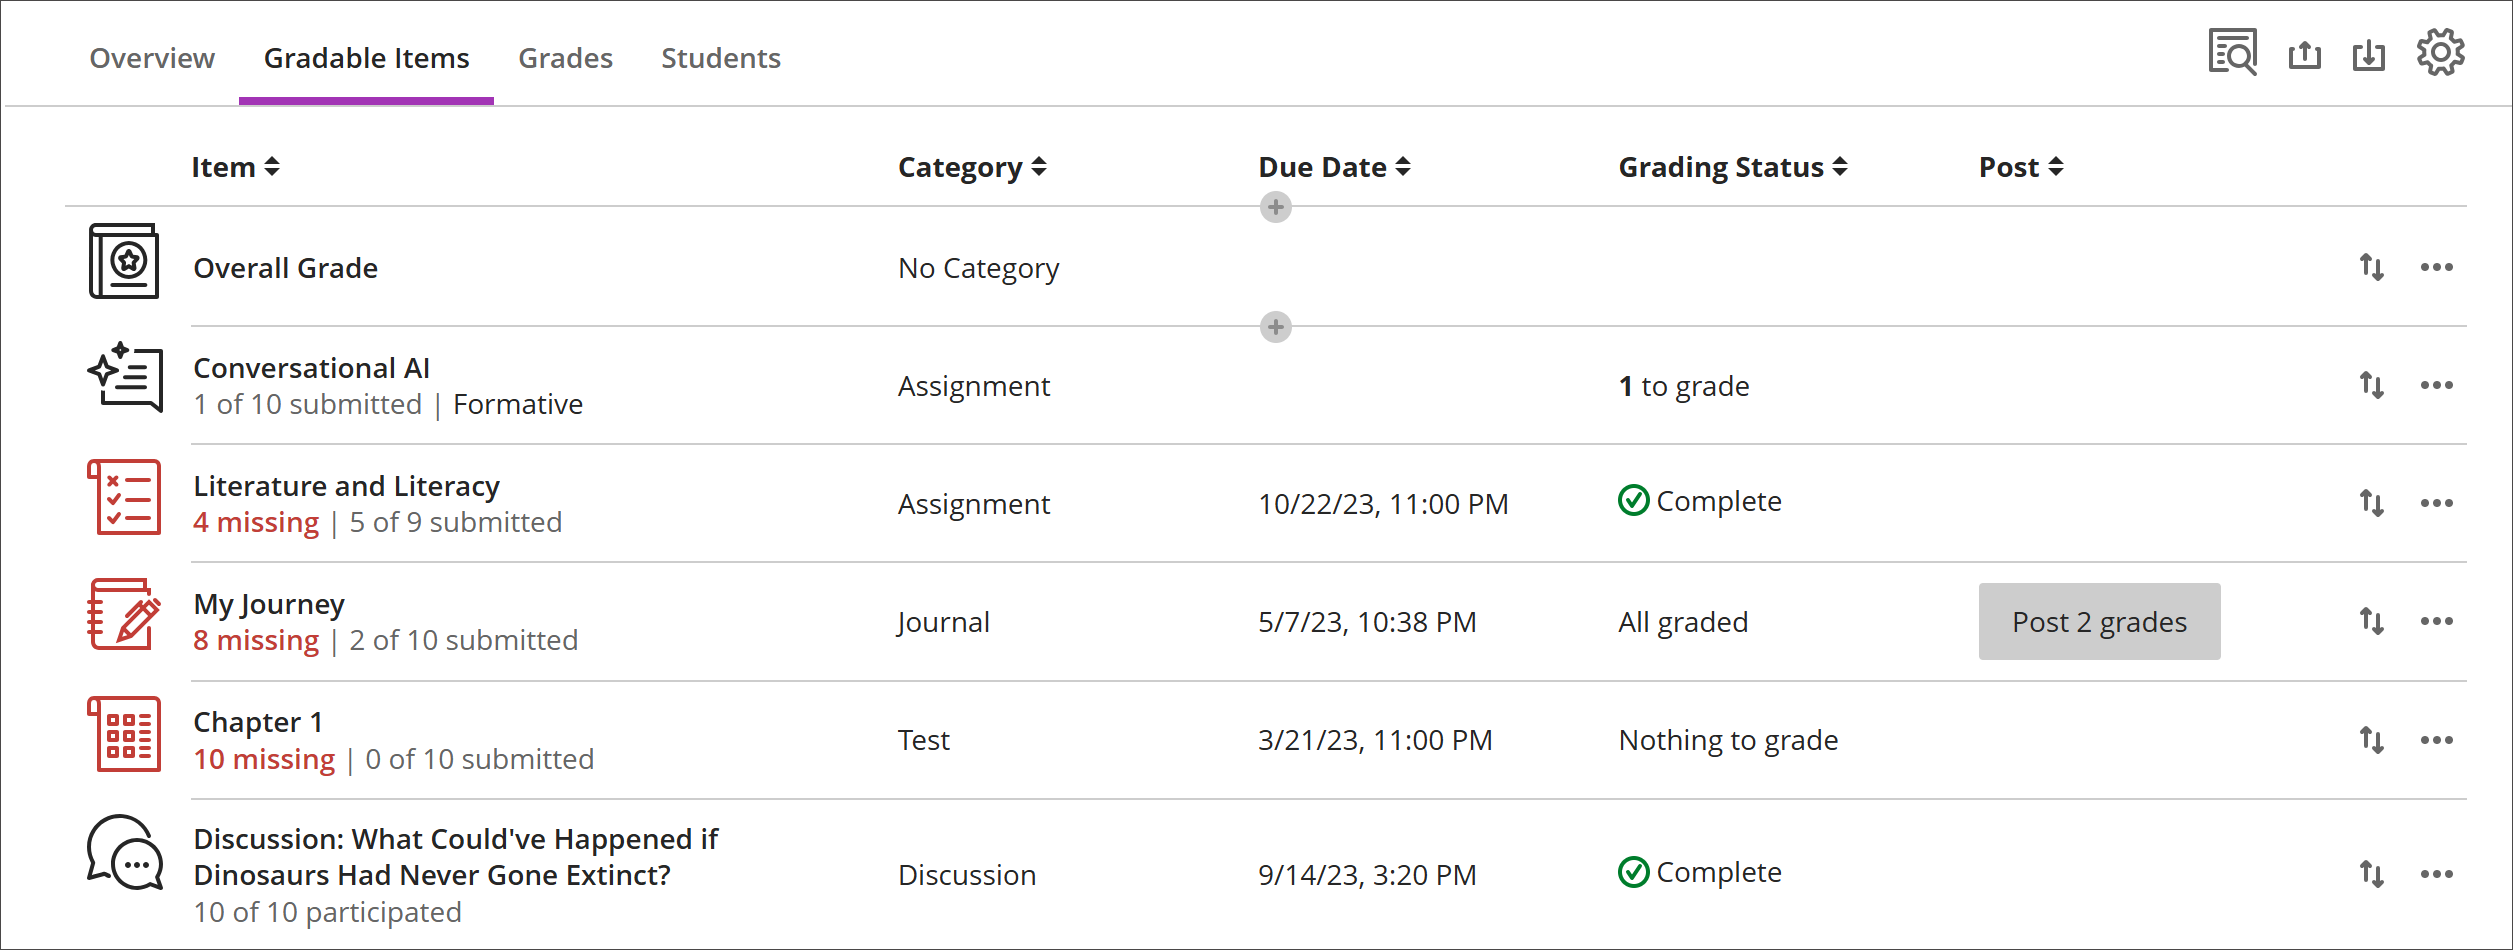
تظهر العناصر التي تحتوي على واجبات مرسلة مفقودة تجاوزت تاريخ الاستحقاق باللون الأحمر.
استخدم زر النقل من أجل سحب وإفلات العناصر بترتيب جديد.
حدد اسم العنصر للانتقال إلى صفحة الواجبات المرسلة أو التقديرات والمشاركة الخاصة به.
حدد X المراد تقديره للانتقال مباشرةً إلى صفحة الواجبات المرسلة الخاصة بالتقييم وبدء التقدير.
أعمدة مخصصة مستندة إلى نص
لإنشاء عمود مخصص مستند إلى النص، حدد (+) إضافة، ثم حدد إضافة عنصر نصي. يمكنك لكل عمود إدخال اسم العمود ووصفه، كما يمكنك التحكم في رؤية الطالب بالنسبة للعمود. يمكنك لكل صف إدخال ما يصل إلى 32 حرفًا.
التنقل في علامة التبويب العناصر القابلة للتقدير في دفتر التقديرات
تستخدم علامة التبويب "العناصر القابلة للتقييم" تصميمًا قائمًا على الجدول لتعزيز سهولة الاستخدام مع لوحات المفاتيح وقارئات الشاشة.
التنقل بيم العناصر القابلة للتقدير عن طريق لوحة المفاتيح
استخدم مفتاح Tab للانتقال إلى مركز التقديرات.
استخدم مفاتيح الأسهم للانتقال إلى علامة التبويب "العناصر القابلة للتقييم".
اضغط على زر "Tab" حتى تصل إلى جدول "العناصر القابلة للتقييم".
استخدم مفاتيح الأسهم للتنقل في الجدول.
سيؤدي الضغط على مفتاح Tab إلى الخروج من الجدول والانتقال إلى زر مساعدة Blackboard. يعيدك الضغط على Shift + Tab إلى الزر الإعدادات.
التنقل بين العناصر القابلة للتقدير باستخدام قارئات الشاشة
يمكن لمستخدمي برامج قراءة الشاشة الانتقال إلى علامة التبويب "العناصر القابلة للتقييم" باستخدام تعليمات لوحة المفاتيح. يمكنك أيضا استخدام مجموعة لوحة المفاتيح المتخصصة لقارئ الشاشة لديك للانتقال مباشرة إلى الجدول.
JAWS: استخدم المفتاحين Insert و Ctrl + T
NVDA: استخدم المفتاح T، ثم اضغط على مفتاح Ctrl مع مفتاح السهم لأسفل للدخول إلى الجدول.
VoiceOver: استخدم مفتاحي Ctrl و Option مع مفتاح السهم الأيمن لتحديد خيار الجدول
بمجرد الوصول إلى الجدول، يمكن لبرامج قراءة الشاشة استخدام أدوات التنقل داخل الجدول (Ctrl + Alt + مفاتيح الأسهم) للتنقل في الجدول.
إذا كنت ترغب في إضافة محتوى، فاستخدم السهم لأسفل للانتقال إلى زر خيارات أخرى (...) الموجود في نهاية الصف. سيكون السهم المتجه للأسفل هو زر إضافة محتوى.
ملاحظة لمستخدمي JAWS
يمكن لمستخدمي JAWS التحرك إلى اليسار أو اليمين في أي صف باستخدام مفاتيح التنقل في الجدول.
للانتقال لأعلى ولأسفل بين صفوف المهام، انتقل أولاً إلى عمود العناصر.