ORIGINAL Manage Discussions
You can manage the discussion board and the content within forums and threads. For example, to keep students focused as the term progresses, edit forum settings or organize forums and threads to attract attention again. You can also add forums to other locations, edit content, and delete unneeded forums or threads. To help students locate important posts, you can enable tagging and attach tags.
You can assign forum roles to limit access to a forum or to help with forum administration. To help control the discussion board content that is presented to your students, you can assign a responsible user the role of moderator.
Edit a forum
As a discussion progresses, you can edit forum settings to solve any issues. For example, if students are posting to the wrong topic, you can fine-tune the forum name or description to clarify the forum's purpose. You can also choose to create all forums at the beginning of the term and make them unavailable. When you need a forum, edit the forum to make it available.
On the Discussion Board page, open a forum's menu and select Edit.
On the Edit Forum page, change the forum's name, description, availability, or settings.
Select Submit.
Availability of discussions on mobile apps
To make Original course discussions unavailable to mobile app users, you can use these methods:
Single Forum: On the Discussion Board page, open a forum's menu. Select Edit and change the availability.
Entire Discussion Board: On the Control Panel, expand the Customization section and select Tool Availability. Clear the check box for Discussion Board. Users on the app will see the Discussions tool, but it will be empty.
Simply hiding the Discussion Board link on the course menu or tools page doesn't prohibit access to the tool for mobile app users or web view users.
Edit a thread
You can edit posts in any thread. If a student added inappropriate or inaccurate content, you can edit the post. When you create or edit a forum, you control if students may edit their published posts.
Open a forum and select a thread.
On the thread's page, point to a post so that all of the functions appear and select Edit.
The editor appears. Make edits while you view the original post.
Select Submit. Your edits appear in the post.

Delete forums and threads
When you delete a forum or thread, all content is permanently deleted. You won't be able to refer to the posts if a student wants to dispute a grade. For a less permanent solution, you can make a forum unavailable. When you delete graded discussion content, you control if the Grade Center column and scores are also deleted.

Open a forum or thread's menu and select Delete.
Select OK in the pop-up window.
On the Delete Confirmation page, you have two options:
Retain Grade Center columns (don't select check boxes): If you select this option, the graded forum or thread is deleted, but the Grade Center column and scores you assigned remain. Choose this option if want to keep the Grade Center column for the final grade calculations. If you delete the forum or thread, but retain the Grade Center column, you can delete that column from the Grade Center at any time.
Delete Grade Center columns (select check boxes): The grade column in the Grade Center and the forum or thread are deleted. If you don't want to include the grade column for the discussion posts in the final grade, you can safely delete both.
Select Remove.
Delete a post
To delete individual posts, point to the post on the thread's page and select Delete. This action is permanent. Any replies to the post you delete are also permanently deleted.
Organize forums
You can reorganize discussions to help students focus on the most relevant content. When you create a forum, it appears at the bottom of the list. You can move the current forum to the top or delete forums that are no longer relevant.
Reorder forums with the drag-and-drop function. You can also use the keyboard accessible reordering tool.
Drag and drop
Open the discussion board and point to the forum you want to move. Select and hold the arrows next to a forum you want to move. The item is highlighted.
Drag the forum into a new location in the list.
Release the forum to place it in its new location.
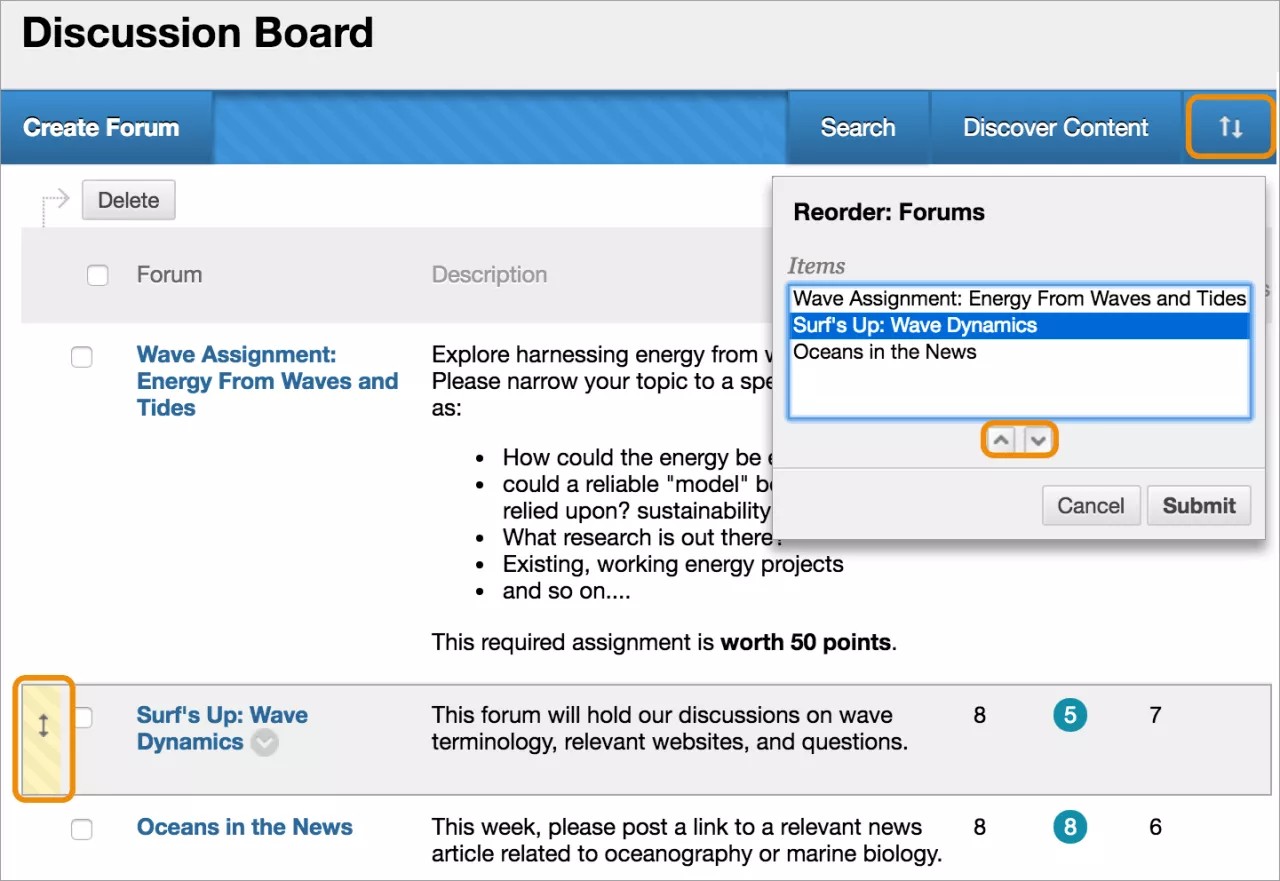
Keyboard accessible reordering tool
You can use an accessible tool to reorder items.
In the upper-right corner of the discussions area, select the Keyboard Accessible Reordering icon.
In the Reorder: Forums box, select a forum title.
Use the Move Up and Move Down icons to adjust the order.
After you submit, a pop-up box states: Items have been reordered.
Select OK.
Copy a forum
You can copy discussion forums and add them to the current discussion board or to a group discussion board in the same course. You can copy a forum, the settings, and the posts, or copy just a forum's settings.
Note
To copy discussion board forums to another course, use the copy course utility.
Example: Copy the entire forum
If two distinct topics emerge during a discussion, you can create separate forums for these topics. Copy the forum and delete the off-topic posts from each forum.
When you copy content, all threads and replies appear in the new location, along with any file attachments.
Example: Copy forum settings only
You can base a new forum on the settings from another forum. If you want students to submit a second research paper, copy the settings of the first research paper's forum. The forum is added with no threads.
On the Discussion Board page, open a forum's menu and select Copy.
On the Copy Forum page, type a name.
Choose the option to copy Entire forum or Forum settings only.
In the Location box, select a discussion board as the destination. To select the course's discussion board, select the course ID.
Select Submit.
On the Discussion Board page, the copied forum is added to the bottom of the list.
Note
When you copy a discussion forum to a group discussion board, the copy only includes messages authored by the group's members.
Add a discussion link on the course menu
You can include a link on the course menu for instant access to the discussions tool. You can also customize the name of the link.
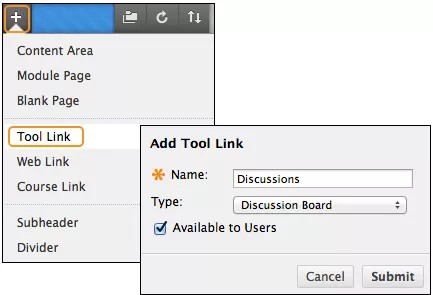
Select the Add Menu Item icon above the course menu to access the menu.
Select Tool Link.
Type a Name for the link.
From the Type menu, select Discussion Board.
Select the Available to Users check box.
Select Submit.
The new tool link appears last in the course menu list. Press and drag the arrows icon to move the link into a new position. In the link's menu, you can rename, delete, or hide the link from students.
Add a discussion link in a course area
You can incorporate the discussion board into course areas, allowing students to access the tool alongside content.
In a content area, add a forum link following lecture notes to gather questions on the material presented or after an assignment to gather students' perceptions of how they did. You can add adaptive release rules or date availability restrictions to limit students' access. Then, students access content in a specified order, such as reading a PDF before they add posts to the discussion board.
Access the content area or folder where you want to link to the discussion board or forum.
Access the Tools menu and select Discussion Board.
From here, you have three options:
On the Create Link: Discussion Board page, select the Link to Discussion Board Page option to link to the discussion board itself.
Use Select a Discussion Board Forum and select a forum from the list.
Select Create New Forum to add a link to a forum you create at this time. You select all forum settings at the time of creation. The newly created forum appears in the list of forums to choose from when adding the link in your course.
Select Next.
On the next Create Link: Discussion Board page, type a Link Name. The Link Name can't exceed 50 characters.
Optionally, type instructions or a description in the Text box.
For the Available option, select Yes.
To enable tracking, select Yes. The system will record the number of times the link is viewed, when it's viewed, and by whom.
Select the Display After and Display Until check boxes to enable the date and time selections. Display restrictions affect the visibility of the discussion board or forum.
Select Submit. The discussion link appears in the course area.
Frequently asked questions
You can make some simple changes to help successfully manage your discussion content.
A discussion forum has been available for two weeks with few contributions. What changes can I make to the forum to encourage participation?
You can make two changes:
If the topic is potentially controversial, allow anonymous posts.
If you aren't grading threads, allow students to create new threads. This flexibility may encourage students to post their ideas and questions.
By the end of the semester, my discussion board contains dozens of forums. What can I do to provide better organization and flow?
To keep your discussion board organized, you can:
Change the order of the forums and move the most current forums to the top of the list.
Delete ungraded forums that weren't used or contain few postings.
ORIGINAL Moderate Discussions
After you start a discussion in your course, you might find it's a challenge to maintain discussion activity throughout the term. Discussions that start out with ample excitement can dwindle as the term progresses.
Moderation is a balance between guiding the conversation and standing back to let students discover new ideas. You can configure discussion board functions to keep students focused on relevant discussions and determine a student's level of access.
You can grant forum moderation abilities to other users.
Forum roles
Assign forum roles to limit access to a forum or to help with forum administration. For example, to help control the discussion board content presented to your students, you can assign a responsible user the role of moderator.
In a forum, each user has a role and can have only one role per forum. By default, instructors have the role of manager and students have the role of participant. When you're logged in as an instructor, you can't change your own forum role.
Note
Your institution controls which course roles are available.
This table describes the forum roles and their permissions.
Role | Permissions |
|---|---|
Manager | Managers have full control over a forum and can change forum settings, moderate posts, and assign roles and grades. Instructors and teaching assistants are granted this forum role by default. |
Builder | Builders can edit, copy, and delete forums, but not grade or manage forums. Inside a forum, a builder can perform the same actions on posts as an instructor, except grading threads. Builders can also create new threads in a forum, and can enable grading for a thread and type a value. Course builders are granted this forum role by default. |
Moderator | Moderators can delete, edit, and lock all posts in any forum, even if the forum doesn't use the moderation queue. If you use a moderation queue, the moderator approves or rejects posts in the queue before they're made available to all users. Instructors and course builders are granted this forum role by default. |
Grader | Graders can read, reply to, and grade posts. The grader role has some access to the Grade Center, but can't assign grades to their own work. Graders are granted this forum role by default. |
Participant | Participants can read and reply to posts. Students are granted this role by default. |
Reader | Readers can read the contents of a forum, but can't post responses or add threads. |
Blocked | Blocked users can't access the forum. |
Assign forum roles
In a discussion board, open a forum's menu and select Manage.
On the Manage Forum Users page, a list of users appears. Open a user's menu and select a new role for them. The new role appears in the Forum Role column for the user.
Tip
If you want to show only one role at a time, make a selection in the Display Forum Role list and select Go.
To change multiple roles at one time, select the users' check boxes and point to Edit Role. Select the check box in the header row to select all users.
Select OK to return to the discussion board.
Moderation
As an online instructor, your role is to facilitate the conversation and exchange of ideas on the discussion board. You ensure that students feel comfortable to share while also monitoring responses and keeping everyone focused and on track. At the same time, you want to be careful not to dominate or impede the flow of the discussion.
Occasionally, students may introduce inappropriate material for the class discussion. Depending on the maturity and sensitivity of the students in your course, you may need to review student posts for inappropriate content before you share posts with the rest of the class.
In a discussion forum, you can assign a user the role of moderator. A moderator reviews posts before they appear in the discussion.
When you create a moderated forum, all posts to the forum are added to a moderation queue. A moderator reviews each post and can:
Publish the post
Return the post to the sender without a message
Return the post to the sender with a message
A moderator can delete, edit, and lock posts in a forum even if the forum doesn't use the moderation queue.
You can choose to moderate a forum when you create it or when you edit an existing forum. Only posts added after you enable forum moderation are available for review in the moderation queue.
Note
If you don't assign a moderator, the manager must take responsibility for the approval of posts in a moderated forum.
In a discussion board, open a forum's menu and select Edit.
On the Edit Forum page, select the Force Moderation of Posts check box and select Submit.
Tip
In a moderated forum, the settings don't allow students to edit or delete posts. These settings ensure that the post approved is the one viewed by users.
After posts are submitted, open the forum. In the moderator view, no posts appear because the messages need approval. Select Moderate Forum.
Note
The Moderate Forum function appears only to those users who have a forum role of manager or moderator. In the student view, the author can see the post in Tree View with a reminder it's in the moderation queue.
On the Moderation Queue page, the posts appear in alphabetical order by title. Select the column title to sort by post title, author, or date. To review a post, select Moderate.
On the Moderate Post page, read the post and select Publish or Return. Published messages are immediately posted to the thread.
Type feedback in the text box. Though feedback is optional, you can provide guidance, ask questions, redirect a student's focus, and explain why a post was returned.
Select Submit.
When you choose Return on the Moderate Post page, the post is removed from the moderation queue. Students see their returned posts in the thread, along with the explanation you may have provided. The post is marked as Returned.
The student can also see the returned post if they view the forum in Tree View. Expand the post with the plus sign. If you included feedback, students can see why the post was returned.
In the thread, students can edit their posts while they view the moderator's feedback and resubmit them. The posts are returned to the moderation queue. Moderation Queue appears next to the post's title.
ORIGINAL Search and Collect Discussions
In discussions, you can search for specific text, such as a phrase, word, or part of a word.
Search discussions
Go to the discussion board, a forum, or a thread and select Search.
Type your search word or phrase in the Search box.
In the list, select an area to search:
Current Discussion Board
All Forums in Course
Current Forum
Current Thread
The options are based on where your search began. Users don't see results from group discussion boards unless they're members of that group.
To further narrow your search results, select the After and Before check boxes to enable the date and time selections. Type dates and times in the boxes or use the Date Selection Calendar and Time Selection Menu to select dates and times.
Select Go.
On the Search Results page, you can browse and read the results. Select Print Preview to open the page in a new window in a printer-friendly format. Posts print in the order they appear on the page. You can filter and sort posts using the Filter function and the Sort By and Order options.
On this page, you can also reply to posts and mark posts read or unread. To view the post in context, with any responses, select the post's hyperlinked title to navigate to the thread's page.
Collect posts
If a thread contains many posts, you can reduce the list with the Collect function. After you collect posts, you can filter, sort, print, and tag them. You can also use the Collect function on the forum page to gather all the posts made to different threads.
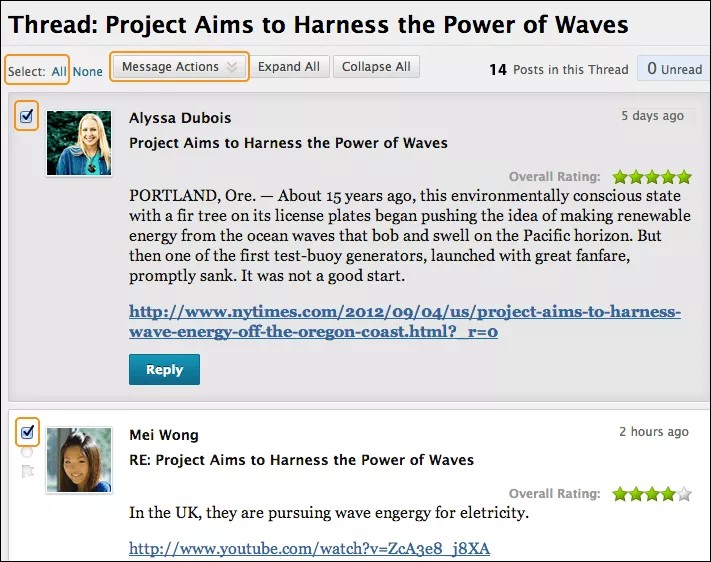
In a forum, open a thread.
Select the check boxes next to the posts you want to collect. If a post has replies and you want them to appear on a collection page, select the check boxes for those posts as well.
At the top of the list, access the Message Actions menu and select Collect.
Tip
Want to select all but a few posts in a long list in a thread? Use Select: All and then clear the check boxes for the posts you don't need.
Filter and sort posts
To narrow your search results or sort a collection, you can use the filter and sort functions. If you print the posts after you filter or sort, they print in the order they appear on the page.
Note
If the authors of some posts are no longer enrolled in your course, the posts may appear out of order.
To filter posts on the Search Results or Collection page, select the Filter function to expand the field. Select options from the lists:
Author: Select All or select an author.
Status: Show All or select a status.
Read Status: Select Show All, Read, or Unread posts.
Tags: Show All Tags or select a tag. You need to enable the tag function at the forum level for this filter option to appear.
Select Go to apply the selections. You can further organize the results with the Sort By and Order options.
Select the X to close the Filter field.
To sort posts on the Search Results or Collection page, access the Sort by menu.
Select an option from the list:
Author's Last Name
Author's First Name
Subject
Date of Last Post
Thread Order
If you enabled the rating of posts, you can also sort by Overall Rating .
Access the Order menu and sort posts in ascending or descending order.
Tag threads
Tags are text labels that act like bookmarks. You can tag posts to group similar messages together. For example, if the subject of scientific notation is discussed often, tag each of the posts on this topic. Students can filter and search posts with these tags, but they can't create tags.
Note
In a forum's settings, you must enable Allow Post Tagging so that you can create tags.
Open the forum that contains the threads you want to tag.
In List View, select the check boxes for the thread or threads to tag. Use the check box in the header row to select all the threads in a forum.
At the top of the list, select Collect.
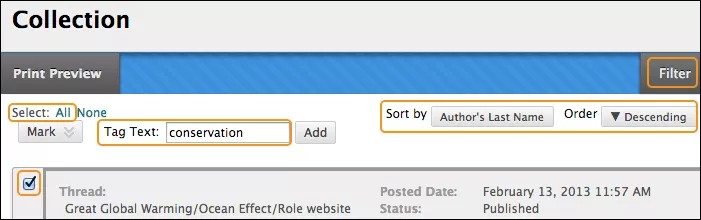
On the Collection page, you can filter and sort your results.
Type a tag name in the Tag Text box.
Select the check boxes of the posts to assign the tag to. To select all the posts, choose Select: All above the list.
Select Add next to the Tag Text box.
Tip
You can disable post tagging when forum usage is heavy so that the discussion board loads faster. When you enable tagging again, all tags are restored.
On the Collection page, the tag you provided appears below each post you selected. If you provide multiple tags, all appear. To delete a tag, select the red X next to it.
You can also add a tag to an individual post. Below the post, type the tag in the Add Tag box and select OK or select Choose from Existing to choose a tag from a list of tags that appear on the Collection page.
On the forum page, all tags appear in the Tags column, which is only visible in List View. To filter the list of threads by a tag, select Tags and choose a tag to display or Show All Tags. After you make a selection, only the threads with the chosen tag appear on the forum page. You can also select a tag in the Tags column to filter the list.