Automations
About automations
Automations allow instructors to configure triggers that prompt the system to act automatically when certain student criteria are met. Currently, instructors can set up automatic congratulatory messages for students who achieve high scores and supportive messages for those who may need encouragement. These messages are sent automatically based on conditions defined by the instructor.
With these automations, instructors can provide timely feedback to students without sending individual messages manually. This approach saves time and increases student engagement, ensuring that feedback is delivered promptly and tailored to each student's performance.
Note
For administrators: To turn on automations, select Configure in the The Ultra Experience is Here! module. Select Automations.
Users need the following privileges to work with automations:
Course/Organization > Automations > Add allows users to create new automations.
Course/Organization > Automations > Delete allows users to delete automations.
Course/Organization > Automations > Edit allows users to edit existing automations.
Course/Organization > Automations > View allows users to view existing course automations.
Create a new automation
You can create new automations from the Course Content page.
Above the Details & Actions panel, under Automations, select View Automations.
Select New Automation.
Enter a name for your automation.
Select your automation type
In the Automation gallery, there are currently two options. Select Configure for your choice.
Send congratulatory message: Send a congratulatory message when students achieve a high score.
Send supportive message: Send a supportive message when students do not achieve a specified score.
Set up the automation trigger
The automation trigger determines when the system will act. The automation trigger is based on when a grade is posted. You need to specify:
The grade item the trigger is based on. This can be any grade item in the course, or “All graded items.”
Whether the trigger is limited by an attained grade. If selected, the student must meet certain grade criteria to trigger the action. If not selected, then the action will be triggered by the student’s completion of the grade item.
The condition for the trigger—for example, “greater than” or “less than.”
The grade percentage threshold for the trigger. This value must be a percentage, even if your gradebook uses score values.
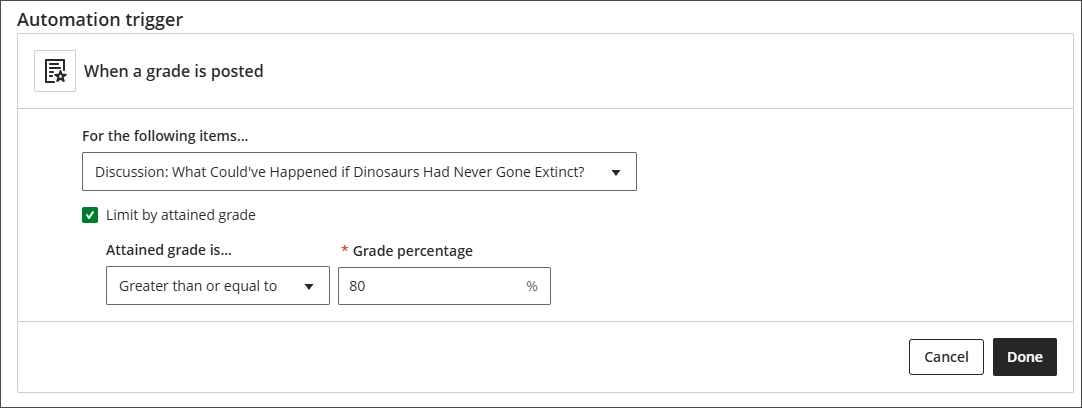
Example;
The automation trigger in the following image is set up to act when a grade is posted for the grade item “Discussion: What Could’ve Happened if Dinosaurs Had Never Gone Extinct?” and the student has attained a grade greater than or equal to 80%.
When you finish setting up the automation trigger, select Done.
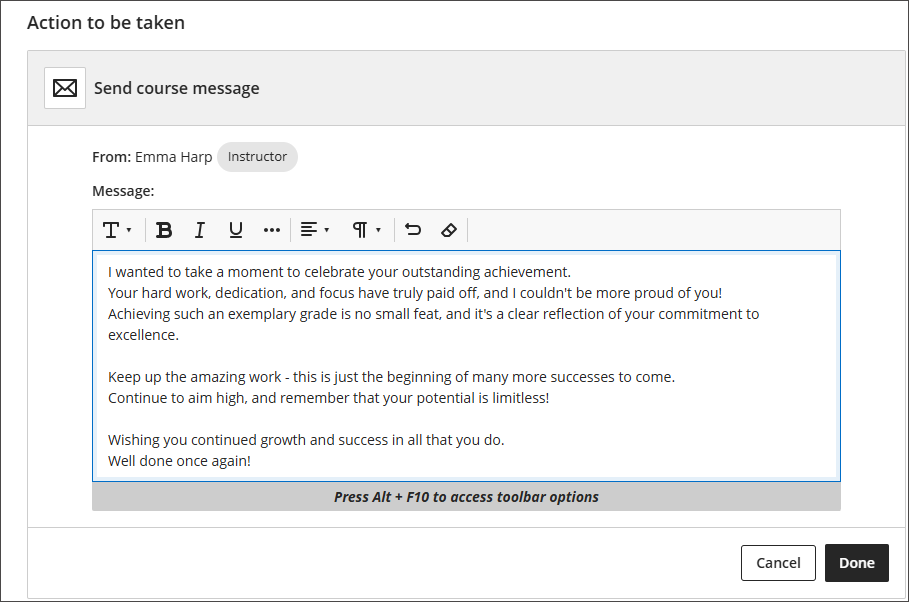
Set up the action to be taken
Next, set up the action to be taken when the automation is triggered. Currently, the only option is to send a course message. Select the Edit Actions icon. Write the message that students will receive when they meet the criteria you set. Students will receive the message as a course message and will see that it came from you. When you are done, select Done.
Select Save to save your automation.
Now, when a new grade is posted for a student that triggers the automation, the message will be sent to that student.
Manage automations
To view all the automations that have been set up for a course, select View Automations under Automations.
A list of automations for that course will appear. This list includes automations that you created and any automations created by other instructors in the course. It will show a summary of each automation and whether it is active. It will also indicate when it was last edited and by whom. From the three-dot menu for each automation, you can:
Edit: Edit the automation.
Duplicate: Duplicate the automation.
Set as Inactive: Make the automation inactive without deleting it.
Activate: Make an inactive automation active.
Delete: Delete the automation.
