ORIGINAL Add Files to Course Files
You can add files and folders to Course Files in multiple ways, including when you create course content.
Student files aren't saved in Course Files, and they can't upload items here. When they participate in a course, they can only browse for and attach files from their computers.
You can upload a single file, multiple files, or one or more folders to Course Files. The contents of folders will be uploaded and appear individually in the upload list. After you upload, you can move them to other folders as needed.
Tip
To select multiple files and folders in a list on a Windows machine, press the Shift key and select the first and last items. To select files and folders out of sequence, press the Ctrl key and select each item. If you're using a Mac, use the Command key instead of the Ctrl key.
Add files
You can add content in four ways:
Upload files and folders into Course Files with the drag-and-drop or the browse functions.
Upload files from your computer when you create content with Browse My Computer.
Create HTML objects in Course Files and upload files.
Use WebDAV for direct upload, editing, and management of files in Course Files from your computer desktop or through WebDAV capable applications.
Drag files to upload
In the Course Files folder where you want to upload the files, point to Upload and select Upload Files.
On your computer, open the folder that contains the files and folders to upload.
Drag files from your computer to the "hot spot" in the Attach Files area. If your browser allows, you can also drag a folder of files. The files will upload individually.
You can use the file name or provide another name for the file.
Select Do not attach in the row of any files you don't want to upload.
Select Submit.
Note
You won’t be able to drag files to upload if your institution uses an older version of Blackboard.
Browse for files
In the Course Files folder where you want to upload the files, point to Upload and select Upload Files.
On the Upload Files page, select Browse and open the folder on your computer with the files and folders to upload. Select the files.
The files and folders appear in the upload box. To delete a file in the list, select the X in the Remove column. The contents of folders appear individually in the upload list, but after they are uploaded, they are contained in their parent folders.
Select Submit. A status bar displays the progress of the upload.
Upload local files while creating content
When you create content in your course, you can browse for a file on your computer and link to it. Files you upload with the Browse My Computer function are saved in the top-level folder in Course Files. You don't have the option to select a different folder when you upload a file. By default, all enrolled users are granted read permission for files you upload to your course this way.

If you upload a file with the same name as a file already in the top-level folder, the new file is saved with a number appended to the name. For example, Project Guidelines.pdf becomes Project Guidelines(1).pdf.
Note
Some files uploaded to your course are not saved in Course Files, such as when creating wiki pages. For a complete list, see About Files Added Automatically to Course Files.
In the Attachments section on the Create Item page, select Browse My Computer to search for a file.
Type a Link Title. This text is what students see as the link to the file. Select Do not attach to remove the selected file.
Select Submit when you're finished creating the item.
The file uploaded to the content item appears as a link in the content area and is saved in Course Files in the top-level folder. You can move the file to a different folder in Course Files and the link in your course won't break.
Attach files with the editor
You can also use the editor functions to create links to files. Files you upload with the editor are saved in Course Files in the top-level folder.
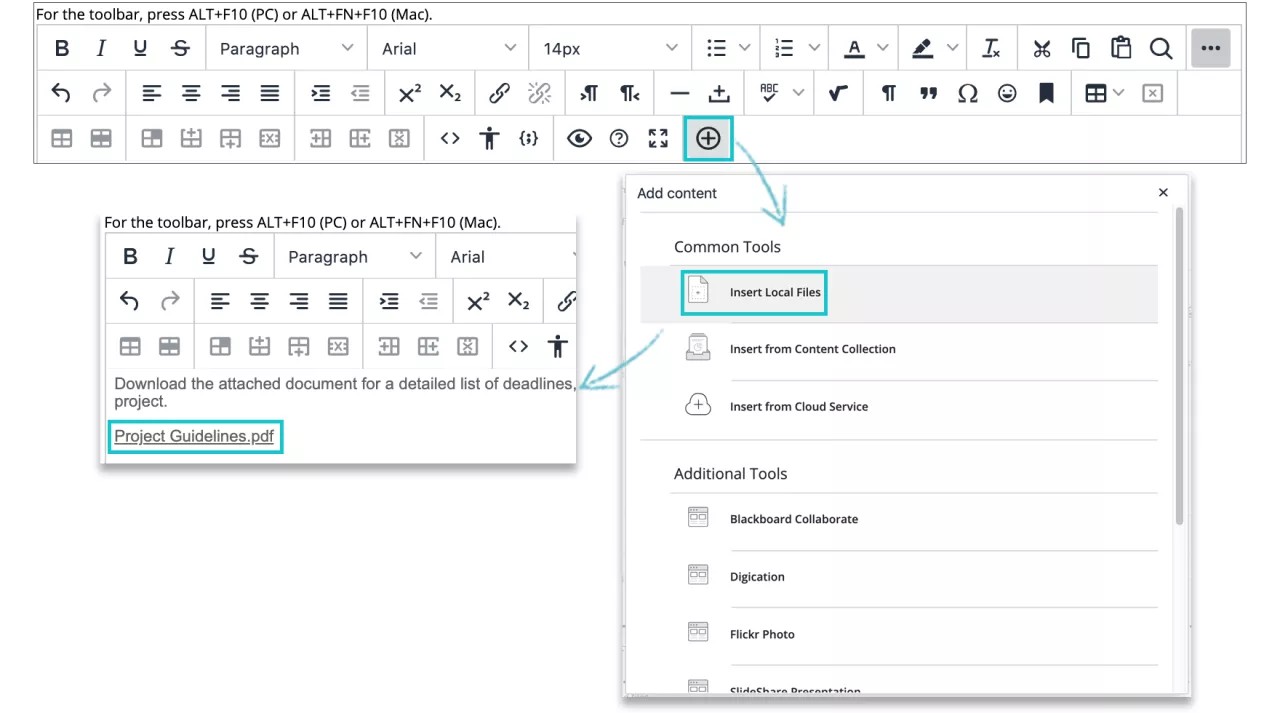
Creating a link to a file with the editor offers more control over where a file's link appears in relationship to other text. Alternative text appears when a user moves the mouse pointer over a link and it is read by screen readers.
To add a file and create a link in the editor, select the Add Content icon. A new window appears for you to add your content.
Upload a zip package to Course Files
When you upload a zip package to Course Files, you have two options:
Unzip its contents, keeping the folder structure and links intact—the Upload Zip Package option.
Keep the file zipped—the Upload Files option.
Unzip the file upon upload
You can create a collection of files or an entire lesson, including cascading style sheets (CSS), zip it into a package, and upload it into Course Files from your computer.
Example: You may want to use this option if you prefer to create a lesson with several interrelated pages with navigation, images, web links, and documents. You can compress the contents into a zip package and upload it into Course Files with the Upload Zip Package option. When you upload a zipped file in this way, the system unzips its contents. When you create content in your course, you can create a link to the unzipped package you uploaded by selecting a starting page. In your course, students select the starting page link and view the lesson you uploaded.
Create a folder in Course Files for the contents of the unzipped package, if needed. When unzipping a package with many files and folders, it can be helpful to contain the contents in a folder.
Advantage: You can edit any part of the lesson's content and overwrite just the edited file or files without removing and uploading a new zipped file. All links remain intact in your course.
In Course Files, go to the folder where you want to add the zip package.
Select Upload > Upload Zip Package.
Browse for the file and select the encoding type, if applicable.
Select Submit.
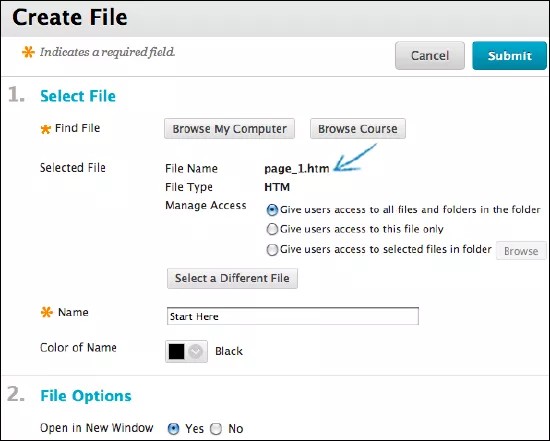
Go to the course area where you want to add the file. In the Build Content list, select File.
Use the Browse Course function to search for the start page for the unzipped content.
Students select the link for the lesson's start page and can view the lesson contents in order with all links intact. You can rename the start page link and manage permissions for the files and folders in the unzipped package.
Note
If a description or instructions are necessary and a title can't convey that meaning, you can create an item content type instead of a file. When creating an item, use the Insert File function in the content editor to select the starting page so that you can select the Open in New Window option.
Keep the file intact upon upload
You may want to keep a compressed folder intact when you upload it to your course. For example, if you want to include several images for students to use in a presentation.
Use the Upload Files option, not Upload Zip Package, to upload the zipped package to Course Files. The file remains zipped. When you create content in your course, you can create a link to the zipped file. In your course, students select the link to the zipped file, download it to their computers, unzip the package, and are able to use the contents.
ORIGINAL Create HTML Objects
Within Course Files, you can create new items with the editor. These items are called HTML objects and they're a type of reusable content. If your institution has access to the content management features, you can create other types of reusable content also.
HTML objects are stored in the Content Collection as HTML files. When you add an HTML object to your course, the actual content appears. The HTML object doesn't appear as a file link that users must select to view the content. You can create information that you want to use in multiple areas in your course or in multiple courses. You can change an HTML object stored in Course Files and the change is reflected in all instances where the HTML object is linked in your course.
Create an HTML object
Select the Course Files folder where you want to create the HTML object.
Select Create HTML Object.
On the Create Reusable Object page, type a name, which becomes the file name in Course Files.
Type information in the Content box. You can use the editor options to format the text and include files, images, web links, multimedia, and mashups. Any files you upload from your computer are saved in Course Files in the top-level folder.
Select Submit. The HTML object appears in the selected folder in Course Files. The system adds the
.htmlextension to the HTML object file name in Course Files.
If you delete a link to an HTML object in your course, it's not deleted from Course Files. The link to the HTML object in your course is deleted. To delete an HTML object from your course completely, you need to delete it from Course Files. If the object is linked in your course, a warning message appears to alert you that the deletion will introduce broken links. You can view the 360° view report to see where the file is linked before you continue the deletion.
Edit an HTML object
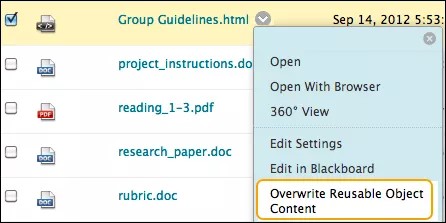
You can edit an HTML object stored in Course Files. The changes you make are reflected wherever the HTML object is linked in your course. Open the HTML object's menu and select Overwrite Reusable Object Content.
ORIGINAL Web Folders and Shared Locations
Note
Your institution controls which tools are available.
Warning
Please note: WebFolders only work for customers who are not using federated login providers for authentication. As federated login providers don't pass the password on to Blackboard, it isn't possible to authenticate when trying to add a web folder to a PC or Mac.
What is WebDAV?
You can use WebDAV to share files over the internet. WebDAV is compatible with most operating systems. When you set up WebDAV, also called a web folder, you can manage all the files for your course.
Note
On a Mac, you'll set up a shared location rather than a web folder.
Use web folders to perform these actions:
Create folders and easily move items between folders.
Rename and remove files and folders.
Drag content from multiple drives and folders into the web folder or shared location.
Easily view and edit a file in a web folder. You don't have to download the file, edit it, and upload it again.
About file names
These characters are acceptable to use in file names:
a-z
0-9
period '.'
underscore '_'
All standard ISO 8859 characters are also supported. No foreign characters or symbols are allowed.
All spaces are converted to underscores '_' in the name of the uploaded file. Special characters aren't supported in file names.
Set up a web folder for Microsoft Windows©
To connect to a web folder, use the web address of the Course Files folder and a valid username and password.
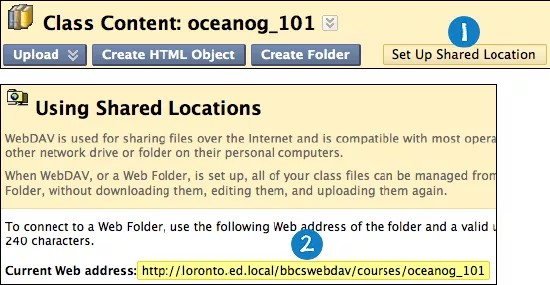
In Course Files, select Set Up Web Folder for the top-level folder. Starting from this location ensures WebDAV access to all folders contained in Course Files. You can choose any folder inside Course Files, but the web folder path must be fewer than 240 characters. Each folder chosen has a different address.
On the Using Web Folders page, right-click and copy the URL that appears for Current Web address. You'll paste the address in later steps.

From the Start Menu in Windows, select Documents > My Documents. Select My Network Places in the left frame.
Select Add a network place from the Network Tasks menu.
In the Add Network Place Wizard, select Choose another network location to create a shortcut.
Paste the URL for the web folder you copied earlier and select Next.
If prompted, type your Blackboard username and password. Type a name for the network place and select Next. Select Finish to close the wizard. You may be prompted again for a username and password.
The web folder opens and displays the files and folders in the Course Files folder.
With the web folder open, navigate to the folder where you'd like to add files or folders.
In a separate window, locate the folder on your computer containing the files and folders you want to transfer.
With your folder and the web folder open, you can drag and drop files or folders to move items between them. Select an item and drag it to the destination folder. Drop it into the folder by releasing the mouse button. Files and folders moved to the web folder are copied to Course Files.
If you prefer, you can also use copy and paste to move files between the web folder and a location on your computer.
In Course Files, select Refresh to view the uploaded files.
After you copy all files and folders, disconnect from the web folder. If you don't disconnect, the server connection remains open until you shut down the computer. If you use a computer that others use, they'll have access to everything in Course Files.
When you need to use the web folder in the future, access My Network Places and select the web folder shortcut you created.
Set up a shared location for Mac©
To connect to a web folder, called a shared location for the Mac, use the web address of the Course Files folder and a valid username and password.
In Course Files, select Set Up Shared Location for the top-level folder. Starting from this location ensures WebDAV access to all folders contained in Course Files. You can select any folder inside Course Files, but the shared location path must be fewer than 240 characters. Each selected folder has a different address.
On the Using Shared Location page, copy the URL that appears for Current Web address. You'll paste the address in later steps.

On the Finder bar, select Go > Connect to Server.
In the Connect to Server window, paste the URL you copied in step 2 into the Server Address box. Select Connect.
Tip
Select the plus sign next to the pasted address to include it in the Favorite Servers box. When you save the address as a favorite server, you won't have copy and paste it each time. In the future, start with step 3 to connect to this shared location.
If the WebDAV File System Authentication window appears, type your Blackboard login username and password. Select OK.
After you are connected to the shared location, the Mac network icon appears on your desktop. Double-click the icon to open the shared location. The shared location displays the files and folders in the Course Files.
With the shared location open, navigate to the folder where you'd like to add files or folders.
In a separate window, navigate to the folder on your computer containing the files and folders you want to transfer.
With your folder and the shared location open, you can drag and drop files or folders to move items between them. Select an item and drag it to the destination folder. Drop it into the folder by releasing the mouse button. Files and folders moved to the shared location are copied to Course Files.
If you prefer, you can also use copy and paste to move files between the shared location and a location on your computer.
In Course Files, select Refresh on the action bar to view the uploaded files.
Note
After using the shared location, some files may appear with duplicate file names that begin with "._" or ".DS Store." You can safely delete them from Course Files.
When you have copied all files and folders, close the window and drag the Mac network icon to the trash to disconnect from the shared location. If you don't disconnect, the icon and server connection remain open until you shut down the computer. If you use a computer that others use, they'll have access to everything in Course Files.