Manage Groups
Manage individual groups
After you create a group assignment, you can add or delete individual groups and manage student membership. You can also edit group names, add or edit group descriptions, and send messages to your groups to kick off collaboration!
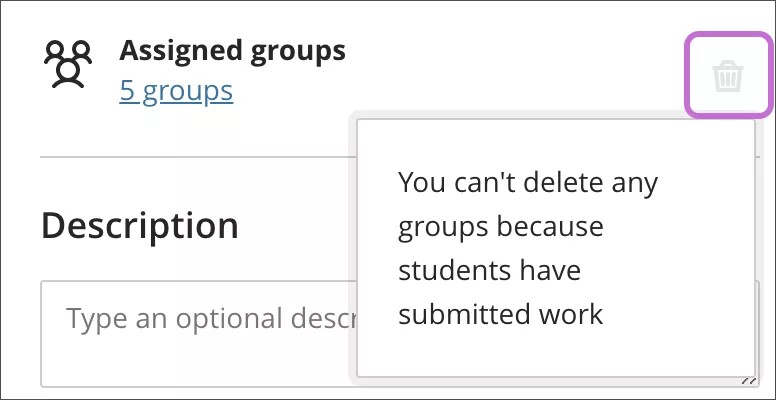
You can also remove groups from the assignment if the groups haven't started their submissions. Select the Delete icon in the Assignment Settings panel.
Add and delete groups
Select the plus sign wherever you want to add a group.
If you no longer need a group, open the group's menu and select Delete group. The students in that group are unassigned automatically and appear at the top of the page. You can manually assign these students to new groups. Or, you can randomly assign all students—not only the students you unassigned—to the number of groups you choose. You can't delete a group with submitted work.
Ramifications:
If you add or delete a group in a group set that you used to create a group assignment, the assignment's groups are updated. Edits to group titles and descriptions also affect the assignment.
If you add or delete a group in a group assignment that's based on a course group set, the course group set is updated. Edits to group titles and descriptions also affect the course group set.
If you delete an entire group set used to create a group assignment, the assignment’s groups are removed.
If you delete a group assessment based on a course group set, the group set is unaffected.
Manage student membership
You can move students between groups and add new students added to your course. New members can access the work the group has saved up to that point. New group members can also submit work on behalf of the group.
When you move students who have grades to different groups, their grades move with them, but their work doesn’t. These new group members keep their existing grades. Their grades won’t apply to the rest of the group. However, if you haven't graded the group work, the new members' grades will update.
If a group has received a grade and you move students to this group, you need to manually assign grades to them.
Open the menu next to a student's name to access these options:
Start a new group with the student as a member.
Select Unassign to remove the student from the group. Unassigned students appear at the top of the page. Reminder: Students who aren't assigned to a group won't have access to the group assignment because it won't appear on their Course Content pages.
Assign the student to a different group that already exists. Select the group's name in the menu. For self-enrollment groups, you can move selected students to other groups, even if the group limit is exceeded.
You can also move multiple students to a different group in one action, create a new group for them, or unassign them all from the group.
To remove all students from all groups, select Unassign All at the top of the page. Unassign All disappears after groups submit attempts.
Warning
If you change the number of self-enrollment groups, new groups are created, and all members are unassigned. Students who enrolled previously aren’t notified they need to enroll again.
Ramifications:
Membership changes in a group set affect everywhere the groups are used, such as in group assignments.
Membership changes in a group assignment based on a course group set affect the course group set.