ORIGINAL Create Course Materials
Instructors can create a variety of course materials to support student learning. This section explains how to add items such as files, web links, multimedia, and learning modules. You'll also find guidance on organizing content and making it accessible to students in a clear and structured way.
ORIGINAL Add Course Module Pages
A one-stop spot to check what's happening in your course
By default, your course includes a Home Page on the course menu. The Home Page is a course module page. You can rename or delete this page, and create other course module pages.
Course module pages contain details about new content and due dates for the course you're in. Information is presented in boxes called modules, such as My Announcements, My Tasks, To Do, and What's New. The system generates the information in each module. You can't add your own content to module pages.
The Home Page is often the default course entry point and it's the first page students see when they enter your course.

You can also add modules that contain tools and links, such as a calculator or a site to buy textbooks.
You can add the Alerts and Needs Attention modules on your course home page. These modules are for your use only and contain no information for students.
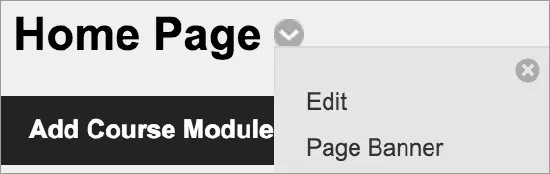
You can rearrange and delete modules, choose modules from a list, and edit settings. To edit the Home Page's settings, access its menu next to the page title. For example, change the setting to enable users to personalize their Home Pages.
From some modules, you can edit your notifications settings.
Watch a video about the course Home Page
The following narrated video provides a visual and auditory representation of some of the information included on this page. For a detailed description of what is portrayed in the video, open the video on YouTube, navigate to More actions, and select Open transcript.
Add a course module page
You can add course module pages to organize modules as you want. Add course module pages on the course menu or in a content area.

Tip
Be sure Edit Mode is ON so you can access all of the instructor's options.
Select the Add Menu Item icon above the course menu to access the menu. Select Module Page and type a name. Select the Available to Users check box if you're ready for students to see it.
After you submit, a link to the new module page appears at the bottom of the course menu. You can drag it to a new location or use the keyboard accessible reordering tool.
Or, in a content area or folder, select Build Content to access the menu and select Module Page. Type a name, optional description, and select the appropriate options for availability, tracking, and display dates. To make changes to the name or settings, access the module page's menu next to the title and select Edit. Display dates don't affect a module page's availability, only when it appears.
You can allow students to change the color theme, reorder modules, and add modules to their personal views of the page. Students' customizations affect their views only.
A newly created course module page is an empty container. Select the title to access the page and add course modules.
To edit the title and settings of a course module page, access the module page title's menu and select Edit. If you change the title, the change does not show on the course menu. You can also edit the title on the course menu for consistency. If you change the title of the course module page on the course menu, the title is changed in the course menu and on the page itself.
Add course modules
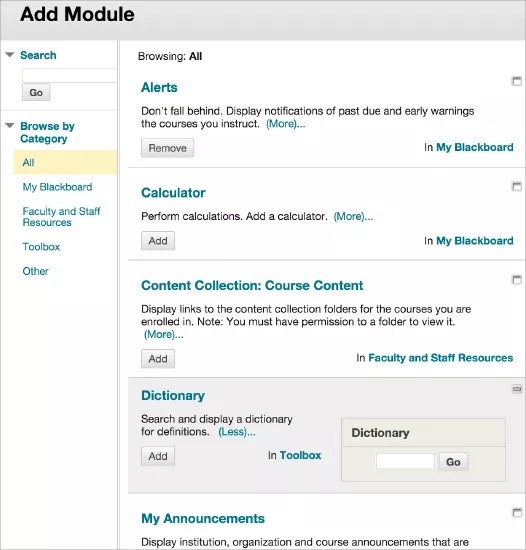
You can choose which modules appear on your course module pages.
Tip
Be sure Edit Mode is ON so you can access all of the instructor's options.
On the course module page, select Add Module. On the Add Module page, you can search by keyword or browse by category to find modules. Select More to view how a module will appear on the page.
Select Add or Remove to determine which modules appear on your page. Select OK when you're finished.
Manage modules

Select the Manage Settings icon to change how the content appears. For example, you can select how many days of announcements appear in a module. Select the X to remove a module. Content reported in the module isn't removed. Not all modules have settings you can change.
Use the drag-and-drop function to reorder course modules.
Or, use the keyboard accessible reordering tool to reorder the modules.
Select the link in a module to view more.
Select the Open in a New Window icon to move the module to a different location on your screen. You can use the information as a reference while you navigate in your course.
Important
Reminder: For your Original courses in the Ultra experience, you won't see the Edit Notifications Settings option in any module. You'll choose which notifications you want from your activity stream's Notification Settings panel.
Add a course module page banner
You can add a banner image that only appears when students open the module page. You can also add and format text in the editor.
The recommended size for banners is approximately 480 x 80 pixels.
Access the module page title's menu and select Page Banner. In the editor, you can browse for an image from your computer or the course repository: Course Files or the Content Collection. After you submit, the banner appears above the title of your course module page.
ORIGINAL Add Files, Images, Audio, and Video
About files and multimedia
You can add files, images, audio, and video when you create content in your course. For example, in discussions, you can browse for a media clip from your computer or your course's file repository: Course Files or the Content Collection.
Based on the content type, you can use the functions in the editor to embed content in your text. You have creative control over how your content appears and the flexibility to change the order and appearance when you want.
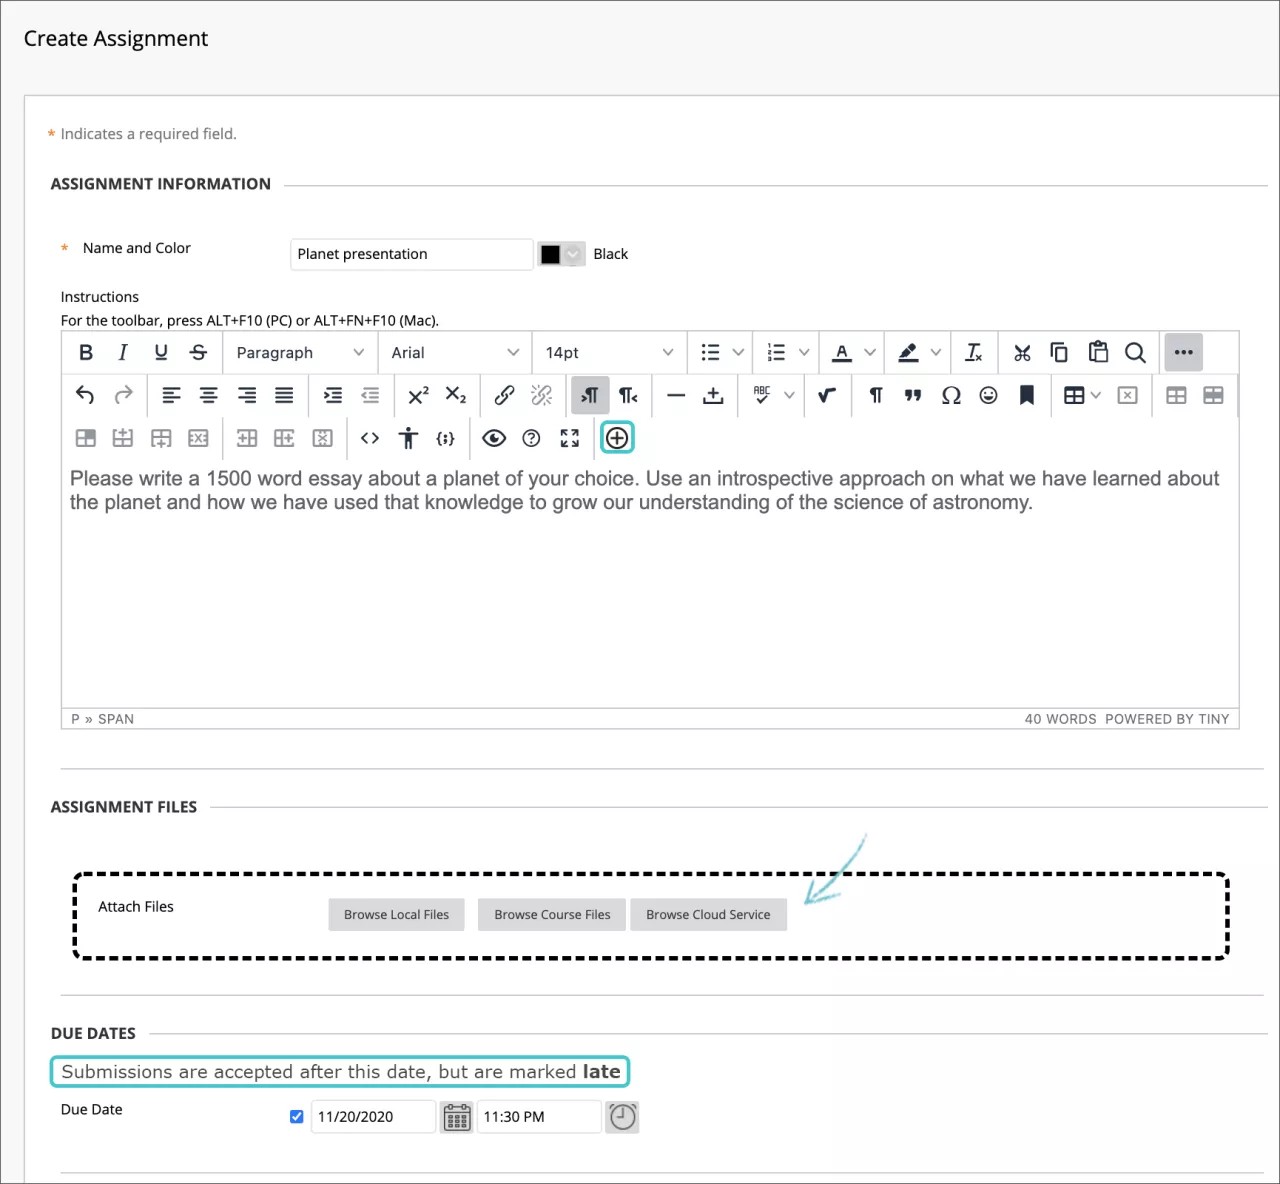
In some instances, you can browse for files in a separate attachment section. You may also be able to drag and drop files from your computer into the Attachments area. Drag files from your computer to the "hot spot" in the Attach Files area. If your browser allows, you can also drag a folder of files. The files upload individually. If the browser doesn't allow you to submit after you upload a folder, select Do not attach in the folder's row to remove it. You can drag the files individually and submit again.
Tip
The supported formats for embedding images are PNG, GIF, JPG, SVG, BMP and ICO. For audio they are MP3 and WAV, and for video they are MP4 and MOV.
You can also add social media from other websites to your content. These social media elements that appear in a course are called "mashups." A mashup combines elements from two or more sources. For example, when you view a YouTube™ video as part of the course content, you're experiencing a mashup.
Or, use the Build Content menu to embed multimedia as standalone items in the content list.
Add files to your content
Wherever you can attach files in your course, you can browse for files from your computer or your course's file repository: Course Files or the Content Collection.
When you use the Add Content function in the editor, you can determine exactly where the file's link appears within your content. When you use the Attachments section, the file you uploaded appears immediately after the title of the content item.
The Browse Course and Browse Content Collection windows include tabs and functions so you can browse and search for files easily.
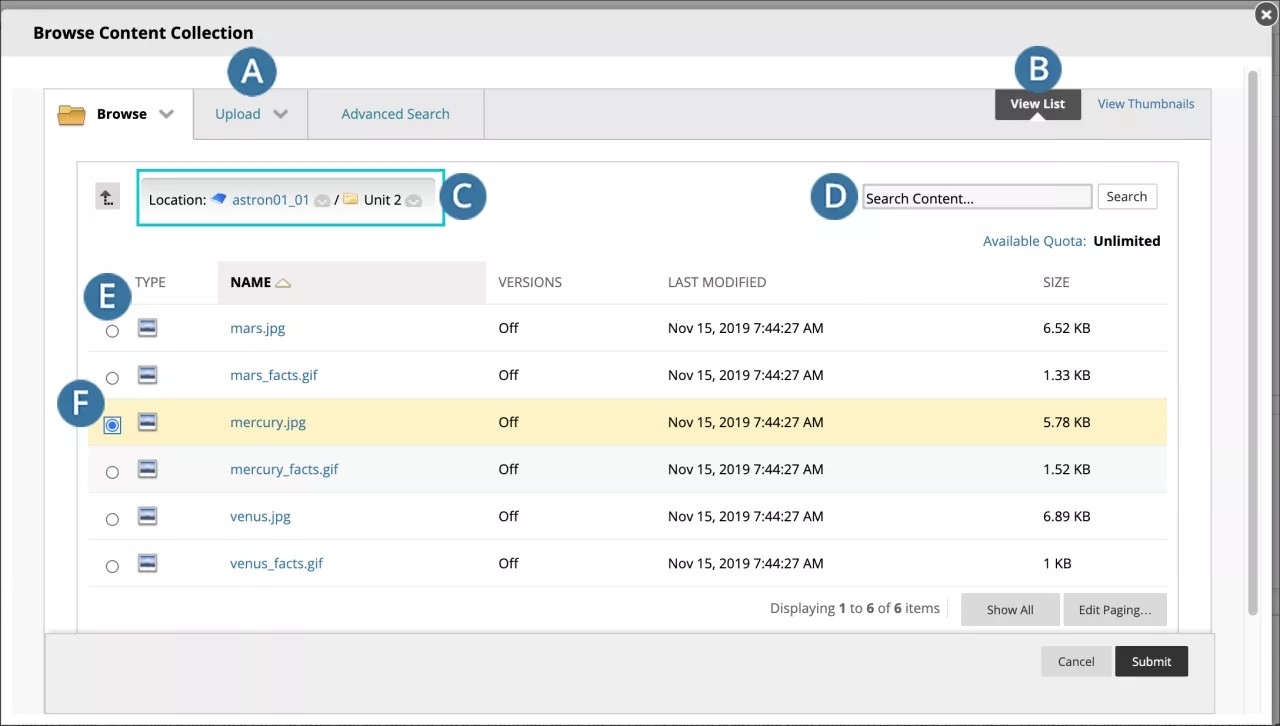
A. Browse, Upload, and Advanced Search tabs:
Browse for folders you have access to. If you have Course Files, you only have access to the files for the course you're in. With the Content Collection, you may be able to access files for other courses and those files shared institution-wide.
Upload one file, multiple files, or a zipped package.
Perform an advanced search. You can search file and folder names, metadata, file contents, date created, and more.
B. View List and View Thumbnails: View files and folders as a list of file names or as thumbnail icons.
C. Breadcrumbs: Navigate to other folders. Use the Select to use the current folder location icon to link the folder that appears last in the breadcrumbs in your course. Note the folder appears in the Select Items area.
D. Search Content: Perform a basic search for file and folder names.
E. Use the check boxes to select files and folders to include in your content item. You can select the header check box to select all visible items. When you link to a folder, use caution as students receive the read permission by default on all of the folder's contents. Read permission allows students to view all the files and sub-folders in the selected folder.
F. Selected Items.
Tip
In most browsers, you can select where the files that you open in courses are downloaded. For example, in Chrome, navigate to Settings > Advanced > Downloads. You can select the location for file downloads and choose if you want the browser to ask each time. In Safari, you have the same capabilities. Navigate to Preferences > General > File download location. You can perform an internet search to learn about file download choices in other browsers.
If your institution has enabled the Dropbox Education integration, you and your students can link directly to your Dropbox content in most content areas with the content editor Add Content feature. Students can also upload files directly from Dropbox when they submit assignments.
When you access Dropbox Education the first time from Blackboard, you're prompted to either create an account or authenticate to your current account. After you log in, browse Dropbox and select content.
Add images in the editor
You can determine where images appear in relation to your text. You can place the cursor where you want the image to be placed and select the Add Content icon. In the new window, choose one of the Common Tools or Additional Tools available according to the content type you are creating, then browse for the image file.
You can resize an image. Once the image is created, press and drag an image's corners or sides. You can also edit an image with the right-click menu, manually modify its size in pixels and add a title that appears when a user points at it.
Note
Copying and pasting links from the URL bar to Images, PDFs, or other Files in the content collection won't function properly. These URLs are temporary and break later.

You can add the common image types, such as GIF, JPG, JPEG, BMP, PNG, and TIF.
Add images in the Build Content menu
You can embed an image so it appears as a standalone piece of content in the content list.

In a content area, learning module, lesson plan, or folder, select Build Content to access the menu and select Image. Type a name, optional description, and alternative text. Select the appropriate options for dimensions, availability, tracking, and display dates. Display dates don't affect an image's availability, only when it appears.
Note
Each inserted file, link image or other media will be inserted in a "new line" to prevent consecutive inserted items from colliding. Line Breaks will be created when an image is inserted into a pre-existing text line. To make this text flow around the image, delete the line breaks.
Browse for an image file from your computer or your course's file repository: Course Files or the Content Collection. If the Add Content function is available, you can also browse for a Flickr photo. You can preview the image before you submit.
After you submit, the title and image appear in the content list. You can change the content at any time. Open the image's menu and select Edit.
You can change where the item appears in the list with the drag-and-drop function or the keyboard accessible reordering tool.
Add audio and media files in the editor
When you create content, you can determine where media clips appear in relation to your text. Select the Add Content icon to embed a media clip in the text area or edit an existing selected media item. You can also use the right-click menu to edit some properties of an existing selected media clip.

Blackboard supports these media file types:
Audio: AIFF, MP3, MIDI, MP, WAV, and WMA
Video: ASF, AVI, MOV, MOOV, MPG, MPEG, QT, SWA, SWF, and WMV
Media settings
With the right-click menu you can edit the properties of an existing selected media clip.

From the menu, you can select General, Embed or Advanced properties. The General properties you can change are the source, and the dimensions of the video (width and height) measured in pixels. If not set, the actual size will be used. If you select the padlock icon to Constrain Proportions and add a measurement, the file is resized without horizontal or vertical distortion.
The Embed properties option presents you with a text area where you can write or modify the embedding HTML code for the video to appear. This feature is intended for advanced web developers.
The Advanced properties include an alternative source or image URLs.
The following image settings are not available within the content editor anymore. For you to display these settings, add the image file from your computer, for example, using the Attachments section. When the file you selected is uploaded and visible, select the Display Media File within the page option from the File Action menu.

You can add alternative text that describes the image for people who use screen readers or visit web pages with images turned off. You can also add a title that appears when a user points an image.
You can control image placement and appearance. Pixels are used for dimensions, space, and the border width. You can also add a target URL for the image to behave as a link and decide if the target page will be opened in a new window.
Add a feedback recording
You can embed an audio/video recording of your feedback in the editor as you grade attempts. The recording option appears in the feedback editor for most graded items in your course. Students watch or listen to your feedback alongside any text you include.
Note
This function isn't supported on all browsers. For the best experience, use Chrome or Firefox.
Add audio and video in the Build Content menu
You can embed audio and video so they appear as standalone pieces of content in the content list.
In a content area, learning module, lesson plan, or folder, select Build Content to access the menu and select Audio or Video. Type a name, optional description, and select the appropriate options for dimensions, availability, tracking, and display dates. Display dates don't affect the media's availability, only when it appears.
Browse for an audio or video file from your computer or your course's file repository: Course Files or the Content Collection. If the Add Content function is available, you can also browse for a YouTube video. You can preview the media clip before you submit.
We recommend that you include a transcript so students who can't hear are able to receive the same information. Browse your computer to attach your own transcript file. If the video file is an MPEG file, you can use the Include Transcript field to attach an SAMI transcript file.
After you submit, the title, transcript, and media clip appear in the content list. You can change the content at any time. Open the item's menu and select Edit.
You can change where the media clip appears in the list with the drag-and-drop function or the keyboard accessible reordering tool.
Note
If a video file type isn't supported and doesn't appear embedded, students can download the file to watch it.
View and improve file accessibility
Note
Your institution controls which tools are available.
Your class is full of diverse students with unique learning abilities. Providing students with more accessible content means each individual can choose formats that work best for them. If your institution uses Blackboard Ally, you can use the tool to help ensure your course content is accessible to every student.
Ally automatically scans your course content and performs steps to make files more accessible.
In your course, find the file you want to improve.
Next to the file name, an icon appears to quickly show the file’s accessibility score. Hover over the icon to view the score. File accessibility icons are always located next to your file, but the specific location will vary throughout different areas in your course. Throughout Blackboard, most accessibility icons will be to the left of the file.
To learn how to improve the file’s accessibility, select the score icon.
Ally opens and shows you steps on how to edit your file for improved accessibility and optimize it for alternative formats.

Students don’t see the file’s accessibility score. Instead, students can choose from the alternative formats Ally generates for the file. You can help Ally create better alternative formats by following best practices for creating accessible files.
After you attach files to a course, Ally creates alternative formats of the file based on the original. For example, if the original file is a PDF, Ally creates audio, electronic braille, and ePub formats of the same content. These formats are made available with the original file so everything is in one convenient location.
Note
The alternative formats created depend on the original file type. If you don't see an option to download alternative formats, Ally isn’t enabled for that course or the file isn't a supported content type.
Find a file in your course. Select the menu beside it and select Alternative Formats. Choose the version that is best for your needs! Select Download to save the alternative format to your device.

The following narrated video provides a visual and auditory representation of some of the information included on this page. For a detailed description of what is portrayed in the video, open the video on YouTube, navigate to More actions, and select Open transcript.
ORIGINAL Add Files from Cloud Storage
You can upload files to web apps that run in the "cloud" and aren't installed on your computer, such as OneDrive®.
Your files are stored on secure, online servers where they're protected from accidents and viruses. If something happens to your computer or phone, you don't have to worry about file loss. You can access your files in the cloud any time you're connected to the internet, on any of your devices.
In your courses, you and your students can instantly connect to multiple web apps where you store files. Blackboard uses a cloud integration service for easy access to web apps in one location.
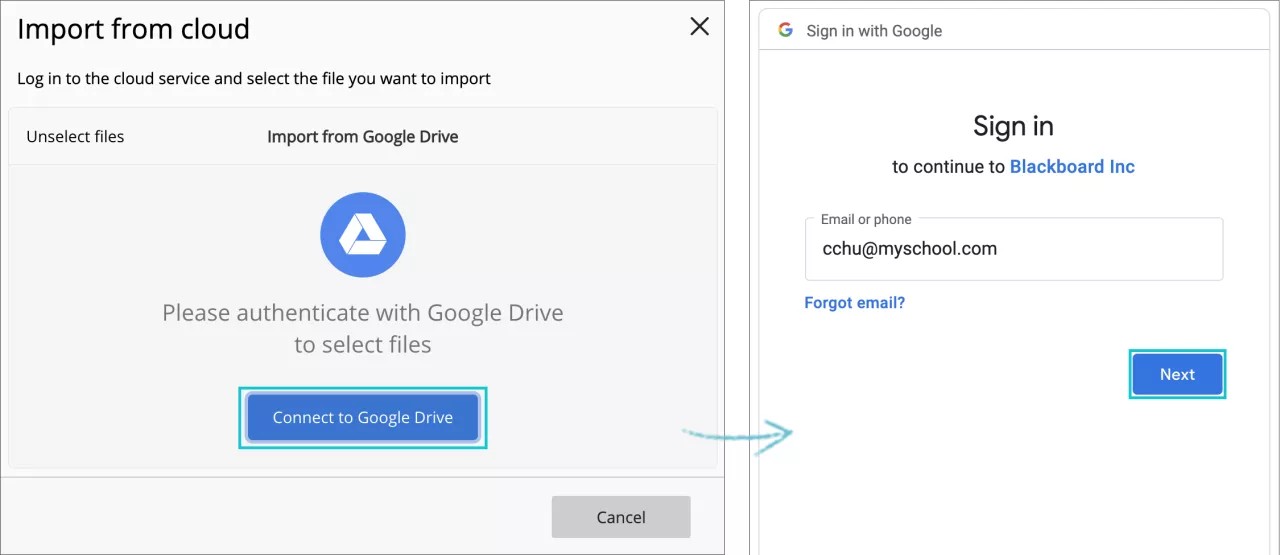
When you access cloud storage for the first time, you choose the web app you want to connect to:
OneDrive
Box
OneDrive for Business
Note
If you have an institution OneDrive account, use OneDrive for Business.
Dropbox
Google Drive™
Next, sign in and allow the cloud integration service to connect to your web app.
Important
You can to use your institutional account as well as personal accounts to login to the service and upload files. However, 'stored accounts' inside Blackboard are not supported anymore. We still support OneDrive for Business accounts and Google Workspace accounts (formerly Google GSuite).
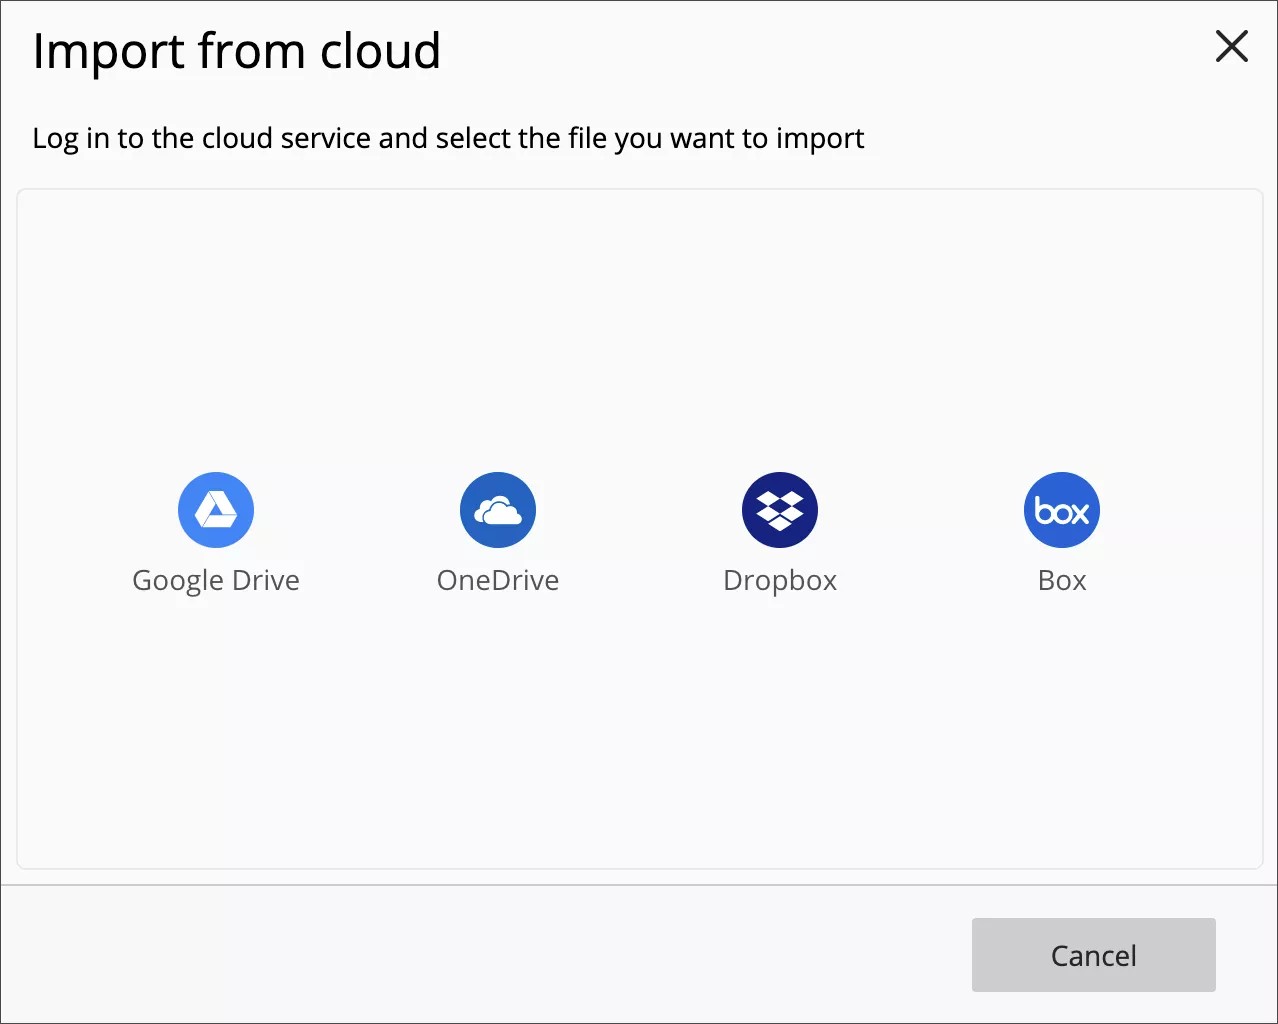
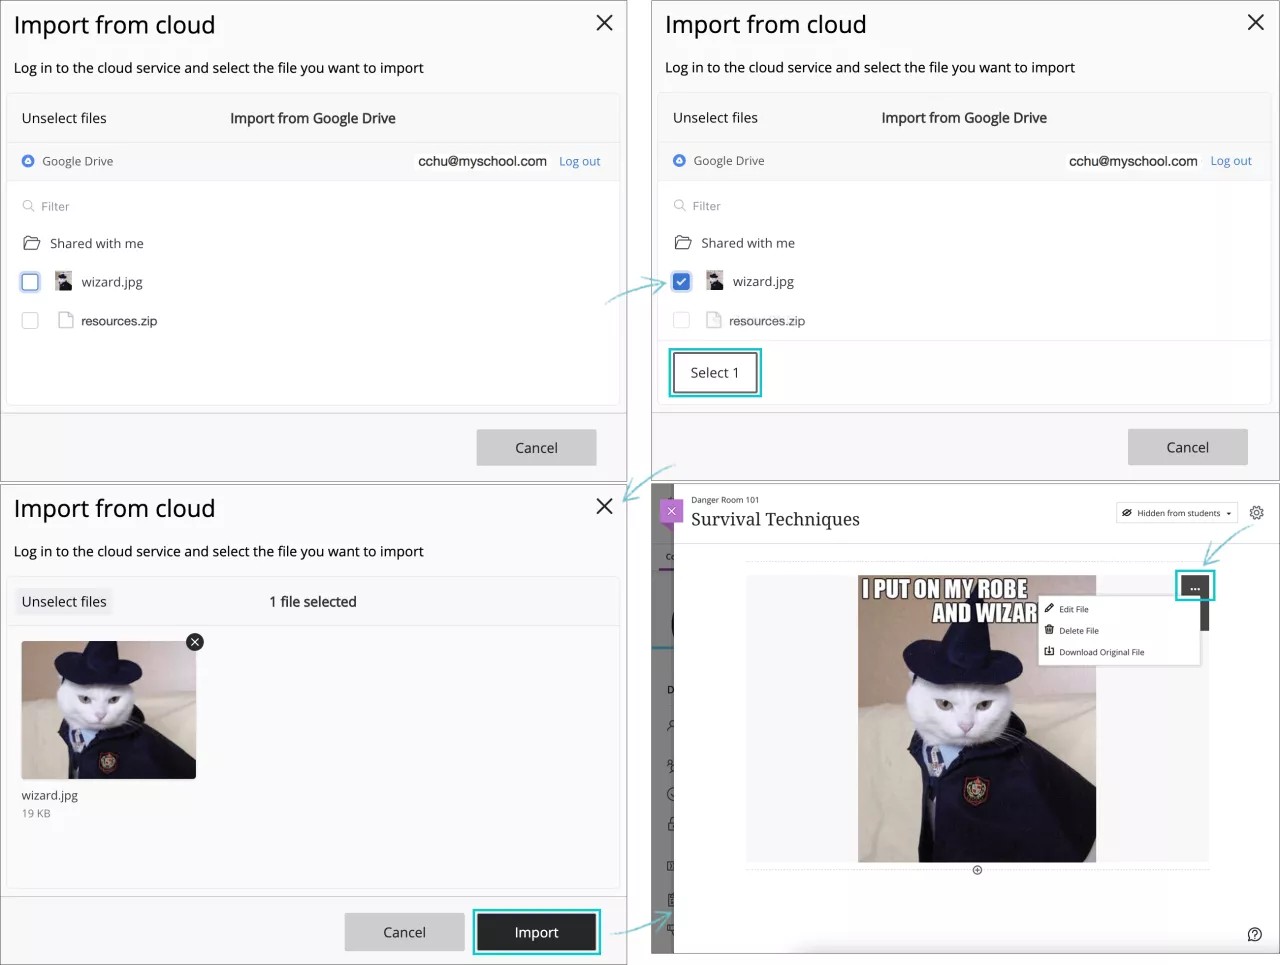
In the cloud storage pop-up window, you see your files for the selected web app. You can:
Unselect files, Cancel or select the upper right X button to cancel and go back to the list of services available.
Select a file from the folders available.
Log out.
When you choose a file from the list by selecting the checkbox in front of it, the Select button appears. The number on the button corresponds to the number of files selected. Select that button to confirm your choice.
The file you chose will be previewed, and you can either select Import to confirm your choice and to add the file to your content item, or the button Cancel to go back to the folder file. You can cancel your choice by selecting the file's upper right X icon.
After you import the file, it will appear as part of the content item you are creating or editing, and you can proceed with your creation process.
You can access your files in cloud storage in these course areas:
Attachments and in the editor for assignments
Attachments and in the editor for content items
If you can't access cloud storage in your course, contact your administrator. Cloud storage might not be available in your Blackboard deployment.
Students can access their cloud storage files when they submit assignments.
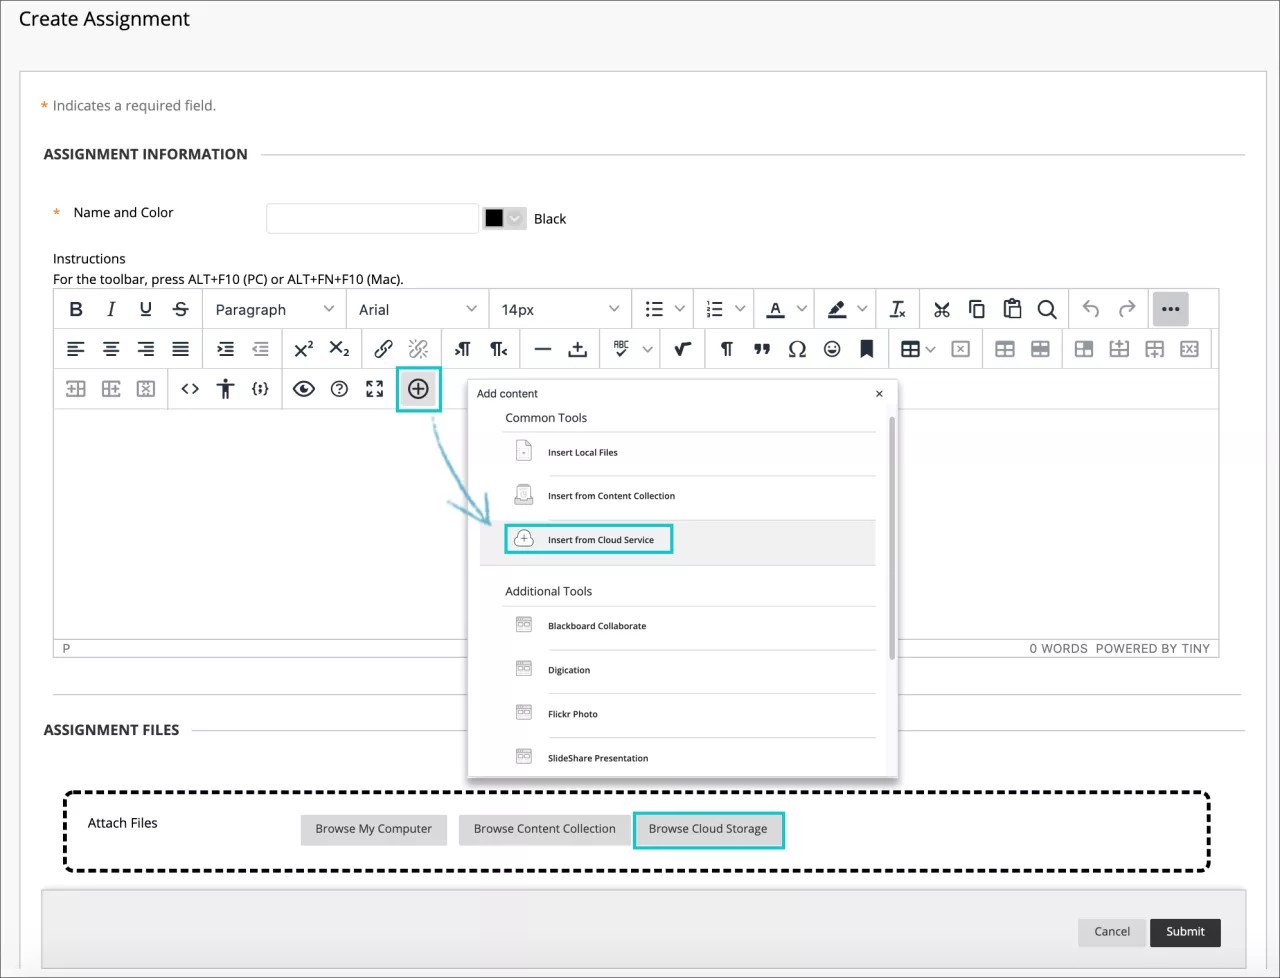
In an assignment in the Attach Files section, select Browse Cloud Service.

You can also access cloud storage from Add Content icon in the editor, by selecting Insert from Cloud Service.
When you add files from cloud storage, the system makes copies of the files in your course. The files aren't linked. Any change you make to a file within your course doesn't apply to the file in cloud storage.
In the Attach Files section, select Browse Cloud Service.
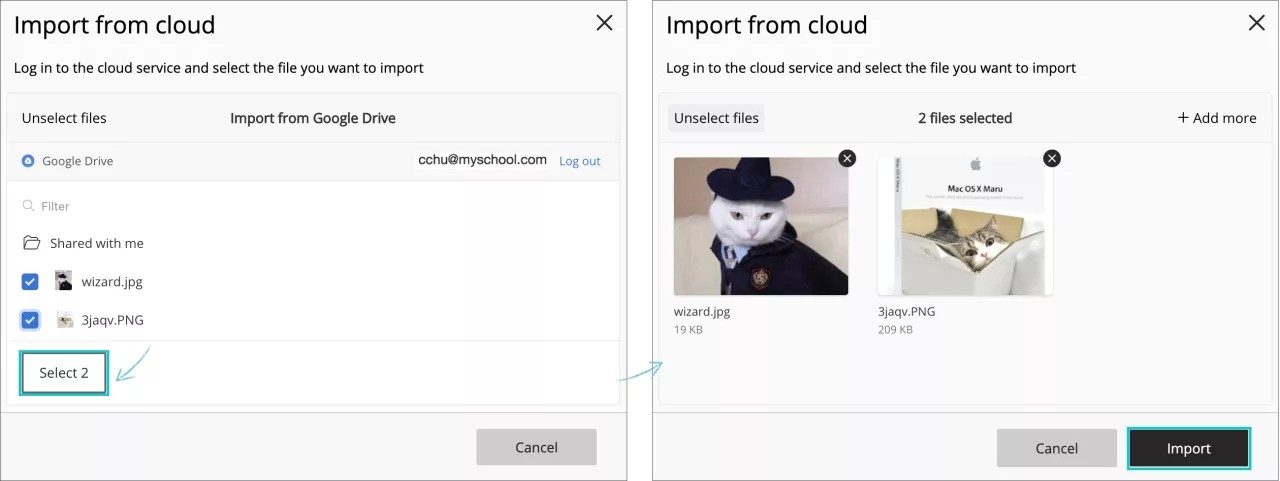
In the cloud storage pop-up window, select a web app from the menu and select one or more files. Or, select a folder title to view the contents and select a file. You can select a ZIP file—a compressed package of files. ZIP files stay compressed when you add them. Students select the ZIP file to download it to their computers and unzip it to access the contents.
The button Select, will show you the number of files selected (e.g. Select 2) and allows you to continue the process.
A preview of the files chosen will appear. Select Import to add the files to the content item as attachments.
If you use a computer that others use, clear your cookies and site data after you sign out. Then, other users can’t access your files in cloud storage.
ORIGINAL Add Social Media
What is a mashup?
Wherever you can add and format text in your course, you can add social media from other websites to your content. These social media elements that appear in a course are called "mashups." A mashup combines elements from two or more sources. For example, when you view a YouTube™ video as part of the course content, you're experiencing a mashup.
You can add mashups to test questions, discussions, assignments, or as a standalone piece of content. You can also add a clip of a movie or a photo in a journal, blog, or wiki.
You and your institution control which mashup types appear in the editor. Typically, the menu includes these types:
Flickr®: Share photographic images.
SlideShare: Share slide presentations, documents, or Adobe PDF portfolios.
YouTube: Share online videos.
Dropbox: Share files from your Dropbox account.

Add mashups in the editor
Wherever you want to add a social media element, access the editor. Select the Add Content icon and choose the type you want to search, such as YouTube Video.
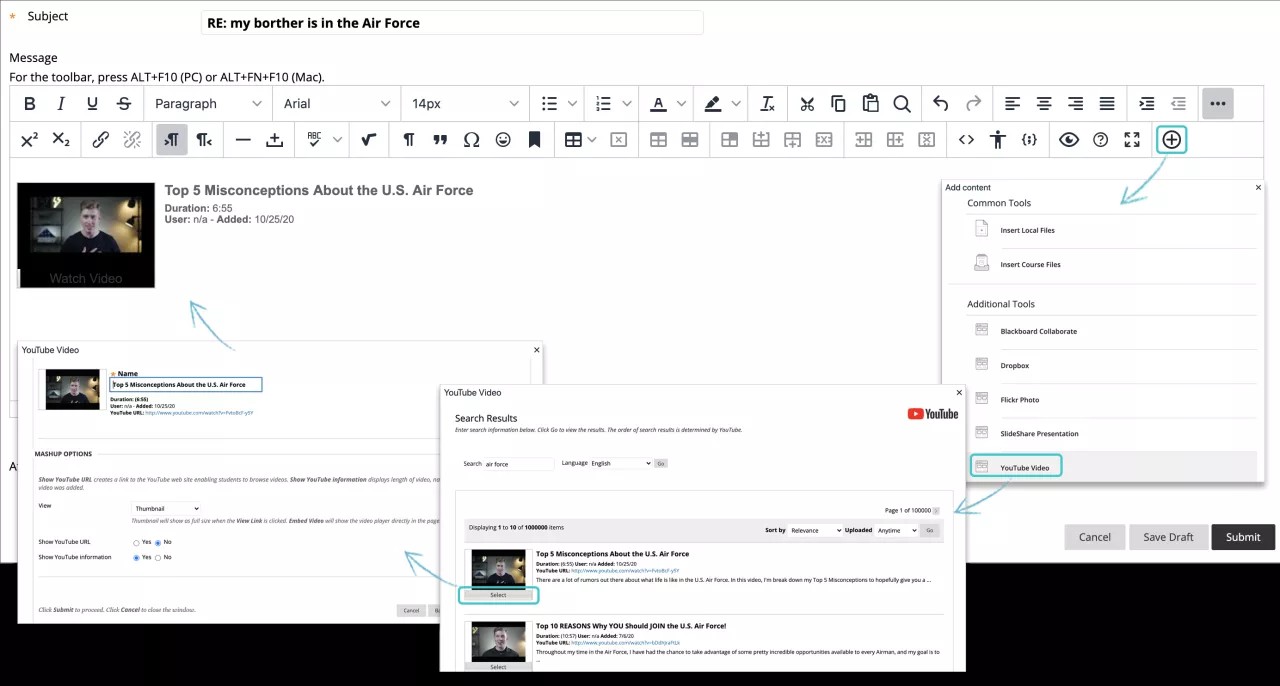
On the search page, type your keywords and select Go. You'll receive a list of items that you can sort. You can also see how many items and pages are returned for your search.
When Preview is available, you can view the items in their own windows. You can also preview videos with the URLs listed in the descriptions.
After you have explored the search results, select an item. You can change the title of the item if you don't want to use the one provided.
Set mashup options
You can choose how a mashups appear on the screen:
Embed: The mashup appears directly on the screen.
Thumbnail: A small picture of the mashup appears with a Watch option.
Text Link with Player: A link to the mashup appears. This option doesn't appear for photos. However, you can set a size for a photo.
Select Yes for Show URL to create a link to the website. For YouTube videos, Select No if you don't want to show suggested videos at the end of playback.
Select Yes for Show information to display the length of the mashup, name of the creator, and the date the mashup was added.
Before you submit, select Preview and view how the mashup will appear in your content. Close the preview window to make changes.
Note
The original website can change a mashup's URL or delete it, which will cause an error in your course.
Add mashups from the Build Content menu
In a content area, learning module, lesson plan, or folder, you can also add a social media element from the Build Content menu. When you add social media from the menu, the element appears as a standalone piece of content.

After you submit, the mashup appears in the content list. You can change the mashup's content at any time. Open the mashup's menu and select Edit.
Privacy setting
An unlisted video doesn't appear in YouTube searches, and only users who know the link can access the video. However, complete privacy isn't guaranteed. The unlisted setting allows authors to publish and share videos easily without a need for specifically choosing who can view the video. If users have access to where the video is published, they can view it. They can also select the YouTube logo on the video which allows them to view the unlisted video on youtube.com.
You can change the privacy setting to Private. From the video library, edit the video to make it private in the YouTube clip edit settings. If you make a video private, only the users you specifically include, and who have a Google account can view it. Private videos appear in the library with a lock next to them. Only the author and specified viewers can view private videos.
ORIGINAL Add Tables
Add tables in the editor
You can add and format tables in the editor. The editor appears wherever you can add text, such as in assignments, tests, discussions, and journals. You have creative control over how your content appears and the flexibility to change the order and appearance.
To be sure your content is accessible to all users, use tables only to present data rather than for layout or presentation purposes. For example, users who are blind use screen readers to have text on the web read aloud. Table information read by screen readers can be difficult for users to understand.
In the editor's text box, place your mouse pointer where you want to add a table and select the Insert/edit table icon. You can also use the right-click menu.
Most of the table options are grayed out and unavailable unless you access an existing table in the text area.
To resize a table, press and drag a table's corners or sides.

Note
To use your keyboard to jump to the editor toolbar, press ALT + F10. On a Mac, press Fn + OPT + F10. Use the arrow keys to select an option.
Table properties
When you add a table, you can set the table's basic properties on the General tab.
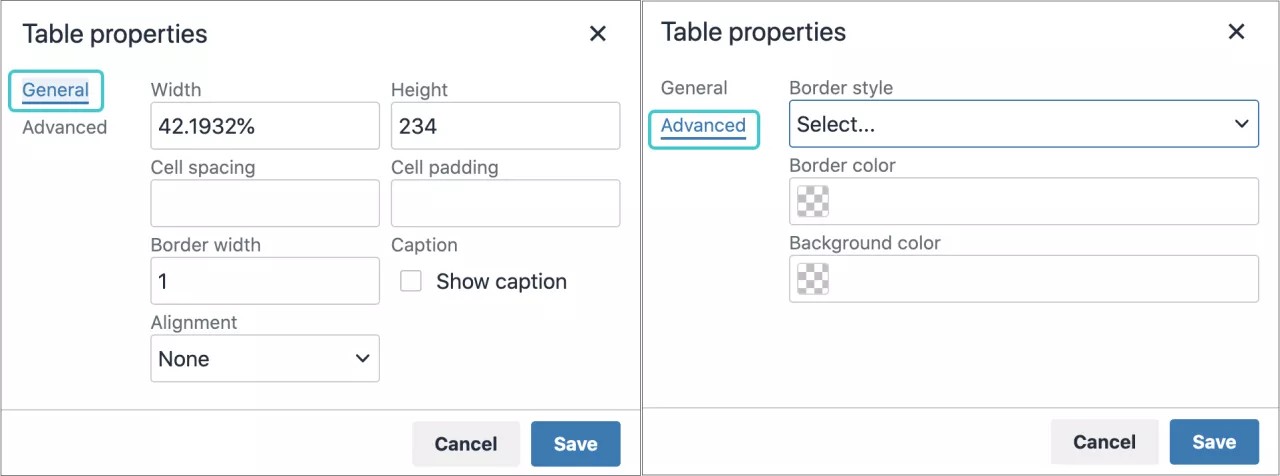
The system uses pixels for padding, spacing, and borders. You can use pixels or a percentage of the available display for the width and height of the table. If you leave the height box blank, the table is sized automatically to fit the content.
If you don't select a table alignment, the current paragraph alignment is used.
Select the Show Caption check box so that you can add a title that appears centered over your table.
On the Advanced tab, you can set additional properties for a table from menus and color boxes. You can also add information about these properties:
Border style - Choose from:
Solid
Dotted
Dashed
Double
Groove
Ridge
Inset
Outset
None
Hidden
Border color: Select a color from the color selector, the palette or write down the color code preceded by the # character to become the border color.
Background color: Select a color from the color selector, the palette or write down the color code preceded by the # character to become the background color.
Set table row and cell properties
You can set formatting parameters to control how the content of table rows or cells will appear. Select a table and then select the Table Row Properties or Table Cell Properties icon. You can also select a row or a cell and use the right+click menu to display any of these options too. Both Row and Cell property windows have a General and Advanced options.

On the General tab, you can set basic properties for rows and cells, such as type, alignment and height. If you don't set a height for a row, the row is sized automatically to fit the content.
General properties for Rows:
Type: Header, Body or Footer
Alignment: Left, Center or Right
Height: Desired height in pixels. If left blank it will take de default value depending of the text size.
The Advanced tab will offer the same properties as the ones for a table.
General properties for Cells:
Width: it can be described in pixels or percentage
Height: it can be described in pixels or percentage
Cell type: Cell or Header
Scope: None, Row, Column, Row group or Column group
H Alignment (Horizontal): Left, Center or Right
V Alignment (Vertical): Left, Center or Right
The Advanced tab will offer the same properties as the ones for a table plus the Border width value (in pixels).
Edit tables
In the editor's text box, select a table, or a group of cells, to make the table editing options active.
Options | Description |
|---|---|
 | Open the Insert/Edit Table window. If you select the icon while inside a table, a new table is created inside the first one. |
Delete the table currently selected. | |
Open the Table Properties window. | |
 | Open the Table Row Properties window. |
 | Open the Table Cell Properties window. |
 | Insert a blank row in the table above the current mouse pointer position. |
 | Insert a blank row in the table after the current mouse pointer position. |
 | Delete the current row from the table. If you select multiple rows, all are deleted. |
 | Insert a blank column in the table to the left of the current mouse pointer position. |
 | Insert a blank column in the table to the right of the current mouse pointer position. |
 | Delete the current column from the table. If you select multiple columns, all are deleted. |
ORIGINAL Add a Syllabus
Add a syllabus
You can upload an existing syllabus file and students select the link to open it. Or, you can use the syllabus builder. The syllabus will appear as a standalone item in the content list. Your institution controls if this tool is available.
You can use the syllabus builder to create a syllabus in a modular format. You can also specify the design and add lesson information.
Tip
Be sure Edit Mode is ON so you can access all of the instructor's options.
In a content area or folder, select Build Content to access the menu and select Syllabus. On the Add Syllabus page, type a name and select the Create New Syllabus option. After you submit, the Syllabus Builder page appears.
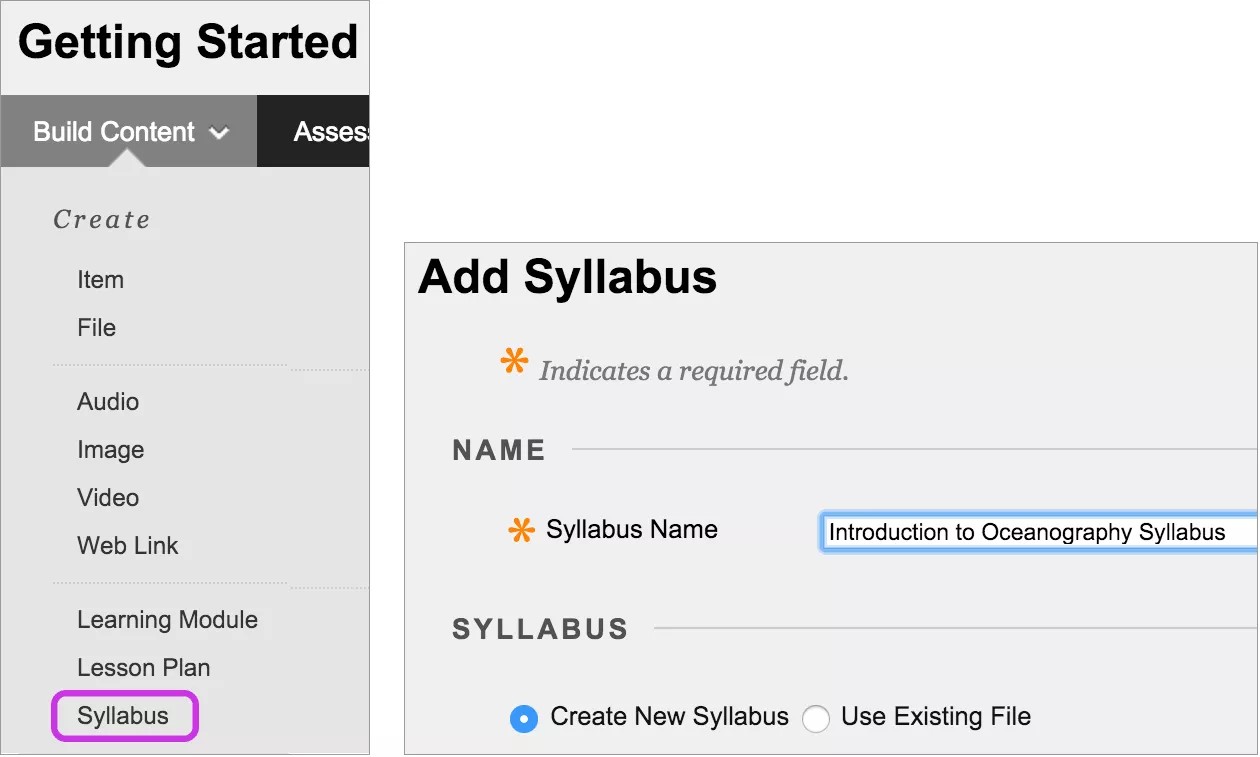
On the Syllabus Builder page, three sections appear by default: Description, Learning Objectives, and Required Materials. You can edit the section headings. Type instructions or a description in each box. You can format the text with the options in the editor.
In the Syllabus Design section, select the style and colors for your syllabus.
In the Build Lessons section, select the Create Specified Number of Lesson Shells option and type a number. You provide lesson information in later steps. Alternatively, you can select the Do Not Create Lesson Shells option.
Select the appropriate options for availability, tracking, and display dates. Display dates don't affect a syllabus's availability, only when it appears.
After you submit, you can view your syllabus and provide the details for the lessons. You can change the syllabus content at any time. Open the syllabus's menu and select Edit.
Access the syllabus you created. Open a lesson's menu and select Edit. On the Edit Lesson page, type a name and description. Optionally, select a date and time when the lesson will appear in the syllabus. Select Submit and select OK to view the syllabus.
To remove a lesson, select a lesson's check box and select Delete Lesson above the syllabus information. You can also add more lessons.
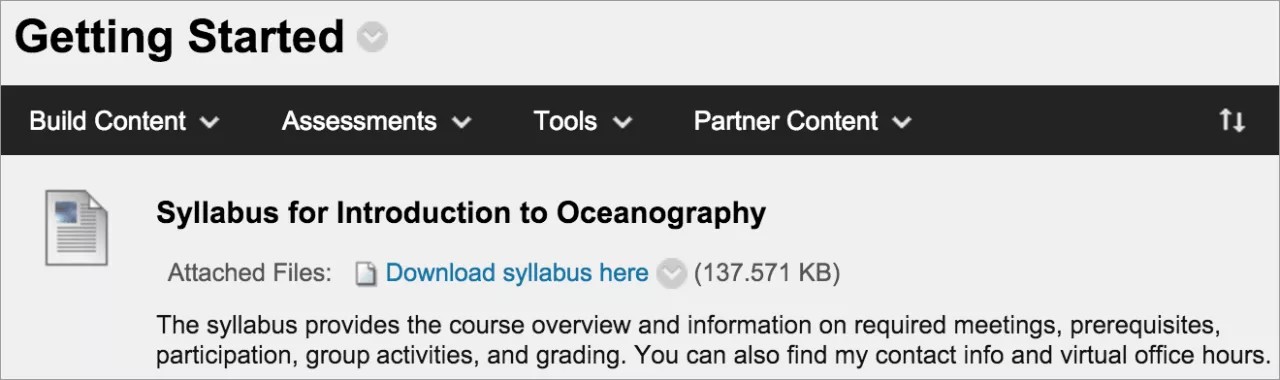
Upload a syllabus file
If you don't want to use the modular syllabus that takes up space in the content list, you can upload an existing syllabus file.
Tip
Be sure Edit Mode is ON so you can access all of the instructor's options.
In a content area or folder, select Build Content to access the menu and select Syllabus. On the Add Syllabus page, type a name and select the Use Existing File option.
Browse for a file from your computer or the course's file repository: Course Files or the Content Collection. You can attach more than one file. You can also edit the Link Title to provide a meaningful name for students.
You can use the options in the editor to type a description, add images, and format the text. Select the appropriate options for availability, tracking, and display dates. Display dates don't affect a syllabus's availability, only when it appears.
After you submit, you can view your syllabus in the content list.
You can change the syllabus content at any time. Open the syllabus's menu and select Edit. You can change where the syllabus appears in the list with the drag-and-drop function or the keyboard accessible reordering tool.
Best Practice: Attaching Files
You can add files to your course in multiple ways, including when you create course content. When you add files to your course, they are stored in the course's file repository: Course Files or the Content Collection.
Three common ways to add files to your course
You can add several types of files to your content. In our examples, we add a document in three ways.
To control where a file link appears in your text, use the editor to attach files as you create content.
When you create content, attach a file in the Attachments section.
Add your files to Course Files or the Content Collection BEFORE you create content.
To control where a file link appears, use the editor to attach files as you create content

When you use the Add Content function in the editor, at the far right end of the Content control panel, you can choose where the file's link appears within your content.
Depending on the type of content, you can link to files already in Course Files or the Content Collection or browse for one on your computer. Any files you upload from your computer are saved in the repository in the top-level folder. You can't select the folder your files are uploaded to.
Advantage: You have creative control over how your content appears. If you add three files to your content item, you can split them up among the text as you want.
Example: You provide your students with three case studies to read. They must select one to further investigate. In the same content item, you can provide an introduction and a file link for each case study. You can use the file name or provide a link title for each.
Files appear: The links to the files appear exactly where you want. As you refine your content or need to update material, you can continue to add files, images, and multimedia. You have the flexibility to change the order and appearance when you want.
When you create content, attach a file in the Attachments section
As you create content, you can add a file from your computer or from the course's file repository: Course Files or the Content Collection.
Advantage: You can upload files while you build your course. You don't have to upload your materials first.
Example: Your students are struggling with a group project. You can deliver more instructions and ask them to download a file with specific examples. As you create the new content item, you can attach a file. If the file is on your computer, you can select the folder in Course Files or the Content Collection that you want to upload it to.
Select Browse Course or Browse Content Collection to locate the file on your computer and upload it. Alternatively, locate the file in one of the folders in your repository.
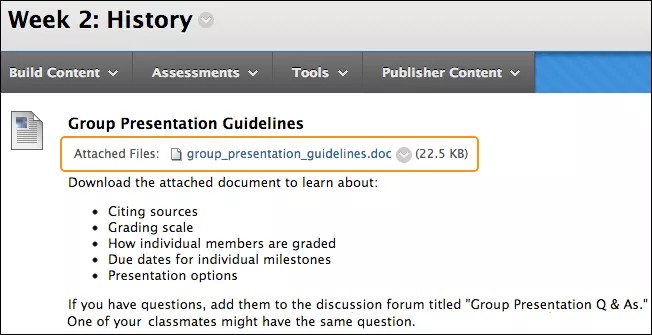
File appears: In the content area, the file you uploaded appears immediately after the title of the content item. You can't change where the link appears. You can use the file name or provide another name for the file. In our example, the file name appears.
Add your files to Course Files or the Content Collection BEFORE you create content
Upload files and folders into Course Files or the Content Collection, either one at a time or in batches, with the drag-and-drop function or the browse function.

Advantage: In Course Files or the Content Collection, you can create folders to organize your content.
Example: You decide to deliver content to your students for each week. On the course menu, you add links for Week 1, Week 2, and Week 3. In Course Files or the Content Collection, you create folders with the same names and upload your files. When you create content, you can navigate to the appropriate folder to locate the file you need.
Frequently asked questions
No. You can add files as you create content. You can use the browse function to upload one or more files. If you upload them into a course area, you don't need to upload the same files directly to the repository. After you create your content, you can move your new files to different folders in Course Files or the Content Collection as needed. Links to the files in your course won't break.
You can reuse files in Course Files or the Content Collection. Therefore, you can delete links to files in your course, yet the files themselves remain in the repository. Then, you can link to them again. Also, if you modify or move a file to another folder after you link it in your course, the link remains intact.
You can edit and overwrite individual files in Course Files or the Content Collection while maintaining the course links to those files.
Example:
You create a link to your syllabus file in your repository. Later, you need to make changes to the file. First, edit a copy of the file on your computer. Then, return to the repository and access the item's menu. Upload the new version of the syllabus with the Overwrite File function. The link to the file in your course remains intact. When students access the syllabus in your course, they see the revised content.
In the Original Course View, when you create content in the interactive tools, you can use the Add Content function in the editor to include a file in your instructions. The system automatically uploads the files to Course Files or the Content Collection in the top-level folder. Later, you can organize your files. You can move the files to different folders in the repository and the links will remain intact.
You can link to a file as many times as you want. If you need to edit a file, your changes will appear in all the linked instances.
Yes. In Course Files or the Content Collection, access the item's menu and select 360° View. You can view information about the item and where it's linked in your course.
For folders, you can view where the files and sub-folders in the folder are linked in your course.
ORIGINAL Create Blank Pages and Files
You can create two content types that appear as links in your content list. Students select the links to view the materials. These content types save screen real estate and reduce the amount of scrolling.
Blank page: You can include files, images, and text together on one page. No description appears with the link.
File: You can upload a file or create an HTML file that students can open in a new window or tab. You can also upload a collection of files, including cascading style sheets (CSS) so that students can view them in the prescribed order and with your design.
Create a blank page
You can create a blank page and include files, images, and text as a link in the content list. You can't add a description with the link. Students select the link to view the materials.
You can also create a blank page directly on the course menu for critical information. For example, add a map image for an upcoming field trip, information about a guest speaker, or a study guide for the final test. Remove blank pages from the course menu as soon as the information is no longer needed.
Tip
Be sure Edit Mode is ON so you can access all of the instructor's options.
With the editor, you have creative control over how your content appears and the flexibility to change the order and appearance when you want.
In a content area, learning module, lesson plan, or folder, select Build Content to access the menu and select Blank Page.
Type a name and add your materials in the Content box. You can use the options in the editor to format text, attach files, embed multimedia, and insert equations, links, and tables. Files that you attach in the editor are visible to students only after they select the blank page link.
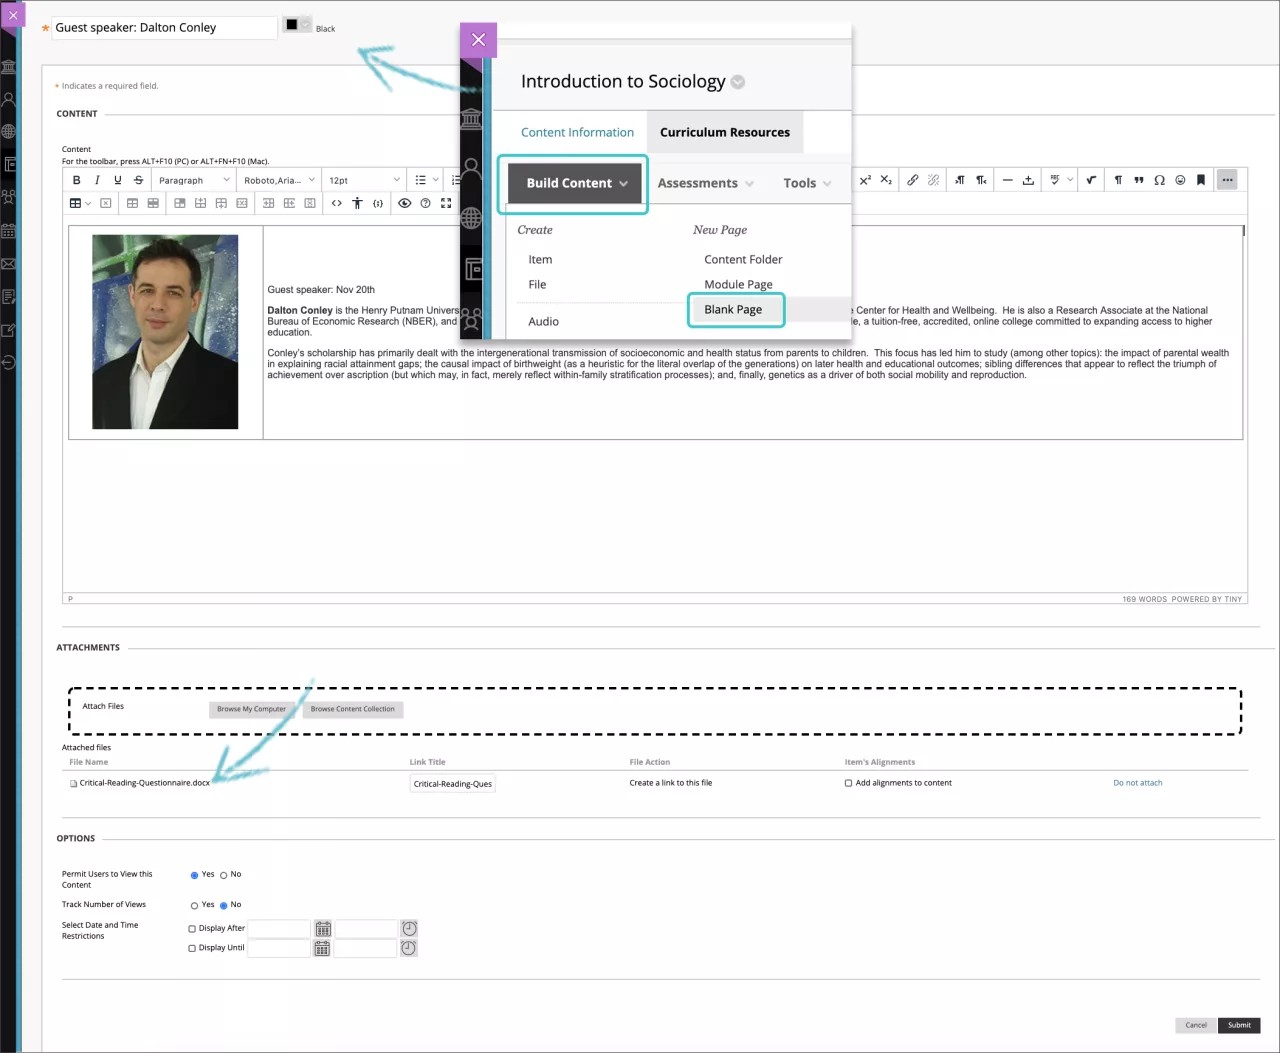
In the Attachments section, select Browse My Computer to upload a file from your computer. The file is saved in the top-level folder in your course's file repository: Course Files or the Content Collection. You can also attach a file from the repository.
-OR-
Drag files from your computer to the "hot spot" in the Attach Files area. If your browser allows, you can also drag a folder of files. The files will upload individually. If the browser doesn't allow you to submit your blank page after you upload a folder, select Do not attach in the folder's row to remove it. You can drag the files individually and submit again.
Note
You won't be able to drag files to upload if your institution uses an older version of Blackboard.
You can use the file name or provide another name for the file.
Select the appropriate options for availability, tracking, and display dates. Display dates don't affect an item's availability, only when it appears.
After you submit, the blank page appears in the content list. You can change the blank page's content at any time.
When Edit Mode is ON and you select the link to a blank page, you see the Edit page. To see the blank page as students do, change Edit Mode to OFF.

You can change where the blank page appears in the list with the drag-and-drop function or the keyboard accessible reordering tool.
Create a file
You can use the file content type to create a link to a file in the content list. You can't add a description with the link. You can choose whether users view the file as a page within the course or in a separate window or tab. Students need to download some file types such as Word docs to view the contents.
You can upload a single file or a single zipped package. For example, you can upload a zipped package to provide students with a group of images they need for a lab project.
Tip
Be sure Edit Mode is ON so you can access all of the instructor's options.

In a content area, learning module, lesson plan, or folder, select Build Content to access the menu and select File.
On the Create File page, type a name and browse for a file. Select Browse My Computer to upload a file from your computer. The file is saved in the top-level folder in your course's file repository: Course Files or the Content Collection. You can also attach a file from the repository. Use the Select a Different File option to delete the file you linked and replace it with another.
Select Yes for Open in New Window to display the content in a new window or tab.
Select the appropriate options for availability, tracking, and display dates. Display dates don't affect a file's availability, only when it appears.
After you submit, the file appears in the content list. You can change the file's content at any time. Access the file's menu and select Edit.
You can change where the file appears in the list with the drag-and-drop function or the keyboard accessible reordering tool.
Zipped content packages
You can create a lesson with several interrelated HTML pages with navigation, images, web links, and cascading style sheets (CSS). Then, you can create a zipped file and unzip the file in the course's file repository and choose the start page. Students can view the lesson contents in order with all the links intact. The start page will open in a new window or tab, and students can close the page to return to the content list. Learn more in the next section also.

Access Course Files or the Content Collection where you will upload your package. From the Upload menu, select Upload Package so that the package is unzipped automatically.
Access the content area or folder where you will provide the link to your lesson. Select Build Content to access the menu and select File.
On the Create File page, select Browse Course or Browse Content Collection to select the file that is the start page for your content package. The start page is the first page students see and should contain navigation to the other pages in your package.
Select the appropriate options for availability, tracking, and display dates. Display dates don't affect the availability, only when it appears.
After you submit, the file appears in the content list. You can change the file's content at any time. Access the file's menu and select Edit.
If you want the packaged file to remain zipped, attach the zipped file in a content item with the attach options or use Insert File in the editor. Students select the link in the content list, download it, and unzip it. Use this method to provide students with several files to work with or edit on their computers.
Link to HTML files
You can use the file content type to embed HTML files for a website you have created. After uploading your HTML files to Course Files or the Content Collection, you select which file is the starting point, such as index.html or page_1.html. The file name appears in the Name box. Edit the name to help users access the content. For example, change the name to "Start Here" or "View Lesson 1."

When you select an HTML file, the Manage Access section appears. You can define the access you want to give students. You have three options:
Give users access to all files and folders in the folder. Give users access to all files and sub-folders within the parent folder of the file you are linking. This option is appropriate for users who are linking to a website with a typical hierarchical structure with sub-folders for CSS, JavaScript, and images contained in the parent folder.
Give users access to this file only. Link to one HTML file that has all the formatting within the page itself and doesn't reference other files or images.
Give users access to selected files in folder. Embed a website with a more complicated structure. If some of the content exists outside of the parent folder in other folders in the course's file repository, browse for and select the parent folder and the additional files and folders. You can ensure users have access to all the content in your website.
ORIGINAL Create Content Items or Documents
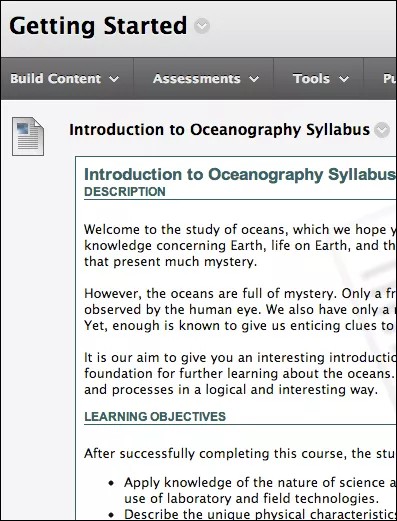
You can create content that combines a variety of materials to view together, such as text, multimedia, and attachments.
You can create a content item to present a combination of content that serves as a handout or document with visual aspects. You can create content items that are as simple as one line of text or include many elements.
For example, in one content item, you can include introductory text for a lesson, an image, a table of data, and links to web resources. The materials are all presented together in the content list. The longer your content item is, the more your students have to scroll to see all the other materials in the content area.
If you don't want longer content items to appear in the content list, you can create blank pages instead. You create a blank page in the same way you create a content item. However, students select the blank page link in the content area to view the materials. Blank pages save screen real estate and reduce the amount of scrolling.
Create a content item
In a content area, learning module, lesson plan, or folder, select Build Content to access the menu and select Item.
Tip
Be sure Edit Mode is ON so you can access all of the instructor's options.
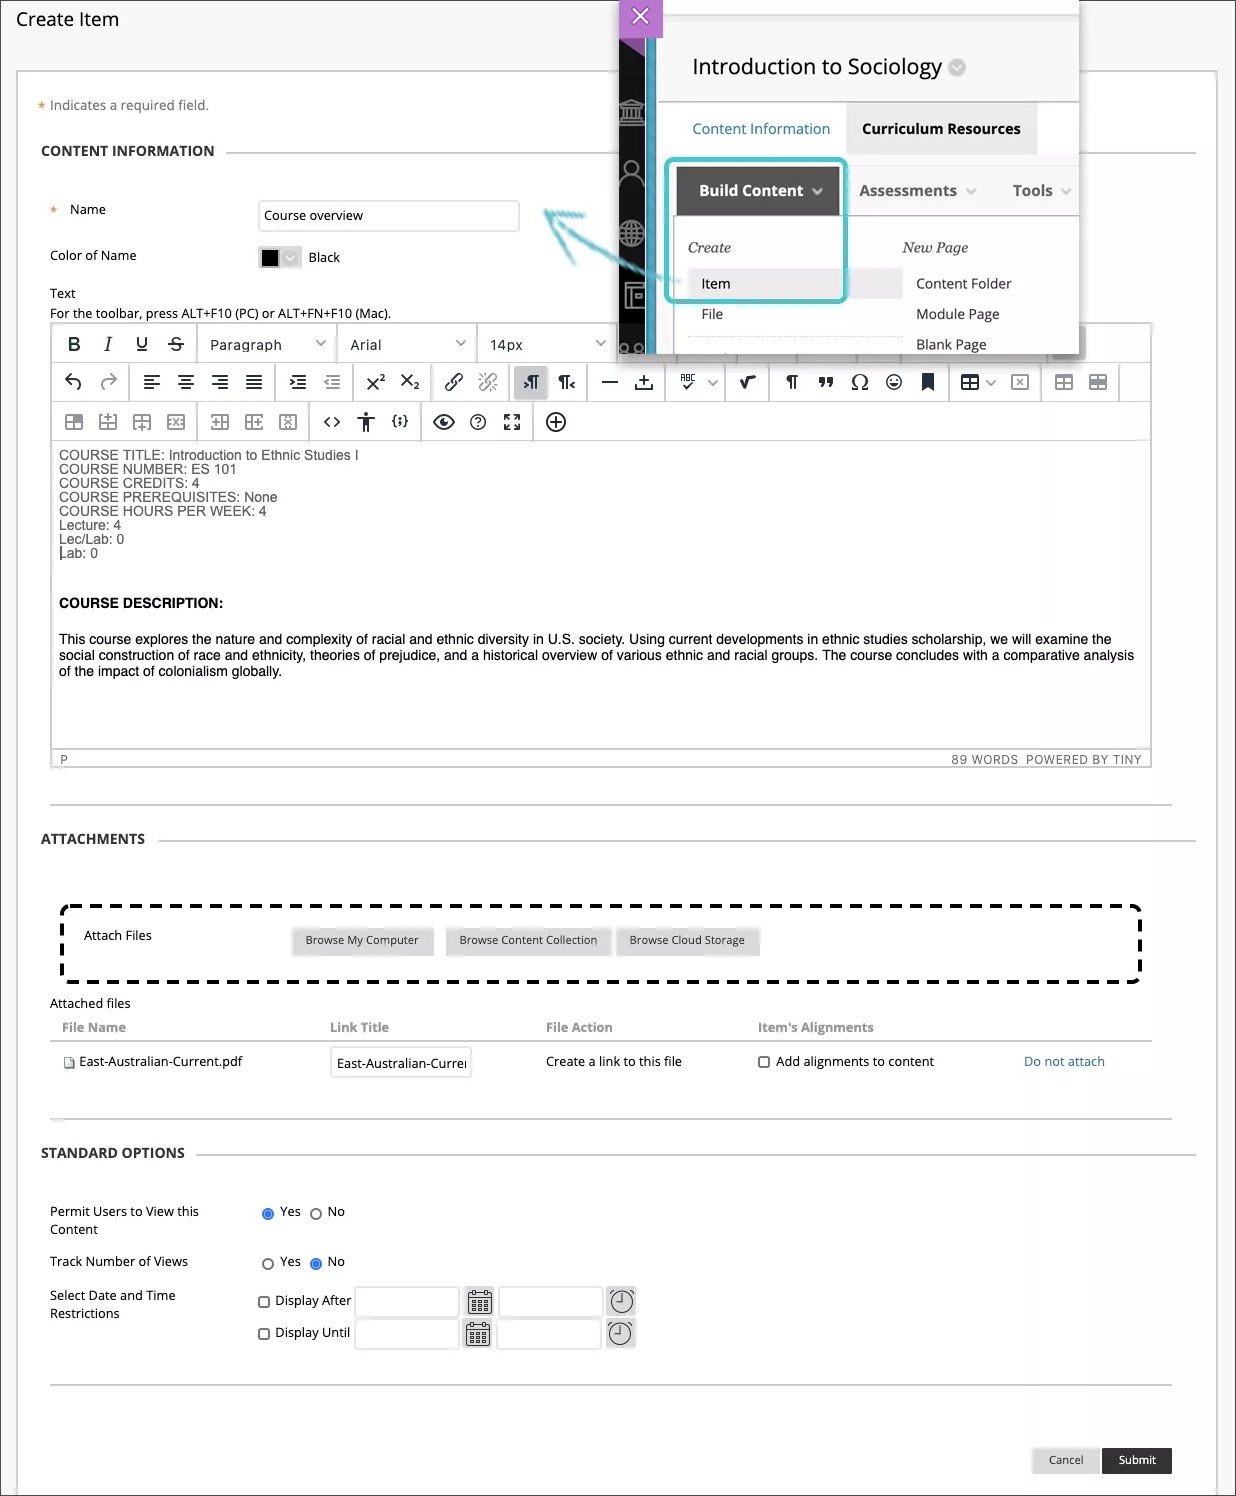
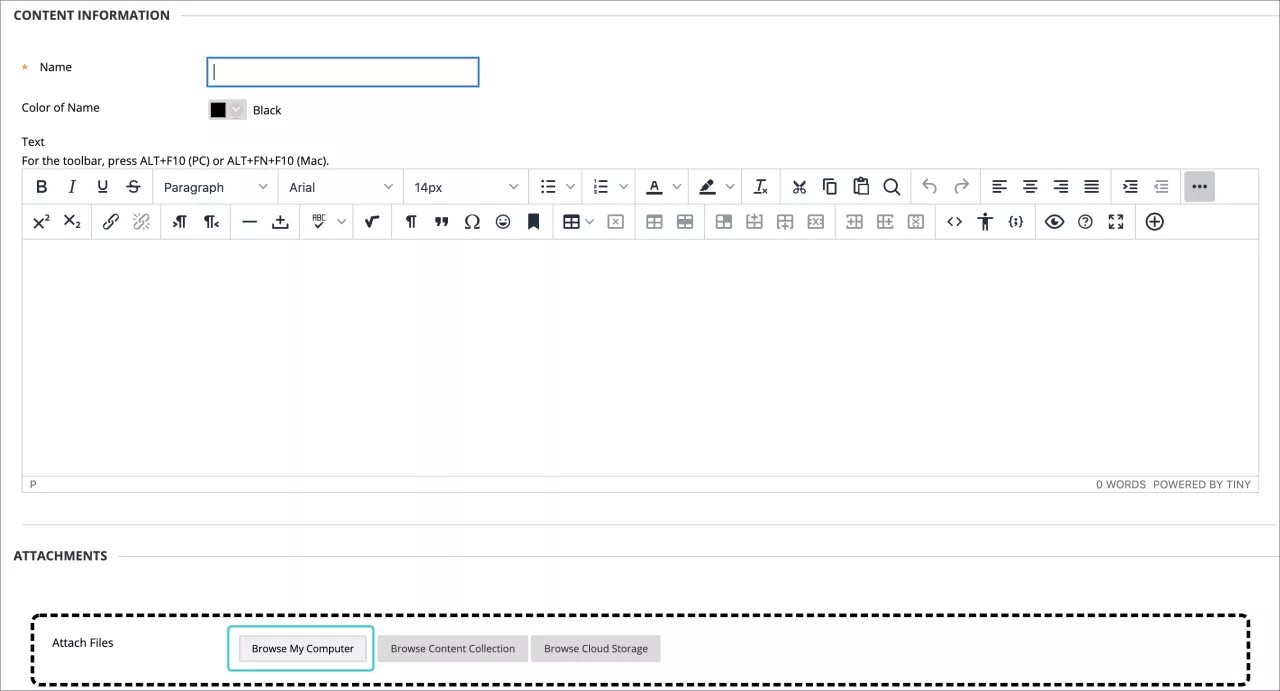
Type a name and an optional description or instructions. You can use the options in the editor to format text, attach files, embed multimedia, and insert equations, links, and tables. You have creative control over how your content appears and the flexibility to change the order and appearance when you want.
In the Attachments section, select Browse My Computer to upload a file from your computer. The file is saved in the top-level folder in your course's file repository: Course Files or the Content Collection. You can also attach a file from the repository.
-OR-
Drag files from your computer to the "hot spot" in the Attach Files area. If your browser allows, you can also drag a folder of files. The files will upload individually. If the browser doesn't allow you to submit your item after you upload a folder, select Do not attach in the folder's row to remove it. You can drag the files individually and submit again.
Note
You won't be able to drag files to upload if your institution uses an older version of Blackboard Learn.
You can use the file name or provide another name for the file.
Select the appropriate options for availability, tracking, and display dates. Display dates don't affect an item's availability, only when it appears.
After you submit, the new content item appears last in the content list.
Note
You can email a link to a file you add to a content item. In the Content Collection or Course Files, access the file's menu and select 360° View. Copy the permanent URL address and paste it in an email.
Choose file download location
In most browsers, you can select where the files that you open in courses are downloaded. For example, in Chrome, navigate to Settings > Advanced > Downloads. You can select the location for file downloads and choose if you want the browser to ask each time. In Safari, you have the same capabilities. Navigate to Preferences > General > File download location. You can perform an internet search to learn about file download choices in other browsers.
Edit and move content items
You can change the item's content at any time. Open the item's menu and select Edit.
You can change where the item appears in the list with the drag-and-drop function or the keyboard accessible reordering tool.

Your content items become documents in the Ultra Course View. You may see some loss of formatting to text and files that you added in the editor. Learn more about Ultra documents in the next sections.
ORIGINAL Link to Content and Tools
You can create a link to an existing area, tool, or item in your course. Provide links next to relevant course materials to create a seamless experience for students.
What is a course link?
A course link is a shortcut to an existing area, tool, or item in a course.
Example: Link to assignments
You can create all assignments in their own content area. Then, you can create course links to individual assignments in other areas of the course, such as in a unit folder or learning module.
If you create a course link to a tool that isn't turned on, students who access the course link see a message that the tool isn't turned on. The same is true of a course link to a content item that you applied release criteria to. For example, if you applied a rule that releases content after a certain date, students can't access the content until after that date.
Create a course link
Tip
Be sure Edit Mode is ON so you can access all of the instructor's options.
In a content area, learning module, lesson plan, or folder, select Build Content to access the menu and select Course Link. On the Create Course Link page, select Browse. In the pop-up window, select the item you want to link to.

The Name and Location boxes are populated automatically. Optionally, edit the name and type a description. You can format the text with the options in the editor.
Select the appropriate options for availability, tracking, and display dates. Display dates don't affect a course link's availability, only when it appears.
After you submit, the course link appears in the content list. You can change the content at any time. Access the course link's menu and select Edit.

You can change where the course link appears in the list with the drag-and-drop function or the keyboard accessible reordering tool.
What is a tool link?
You can provide the relevant tools for a lesson near related content or on the course menu. For example in a content area, you can provide discussion and journal links alongside multimedia, lecture files, and tests.
When you include a link to a tool in a content area, you can describe the tool, provide instructions, and attach necessary files. For example, you can link to a blog, attach a file to read, and explain that students need to post to the blog next week.
Your institution controls which options and tools are available in all Original courses. You can control tool availability in your course on the Control Panel > Customization > Tool Availability.
Create a tool link
You can link to an entire tool, such as the main blogs page, or drill in and choose a specific blog. You can also create a new blog while you create a tool link.
From the Tools menu, you can also select Tools Area so that students can access a list of all available tools in your course.
Tip
Be sure Edit Mode is ON so you can access all of the instructor's options.
In a content area, learning module, lesson plan, or folder, select Tools to access the menu and choose a tool to link to. Select More Tools to show or hide additional tools.

These steps detail how to create a blog link. The steps are similar for other tools.

On the Create Link: Blog page:
Select Link to the Blogs Page to link to the page where all blogs appear.
-OR-
Select Link to a Blog and select a specific blog from the list.
-OR-
Select Create New Blog to add a link to a blog you create at this time. On the Create Blog page, type a name and select settings for the new blog. After you submit, the newly created blog appears in the list of blogs to choose from.
Select Next. On the Create Link page, type a name and an optional description. Select the appropriate options for availability, tracking, and display dates. Display dates don't affect a tool link's availability, only when it appears.
After you submit, the tool link appears in the content list. You can change the content at any time. Access the tool link's menu and select Edit.
ORIGINAL Link to Websites
Create a web link
You can embed a web link so it appears as a standalone piece of content alongside other materials. For example, you can add a link to a website with the required reading you list in the syllabus.
Tip
Be sure Edit Mode is ON so you can access all of the instructor's functions.
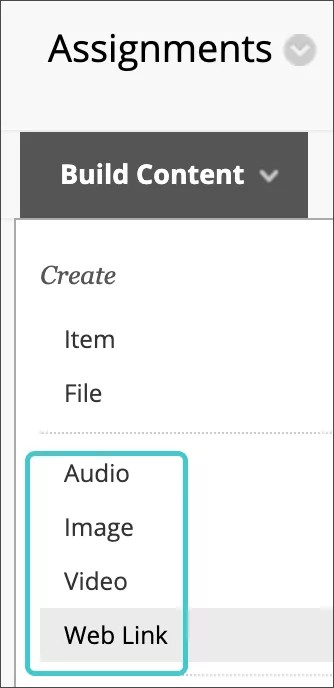
In a content area, learning module, lesson plan, or folder, select Build Content to access the menu and select Web Link.
Type a name and paste or type the URL. Use the http:// protocol, such as http://www.myinstitution.edu/.
Type an optional description. You can use the functions in the editor to embed content in your text and add formatting. You have creative control over how your content appears and the flexibility to change the order and appearance when you want.
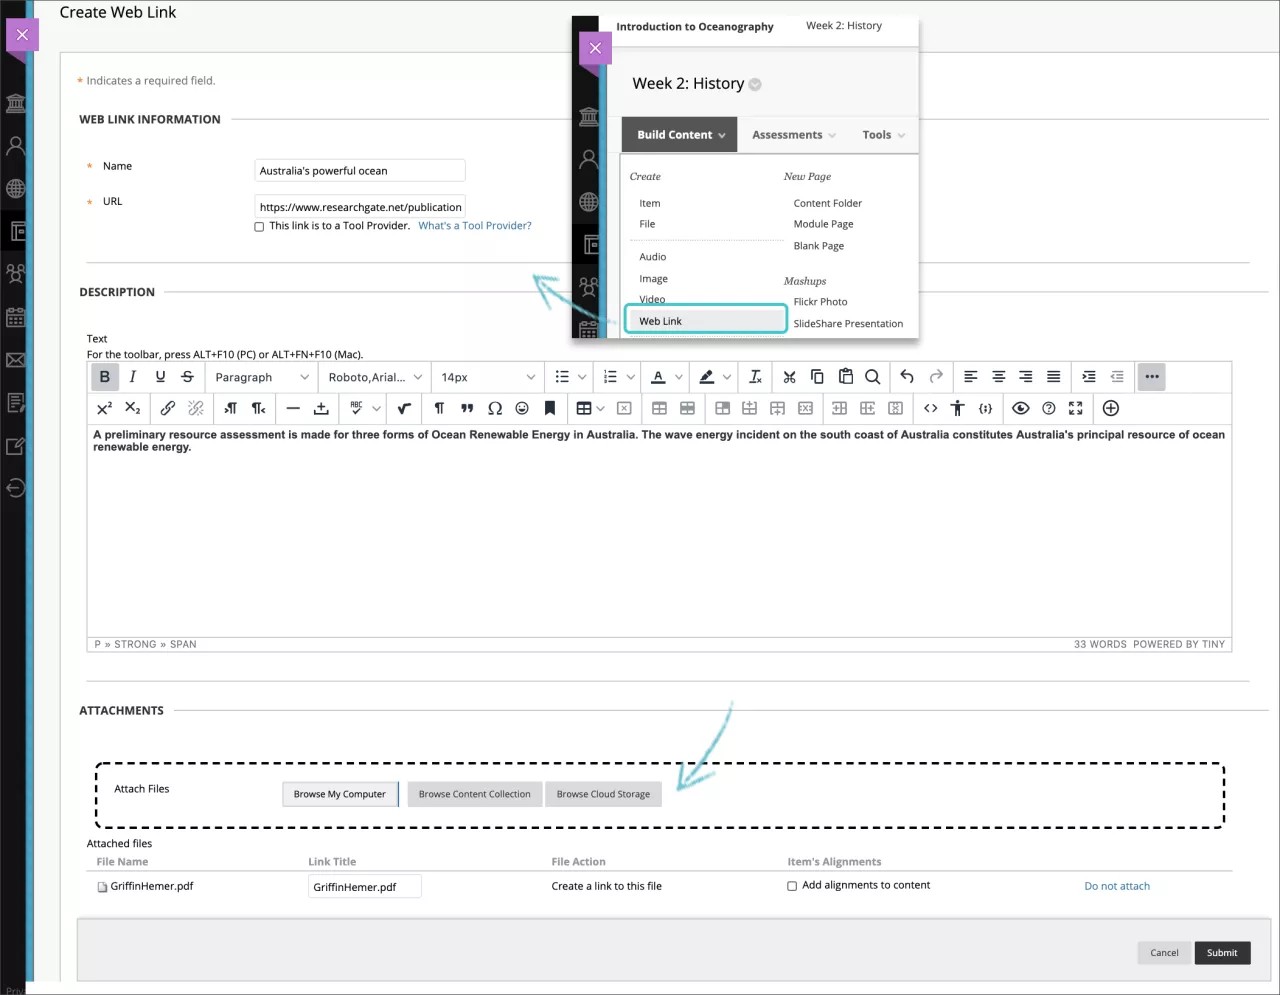
Select Browse My Computer to upload a file from your computer. The file is saved in the top-level folder in your course's file repository: Course Files or the Content Collection. You can also attach a file from the repository.
-OR-
Drag files from your computer to the "hot spot" in the Attach Files area. If your browser allows, you can also drag a folder of files. The files may upload individually. If the browser doesn't allow you to submit the web link after you upload a folder, select Do not attach in the folder's row to remove it. You can drag the files individually and submit again.
Note
You won't be able to drag files to upload if your institution uses an older version of Blackboard.
You can use the file name or provide another name for the file.
Select the appropriate options for availability, tracking, and display dates. Display dates don't affect a web link's availability, only when it appears.
After you submit, the web link appears in the content list. You can change the content at any time. Open the web link's menu and select Edit.
Select the Tool Provider check box if the web link is a third party tool that implements the Learning Tools Interoperability (LTI) protocol. LTI is an initiative managed by the IMS Global Learning Consortium to seamlessly integrate externally hosted web-based learning tools into courses.
For example, if you use external resources that require logins for activities, such as virtual science experiments, create a tool provider web link. Based on the configuration, this link can then pass user information to the tool provider to create a seamless experience for students.
If your institution has already set up the tool provider, paste or type the web address in the URL box. If your institution hasn't performed the setup, and you received a key and secret from the tool provider, add them in the boxes. Provide any custom parameters required by the tool provider. You may also enable grading.
ORIGINAL Math Editor
Math Editor
You can insert math equations and formulas into tests, assignments, discussions, and journals by using the math editor. You can also type LaTeX formulas into any rich text editor where the math editor is an option. The math editor runs on any browser and operating system, including smartphones and tablets. The math editor is written by WIRIS and based on standards set by markup languages like MathML.
Math editor window
You have access to a rich set of features:

Basic operations
Matrix calculus
Calculus and series
Logic and set theory
Units
Greek alphabet
Table of elements
Accessibility features
The accessibility features of the WIRIS editor make mathematics available to all users. The WIRIS editor takes advantage of the accessibility features in web browsers. Users don't have to install additional software to deliver content with accessible formulas.
ORIGINAL Supported File Types
Supported File Types
You can upload file attachments in your course, such as to an assignment. Users select a link to open a file that appears in the course.
After you upload a file, you may be able to edit the link name to the file. This link title appears to users instead of the name of the document. For example, type "My Introduction" as the link title instead of the file name "introduction.doc."
Accepted characters in file names
Blackboard allows the use of all characters in file names. However, a user's operating system and the browser may limit the types of characters accepted. For example, some browsers don't accept characters that are wider. Some browsers may not have the languages installed to display the special alphabetic characters specific to them.
Recognized attachment file types
The system recognizes several file types by default. These files open directly in the browser or an associated application. If the system doesn't recognize the file type, users can download the attached file and open it on their computers.
Extension | File Type | Programs Associated with the File Type |
|---|---|---|
AAM | Multimedia | Macromedia® Authorware® plug-in The AAM file is the starting point for a series of files that must be enclosed in a ZIP file. |
AIFF | Audio | AIFF is an uncompressed audio format. AIFF files tend to be large. |
ASF | Multimedia | Microsoft® .NET™ Show ASF files can contain audio, video, images, and text. |
AU | Audio | Real Audio Player™ |
AVI | Video | Video player - Windows only |
DOC, DOCX | Text | Microsoft® Word - word processor |
EXE | Executable | Executable files are applications. Some network security policies and firewalls might prohibit users from downloading executable files. NoteIf your institution uses a newer version of Blackboard, you may not be able to upload files of this type. Contact your administrator for help. |
GIF | Image | Graphics program or web browser |
HTML, HTM | Web page | HTML editor or web browser |
JPG, JPEG | Image | Graphics program or web browser |
JIF | Image | Graphics program or web browser |
MP3 | Audio | Audio program |
MP4 | Video | Video player |
MPE | Audio/Video | Audio program |
MPG, MPEG | Video | Video player |
MOOV, MOVIE | Movie | QuickTime® movie |
MOV | Video | Movie or media player |
NUMBERS | Spreadsheet | Apple Numbers® |
Text | Adobe® Acrobat® Reader® NoteSee note below table about SafeAssign. | |
PNG | Image | Graphics editor or web browser |
PPT, PPTX, PPS | Slideshow | Microsoft® PowerPoint®, PowerPoint Player® |
QT | Movie | QuickTime® |
RA | Audio | Real Audio Player™ |
RAM | Video | Real Audio Movie™ |
RM | Audio | Audio program |
RTF | Text | Word processor |
SWF | Multimedia | Macromedia® Shockwave® plug-in |
TIFF, TIF | Image | Graphics program or web browser |
TXT | Text | Text or HTML editor, word processor |
WAV | Audio | Audio program |
WMA | Audio | Audio program |
WMF | Graphic | Microsoft® Windows® |
XLS, XLSX | Spreadsheet | Microsoft® Excel® |
ZIP | Compressed package | WinZip® |
Note
SafeAssign can only process PDFs if the PDF contains machine-readable true text. If the PDF was prepared from "Print to PDF" or scanned from an imaging device without external optical character recognition (OCR), such as a scanner or cell phone app, then the PDF contains a bitmap or vector "picture" of text. This is not readable as text and SafeAssign currently does not perform OCR. If you can't select the text with your mouse or keyboard in a PDF reader, then there is no true text in the PDF.
Note
To prevent this issue: make sure to export the document from your word processor using the "Export to PDF" option and avoid the "PDF Printer" option from the print menu. Also, don't use the option to 'outline' fonts sometimes found in advanced applications because it replaces the text with vector graphics of the same shape which aren't machine-readable.
ORIGINAL Types of Course Content
In your Blackboard courses, you can add a variety of content, such as online lectures, multimedia, tests, assignments, and links to websites and social media.
Menus for adding content
Your institution controls which functions and tools are available in all courses. You can control tool availability in your course on the Control Panel > Customization > Tool Availability.
In a content area, learning module, lesson plan, or folder, select one of the menus to view the content types.

Tip
Be sure Edit Mode is ON so that you can access all of the instructor's functions.
This table describes the materials you can add from each menu. Use the information to decide which content type is right for each piece of your content.
Content Type | Description |
|---|---|
Build Content menu | |
Item | You can create an item to present a combination of content. You can use the functions in the editor to format text, attach files, embed multimedia, and insert equations, links, and tables. You have creative control over how your content appears and the flexibility to change the order and appearance when you want. In your course, the materials you add are all presented together in the content list. Students may need to scroll up and down to view the content and the content list. |
File | You can create a link to a file in the content list. You can't add a description with the link, so you want to be sure to use a meaningful title. For example, include "Syllabus" in the title. You can choose whether students view the file as a page within the course or in a separate window or tab. Students need to download some file types such as Word docs to view the contents. This content type saves screen real estate and reduces the amount of scrolling. You can also create an HTML file in your course that students can open in a new browser window or tab. Or, upload a collection of files, including cascading style sheets (CSS) so that students can view them in the prescribed order and with your design. |
Audio Image Video | You can upload multimedia files from your computer or browse the course's file repository: Course Files or the Content Collection. |
Web Link | You can link to an outside website or resource. |
Learning Module | A learning module is a content container that allows students to navigate through the content from a table of contents. You can add all types of content, such as content items, file attachments, links to websites, tests, assignments, and multimedia. |
Lesson Plan | A lesson plan is a content container that holds the content items students need to complete a lesson. You can also add lesson profiles, instructional objectives, required materials, and more. |
Syllabus | You can attach an existing syllabus file or build a course syllabus through a series of steps. |
Course Link | You can create a shortcut to an item, tool, or area in your course for quick access to relevant materials. |
Content Package (SCORM) | You can add web-based learning content called an SCO or Shareable Content Object. These SCOs are gathered together into a compressed, zipped file called a content package. The zipped file can be unpackaged and played through a content player. Typically, individual components or entire packages are provided to you by schools, private companies, or other sources. |
Content Folder | You can organize content in folders and sub-folders. Use folders to reduce scrolling and help students find materials easily. |
Module Page | A module page is a specialized content page that presents content in boxes, such as on a course Home Page. Students can keep track of tasks, tests, assignments, and new content created in the course. You can't add your own content to a module page. The system generates the information in each module. |
Blank Page | You can include files, images, and text together on one page. With the editor, you have creative control over how your content appears and the flexibility to change the order and appearance when you want. Students select the title in the content list to view the content. No description appears with the title, so you want to be sure to use a meaningful title. This content type saves screen real estate and reduces the amount of scrolling. |
Mashups | You can use mashups to browse for and add social media elements from other websites.
|
Assessments menu | |
Test | You can create tests to assess student knowledge. You can add question types, such as Multiple Choice, True/False, Matching, Calculated, and Essay. |
Survey | Surveys are ungraded tests. Use surveys to poll student opinion and conduct class evaluations. Survey results are anonymous. |
Assignment | You can create graded coursework, and manage the grades and feedback for each student or group of students. |
Self and Peer Assessment | You can allow students to review the work of their classmates through criteria-based evaluation and constructive feedback. |
McGraw-Hill Assignment | You can build customized assignments from McGraw-Hill's textbooks and resources. |
Tools menu | |
Links to an individual tool | You can provide links to tools near related content. For example, you can add a file for students to read in a content area. Then, if you want them to respond in discussions, add a tool link in the content area for easy discussion participation. |
Link to the Tools Area | You can provide a list of all available tools. |
Partner Content menu | |
Search for Textbook | You can include information about the textbooks used in your course. The textbook information is also included in the course catalog where prospective students can access this information prior to enrollment. |
Manual Entry Textbook | If your search doesn't return the result you want, you can provide the information needed. |
Content Market | Discover content from third-party providers and publishers to enhance your course without having to build content from scratch. |
ORIGINAL Work with Text
Copy and paste text to prevent loss
While you add text to your course, you can protect against loss of work if an internet connection loss or software error occurs. You can type in an offline simple text editor, such as Notepad or TextEdit, and then copy and paste your work into your course.
Or, before you submit or save, you can copy all of the text you want to add. Select the text and right-click to copy it. You can also use key combinations to copy and paste:
Windows: Ctrl + A to select all the text, Ctrl + C to copy, and Ctrl + V to paste.
Mac: Command + A to select all the text, Command + C to copy, and Command + V to paste.
Can I paste text from Microsoft® Word?
You'll have the best results if you type your text directly in the editor and format it with the available options.
You may see issues when you copy and paste text from a Word document directly into the editor. Your original formatting may not appear as you want. You also may not be able to remove or add formatting after you paste the text into the editor. To avoid the formatting issues, you can remove the formatting and reformat it with the options in the editor.
To remove the Word formatting after you paste the text in the editor, select all the text and select the Remove Formatting icon. Only use this option if you understand that all formatting will be removed. All bullets, numbered lists, indentations, line spacing, centered text, and font formatting and sizing will be removed.

Or, before you add your text in the editor, you can paste it into an offline simple text editor, such as Notepad or TextEdit, and clear the formatting. Then, you can paste the text into the editor and format it as you want.
Add text
The editor appears wherever you can add and format text, such as in assignments, tests, discussions, blogs, and journals.
You can also use the options in the editor to attach files, embed multimedia, and insert equations, links, and tables. You have creative control over how your content appears and the flexibility to change the order and appearance.
The default view is WYSIWYG (What You See Is What You Get). You can select the Source code icon and edit or add code, or the Insert/edit code sample icon.
You can also right-click text to access commonly-used options. The menu changes based on the location of the cursor and whether or not you've selected text.
Note
To use your keyboard to jump to the editor toolbar, press Alt + F10. On a Mac, press Fn + OPT + F10. The focus is placed on the first icon on the left in the top row. Use the right and left arrow keys to move forward and backward. The up and down arrows don't work to navigate to different rows. Use the arrow keys to move to the end of one row and then up or down to the next available row.
Work with lists
In the editor, you can add bullet and number lists to your text.
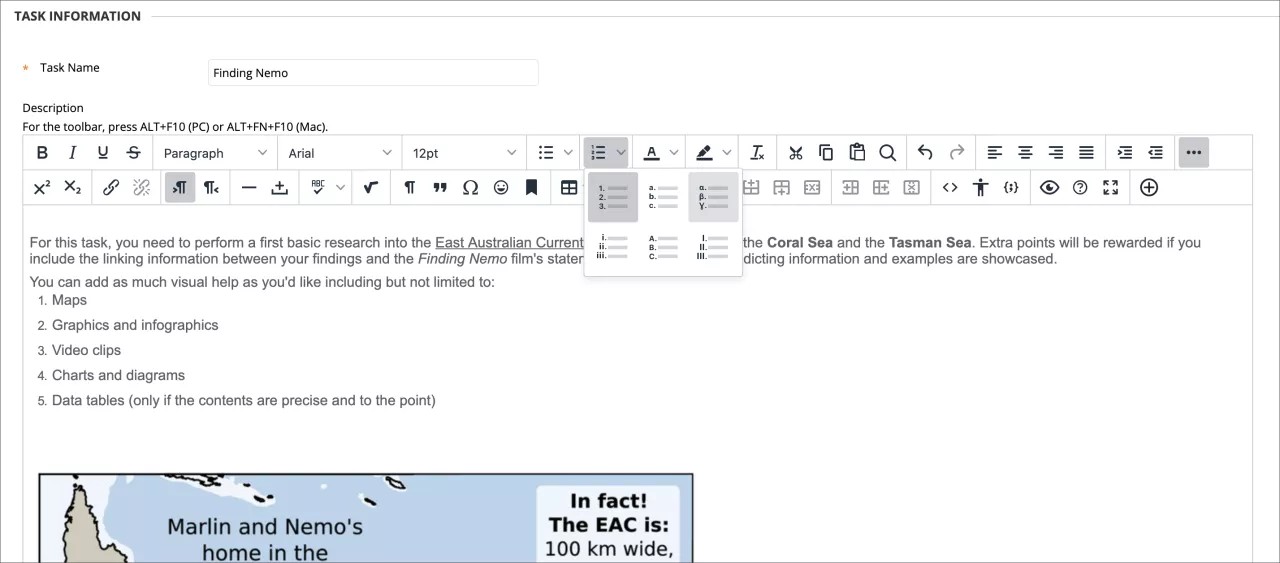
Number List: Choose from the available list options:
Default: Numerals
Alphabetic
Roman numerals
Greek symbols
Bullet List: Choose from filled circle, open circle, or square.
You can adjust spacing between bullet and number items in the Source code view or in the WYSIWYG (What You See Is What You Get) view.
By default, bullet and number lists have the same spacing as lines in a paragraph. Each item in the list uses the <li> tag to create each bulleted or numbered item.

In WYSIWYG view, after you create your list, place your mouse pointer at the end of each bulleted or numbered line and press Shift + Enter. You're adding a line space between each list item. If you continue to press the key combination, additional line spaces are added. In code view, you'll see <br /><br /> for each line space. This code appears inside each bulleted or numbered item's closing tag (</li>).

If you want to control the amount of spacing between list items, you need to work in code view. Select the Source code icon to open the code window. You can add an amount to each list item's tag. For example, where you see <li>, replace each with <li style="margin-bottom: 20px;">. For the 20px, you can add the amount you need. The spacing is added to the bottom of each bulleted or numbered item, creating space between the list items.

Tip
You can adjust paragraph spacing with the same methods.
Insert horizontal lines
You can add lines and horizontal rules to content you add in the content editor.
Select the Horizontal line icon to add a thin horizontal line to the current mouse pointer position, spanning the entire width of the text area.
Check your spelling
Your institution controls if this option is available.
Select the Spell Checker icon to activate the automatic spell checker option. You can change the language's dictionary from the menu. Institutions and instructors can disable spell check. Your institution chooses which spelling dictionaries are loaded in.
When you activate the Spell Checker and there are words to be reviewed, a new window will appear showing you one by one every potentially misspelled word or any word that has not been found in the loaded dictionary. You will see them also in the text area background as wavy, red underlined. You will have the option to change the word for one of the suggested alternatives, ignore, ignore all or close the Spell Checker window.
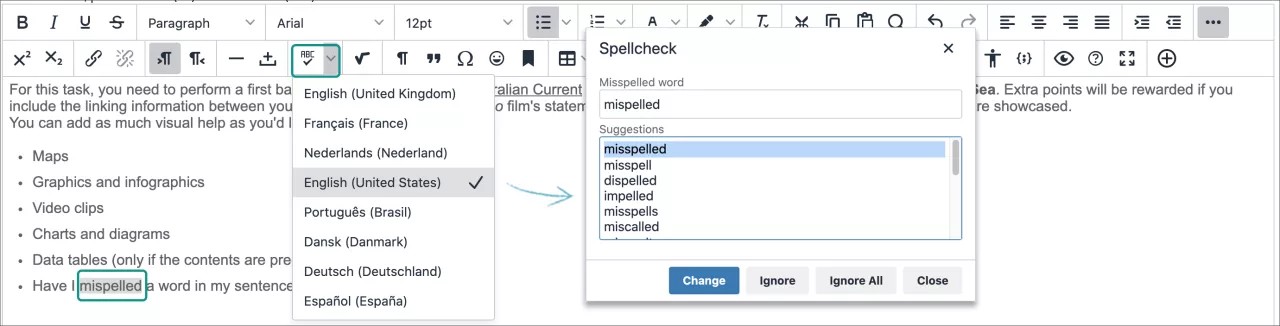
If you choose to change it, select one of the suggested alternatives from the list and select change. The Spell Checker will present you with the next word to review. When it checks them all, the Spell Checker window will close.
If there are no words to review, the Spell Checker will show you the message No misspellings found.
Add links
You can specify a link to a website, a file from your computer, or the course's file repository, such as the Content Collection if your institution has access to it.
Select text or an object, and select the Insert/Edit Link icon to add a new link or edit an existing link. To remove a link, select the link and select the Remove Link icon. You can also link and remove links with the right-click menu. You must use the http:// protocol when you type or paste an address for the link.
Note
Unless you select text or an object, the Insert/Edit Link and Remove Link icons are grayed out and unavailable.
In the Open link menu, choose where to open the link, such as in a new window. You can also type an optional title for the window or frame displayed when users select the link.
Find and replace text
Select the Find icon to search for matching text and, optionally, replace it with other text.
In the pop-up window, type the text to find in the Find box.
The gear settings icon allows you to choose between three finding options: Match Case to match upper and lower case, Find whole words only and Find in selection. If the text is located, it will appear highlighted within the text box.
Select Find to locate all matches in the text, which will appear highlighted automatically, or the right upper corner X to close the window.
In the Replace with box, type the text to replace the located text with and choose an action:
Replace: Replace the next instance found.
Replace All: Replace every matched instance.
You can also select the Find button to search with no replacements.
ORIGINAL Editor Keyboard Shortcuts
Editor toolbar keyboard shortcuts
The editor supports keyboard shortcuts for Windows and Macs.
To use your keyboard to jump to the editor toolbar, press Alt + F10. On a Mac, press Fn + OPT + F10. The focus is placed on the first icon on the left in the top row. Use the right and left arrow keys to move forward and backward. The up and down arrows don't work to navigate to different rows. Use the arrow keys to move to the end of one row and then up or down to the next available row.
To select an icon on the toolbar, press Enter. You're placed back in the editing window.
To go back to the toolbar, use the same keyboard shortcuts: Alt + F10 or Fn + OPT + F10 (Mac). The focus lands on the last icon you accessed.
Use the Tab key to leave the editor and move to the next field on the page.
Use Shift + Tab to leave the editor and move to the previous field on the page.
Note
If you use the shortcut keys that move selected items one character left, right, up, or down, the object is absolutely positioned. "Absolutely positioned" is determined by pixels. When you move an object up once, it moves up one pixel.
Editor text box shortcuts
Blackboard's editor is based on the TinyMCE editor. You can find pages describing their complete list of Keyboard shortcuts and Accessibility keyboard shortcuts (compatible with screen readers such as JAWS and NVDA) on their website.
The only custom addition made to the editor, the Add content button at the end of the second row of commands, has no shortcut attached to it.
ORIGINAL What Does the Editor Do?
With the editor, you can add and format text, attach files, embed multimedia, and insert equations, links, and tables. Use the options in the editor when you work in assignments, tests, discussions, journals, blogs, wikis, and more.
Note
To use your keyboard to jump to the editor toolbar, press Alt + F10. On a Mac, press Fn + OPT + F10. The focus is placed on the first icon on the left in the top row. Use the right and left arrow keys to move forward and backward. The up and down arrows don't work to navigate to different rows. Use the arrow keys to move to the end of one row and then up or down to the next available row.
Tip
Doesn't seem familiar? Jump to the "Ultra" help about options in the editor.
Each editor option is represented by an icon. Some options include a menu of options.
Select the three-doted More icon, at the right end of the first row, to show only the most used text options. Some options appear in different rows when you expand or collapse the editor rows.

Unavailable options appear grayed out. For example, the Remove Link option is available only after you select text or an object that already contains a link in the text box. The options for modifying t a table will become active only when a table is created and selected.
Institutions and instructors can disable the spell checker and the math editor options.
Options | Description |
|---|---|
 | Bold or remove this style on the selected text. |
 | Italicize or remove this style on the selected text. |
 | Underline or remove this style on the selected text. |
 | Strikethrough: Display text with a horizontal line through the letters. |
 | Select a paragraph style for the text from the list. |
 | Select the font face for the text from the list of all available fonts. |
 | Select the size of the text from a list. |
 | Create a bullet list. |
 | Create a numbered list. |
 | Select the text color from the color swatch box. |
 | Select the text highlight color. The color appears as a background. |
 | Remove all formatting so that only plain text appears. |
 | Cut the selected items. |
 | Copy the selected items. |
 | Paste the most recently copied or cut items. |
 | Search for and replace text. |
 | Undo the previous action. |
 | Redo the previous action-only if an action has been undone. |
 | Align text to the left margin. |
 | Align text in the center. |
 | Align text to the right. |
 | Align text to both the left and right margins. |
 | Increase indent: Move the text or object to the right. Select again to indent further. |
 | Decrease indent (Outdent): Move the text or object to the left. Select again to outdent further. You can't outdent text beyond the left margin. |
 | Expand the editor options: Shows more or less options, depending on the current state of the editor panel. |
Options | Description |
|---|---|
 | Superscript: Make the selected text appear slightly above your regular text or remove this style on the selected text. |
 | Subscript: Make the selected text appear slightly below your regular text or remove this style on the selected text. |
 | Select text or an object, and select the Insert/Edit Link icon to add a new link or edit an existing link. You can specify a link to a website, a file from your computer, or the course's file repository, such as the Content Collection. |
 | Remove a hyperlink from the selected text or object. |
 | Add text to the left of the current mouse pointer location. |
 | Add text to the right of the current mouse pointer location (default). |
 | Add a thin horizontal line to the current mouse pointer position, which spans the entire width of the text area. |
 | Insert a non-breaking space character at the current mouse pointer position. |
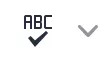 | Begin the automatic spell checker. You can select a different language from the list. |
 | Open the visual math equation editor page. |
 | Show all nonprinting characters. Select the icon again to hide them from view. |
 | Format the text as a block quote. |
 | Open the Select Special Character window. Select a symbol to insert at the current mouse pointer position. |
 | Open the Insert Emoticon window. Select the emoticon to insert at the current mouse pointer position. |
 | Use anchors to position other items and objects, such as images. Position the mouse pointer where you want the anchor to appear and open the Insert/Edit Anchor window. |
| Open the Insert/Edit Table window. If you select the icon while inside a table, a new table is created inside the first one. |
Delete the table currently selected. | |
Open the Table Properties window. | |
| Open the Table Row Properties window. |
| Open the Table Cell Properties window. |
| Insert a blank row in the table above the current mouse pointer position. |
| Insert a blank row in the table after the current mouse pointer position. |
| Delete the current row from the table. If you select multiple rows, all are deleted. |
| Insert a blank column in the table to the left of the current mouse pointer position. |
| Insert a blank column in the table to the right of the current mouse pointer position. |
| Delete the current column from the table. If you select multiple columns, all are deleted. |
 | Open the Source code window to directly edit the code. This feature is included for experienced web developers. |
Open the Accessibility checker window: show detected accessibility issues. | |
Insert / edit code sample: insert code from various programming languages, including HTML/XML, JavaScript, CSS, PHP, Ruby, Python, Java, C, C# and C++. This feature is included for experienced web developers. | |
 | Open a preview window to view how your content will appear when you submit. |
 | Open the editor help window. |
 | Expand the editor window to fill the browser window. |
Add content: add and insert different types of content including content from the Content Collection, Blackboard Collaborate, Digication, Flickr, SlideShares and YouTube. |
The editor appears in most places you can add text. You can use the editor to add and format text, embed images, attach files, and insert equations, links, and tables.
Tip
If you view the editor on a smaller screen, select the plus icon or the icons with arrows to view their dropdown menu or their second row options.
Use the options in the editor when you work in assignments, tests, discussions, messages, conversations, journals, and more.

When you open the editor on a smaller screen, the options condense into menus or second line menus that will remain open until you select the menu again or select a different option menu, for easy access:
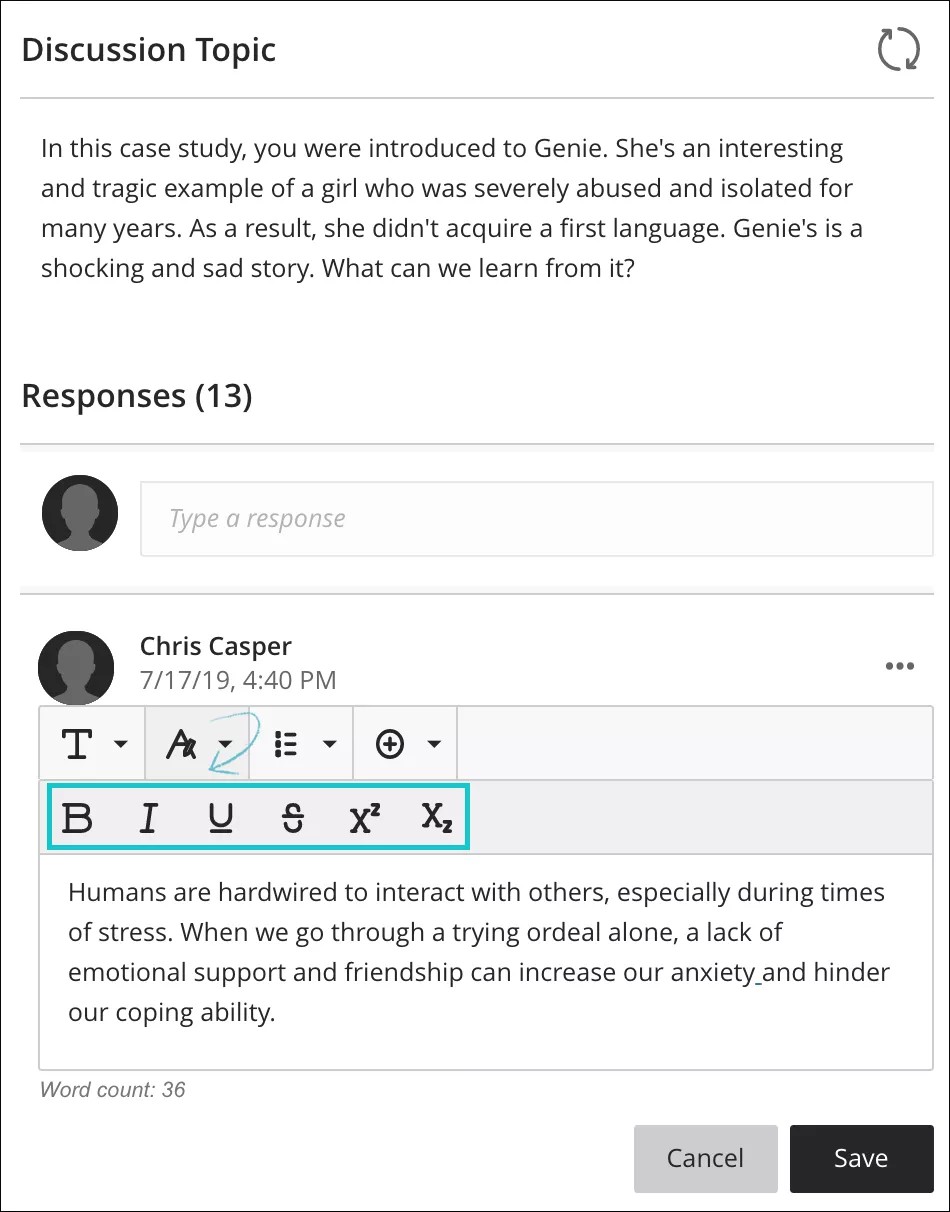
Note
To use your keyboard to jump to the editor toolbar, press Alt + F10. On a Mac, press Fn + ALT + F10. The focus is placed on the first icon on the left in the top row. Use the right and left arrow keys to move forward and backward. The up and down arrows don't work to navigate to different rows. Use the arrow keys to move to the end of one row and then up or down to the next available row.
Each editor option is represented by an icon. Some options include a menu of options.
Icons | Options | Description |
|---|---|---|
 | Text style menu: Title Header Subheader Paragraph | Select a preformatted paragraph style from the list for the selected text. |
 | Font Style | Font type can be chosen between: Arial, Comic Sans MS, Courier New, Noto, Open Sans, Times New Roman and, Verdana. |
 | Font Size | Font size, it defaults to a specific chosen font type. |
 | Color Picker (Font color) | Font color can be chosen between: black (default), grey, purple, blue, green and, red. |
 | Bold | Bold or remove this style on the selected text. |
 | Italic | Italicize or remove this style on the selected text. |
 | Underline | Underline or remove this style on the selected text. |
 | Text options menu | The text options selector will open a second line menu with the options for: superscript, subscript and, strikethrough text to choose from. |
 | Format style: Strikethrough | Display text with a horizontal line through the letters. |
 | Format style: Superscript | Make the selected text appear slightly above your regular text or remove this style on the selected text. |
 | Format style: Subscript | Make the selected text appear slightly below your regular text or remove this style on the selected text. |
 | Alignment Options | The text options selector will open a dropdown menu with the options for: left-align, center, right-align and justify text to choose from. |
 | Left Align | Left-align for text. |
 | Center | Center alignment for text. |
 | Right Align | Right-align for text. |
 | Justify | Justified alignment for text. |
 | List options menu | The list options selector will open a second line menu with the options for: numbered and bulleted lists to choose from. Also includes the line height space selector option. |
 | List style: Bulleted List | Create a bulleted list. |
 | List style: Numbered List | Create a numbered list. |
 | Line height options menu | The line heigh options selector will open a dropdown menu with the options for: Single, 1.15, 1.5 and Double space options to choose from. |
 | Insert/Edit Math Formula | Open the visual math equation editor page or edit the selected equation. |
 | Undo | Undoes the last action performed. |
 | Clear Format | Clears the existing format in any selected section of text. |
 | Insert/Edit Link | Add or edit a URL link to a website, page, or file. |
 | Insert Local Files | Upload a file from your computer or device to embed in the editor. You can display it as a file attachment or inline with other text, if the browser allows. |
 | Insert Content menu | The content selector will allow you to choose from insert or edit: images from web, media from web, YouTube™ videos, Cloud Storage content and, LTI items. |
 | Insert/Edit Image from Web | Embed an image in the text box or edit an existing selected image. You can add images from a URL. |
 | Insert/Edit Media from Web | Add or edit a URL for a video from a YouTube™ or Vimeo™ channel, embed enterprise Office365 files. |
 | Insert YouTube Video | Browse and add content hosted on the external content provider YouTube. |
 | Insert from Cloud Storage | Browse and add content from your cloud storage accounts. |
 | Insert/Edit LTI Item | You can add files or tools your institution allows from the Content Market. |
 | Insert/Edit Recording | Record and insert a file with your device camera and microphone. NoteAvailable for instructors only in the Feedback area of assessments. Your institution controls which tools are available. |