Create or Generate Rubrics
Create rubrics
Go to the Course Rubrics page. You can access it in two ways:
From Gradebook Settings, select Manage Course Rubrics in the Course Rubrics section.
From Assignment Settings, select Add Rubric in the Grading & Submissions section.
When accessing the Course Rubrics page from Assignment Settings, select the radio button next to a rubric and select Save & Close to add it to the assignment. Once a rubric is added to an assignment, you can select the trash can icon to remove it.
Only one rubric can be associated with an item.
On the Course Rubrics screen, select Create.
Enter a name for the rubric. Titles are limited to 255 characters. If you don't add a title, "New Rubric" and the date appear as the title.
Select the rubric type.
Hover over the column headers or cells to prompt the edit icon.
Select the edit icon to edit your rubric.
Select Save.
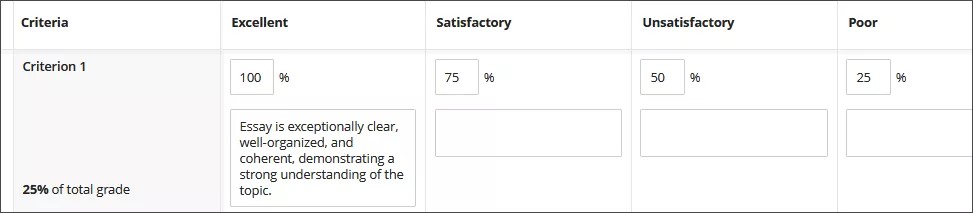
By default, four criteria rows and four achievement level columns appear. You can add, delete, and rename the rows and columns. Hover over a cell to access the edit and delete icons. Select the plus sign wherever you want to add a row or column and type a title. If you don't want the new row or column, you can delete it.
When you add an achievement level, a percentage is automatically added. For example, if you add an achievement level between two levels listed at 100% and 75%, your new level is assigned 88%. You can adjust the percentages as needed. Select anywhere on the rubric to save your changes.
For new and existing levels of achievement, you can add an optional description. Achievement titles have a 40 character limit. Criteria and description cells have a 1,000 character limit. Rubrics support plain text only. You can paste text from another document, but the formatting doesn't carry over.
Important
When you press the Enter key, a new paragraph isn't started in a cell. The Enter key confirms you're finished. Your work is saved and you leave edit mode.
You can align goals with rubrics criteria if you want to measure achievement against goals set by your institution. Select Align with goals to get started. Students can't see the goals you align with criteria in a rubric.
Note
Rubric columns range from highest to lowest scores. You can't change this order.
Generate rubrics
If your institution has turned on the AI Design Assistant feature, you can generate a rubric.
Go to the Course Rubrics page. You can access it in two ways:
From Gradebook Settings, select Manage Course Rubrics in the Course Rubrics section.
From Assignment Settings, select Add Rubric in the Grading & Submissions section.
When accessing the Course Rubrics page from Assignment Settings, select the radio button next to a rubric and select Save & Close to add it to the assignment. Once a rubric is added to an assignment, you can select the trash can icon to remove it.
Only one rubric can be associated with an item.
Enter a description to narrow the focus of the rubric.
Select the rubric type: percentage, percentage range, points, point range, or no points.
Adjust the complexity of the rubric.
Define the number of columns and rows.
Optional: Select Advanced options to change the output language.
Select Generate.
Review each cell of the rubric for accuracy. Edit as needed.
Select Continue to save the rubric.
Watch a video about creating rubrics
The following narrated video provides a visual and auditory representation of some of the information included on this page. For a detailed description of what is portrayed in the video, open the video on Vimeo.