Create Video Studio Recordings
Video Studio is an audio/video tool that allows you to create a more engaging learning experience for students. You can record or upload audio and video content directly within your course, including on the Course Content page, in Documents, Discussions, Announcements, and other supported areas.
Video Studio requires a separate license to use the tool to its full capabilities but is available within Announcements and instructor feedback for submitted assignments and tests without a license. To learn whether you have access, contact your Blackboard LMS administrator.
This topic covers everything you need to get started with creating Video Studio content, from technical specifications to recording options, knowledge checks, and immersive 360° video experiences.
Specifications
For the best experience using Video Studio, follow these specifications:
Recording duration: Videos recorded directly with Video Studio have a maximum duration of 20 minutes. However, there is no length limit for videos uploaded from other sources.
Note
Beginning with the July 2026 release, Video Studio recording times are extended:
Premium (Video Studio): Students and instructors can record videos up to 30 minutes
Core (Blackboard LMS): Instructors can record videos up to 10 minutes
Streaming quality: The player supports both HD (1080p, 8Mbps) and SD (480p, 1Mbps) streaming. It utilizes adaptive streaming technology to automatically adjust video quality based on the viewer’s internet speed, ensuring smooth playback with the best possible quality.
Upload file size limit: The maximum upload size for videos is 10GB.
Supported file formats: The player recognizes a wide range of file extensions, including:
Video: .mp4, .mov, .avi, .mkv, .wmv, .flv, .webm, .3gp, .m4v, .mpg, .mpeg, .m2v, .ts
Audio: .mp3, .m4a, .wav, .ogg, .flac, .opus, .weba, .aac
Add a recording
Video Studio is available for the Course Content page, in Discussion topics, and within Documents. You can create audio and video files from a camera, audio recording, or from screen recordings. You can also upload audio and video files. Video Studio also has the capability to upload 360° videos that can pan to the left or right. For information about creating documents, visit our Create Documents Help page.
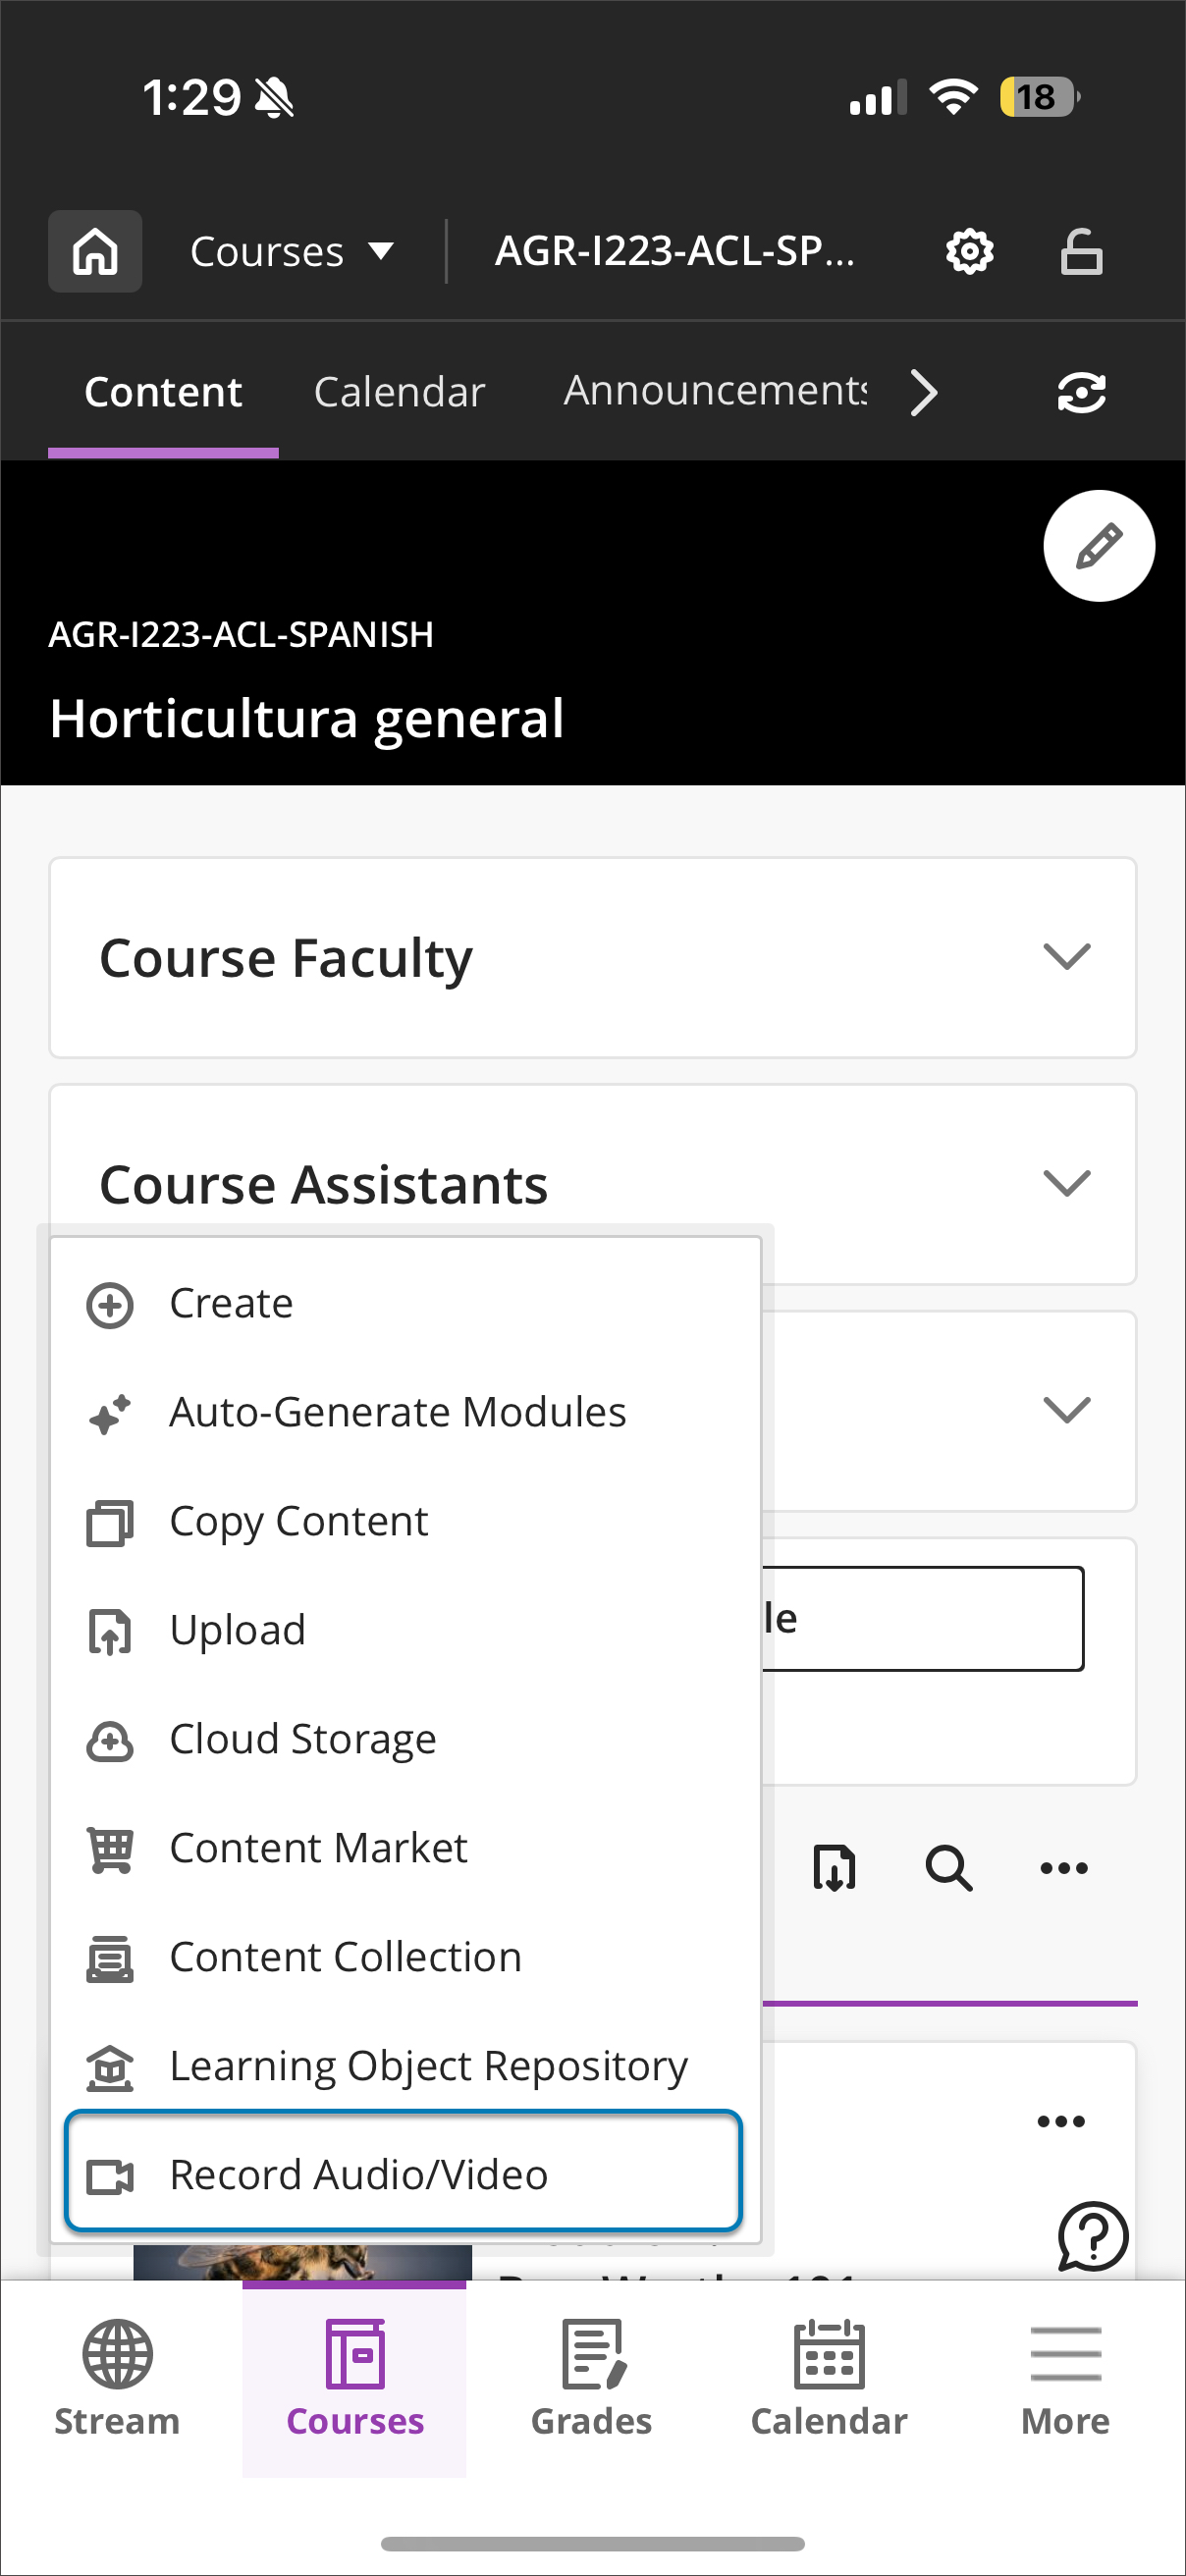
On the Course Content page. Select + where you would like to add content. Then select Record Audio/Video.
Enhanced Document. In a created document, in the options for Select a type of content to add a block, select Audio/Video.
In an Audio/Video content block, options include:
Camera
Audio
Screen
Audio & Screen
Upload from device
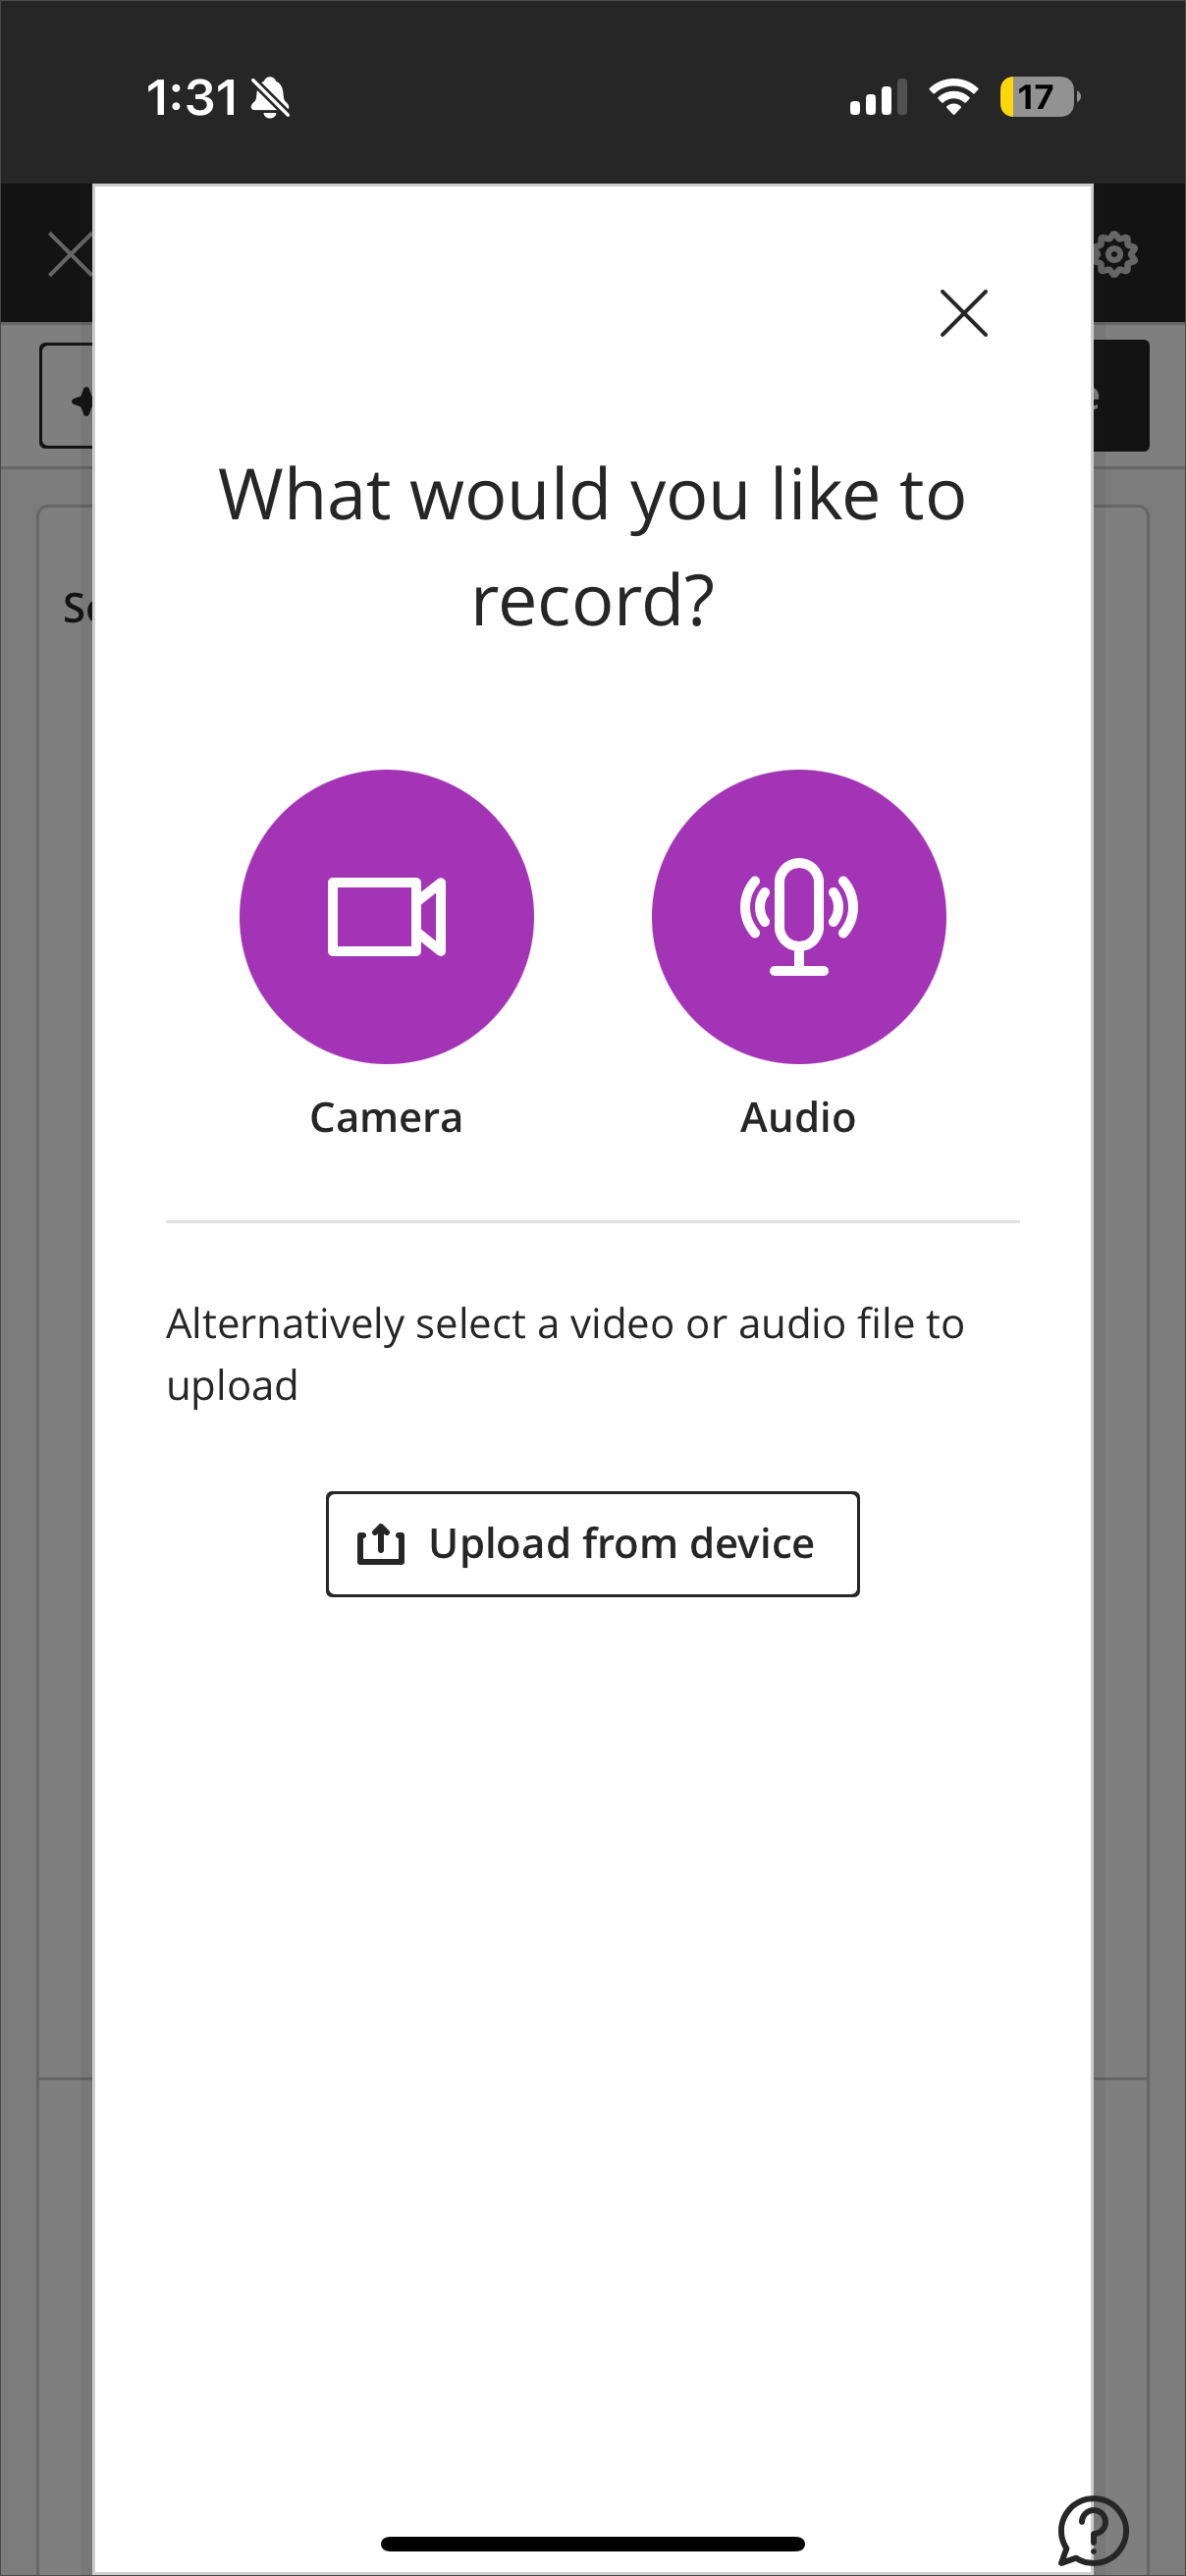
You can select the device used to record video and audio. By selecting the dropdown menu options for camera, mic, and screen, you can choose from any connected devices on your computer.
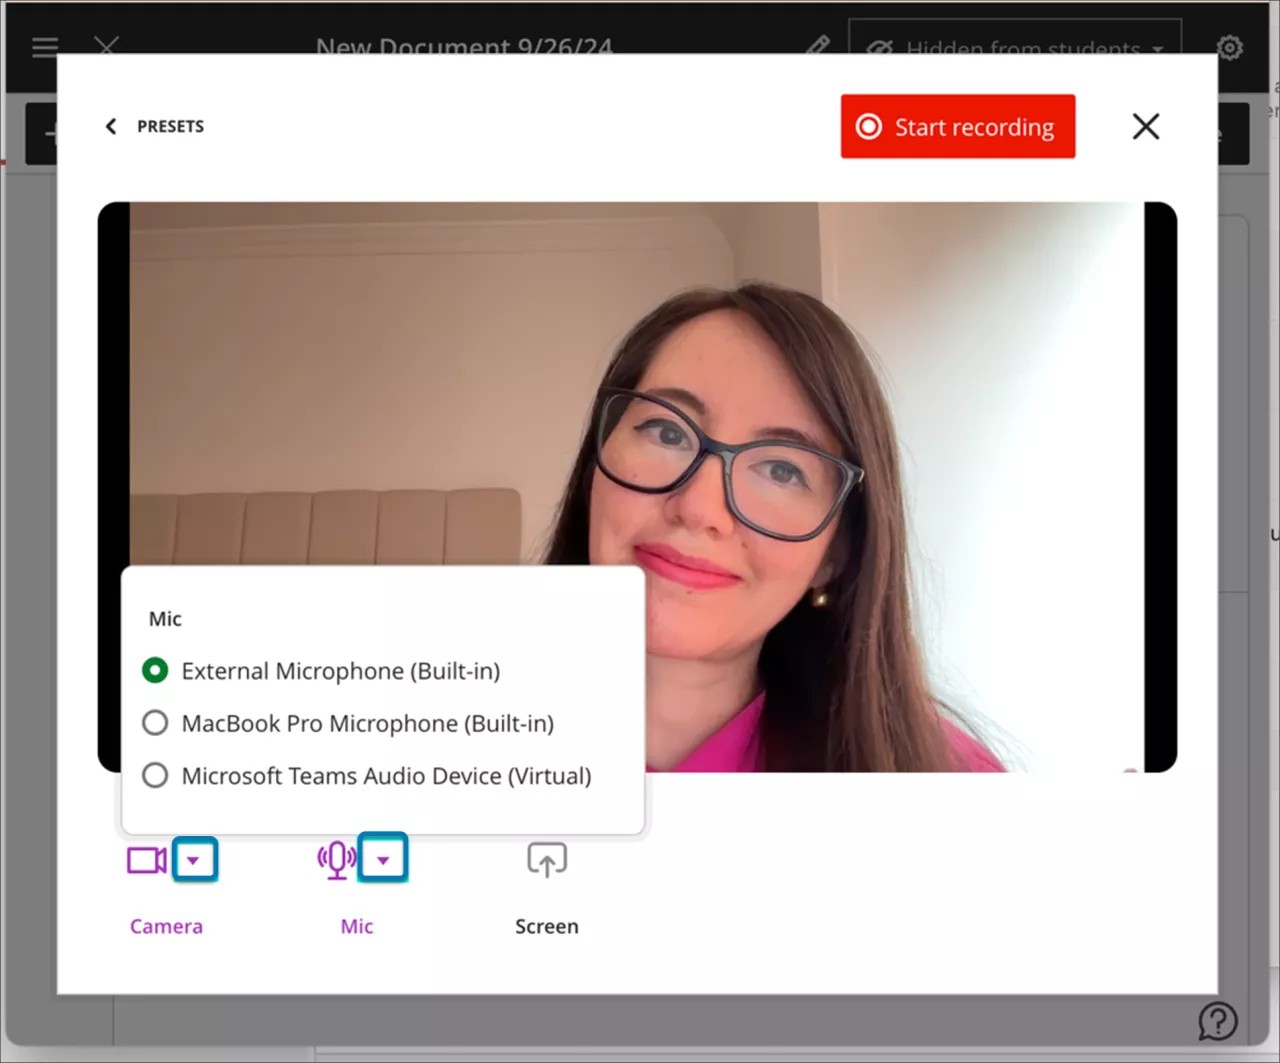
If you are creating a recording, select Start Recording. There is a three second countdown before recording begins. You can pause, resume, retake, or end the recording as needed.
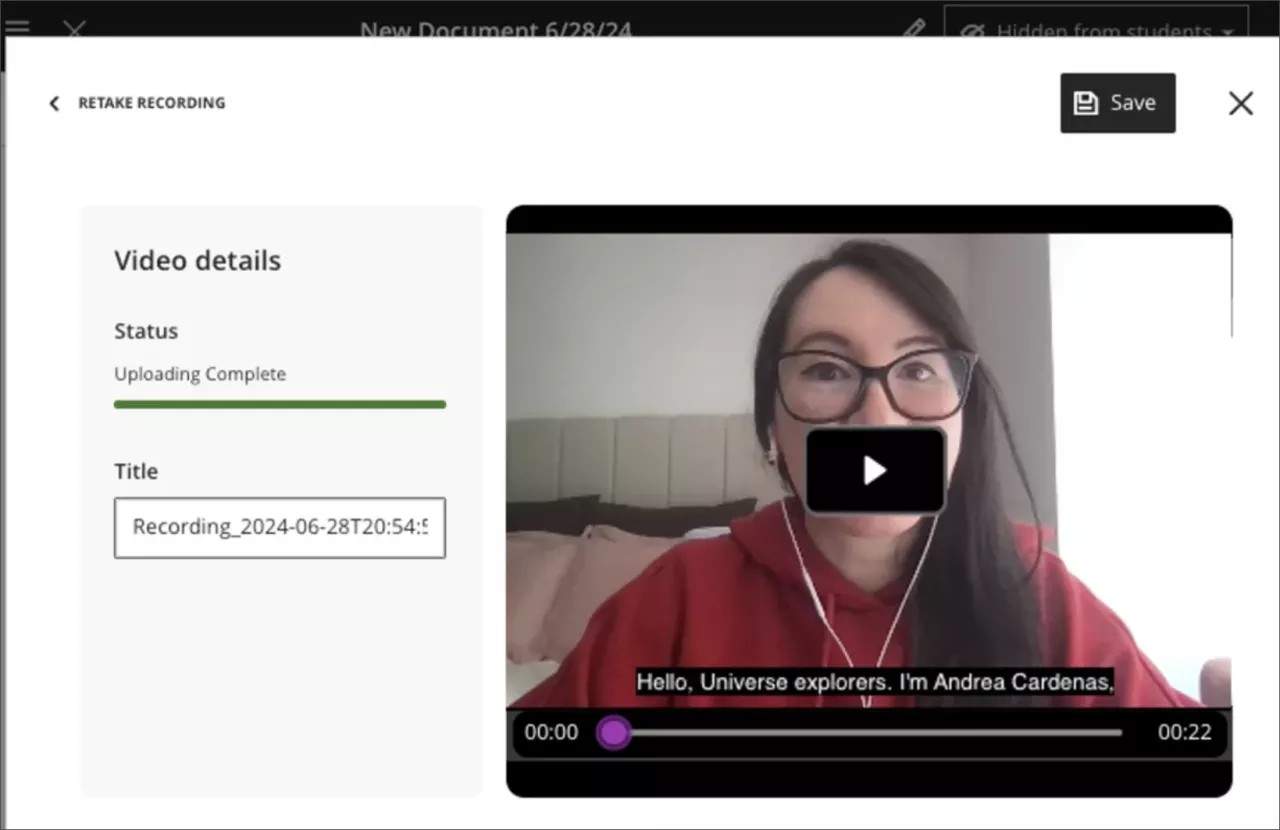
After you end the recording, the uploading process begins. During this time, you can preview the result, edit the title, and add a description. Select Save to add the audio or video into the document. You can edit descriptions for existing recordings as well by opening the settings of a recording, selecting Edit Video, and then selecting Details on the Edit page. There you can find the description to edit.
You can edit the title of a recording or uploaded file after it is saved to the document. Select the pencil button from the top left of the video block.
After selecting the pencil button, the previously uploaded video displays in the Upload Video screen. You can edit your title.

Customize your recording background
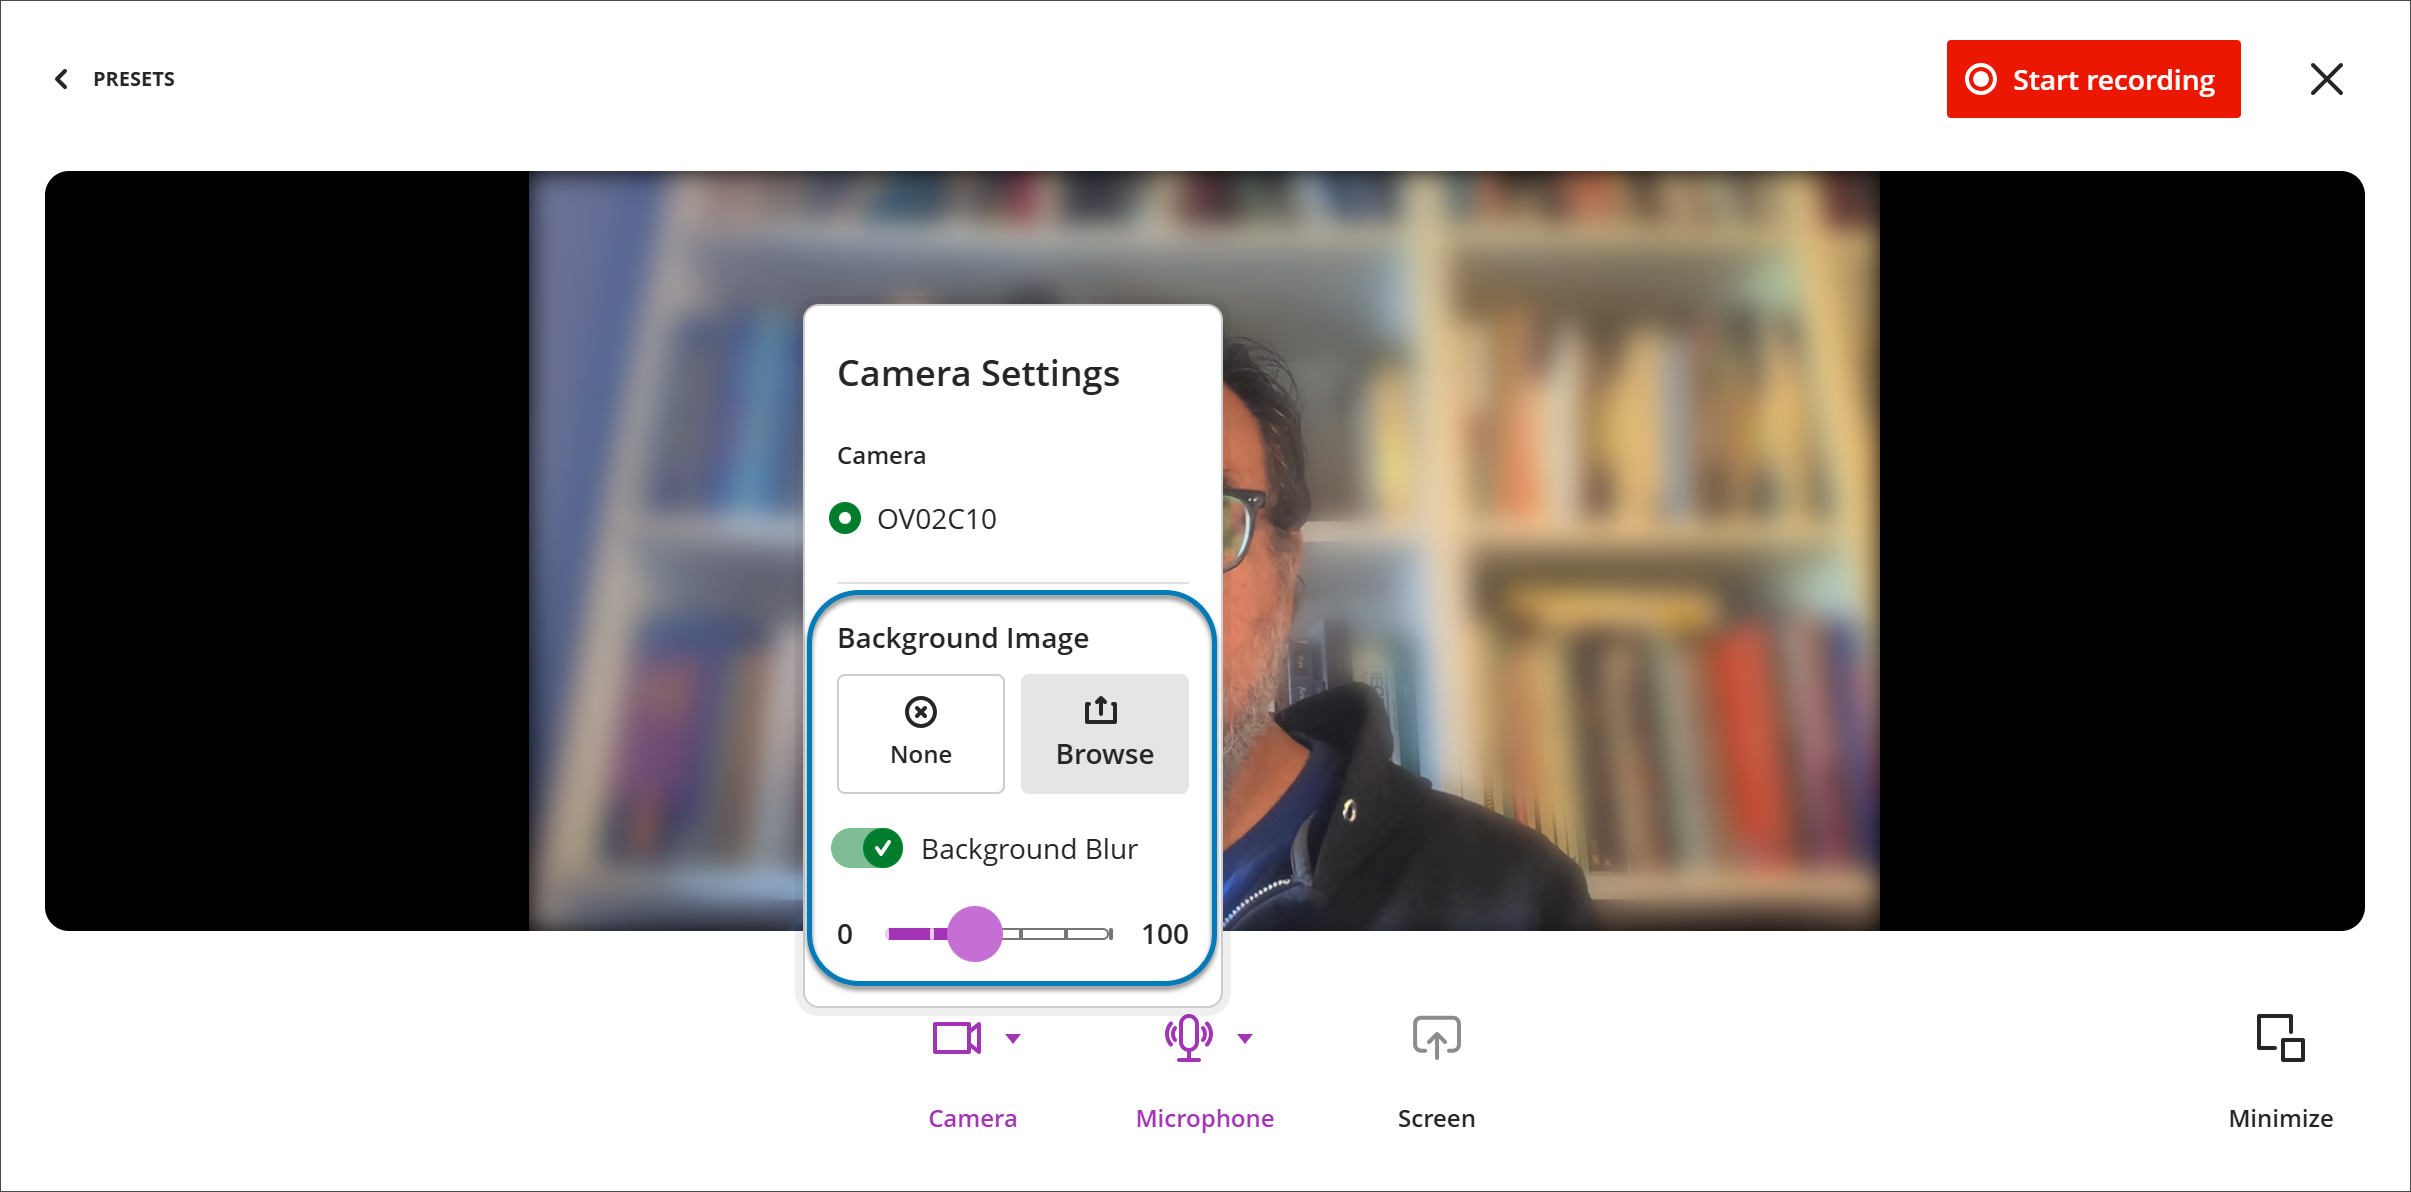
You can customize their background when recording in Video Studio. When setting up a recording, open the camera options to choose how your background appears. You can:
Blur your background. Turn on the background blur switch to soften your surroundings, similar to background blur in other video tools.
Use a background image. Upload an image from your device (such as JPEG or PNG). A real-time preview shows how it will look before you start recording.
When creating a recording, select Camera Settings and, under Background Images, select Background Blur or Browse to upload a background image.
You can use blur or a background image, but not both at once—selecting one replaces the other. Select None to return to your unmodified camera feed. You can change your background at any time before recording begins.
Record Videos on Blackboard LMS App
You can record Video Studio videos directly from the Blackboard LMS App. Using your device's camera and microphone, you can add video content to several course areas without switching to a desktop:
Course Content page
Documents
Areas using the Content Editor, such as Discussions, Tests, and Assignments.
The recording workflow is the same as for Blackboard LMS on the desktop:
Course Content page
Select the plus button (+) where you would like to add content.
Select Record Audio/Video from the dropdown menu.
Documents
Create a document where you want to record with Video Studio
Select Audio/Video under Select a type of content to add a block.
You can record video, audio, or upload a file.
Minimize Video Studio workflow
Users can now minimize the camera view and Video Studio controls during a recording session. This update helps instructors and students focus on screen content while keeping the camera visible in a smaller overlay. The minimized view can be restored at any time, supporting flexible presentation styles.
When creating a recording, select Minimize at the bottom corner of the recording screen to minimize Video Studio workflow.
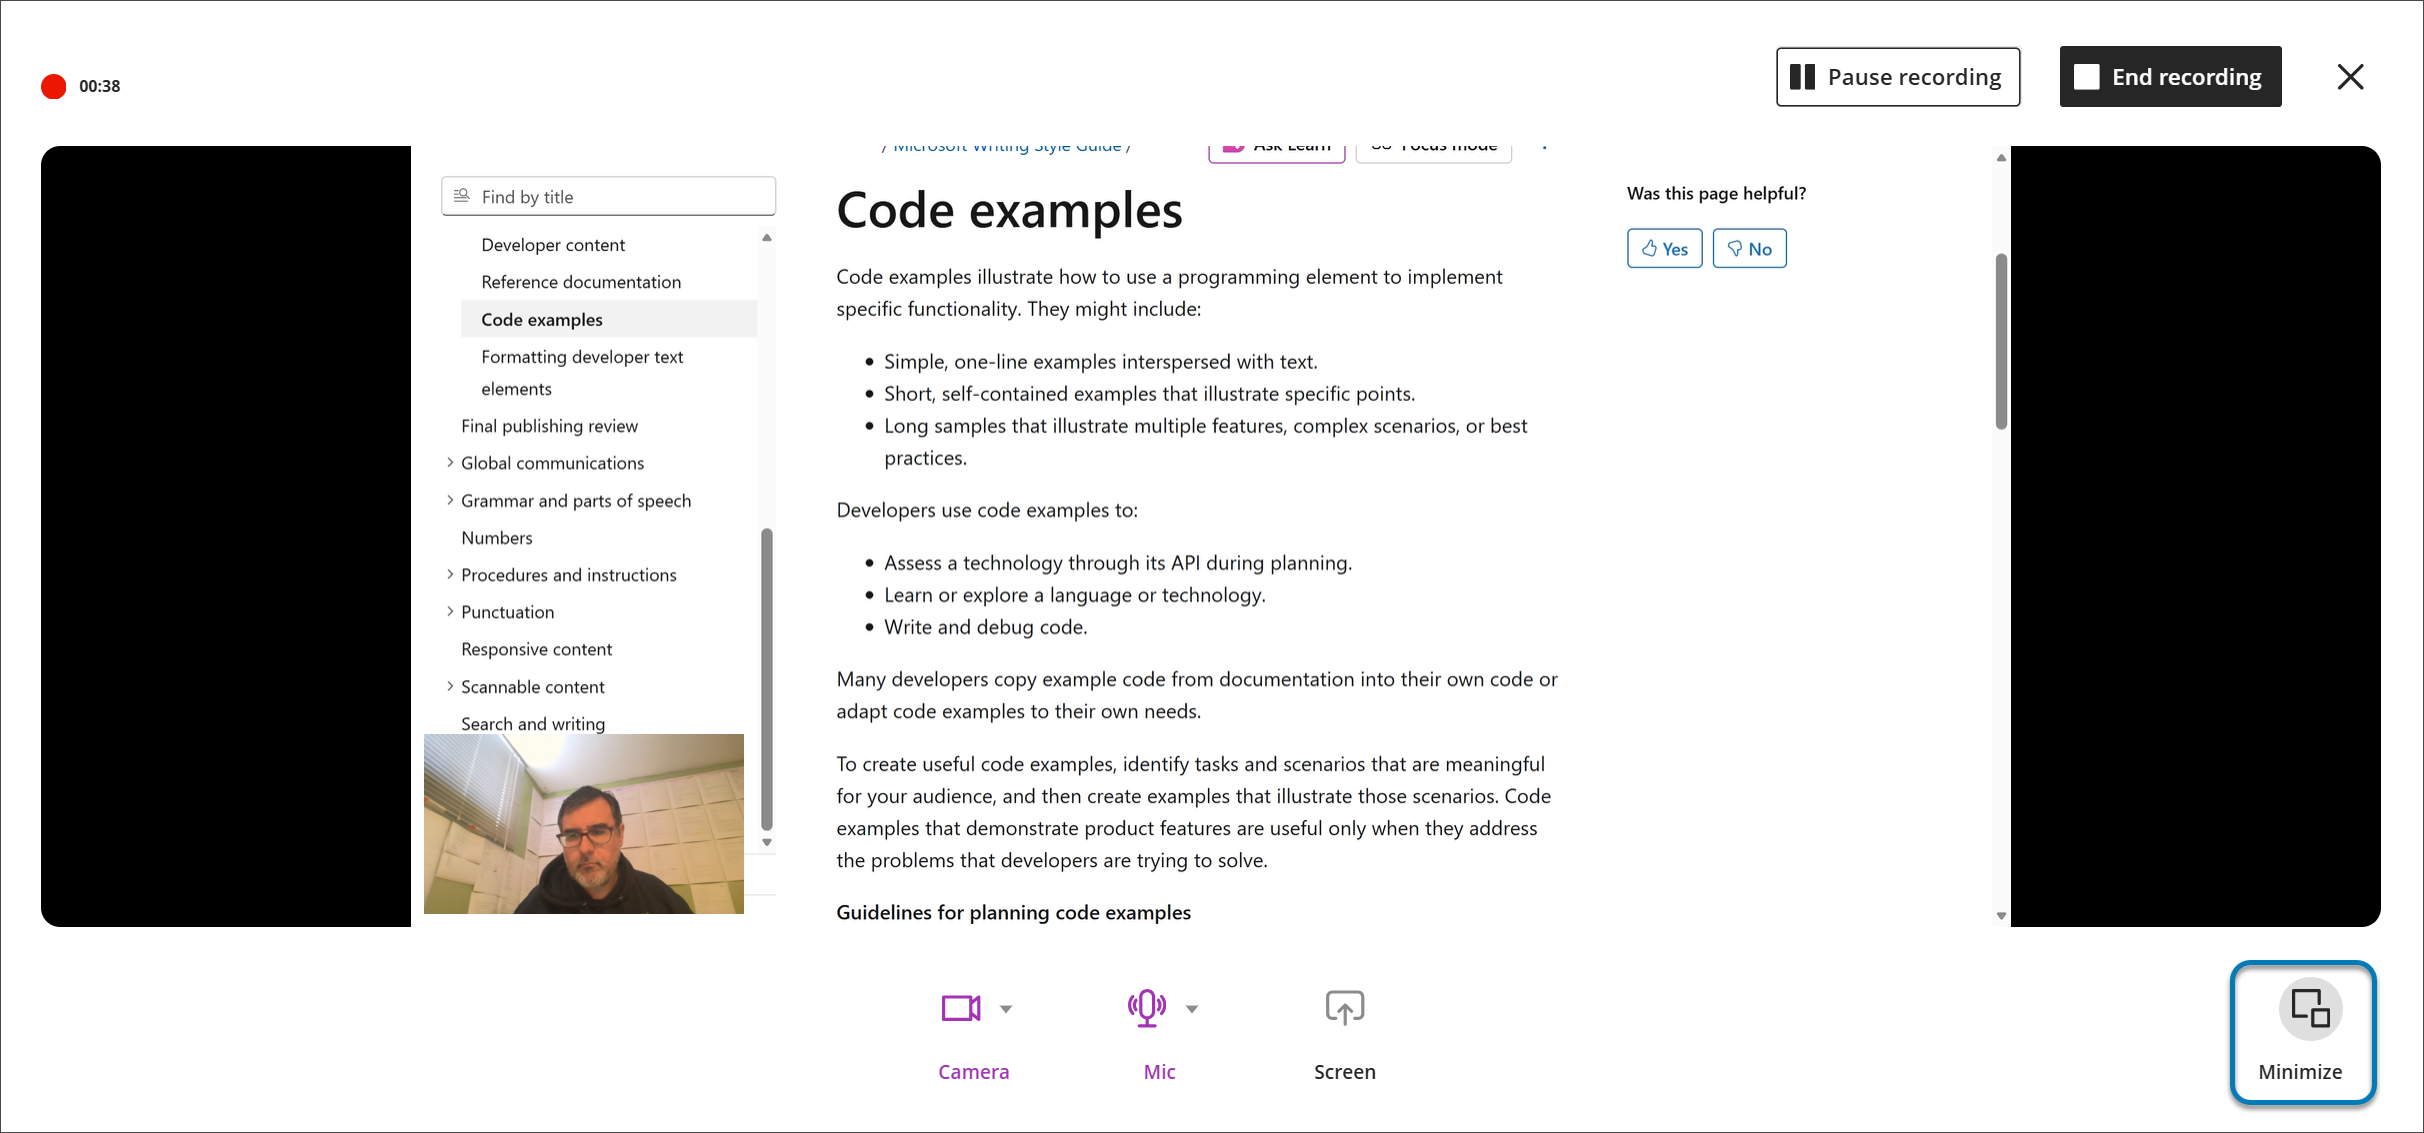
Instructors can minimize the camera and controls while recording feedback or lectures. The camera appears as a small overlay, giving more options for presenting. Instructors can pause, resume, or restore the full camera view during the recording. This workflow is available wherever Video Studio is supported, including assessment feedback and flexible grading.
Add Knowledge Checks to recordings
You can embed ungraded knowledge check questions directly into recordings in Video Studio. A recording pauses at designated points and prompts students to answer a question related to the content they just watched. After answering correctly, the video resumes. Knowledge checks help you confirm student comprehension and engagement.
To add a knowledge check question:
Open a recording and select Settings (the button shaped like a gear).
Select Edit Video.
From the Edit page, select Edit, then select Knowledge Checks.
Under Knowledge Checks, any existing knowledge check questions are listed. Select + to add a knowledge check question.
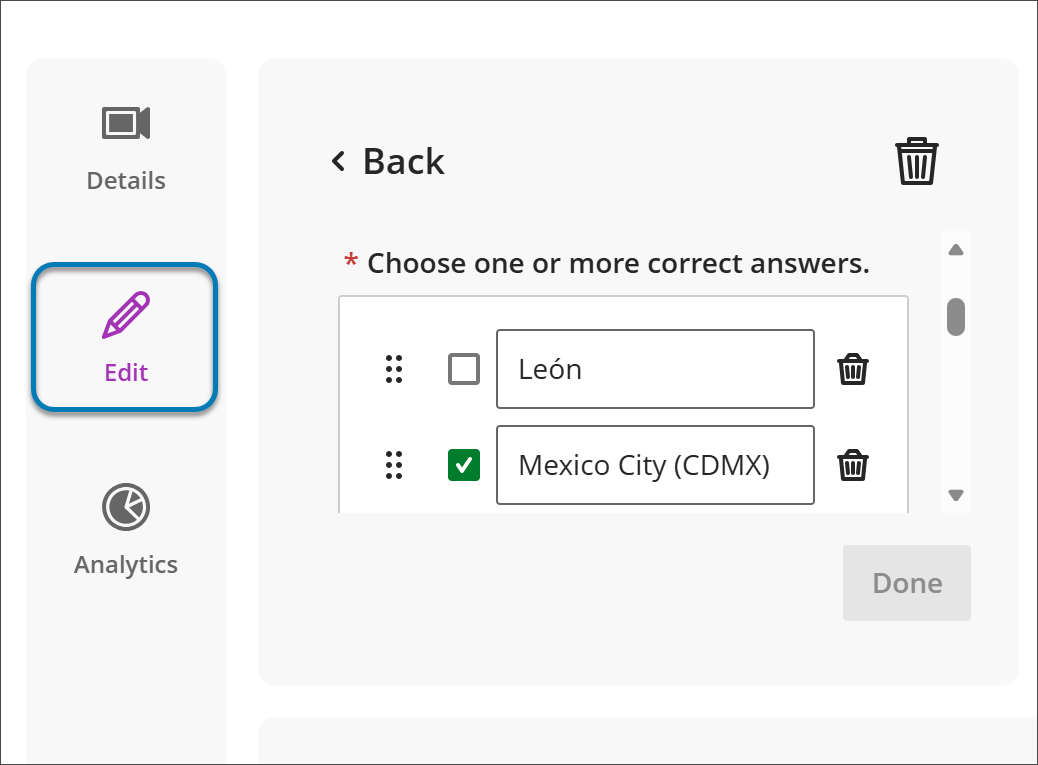
For a new knowledge check question, add content to the required fields:
Question text
One or more correct answers
Correct answer feedback
Incorrect answer feedback
Timestamp where the knowledge check appears in the recording.
Questions are ungraded and designed to validate comprehension, not assess performance. You also have access to general analytics of student responses.
Video Studio: Add Audio Descriptions for Inclusive Videos
With audio descriptions, you can make video content more accessible for students who are visually impaired or have low vision. Audio descriptions are spoken narrations that describe important visual elements—such as actions, settings, and on-screen text—that are not conveyed through audio alone. This feature is in compliance with WCAG accessibility standards.
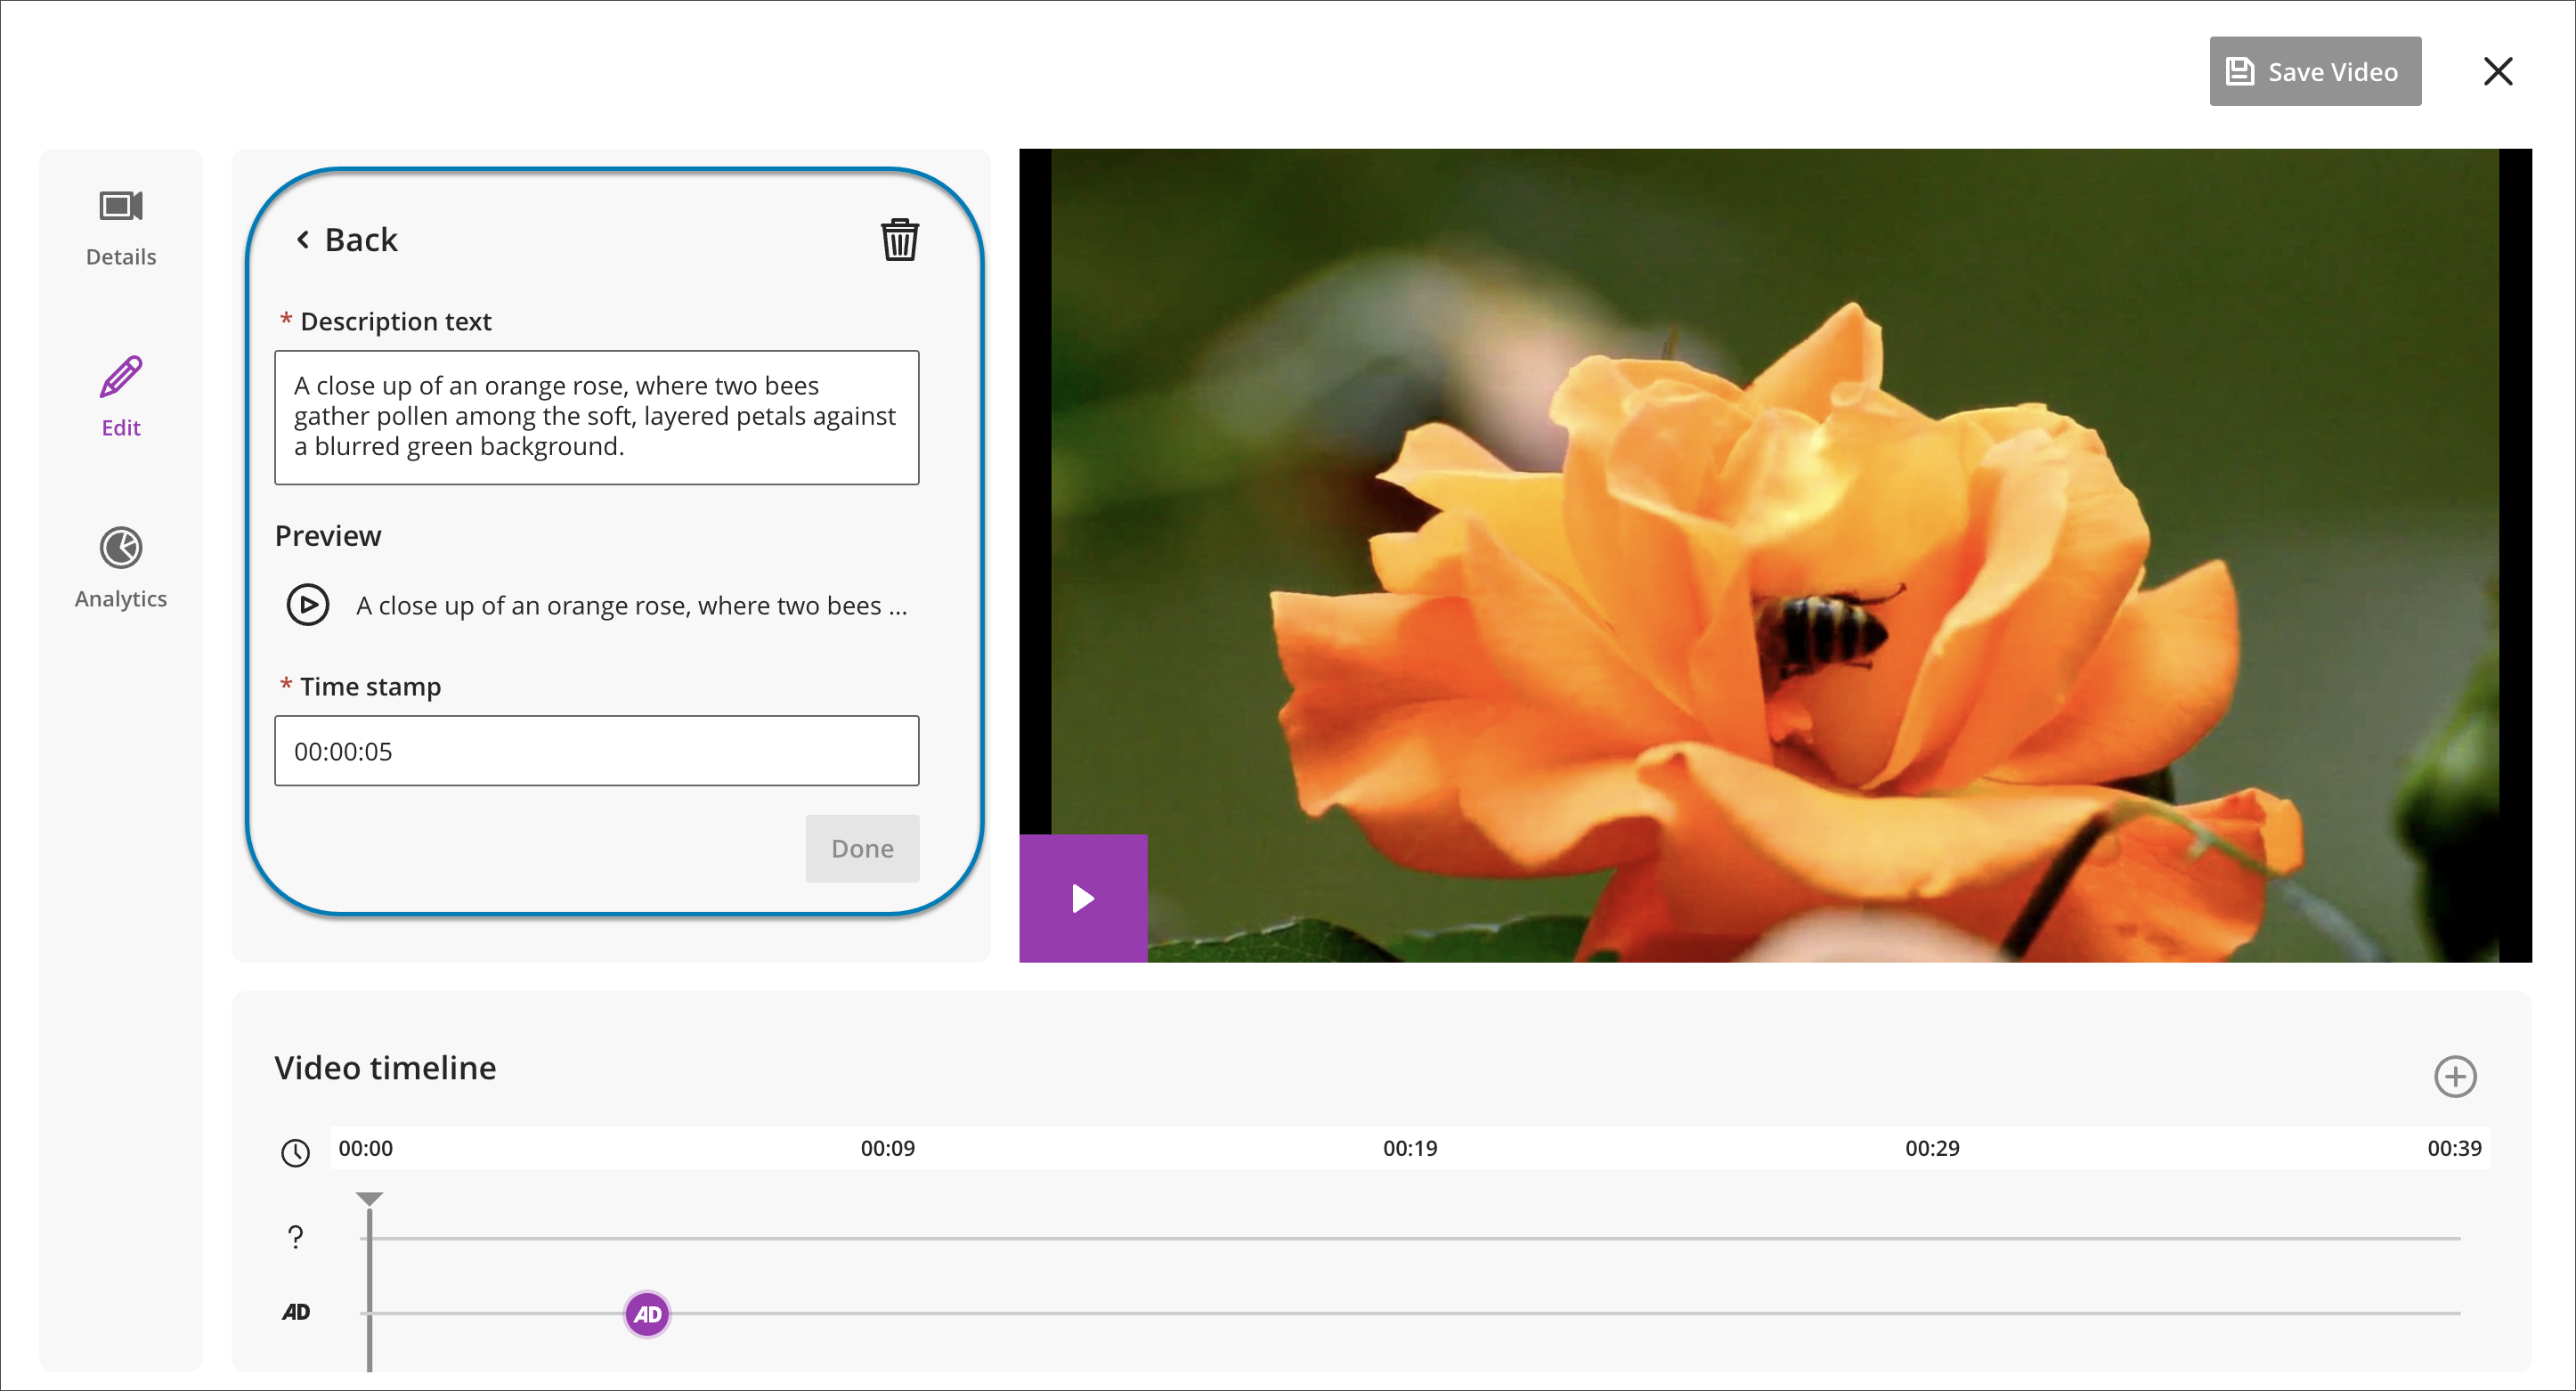
You can add audio descriptions directly within Video Studio by typing descriptive text and assigning it to specific timestamps in a video. The system automatically converts the text into spoken audio using text-to-speech technology, eliminating the need to record or upload a separate audio track.
You can preview, edit, or delete audio description entries before publishing to ensure accuracy, clarity, and quality. There is no character limit for audio description text.
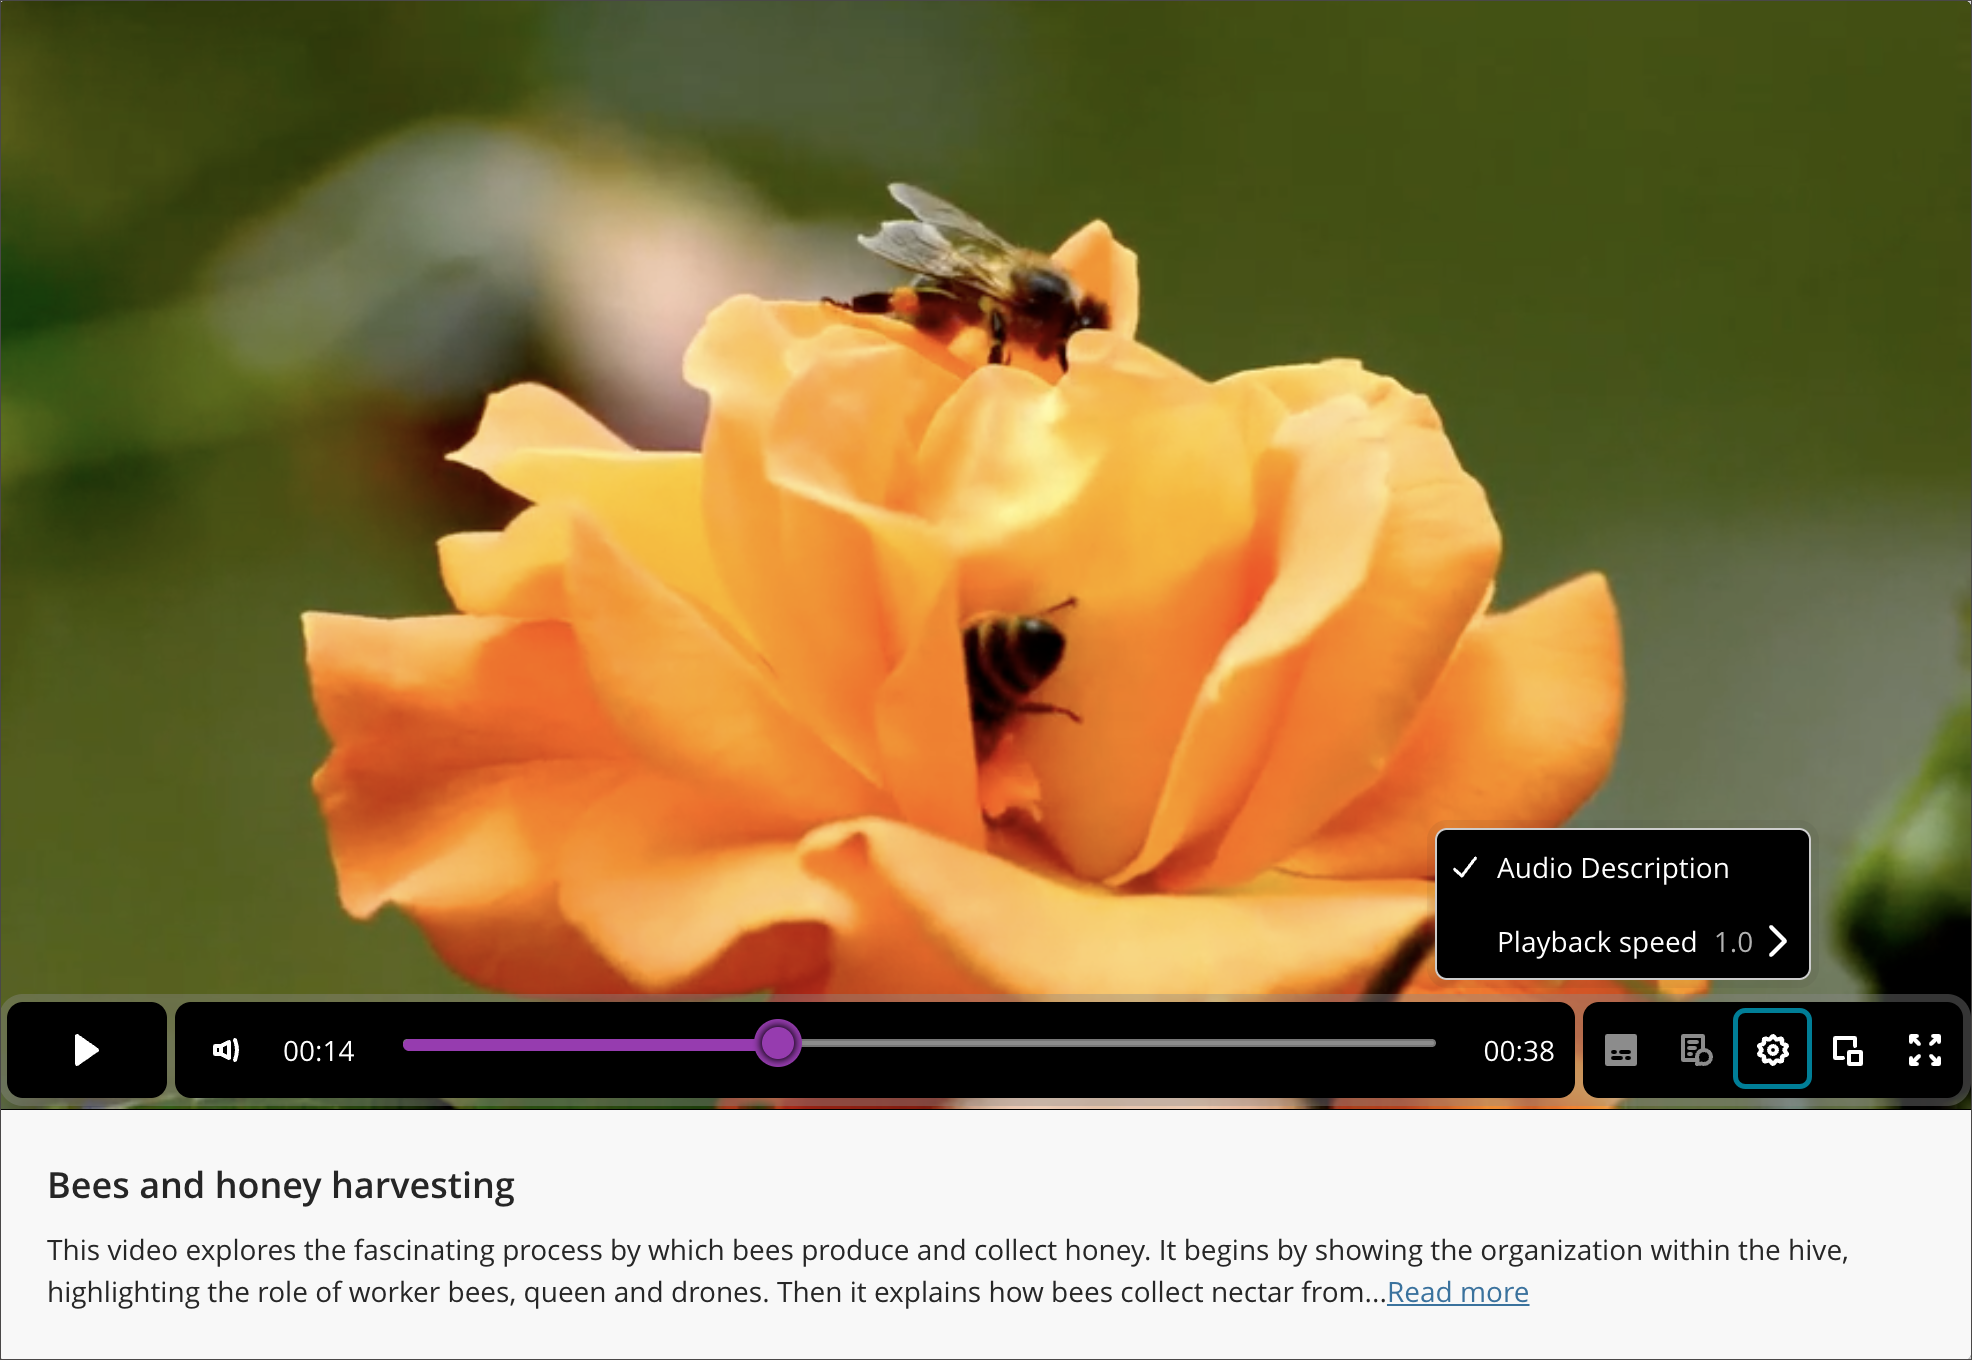
If a video includes audio descriptions, the option to turn on the feature appears when you select the settings button in the bottom panel when playing a Video Studio recording.
Retry a failed video upload
If you upload a file in Video Studio and the upload fails, you can select Retry upload at the top right corner of the screen or Retry next to the Upload process bar.
Important
For administrators: These new video capabilities require a license for Video Studio. The videos created using Video Studio will not count towards your existing storage entitlement. The following existing privileges are used for the Video Studio solution:
Course/Organization (Content Areas) > Create Materials: To create videos. Includes all operations like save, finish, check Video upload Status. Not needed for playback.
Course/Organization (Content Areas) > Delete Materials: To delete videos.
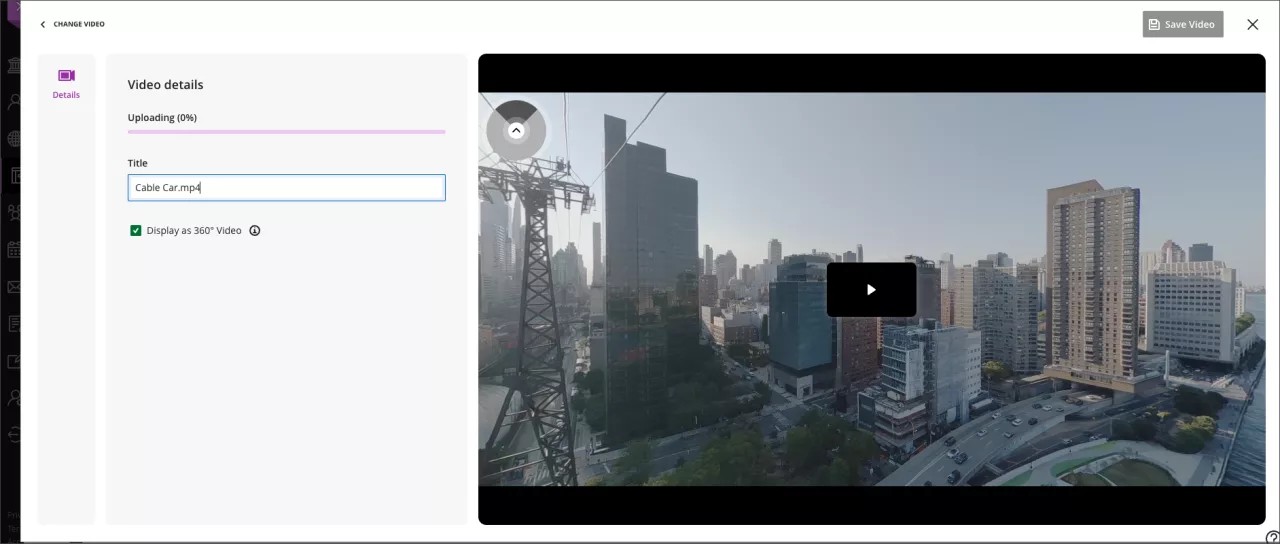
360° videos and linking from desktop to virtual reality headset
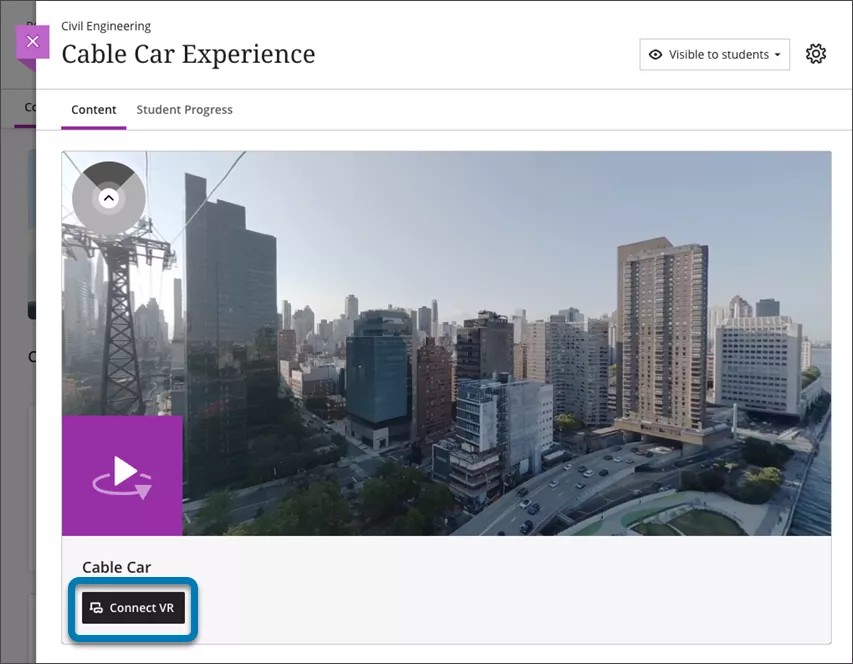
The process for uploading 360° videos is the same as for other recordings. When a 360° video recording is uploaded, a shaded circle displays on the top left corner of the recording, which is used to pan the recording to the left or to the right. For keyboard navigation, you can also use the W, A, S, D keys.
If you want to create immersive virtual experiences for students, Video Studio has a straightforward process for linking from a desktop to virtual reality headset. Immersive experiences are particularly beneficial for educational scenarios where physical presence is not feasible. For example, construction students can explore a highway construction environment to identify risks; students can tour the international space station; or new faculty can familiarize themselves with classroom layouts using 360° walkthroughs. The product agnostic nature of this Video Studio feature means that institutions can use existing VR equipment or purchase equipment to fit their budget and needs.
The product agnostic nature of the VR headset linking process means that you can use existing VR equipment or purchase equipment to fit their budget and needs.
360° Video: link from desktop to Virtual Reality Headset
Important
[note important icon]: Please consult your VR headset operating instructions prior to use. Some users may experience motion sickness, dizziness, or mild discomfort when using VR headsets. In rare cases, individuals sensitive to flashing lights may be at risk of seizures. Taking regular breaks and following safety guidelines can help ensure a comfortable experience.
With Video Studio, users can turn 360° videos into immersive experiences with a straightforward Virtual Reality (VR) headset handoff workflow.
To view a 360° video in a VR headset:
1. Ensure you are viewing a 360° video in a browser (mobile or desktop).
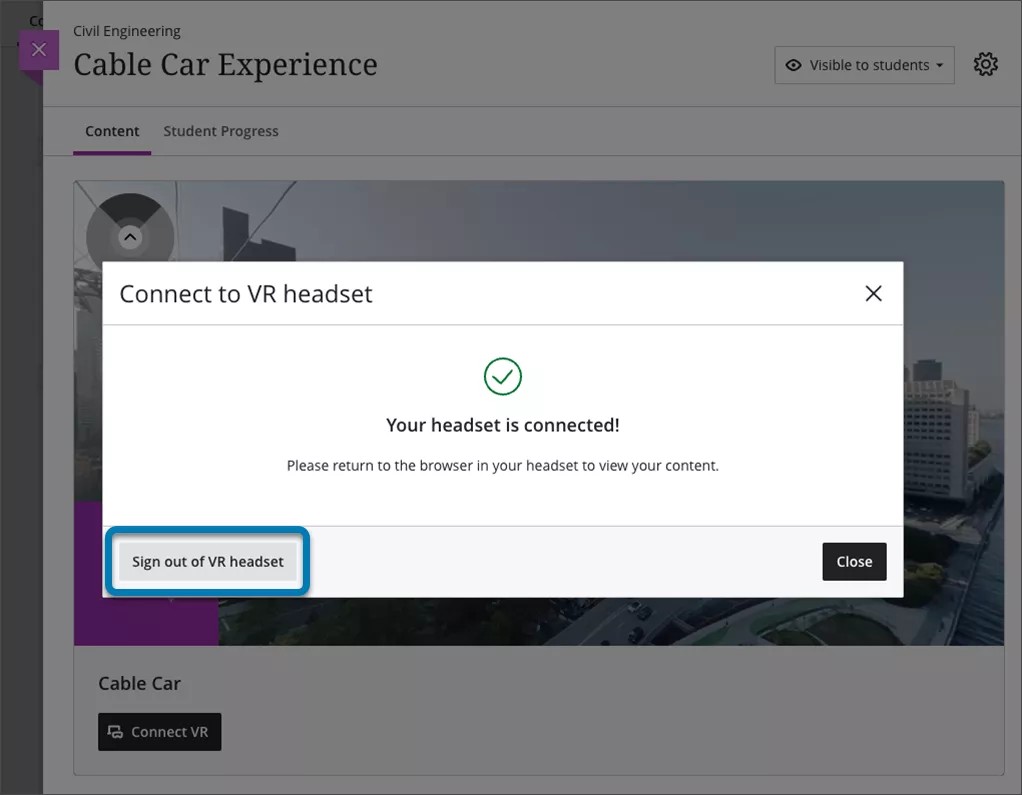
2. Below the video, select Connect VR.
3. A Connect to VR headset overlay appears on the screen. Keep this onscreen as a code will need to be entered into the input box.
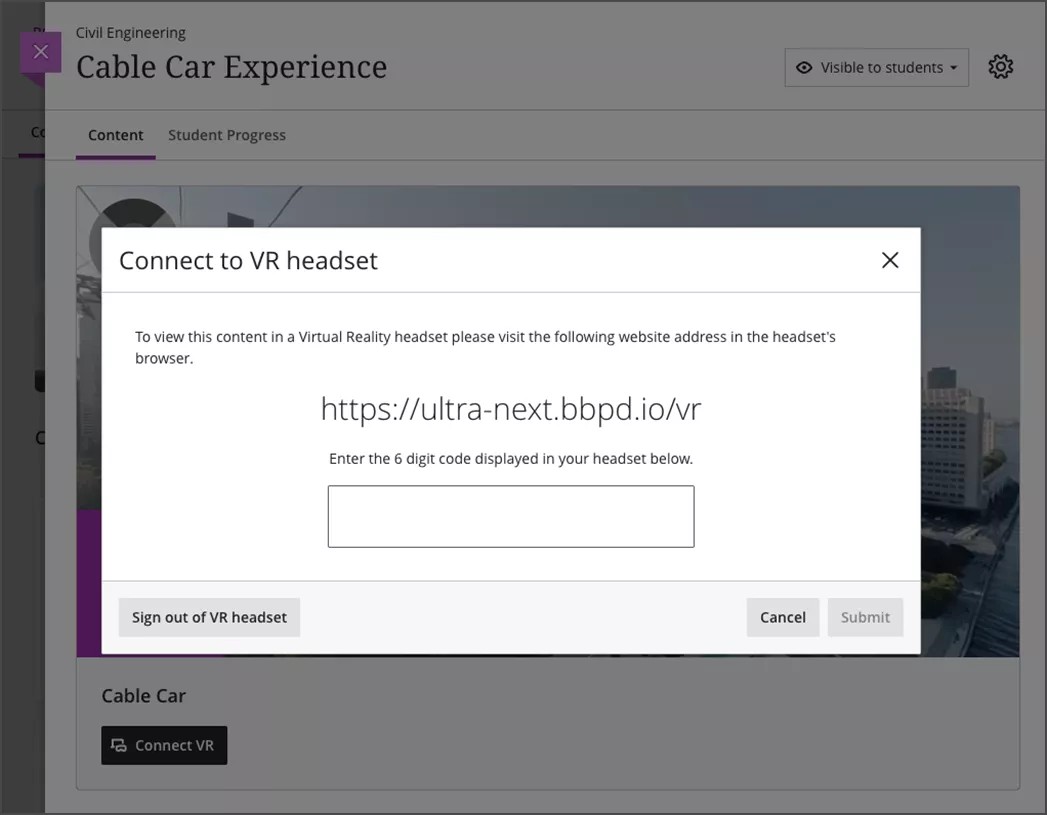
4. Place your headset on and, using the headsets browser, visit the URL shown onscreen in step 3.
5. A 6-digit code will appear in your headset’s browser. Type this 6-digit code into the overlay on your desktop or mobile browser.
6. Once you receive confirmation on the screen that the code is correct, put your headset back on. The VR headset automatically progresses to show the video.
7. You may need to select View Immersive below the video or Enter VR on your headset’s browser.
8. Consume the immersive content on the headset.
9. You can continue to navigate around Blackboard LMS or view other available immersive content from the headset.
10. Once you have finished with the headset, make sure that you logout. This can be done by navigating to logout in the headset or selecting Sign out of VR headset on your mobile or desktop overlay shown in step 3.