November 2026 Release Notes (4001.4)
Release Information
Note
For maintenance release build numbers and bug fixes, visit Maintenance Releases.
For release status and delays, visit Blackboard Status.
Instructional Design
LOR: View Object Source Information
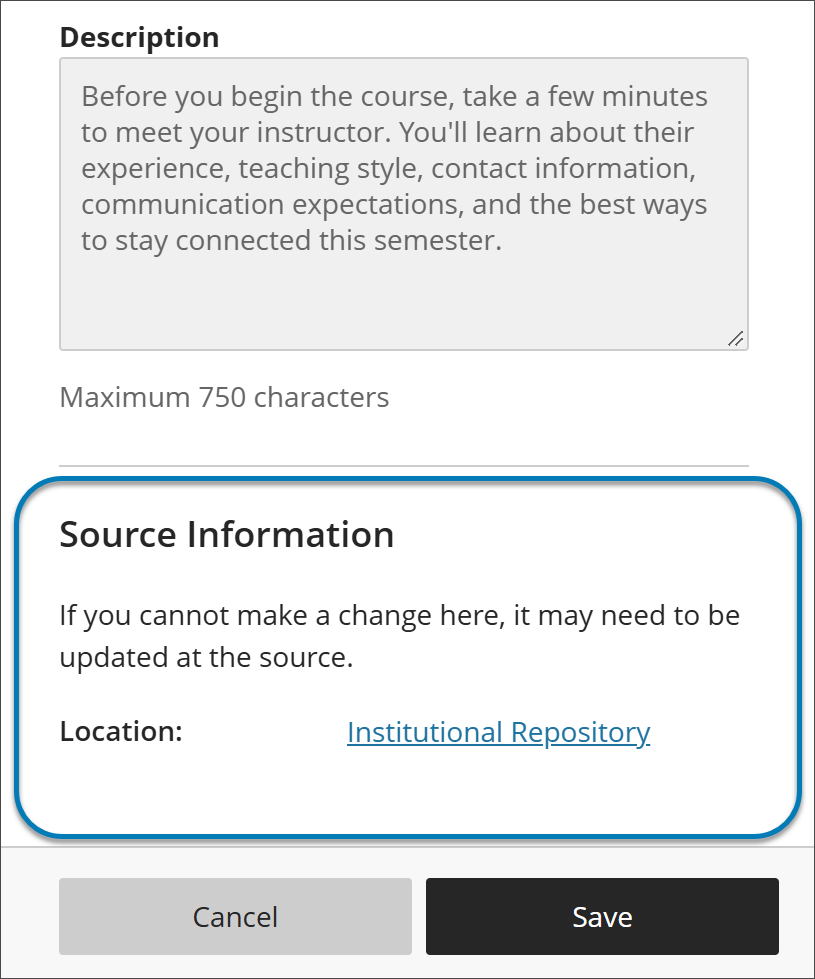
Administrators can now view source information for an object in the Learning Object Repository (LOR) when that object is used in a course or organization. The LOR distributes a single object to many courses and organizations at once, so administrators managing large content libraries need a quick, reliable way to see where an object is stored in the LOR.
When an objects within the LOR is used in a course or organization, the Source Information option appears at the bottom of its settings panel of the object. An administrator can go into that course/organization and identify an object’s node level within the Institutional Hierarchy. This feature streamlines the management of objects within the Learning Object Repository for administrators.
Image 1: Within the Settings panel for a LOR object, you can now find the object’s location in the institutional hierarchy under the new Source Information section.
Administrators
Availability: Available to all Ultra courses.
Activation: None needed.
Configuration: None needed.
November improvements to the beta Content Editor in Blackboard Documents
We've made another round of improvements to the beta Content Editor, focused on accessibility, a more consistent toolbar, easier access to files, and more flexible authoring. These updates make the editor clearer to navigate, more predictable to use, and better suited to a wider range of content.
Instructors
Accessibility
Skip navigation link. A skip navigation link now appears when you move through the Content Editor with a keyboard, giving you quick access to the editor's keyboard navigation instructions and shortcuts. This helps you learn to operate the editor efficiently without a mouse.
Improved contrast for disabled toolbar actions. Disabled toolbar actions now have higher contrast, making them easier to distinguish and improving accessibility.
Toolbars and menu updates
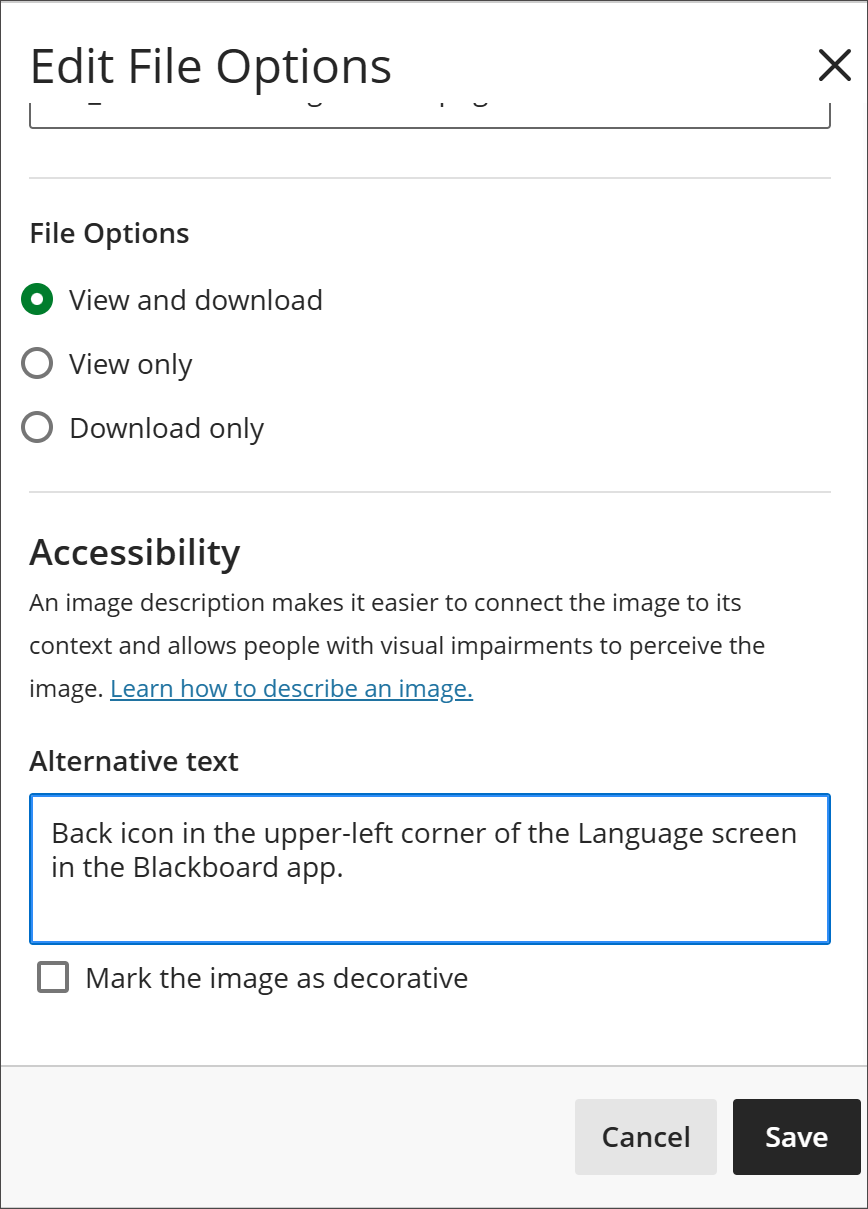
File properties on image upload. File properties now display when you upload an image, so you can add alternative text and adjust display options before the image is inserted.
Image 1: Now when you upload an image, file properties display so you can choose display and add alternative text before the image is inserted in the Content Editor.
Content Collection access. You can now access and select files directly from the Blackboard Content Collection within the Content Editor, without leaving the editor to find them.
Math authoring
The Content Editor now supports LaTeX. The Content Editor now supports LaTeX
\begin{...}...\end{...}environments, building on the LaTeX and MathJax rendering introduced previously.
Administrators
Availability: Available for all Ultra Courses.
Activation: Turned off by default.
Configuration: In the Admin Panel, select Configure in the The Ultra Experience is Here module. Turn on the New Content Editor for Blackboard Documents (Beta) feature flag.
Communication and Collaboration
Expand group management search capabilities
Instructors using the group management system can now search for students who are already assigned to a group, not just those still waiting to be assigned. A new dual search lets instructors look up an individual student and the groups in a set at the same time, so they can instantly see which group a student is in, move them, and manage large, fully assigned group sets without losing track of anyone.
Group sets can contain hundreds of students across many groups, and until now the search on this screen only covered unassigned students. Once everyone was assigned, the search returned nothing useful, which made finding one student among many groups slow and, at large scale, nearly impossible.
Instructor
When managing groups in a group set, instructors now have a search that covers both students and groups:
Find any student, assigned or not. Searching for a student returns their current status — whether they’re assigned to a specific group or not yet in any group. From the result, instructors can unassign an assigned student to return them to the unassigned pool or assign a student who isn’t in a group yet.
Image 1: Instructors can now search students who have been assigned to groups in addition to the existing search for students who are unassigned.
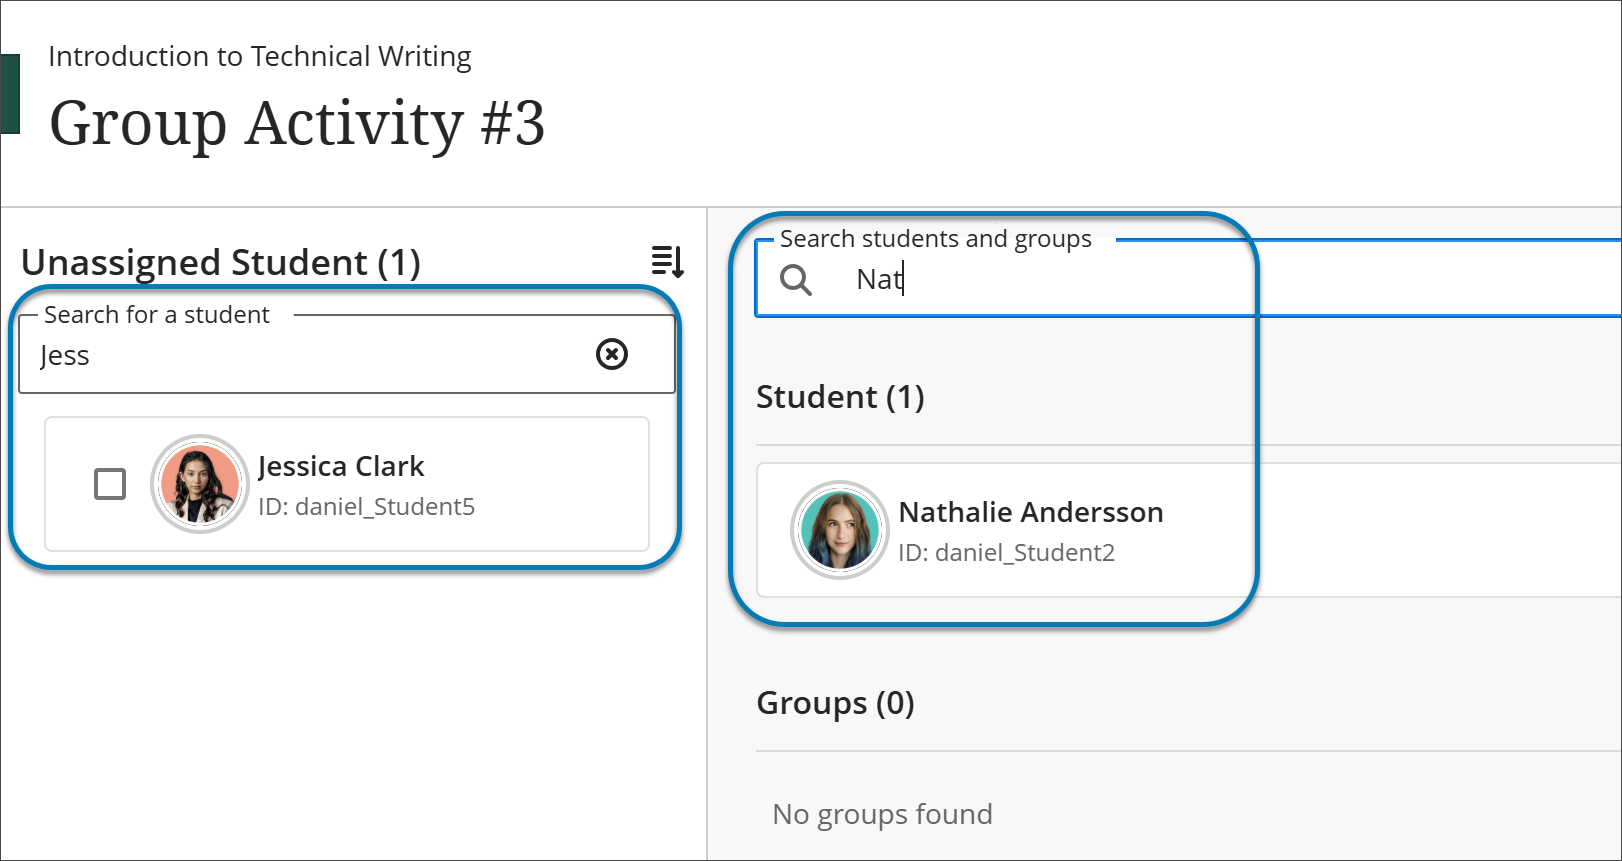
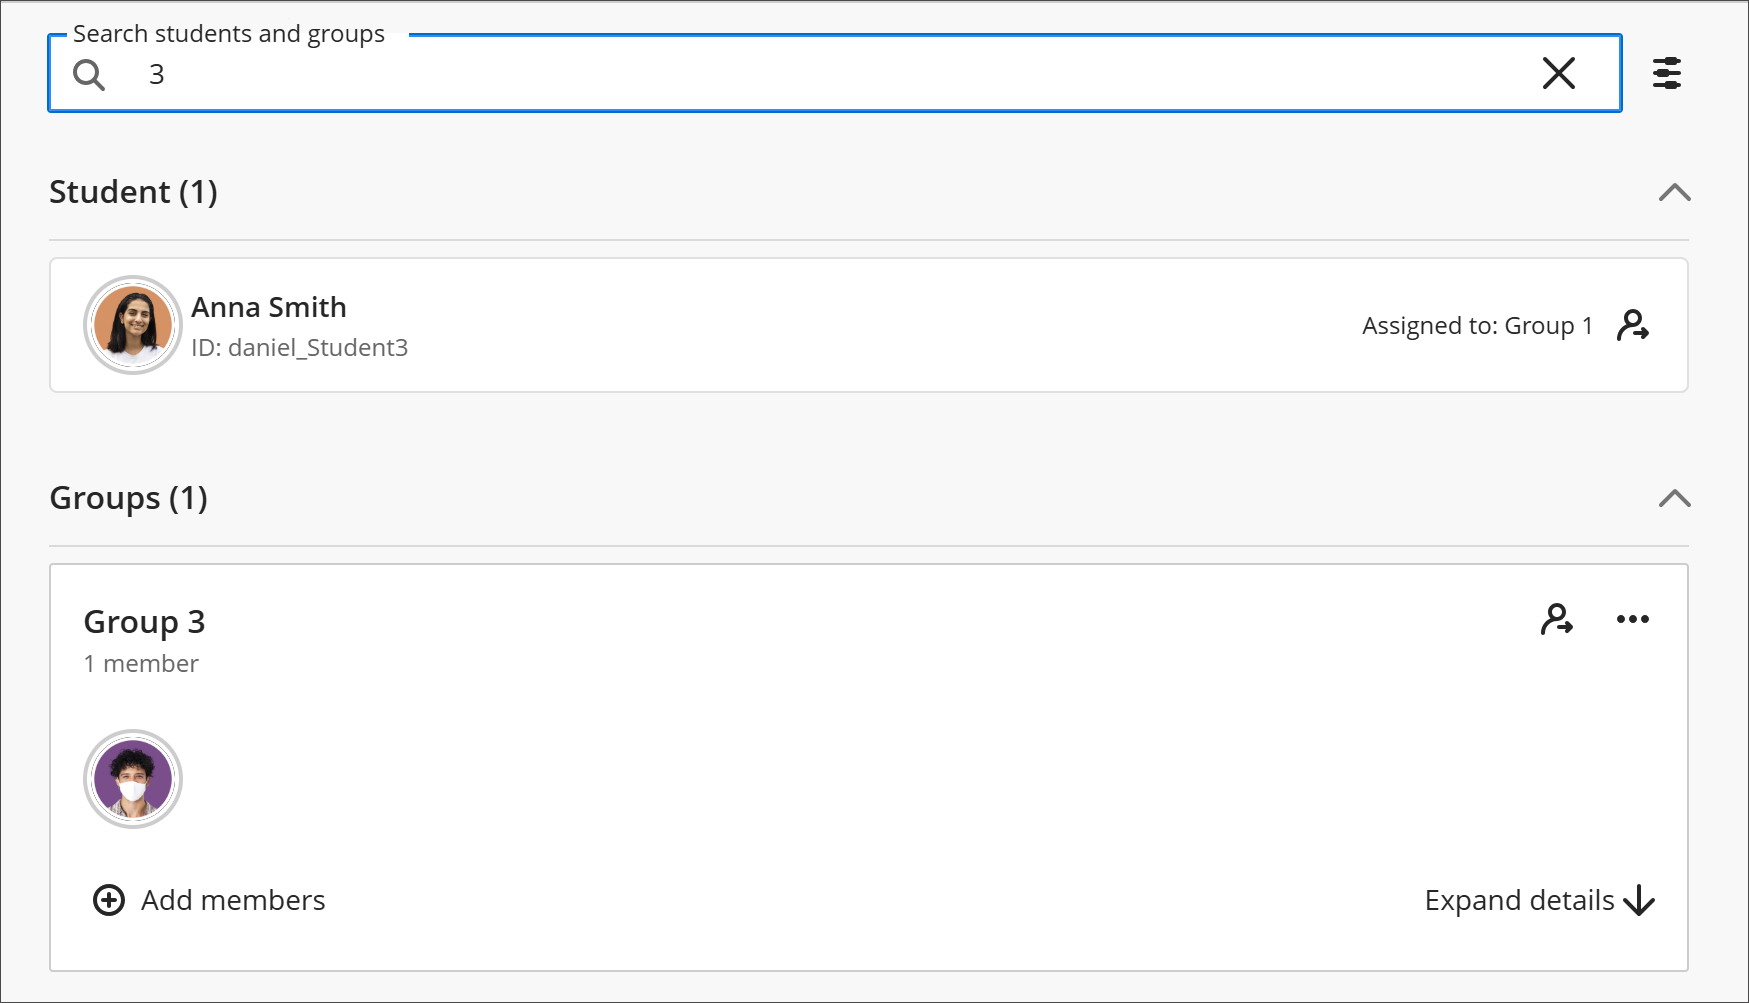
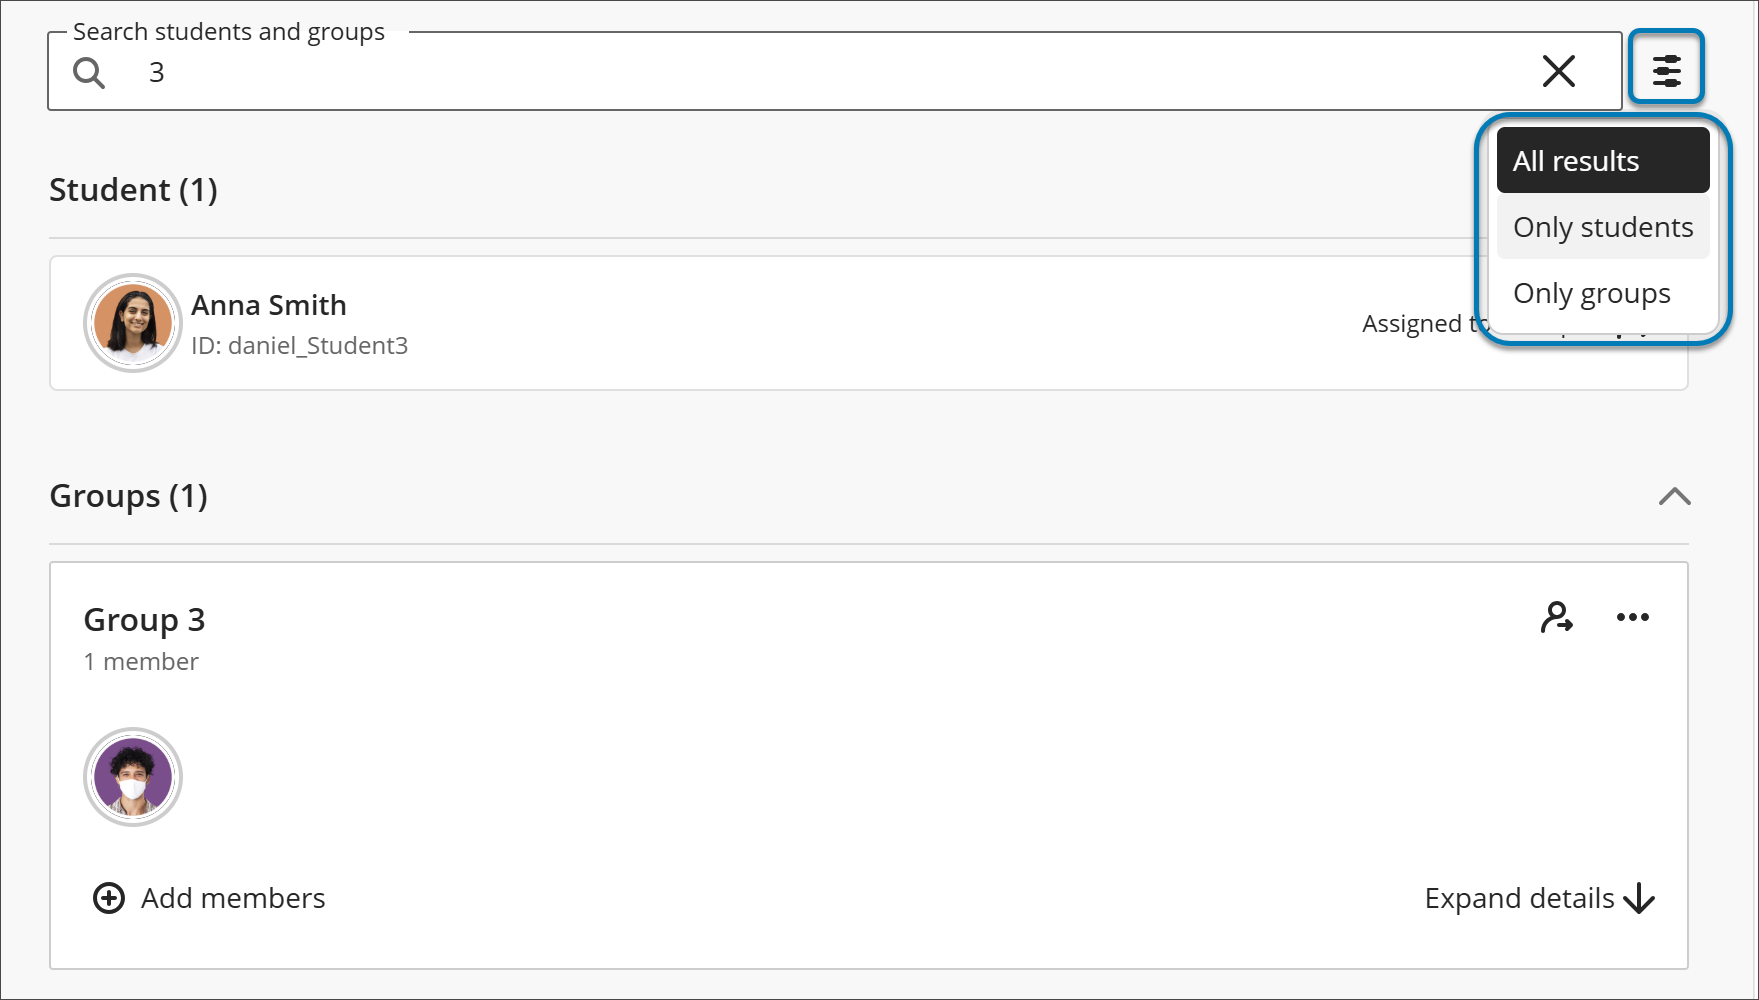
Search for groups alongside students. Instructors can search for a group as well as a student, which makes it possible to locate a student in one search, bring up the destination group in another, and drag and drop the student into that group.
Image 2: Instructors can use the expanded search to search for groups as well as students within those groups.
Filter mixed results. When a search returns both students and groups, instructors can filter the results to show only students or only groups. This is especially useful in large classes with many results; on small group sets, the filter is optional.
Image 3: The expanded search includes filters for results that include both students and groups.
Searching continues to match based on first name, last name, and student ID, as it did before.
Together, these changes make the group management screen far more flexible for large courses, letting instructors find and reorganize students no matter how many groups exist or how many students are already assigned.
Administrators
Availability: Available for all Ultra courses
Activation: Controlled by an administrator‑managed feature toggle. The feature is off by default until January 2027 production release, where the new experience will be the default setting.
Configuration: No additional configuration is required once the feature is enabled. The new group management experience is introduced behind a feature toggle, allowing institutions to enable it in test and stage environments before turning it on in production. Both the new and existing group experiences may run in parallel for a limited time to support transition and documentation updates.
Assignments and Tests
Print and download rubrics
Instructors can now print blank and scored rubrics or download them as PDFs using the browser’s print dialog. Printed rubrics support offline grading and student feedback, and they make it easy to include rubrics in accreditation or instructional review documentation.
Instructors
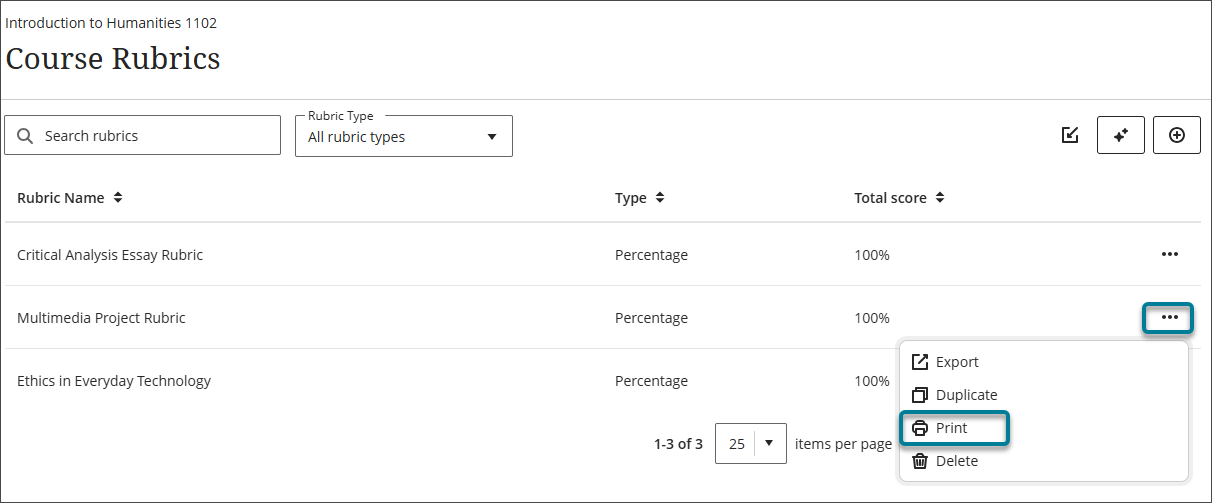
To print a blank rubric, on the Course Rubrics page, select the ellipsis menu on a rubric and select Print. Instructors can also open a rubric from the Course Rubrics page and select the Print icon. The browser’s print dialog opens with a printer-friendly version of the rubric that shows its criteria and levels without scores. From the print dialog, instructors can print the rubric or save it as a PDF.
Image 1: The ellipsis menu on a rubric shows the Print option.
Instructors can print scored rubrics for any activity graded with a rubric.
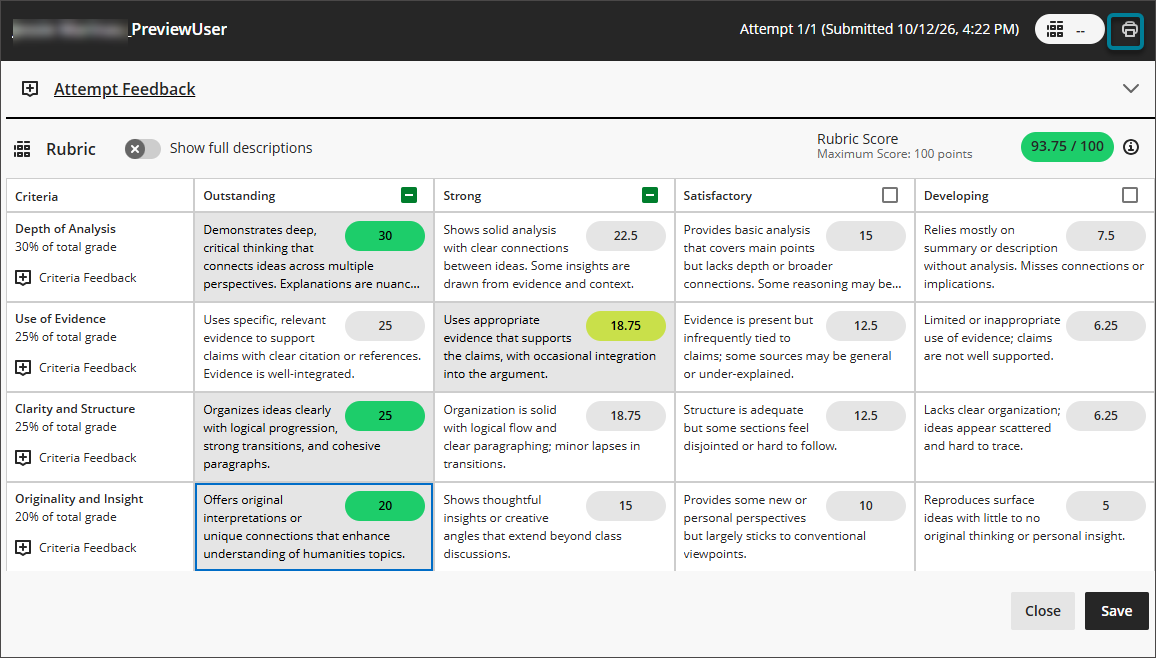
For assignments and tests in flexible grading, in the pop-out rubric view, the Print icon is enabled once the instructor makes at least one selection in the rubric. Select Print to open the browser’s print dialog, where instructors can print the scored rubric or save it as a PDF.
Image 2: For assignments and tests in flexible grading, the Print icon appears in the rubric window after at least one criterion is scored.
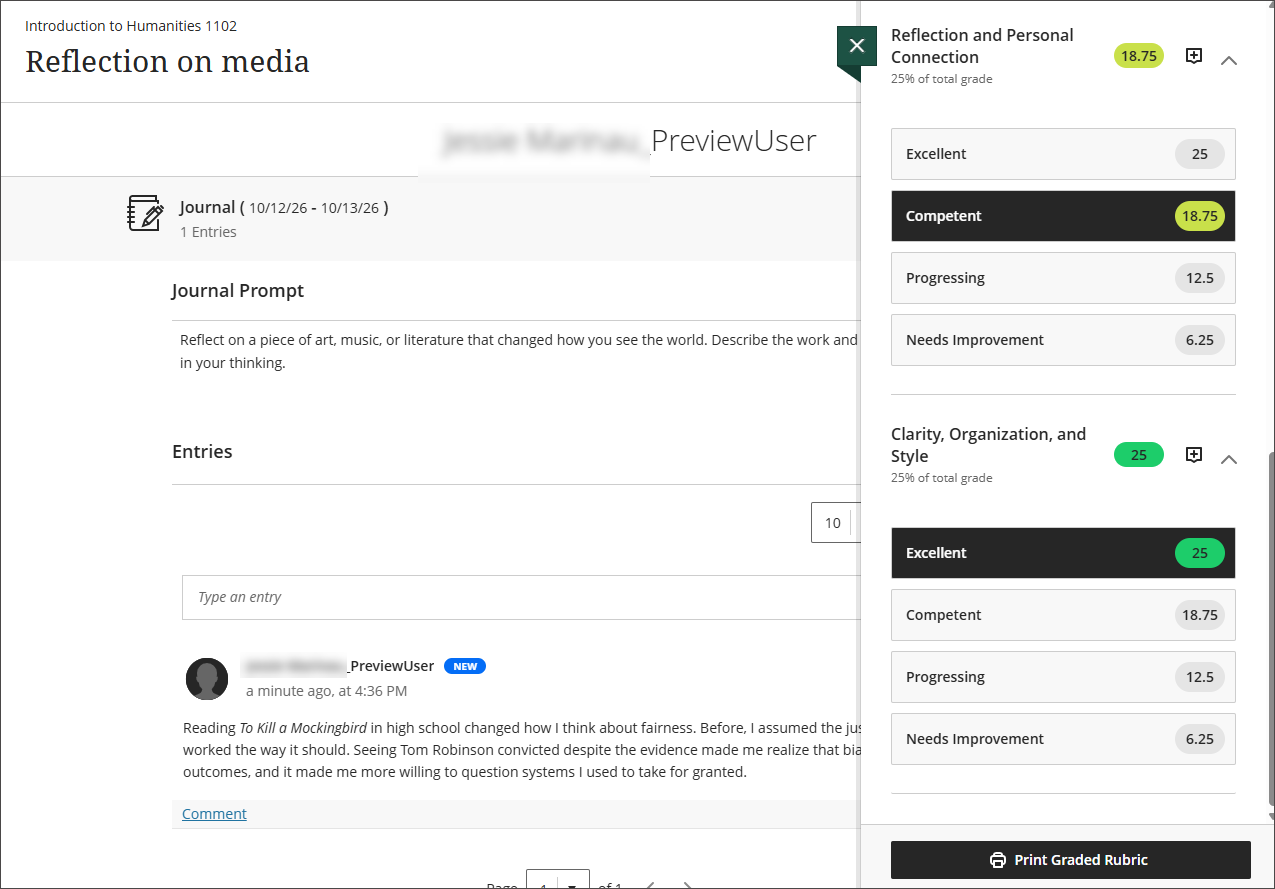
For journals and discussions, the Print Graded Rubric button appears at the bottom of the Rubric Details panel while grading. The button is enabled once the instructor makes at least one selection in the rubric. Select Print Graded Rubric to open the browser’s print dialog, where instructors can print the scored rubric or save it as a PDF
Image 3: The Print Graded Rubric button appears at the bottom of the Rubric Details panel for journals and discussions.
Administrators
Availability: Available to all Ultra courses.
Activation: None needed.
Configuration: None needed.
Gradebook
Submit in-progress attempts on behalf of students
Instructors can now submit a student’s in-progress assignment or test attempt from the Submissions page and document the reason as part of the workflow. To provide a clear record, the submission receipt and the submission review show the name of the instructor who submitted the attempt, the reason provided, and the date.
Instructors
On the Submissions page for an assignment or test, select the ellipsis menu for a student whose status is Draft saved, then select Submit draft attempt. Enter the reason for the submission, then select Submit.
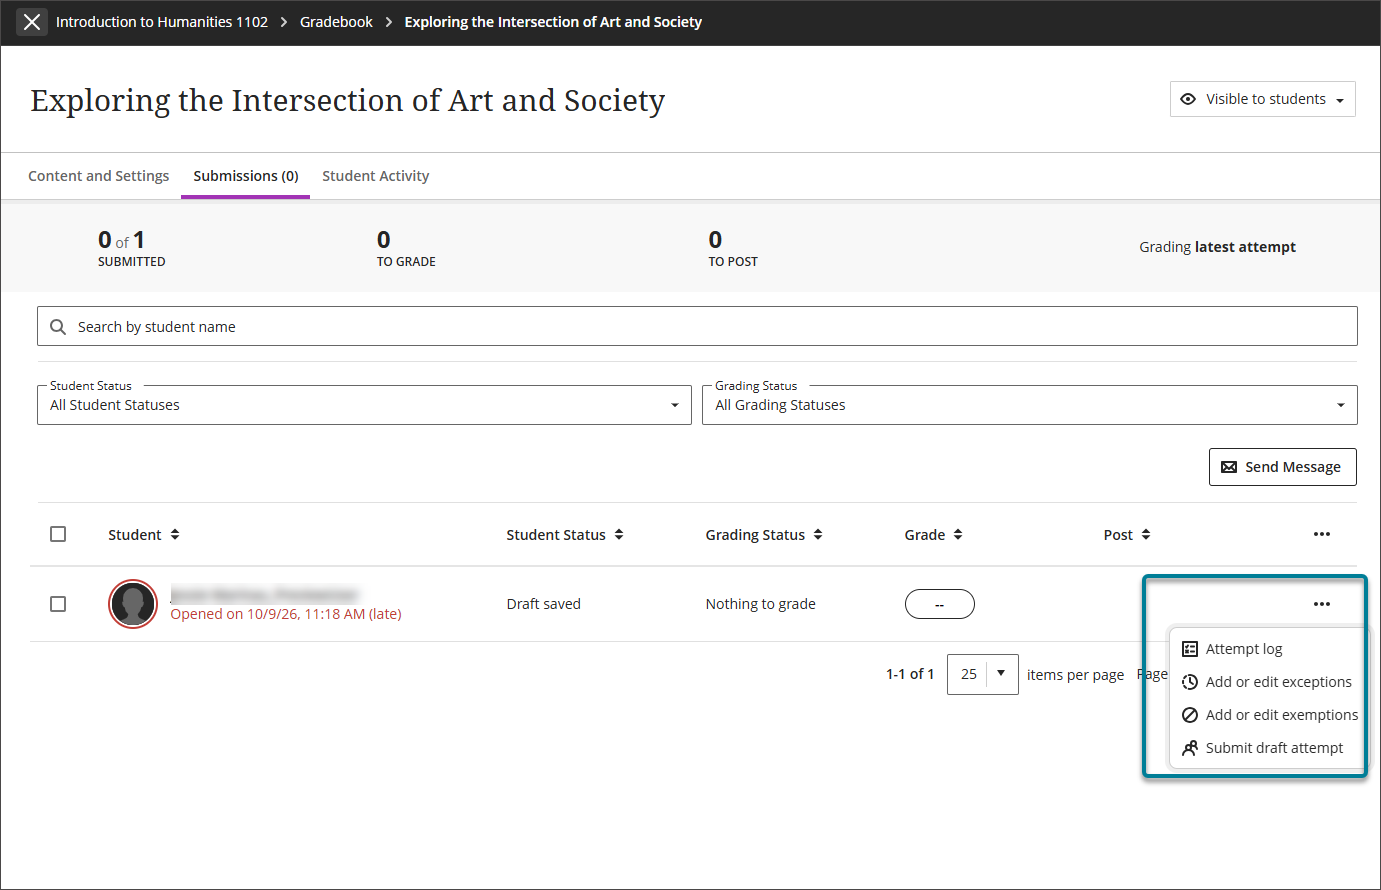
Instructors can also submit draft attempts for anonymously graded assessments. In the gradebook, open the student overview, select the ellipsis menu for the assessment, then select Submit draft attempt.
When instructors look up the submission receipt in the gradebook, the receipt shows the name of the instructor who submitted the draft attempt, the reason provided, and the date.
Students
When an instructor submits a draft attempt on a student’s behalf, the student’s emailed submission receipt and submission review show the name of the instructor who submitted the attempt, the reason provided, and the date.
Administrators
Availability: Available to all Ultra courses.
Activation: None needed.
Configuration: None needed.
Use AI Writing Tools in overall feedback
Instructors can now use AI Writing Tools when writing overall feedback in flexible grading. This makes it easier to refine the clarity and tone of feedback before sharing it with students.
Instructors
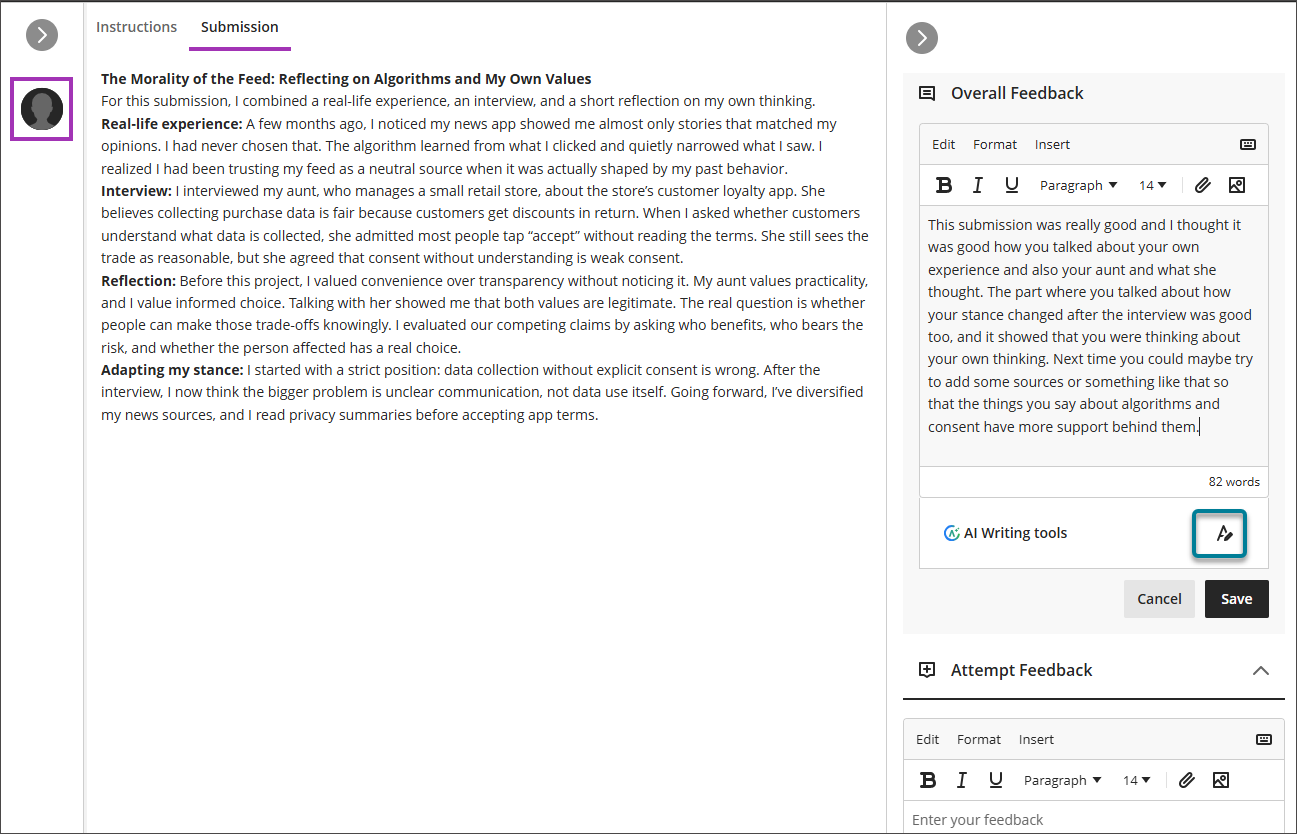
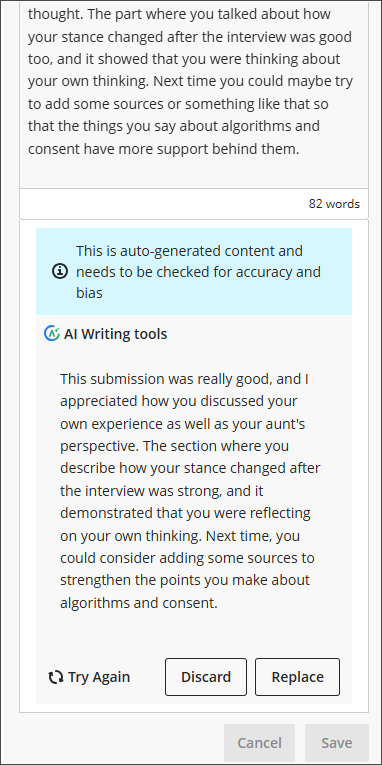
In flexible grading, enter feedback in the Overall Feedback section, then select AI rewrite icon under AI Writing Tools. AVA generates a rewritten version of the feedback below the editor, along with a notice that the content is auto-generated and needs to be checked for accuracy and bias.
Image 1: Select the AI rewrite icon under AI Writing Tools in the Overall Feedback section.
After reviewing the rewritten feedback, instructors can choose one of the following options:
Replace: replaces the original feedback with the rewritten version.
Discard: keeps the original feedback and removes the rewritten version.
Try Again: generates a new rewrite.
Instructors must select Replace or Discard before they can save the feedback.
Image 2: The rewritten feedback appears below the editor with options to try again, discard, or replace.
Administrators
Availability: Available to all Ultra courses.
Activation: To enable this feature, navigate to Administrator Tools > Integrations > Building Blocks > Installed Tools, AI Design Assistant and Unsplash > Settings. Turn on Enable AI Design Assistant if not already turned on. Turn on AVA Rewrite Feedback toggle if not already turned on.
Configuration: None needed.
Integrations
Manage Respondus availability with Institutional Hierarchy
Administrators can now use Institutional Hierarchy to control where the Respondus LockDown Browser integration is available. Respondus can be enabled or disabled at different levels of the hierarchy — such as the institution, a node, or an individual course — so institutions can manage its availability the same way they manage other tools, without relying on manual governance or course-by-course workarounds.
Respondus is a custom integration that appears in its own placement in Assessment Settings, separate from the Proctored Assessments section used by standard proctoring providers. Because it sits outside the Ultra Proctoring Framework, the recent Institutional Hierarchy support added for standard proctoring services did not apply to it. This update extends Institutional Hierarchy control to the Respondus placement specifically, closing that gap while keeping the existing LTI 1.3 integration unchanged.
With this update:
Enable or disable Respondus by hierarchy level. Administrators can turn the Respondus integration on or off at the institution, node, or course level, consistent with how availability is managed for other tools.
Assessment Settings reflects the hierarchy rules. The Respondus placement in Assessment Settings appears or is hidden according to the Institutional Hierarchy configuration that applies to a given course.
No change to existing functionality. Respondus continues to work through its current LTI 1.3 integration. Institutions using the legacy LTI 1.1 integration will need to transition to LTI 1.3 to use Respondus with Institutional Hierarchy. Existing Respondus access through LTI 1.3 remains unaffected.
This brings Respondus in line with Blackboard LMS’s centralized configuration model, giving administrators consistent, hierarchy-based control over a custom integration that previously had to be managed separately.
Administrators
Availability: Available to all Ultra courses.
Activation: None needed.
Configuration: Administrators manage Respondus availability through Institutional Hierarchy, setting it at the institution, node, or course level as needed.
Grade Export: Overall grade override notations
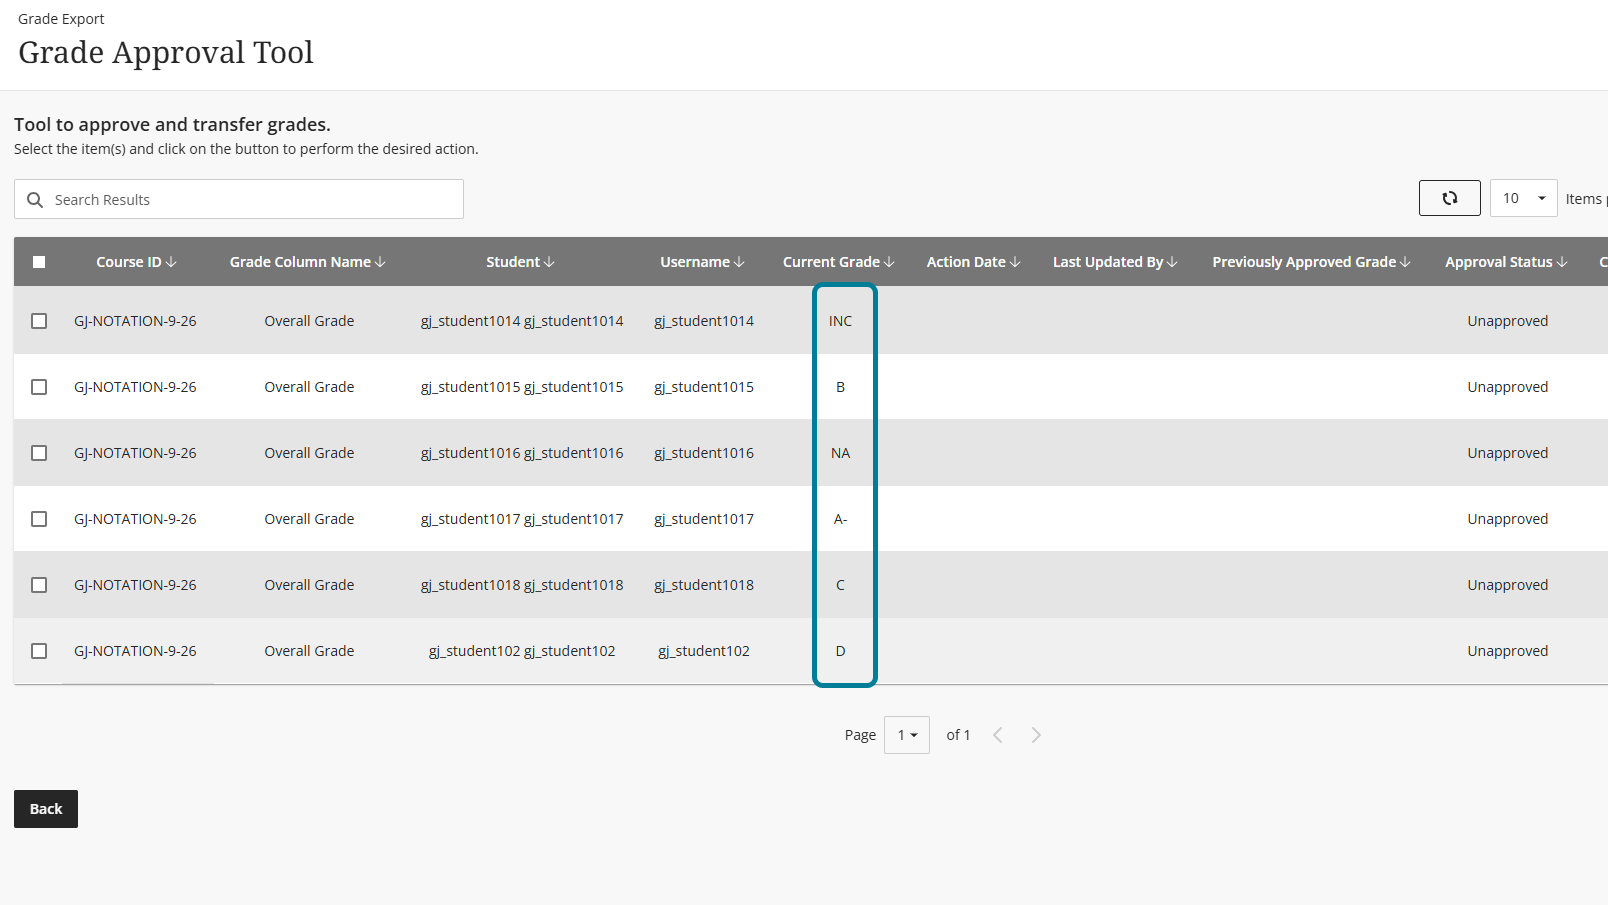
Grade Export now supports overall grade override notations. When an instructor overrides a student's overall grade with a notation, such as "Inc" for incomplete or "NA" for not applicable, Grade Export shows that notation during grade approval and includes it in the grade extract. Previously, these overrides appeared as a blank value (a hyphen), and the blank value was sent to the SIS.
Note
If the approved grades include override notations, Grade Export sends the notations to the SIS exactly as entered in the Gradebook, including any special characters or emoji.
Image 1: Grade Export now supports overall grade override notations. When an instructor overrides a student's overall grade with a notation, such as "Inc" for incomplete or "NA" for not applicable, Grade Export shows that notation during grade approval and includes it in the grade extract.
Administrators
Availability: Available to all Original and Ultra courses.
Activation: None needed.
Configuration: None needed.
Premium
Video Studio - Forward and Rewind Controls in Video Player
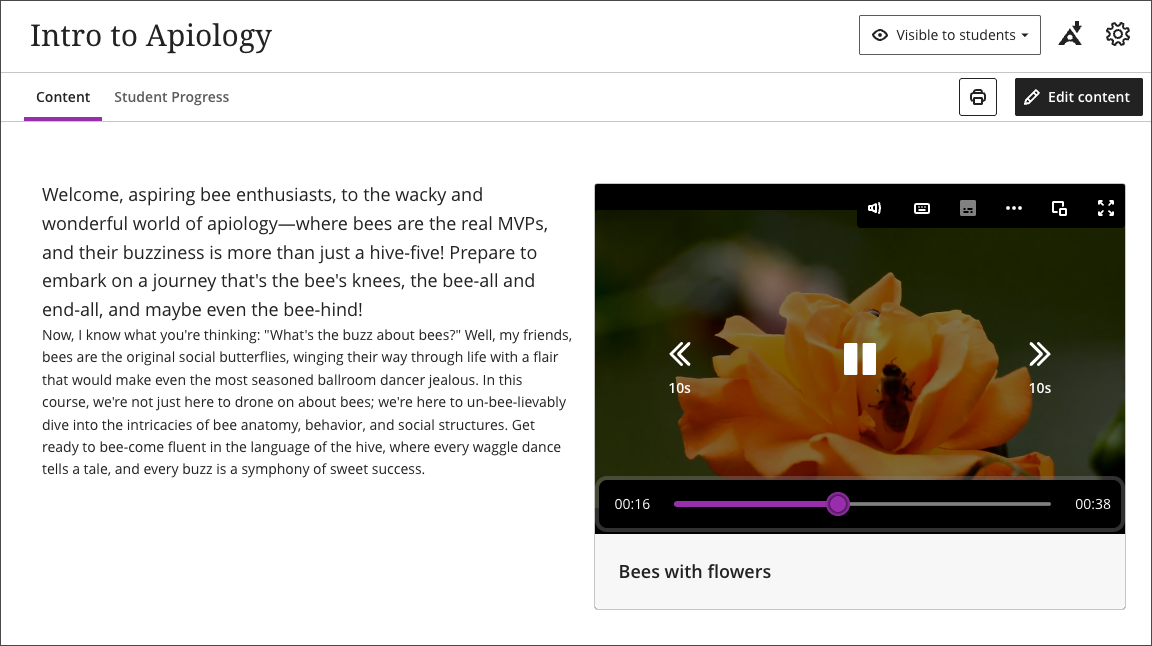
The Video Studio player now has 10-second rewind and forward buttons, one on each side of the play and pause button. Viewers can easily jump back to rewatch something they missed or skip ahead past material they already know in addition to dragging the scrubber or using transcript navigation to find the right spot.
This feature improves navigation, especially on phones, tablets, or when a video is embedded at a small size in an Ultra document. These standard playback controls, familiar from other video platforms, make quick navigation easier wherever the player appears.
Instructors and Students
Select the rewind button to jump back 10 seconds, or the forward button to jump ahead 10 seconds.
The buttons sit on either side of the central play and pause control in the player.
When the player is shown in a compact layout, such as on a small screen or embedded at a small size, the buttons show only their icon without the “10s” label, so they remain usable in limited space.
Image 1: The Video Studio player with 10-second rewind and forward buttons on either side of the play and pause button.
Administrators
Availability: Available to everyone using Video Studio.
Activation: None needed.
Configuration: None needed.