User Accounts
What you can do in Blackboard depends upon the security privileges granted to your user account. Administrators grant security privileges to users by creating roles and assigning those roles to user accounts. You have access to all of the features in Blackboard that your roles allow.
Blackboard comes with three user accounts assigned administrative privileges. One of these accounts is called System Administrator.
Administrators use the default administrator account to create other user accounts, including other administrator accounts. This allows administrators to delegate certain administrative tasks such as managing user accounts, creating courses, or handling enrollment requests.
About default administrator accounts
When Blackboard is implemented, three user accounts with administrative privileges are created.
Administrator
root_admin
integration
Administrator
The System Administrator account has full Blackboard administrator privileges. This account is referred to as the default administrator account.
Administrator and the root_admin are the only two accounts that can log in until more users are created.
The password for the System Administrator account is set during the installation of Blackboard.
root_admin
The root_admin account has full administrative privileges including the management of virtual installations through the Administrator Panel. When the root_admin account views the Administrator Panel, the Manage Virtual Installations link appears at the top of the panel. The root_admin account can log in to any virtual installation and access the Virtual Installation management features from this link.
The password for this account is set during the installation of Blackboard.
Note
The root_admin account is created even if your license doesn't include the use of any virtual installations. The root_admin account can be modified on the Edit Root Administrator Profile page.
Integration
The integration user is used only to facilitate Snapshot operations. You can't use this account to log in through the GUI. It does not appear in any lists of users on the GUI. To change the password for this account, use the Integration Password feature available on the Administrator Panel.
The default password for the integration account is set during the implementation of Blackboard.
Create user accounts
Administrators can create user accounts one at time or in batch. Learn more about using batch files to create multiple user accounts later in this topic.
On the Administrator Panel in the Users section, select Users.
Select Create User.
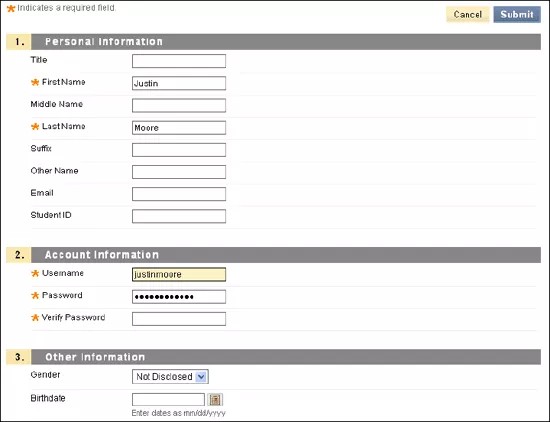
This table describes the available fields. [r] indicates a required field.
Table 12. User Account Available FieldsField
Description
Personal Information
Title
Provide the user's title. For example, type Dr., Mr., or Ms.
First Name [r]
Provide the user's first name. This field is required.
Middle Name
Provide the user's middle name.
Last Name [r]
Provide the user's last name. This field is required.
Suffix
Provide the user's suffix. For example, type Jr., III, or Ph.D.
Other Name
Provide an alternate name for this user. For example, if the user has changed their name due to a marriage or divorce and the institution has records for this student under both names, provide the other name here.
Email
Provide the user's email address. This field is recommended.
Student ID
Provide the user's student ID name or number as defined by the institution.
Account Information
Username [r]
Provide a username for the new user. This field is required. Usernames may not contain ASCII characters 0-31, spaces, or any of these special characters: & # + < > % = / \
These special characters are explicitly permitted and supported in usernames: _ - . @
These special characters aren't currently disallowed in usernames, but Blackboard recommends against using them, as they may cause unforeseen problems: ( ) [ ] { } : ; , | ? ! ` ~ ' ^ " * $
For example, commas and quotes cause issues with JavaScript or with lists during form handling.
Enter a username in lowercase. Uppercase letters in usernames are converted to lowercase in the system database.
Note
A username isn't a confidential value and may appear in the user interface to unprivileged users. Never include sensitive or private information in a username, especially information restricted by law or reasonable expectation.
Password [r]
Provide a password for the user's account. The password must be at least one character in length and contain no spaces.
Verify Password [r]
Provide the user's password again to ensure accuracy.
Other Information
Gender
Provide the user's gender.
Birthdate
Select the user's birthday from the drop-down lists.
Education Level
Provide the user's education level.
Company
Provide the user's company name.
Job Title
Provide the user's job title.
Department
Provide the user's department.
Street 1
Provide the user's address.
Street 2
Provide any additional address information.
City
Provide the user's city.
State/ Province
Provide the user's state or province.
ZIP/Postal Code
Provide the user's ZIP code or postal code.
Country
Provide the user's country.
Web Site
Provide the URL of the user's personal website. This must be the full URL. For example:
http://www.blackboard.com, notwww.blackboard.comorblackboard.comHome Phone
Provide the user's home phone number. The phone number will display exactly as typed. If your institution has a preferred format for phone numbers, use that format here. For example, (530) 555-1234 or +1 530-555-1234.
Work Phone
Provide the user's work phone number. The phone number will display exactly as typed. If your institution has a preferred format for phone numbers, use that format here. For example, (530) 555-1234 or +1 530-555-1234.
Work Fax
Provide the user's fax number . The fax number will display exactly as typed. If your institution has a preferred format for phone numbers, use that format here. For example, (530) 555-1234 or +1 530-555-1234.
Mobile Phone
Provide the mobile phone of the user. The phone number will display exactly as typed. If your institution has a preferred format for phone numbers, use that format here. For example, (530) 555-1234 or +1 530-555-1234.
Institution Roles
Institution Roles
Select one or more institution roles from the list. Select the right-pointing arrow to move the role into the Primary Institution Role field or the Secondary Institution Roles list.
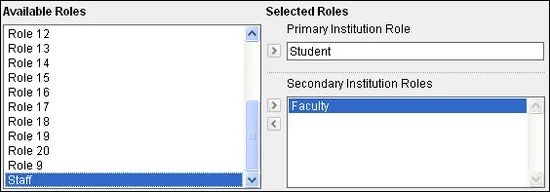
Institution roles control what the user sees on the portal. If your institution has access to community engagement features, you can configure tabs and modules to appear to different groups of users based on institution roles.
System Roles
System Roles
Select one or more system roles from the list. Select the right-pointing arrow to move the role into the Primary System Role field or the Secondary System Roles list.
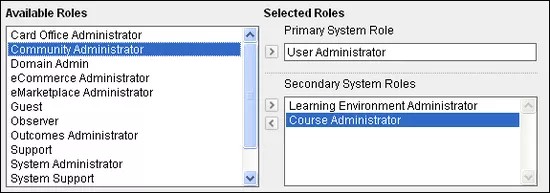
System roles control the user's access to administrative features.
Select Submit.
Create user accounts in batch
You can create large numbers of user accounts at one time with a batch file.
Create the batch file. If you are using a batch file created for a previous version of Blackboard, verify that the file is in the correct format for the current version.
On the Administrator Panel in the Users section, select Users.
Point to Batch Actions and select Create Users.
On the Batch Create Users page, select in the File Location field or select Browse.
In the File Upload dialog box, navigate to the batch file and select Open.
Select the Delimiter Type that the batch file uses. If you select Automatic, Blackboard analyzes the batch file and determines the delimiter based on the frequency of that character in the file.
Select Submit.
View or edit user accounts
You can view and edit user profile data, including passwords and course roles for specific courses. You can also send an email to a user by selecting the user's email address in the Email column.
On the Administrator Panel in the Users section, select Users.
Open the user's menu and select Edit.
View or edit the user account.
Select Submit.
View user enrollments or memberships
On the Administrator Panel in the Users section, select Users.
Search for a user.
Open the user's menu and select Course Enrollments, Organization Enrollments, or Outcomes Memberships.
To view the course, organization, or outcome, select Open.
To remove the user from the course or organization, select Manage. On the Enrollments page, select the user's check box and select Remove Users from Course or Remove Users from Organization.
Change privileges and access for user accounts
You can change a user's privileges by assigning different roles to the user account. For example, if a student is to help an instructor with a course, you can add the Teaching Assistant role to grant the user access to the course Control Panel. If that student is no longer helping the instructor, you can remove the Teaching Assistant role to revoke the access.
On the Administrator Panel in the Users section, select Users.
Search for a user.
Open the user's menu and select Edit.
For Institution Roles, add or remove roles.
For System Roles, add or remove roles.
Select Submit.
Create additional administrator accounts with full or partial administrative privileges
The default administrator account includes permissions to create other full administrator accounts. You can also grant partial administrative rights to other users by creating roles for various permission sets and assigning them to user accounts. This allows administrators to delegate routine administrative tasks such as managing user accounts, creating courses, or handling enrollment requests.
To create a new user account with administrative privileges, assign the user a system role with administrative privileges.
Use the following steps to grant administrative rights to an existing user:
On the Administrator Panel in the Users section, select Users.
Search for a user.
In the search results, open the user's menu and select Edit.
In the System Roles section, assign an administrative role to the user. This can be a custom role or one of the system default roles.
Select Submit.
Change user passwords
If you change a user's password, you must give the user the new password or they will not be able to log into Blackboard. There is no automated way for the user to acquire the new password. Passwords must be at least one character in length and may not contain any spaces.
On the Administrator Panel in the Users section, select Users.
Search for a user.
In the search results, open the user's menu and select Change Password.
Type and verify the new password.
Select Submit.
Delete user accounts
You can delete user accounts through the user interface or through a batch file. To learn more about using batch files to delete multiple user accounts, see How To Delete User Accounts in Batch.
Warning
You cannot restore deleted user records. Deleting users also deletes any course data associated with the user, including grades.
On the Administrator Panel in the Users section, select Users.
Search for the users you want to delete.
To delete one user, open the user's menu and select Delete. To delete multiple users, select the users' check boxes. Select Delete.
Delete user accounts in batch
You can delete large numbers of users at a time by using a batch file.
Warning
You cannot restore deleted user records. Deleting users also deletes any course data associated with the user, including grades.
If using a batch file created for a previous version of Blackboard, verify that the format is correct for the current version.
On the Administrator Panel in the Users section, select Users.
Point to Batch Actions and select Delete Users.
On the Batch Delete Users page, select in the File Location field or select Browse.
In the File Upload dialog box, navigate to the batch file and select Open.
Select the Delimiter Type that the batch file uses. If you select Automatic, Blackboard analyzes the batch file and determines the delimiter based on the frequency of that character in the file.
Select Submit.
Run the user activity overview report
A number of reports provide information about overall user and system activity, but you can also run a report on the activity of a single user across all of their courses. To learn more about the other reports, see Running Statistics Reports.
On the Administrator Panel in the Users section, select Users.
Search for a user.
In the search results, open the user's menu and select User Activity Overview Report.
Optionally, Select Courses and change the values in Select a Start Date and Select an End Date.
Select Submit.
After a report is run successfully, you can choose to save it to the Content Collection, download the report, or run a new report using different reporting criteria.