Manage Courses
When you create a course, Blackboard LMS requires only two course properties: a course name and a course ID. However, several other course properties control important aspects of courses, such course availability and course completeness.
You can edit course properties and add settings that weren't included when the courses were created.
You can also merge courses. Those courses become child courses in a larger course set, appearing in the course listing under the master course. Child courses are marked as unavailable and must remain that way, but you can manage them in the master course. Active courses—courses with student submissions—should never be made into a child course of a merge course relationship.
Warning
The features detailed here may differ from what your users have access to in the interface. The Ultra Course View and the Original Course View support different features; availability and completion options may appear differently depending on course view and user role.
View or edit course properties
Note
Child courses have limited options in the menu and must be managed from their associated master courses.
On the Administrator Panel in the Courses section, select Courses.
Search for a course.
On the Courses page, open a course's menu and select Edit.
Edit the course properties. You can't change the course ID.
Select Submit.
Change course availability and completion status
Courses have two separate access-related states:
Availability (Available / Unavailable)
Completion (Complete / Not Complete)
These states are independent and can be managed individually or in bulk.
Change availability for one or more courses
In the course search results, Blackboard LMS indicates unavailable courses with a red circle with a white X.
To change availability:
Open the course's menu and select Make Available or Make Unavailable.
Select multiple courses and use the Availability menu at the top or bottom of the search results.
Instructors, administrators, and other users with the role capability Treat Users with this Role like Instructor (P) or the privilege Course/Organization > Access unavailable course can enter courses that are unavailable. This allows course setup before students are granted access.
Students with available enrollments can find unavailable courses listed on their Courses page, but they can't open them.
Mark courses as complete or not complete
Completion status is available only for Ultra Course View courses.
You can:
Mark individual courses as Complete or Not Complete.
Update completion status for multiple courses at once from the Courses page in the Administrator Panel.
Manage completion status through SIS integrations, when configured.
To update completion status from the Administrator Panel:
Select Courses.
Search for one or more courses.
Select the check box next to each course.
Use the Complete menu dropdown to select Mark as Complete or Unmark as Complete.
The course or courses you selected are made complete or not complete.
A completed course is read-only. Students and instructors can access content but can’t submit assignments or participate in course activities. Administrators and instructors can copy content Items from a completed course into an active course, but nothing can be copied into a completed course.
Caution
Completion is primarily intended for Ultra Course View. For Original Course View courses, marking a course as complete disables notifications and may prevent future updates.
Instructor control of course access
Depending on assigned role privileges, instructors can manage access for the courses they teach from Course Settings within a course.
Instructor-facing options include:
Course Status
Open. Students have access to the course content within the course duration timeframe.
Closed - override course duration. The course continues to appear in the course listing, but students cannot access the content. If a course has a defined Course Duration, selecting Closed can override course duration. Administrator equivalent: Not available.
Mark Course Complete: When this option is turned on, no changes can be made by students or instructors. Complete status isn’t tied to the course’s term.
Enable or disable courses (record status)
Blackboard LMS supports a separate record status used primarily with SIS Integrations:
Enabled
Disabled
When a course is disabled:
No users can enter it.
The course doesn’t appear in most course lists.
Only administrators can locate it.
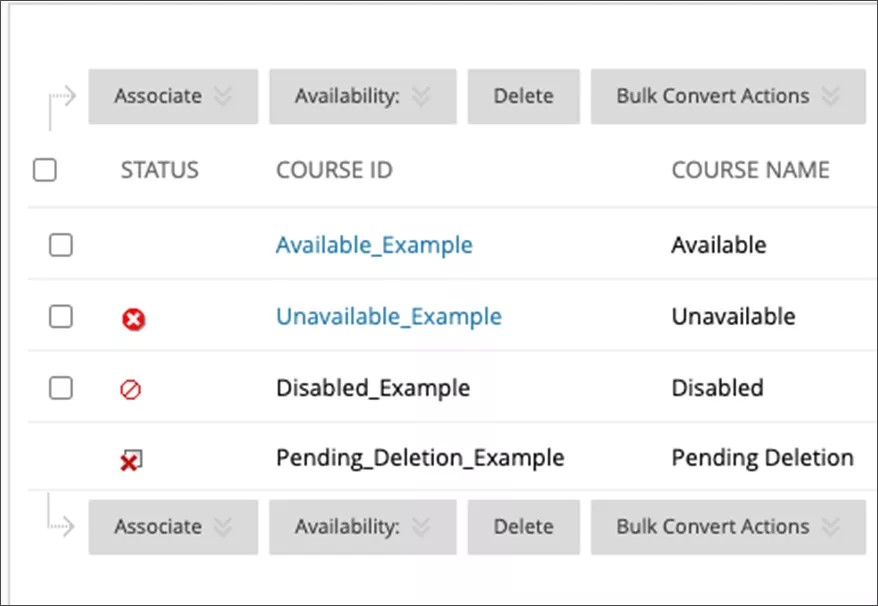
Blackboard LMS indicates disabled courses with a red circle with a slash through it.
Disabled status is commonly used to indicate courses that were canceled or never began.
You can enable or disable a course in two ways:
Use the SIS integration to update the row_status value. Refer to Snapshot Flat File Course Examples for more information.
Use the Data State Management tools, if manual changes are required. Refer to Data Source Key Overview.
The SIS should remain the source of truth whenever possible to avoid conflicts.
When preparing to delete courses in bulk due to data retention policies, we recommend
setting courses to Disabled.
Allow time to confirm the courses are no longer needed before deletion.
Enable or disable course structures in Original Course View
Note
Course structures are available only in the Original Course View.
Course structures contain predefined course materials such as Original Course View course menu links, instructions, and content examples that help instructors jump-start their Original Course View organization. Administrators control the availability of this feature.
On the Administrator Panel in the Courses section, select Course Settings.
On the Course Settings page, select Course Menu and Structures.
On the Course Menu and Structures page, select the check box for Enable Course Structures. To disable them, clear the check box.
Select Submit.
Enable or disable the Quick Setup Guide in Original Course View
Note
The Quick Setup Guide is available only in the Original Course View.
The Quick Setup Guide helps instructors choose elements for their courses such as a course structure. They can also edit the course name and description, and access topics and video tutorials to help them learn more about building their courses.
You can choose whether or not the Quick Setup Guide appears when instructors enter their courses. If you choose to disable its appearance, instructors can access it from the Original Course View by selecting Control Panel then Customization then Quick Setup Guide.
On the Administrator Panel in the Courses section, select Course Settings.
On the Course Settings page, select Quick Setup Guide.
On the Quick Setup Guide page, select the check box for Do not show the Quick Setup Guide when entering a course to disable it. To enable it, clear the check box.
Select Submit.
Delete courses
When you delete a course, Blackboard LMS automatically creates a final, complete archive package. The archive package is stored in the course's autoArchive folder in the Content Collection under the following filename pattern: Course_ID _ Course_PKID _ Course_Title _ currentTime_in_milliseconds _bb_permanent.zip.
Important
Archives created automatically by course deletion are available for 30 days. This can be helpful for recovering data from courses deleted accidentally.
To delete courses:
On the Administrator Panel in the Courses section, select Courses.
Search for one or more courses.
Select the check box next to each course to delete.
Select Delete.
Select OK.
Bulk delete course materials in Original Course View
Bulk deletion of course materials is available in the Original Course View only. This option allows administrators or instructors to remove selected materials while retaining others, such as keeping content while deleting enrollments or grades.
You can't recover materials you bulk delete.
If you choose to bulk delete "Users," all users with the role of Student are removed from your course. The roles of Teaching Assistant, Grader, and Course Builders aren't removed.
Tip
Archive a course first so that you can restore it to its exact state before a bulk delete.
To bulk delete course materials:
From the Control Panel, select Packages and Utilities then Bulk Delete.
In the Select Content Materials to Delete section, select the check boxes for the content areas in the course that you want to delete.
In the Select Other Materials to Delete section, select the check boxes for content found in other areas of the course that you want to delete. For example, if you select Contacts, all of the data associated with staff information will be deleted.
In the Confirmation section, type "Delete" in the box to confirm the bulk delete.
Select Submit.
When performed, your selected course materials are then deleted.