December 2026 Release Notes (4001.7)
Release Information
Instructional Design
Use Learning Activities to create flashcards for student self-review
Instructors can now create flashcards for student self-review as part of the new Learning Activities category of interactive course content. Learning Activities groups interactive activities together as a means of adding additional activity types without changing how instructors find and create them. Flashcards is the initial learning activity.
Flashcards can be built manually, card by card, or generated from course content with AI and then edited before students see them. Students review each card at their own pace, giving them a low-stakes way to check their own understanding before a graded assessment. Instructors now have a quick, simple way to create dynamic and engaging knowledge checks for their course, as well as flashcard metrics that can quickly signal what course content needs more coverage.
Instructors
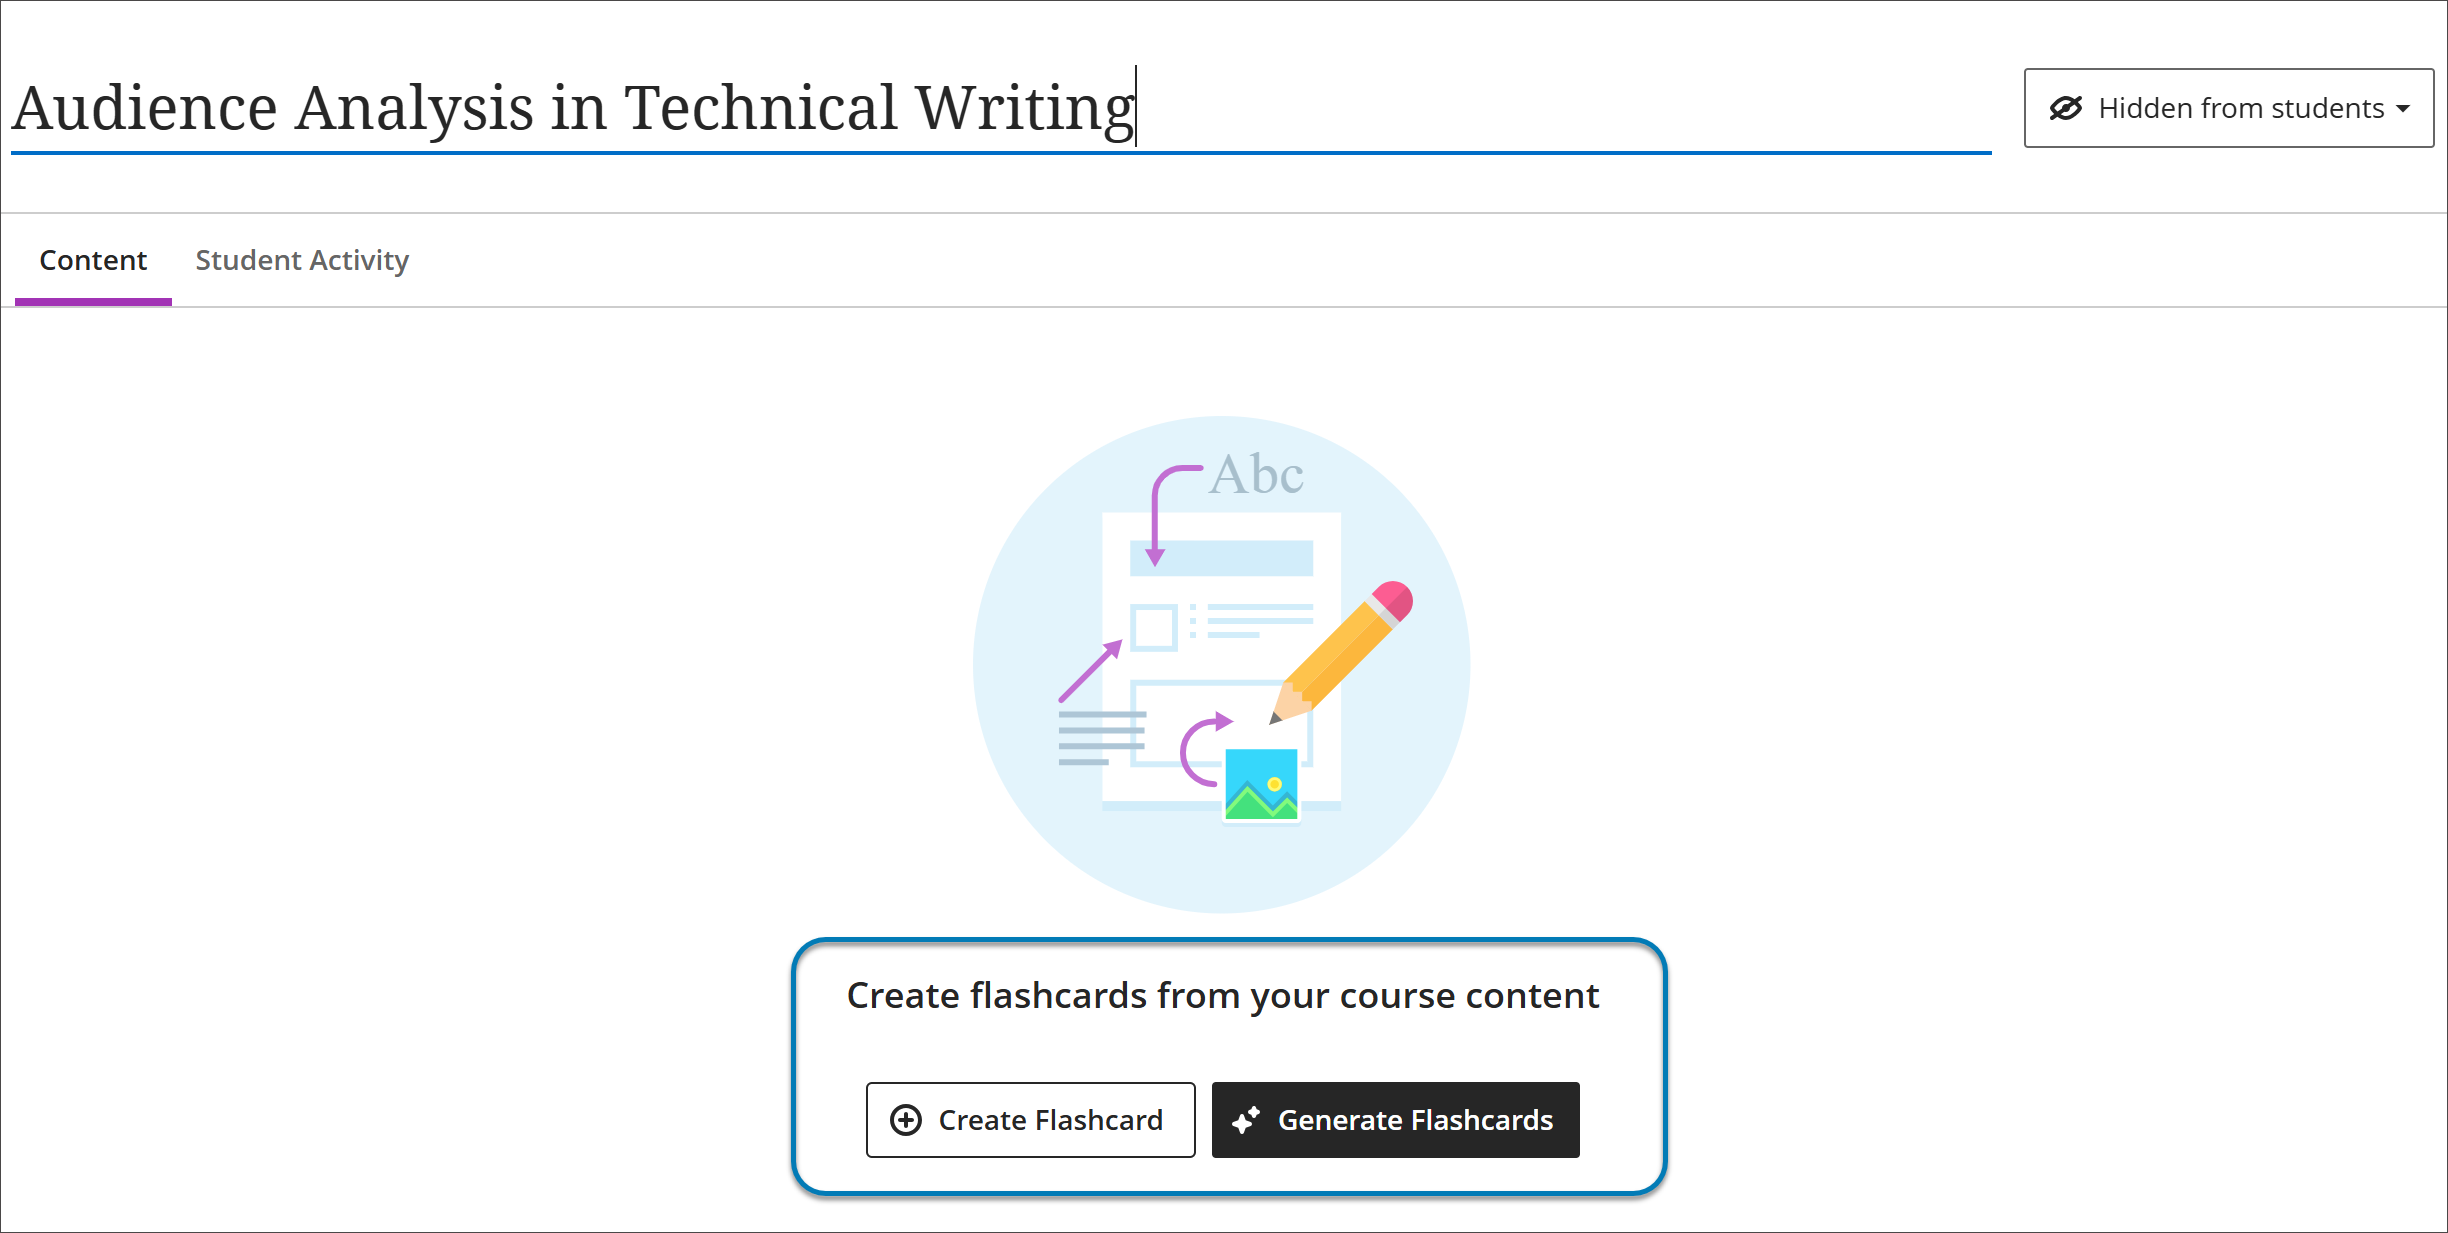
To create a learning activity, open the plus menu in the course, select Create, then select Learning activity. Give the activity a name, then choose one of two paths: build flashcards manually or generate flashcards from course content.
Image 1: From the new Learning Activities area, you can create flashcards manually or by generating them automatically.
Whichever path instructors take, they have full editing control over the result. They can edit both the front and back of any card, add cards manually, and delete cards they do not want.
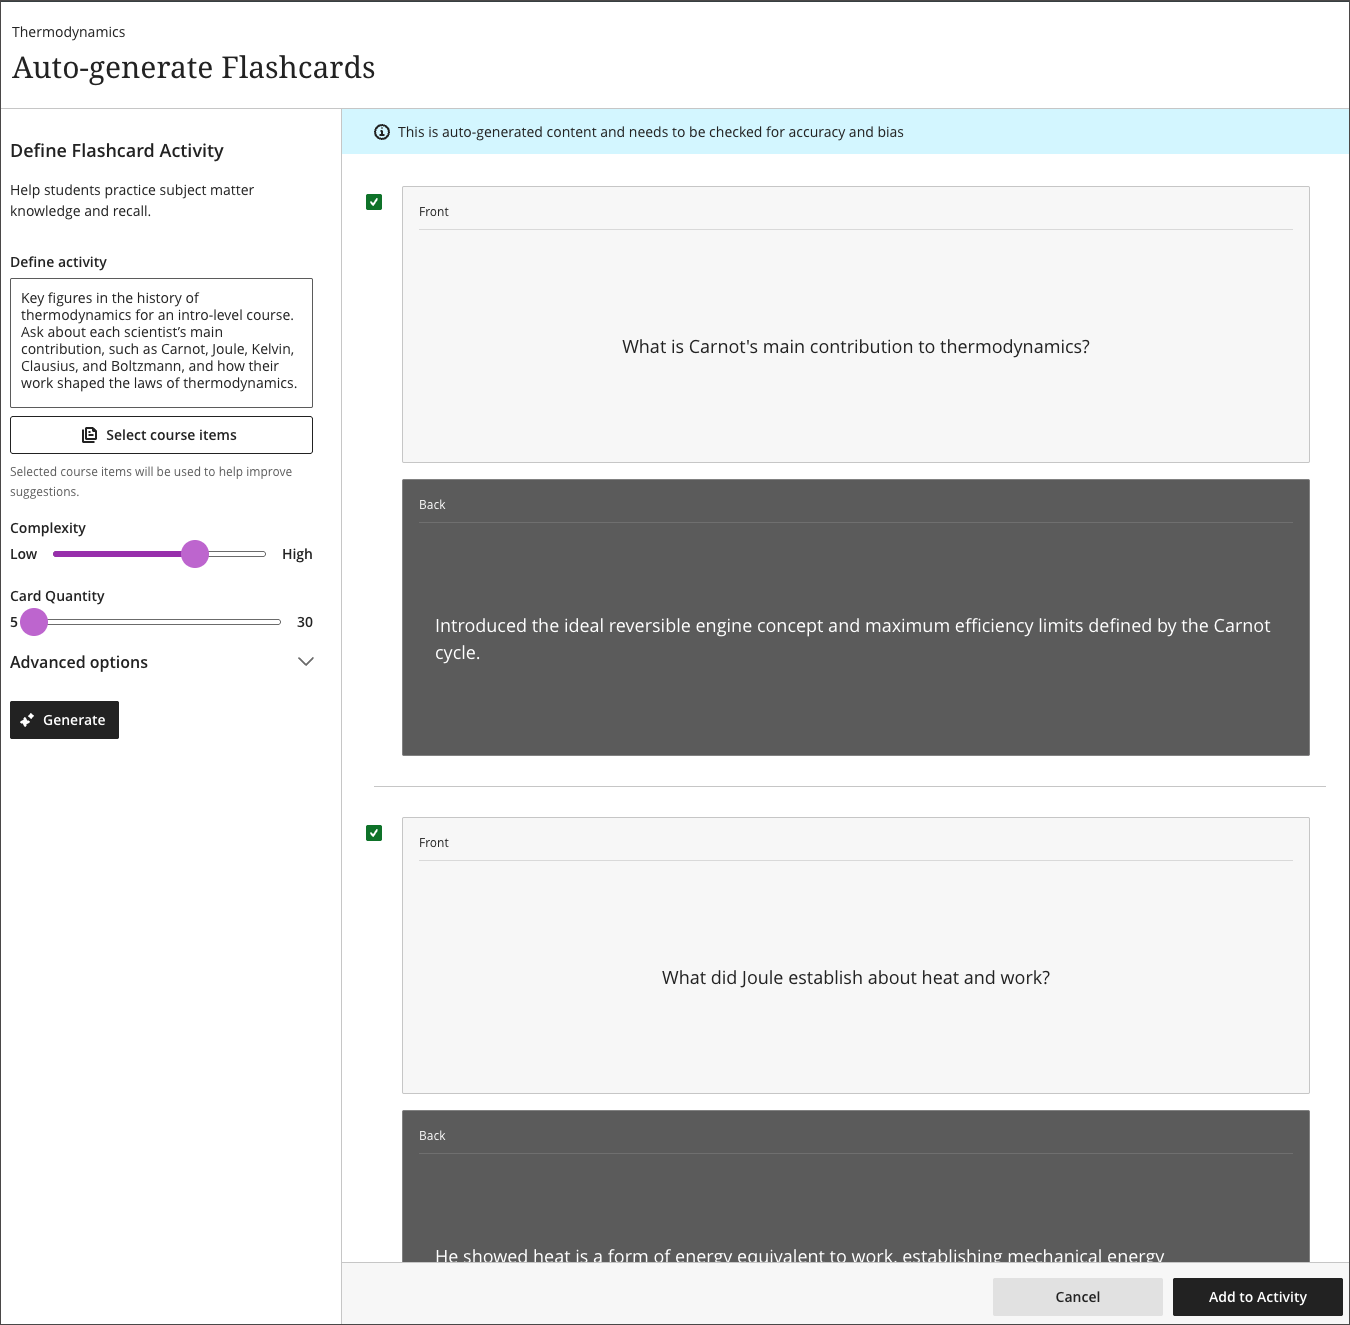
Image 2: You can generate flashcards automatically defining the activity, complexity, card quantity. You can also choose items in your course that you want the flashcard generator to use when creating flashcards.
Two behaviors to note in this release:
Flashcards are text only, so images cannot be added to cards; and cards appear in the order they were created and cannot be reordered after the fact.
Instructors should build cards in the sequence they want students to see them.
When the activity is ready, make it visible to students. The activity can be moved around the course outline like any other content item.
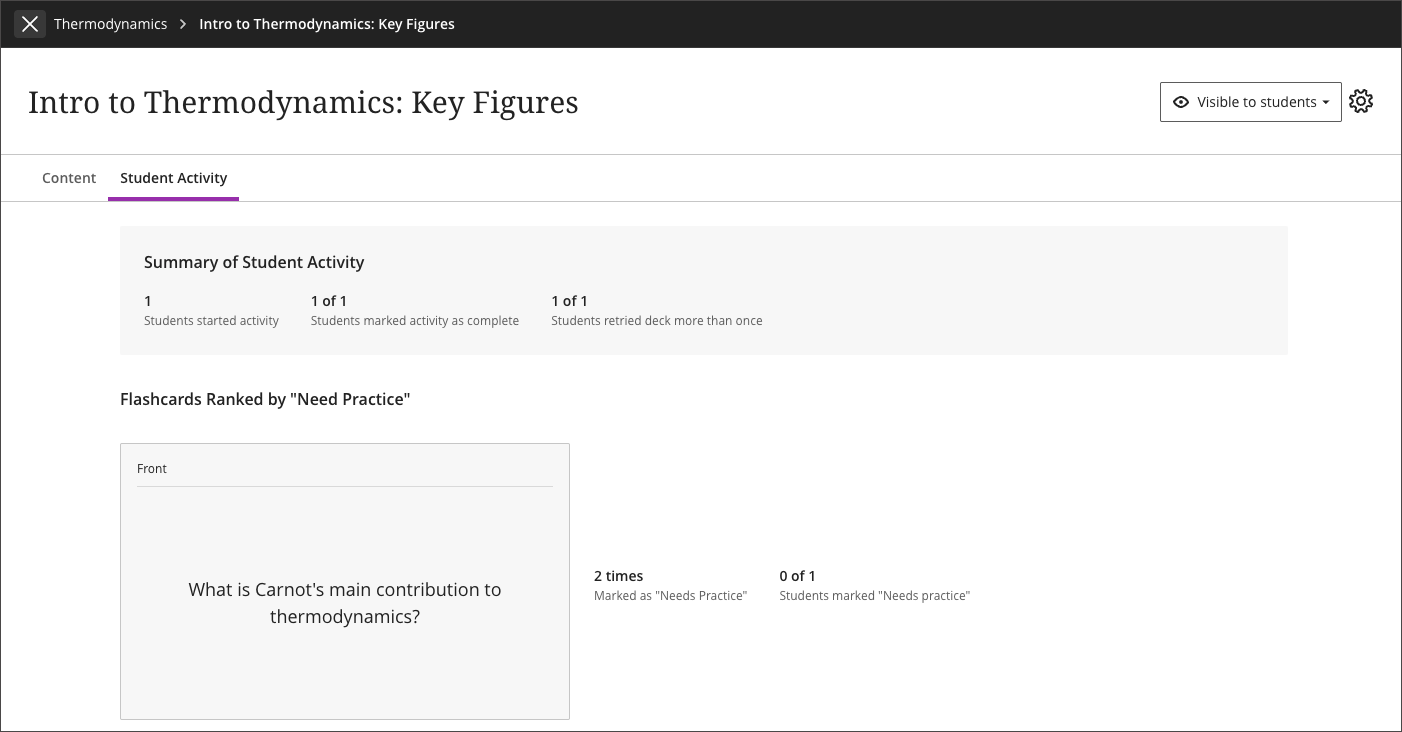
Image 3: In the Student Activity tab, you can view student activity to see how the deck is being used.
Review student activity
Instructors can open the activity and view student activity to see how the deck is being used. Analyze:
Which students have started the activity, and which have completed it.
Whether students retried the deck and how many times.
Confidence levels per card, and how many times each card was marked as needing practice.
These metrics are useful for instructional design. A card repeatedly marked as needing practice can point to a concept students are struggling with. This may signal that the underlying course content needs more coverage. A card consistently marked with full confidence suggests the existing material is doing its job.
Flashcards are created by instructors. Students cannot create their own flashcards in a course.
Students
Students open the activity from the course outline, where they can see the activity description. Inside the activity, they work through one card at a time.
Image 4: When students open flashcards, they read the question, mark their confidence level of understanding of the question, and then flip to see the answer.
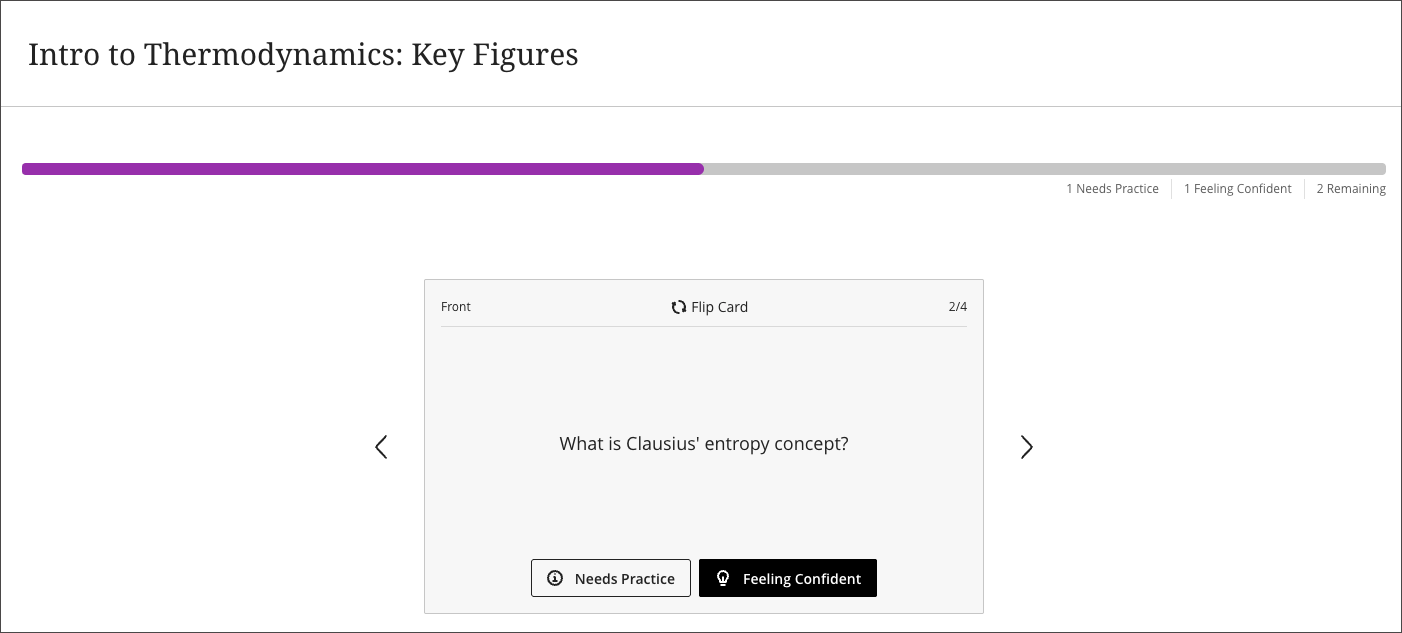
Mark confidence before flipping. Students see the front of the card first and indicate whether they feel confident or need more practice, then flip the card to see the answer.
Track progress as they go. A progress bar runs across the top of the activity, along with counters showing how many cards a student flagged as needing practice, how many the student feels confident about, and how many are still unmarked.
Choose what to do at the end. After working through the deck, students can retry the entire deck, practice only the cards they marked as needing practice, or leave the activity and return to the course with cards still outstanding.
Image 5: When students finish a flashcard deck, they get a progress breakdown of the activity, including how many questions they felt confident about and the option to either practice cards they listed as needing practice or the option to retry the entire deck.
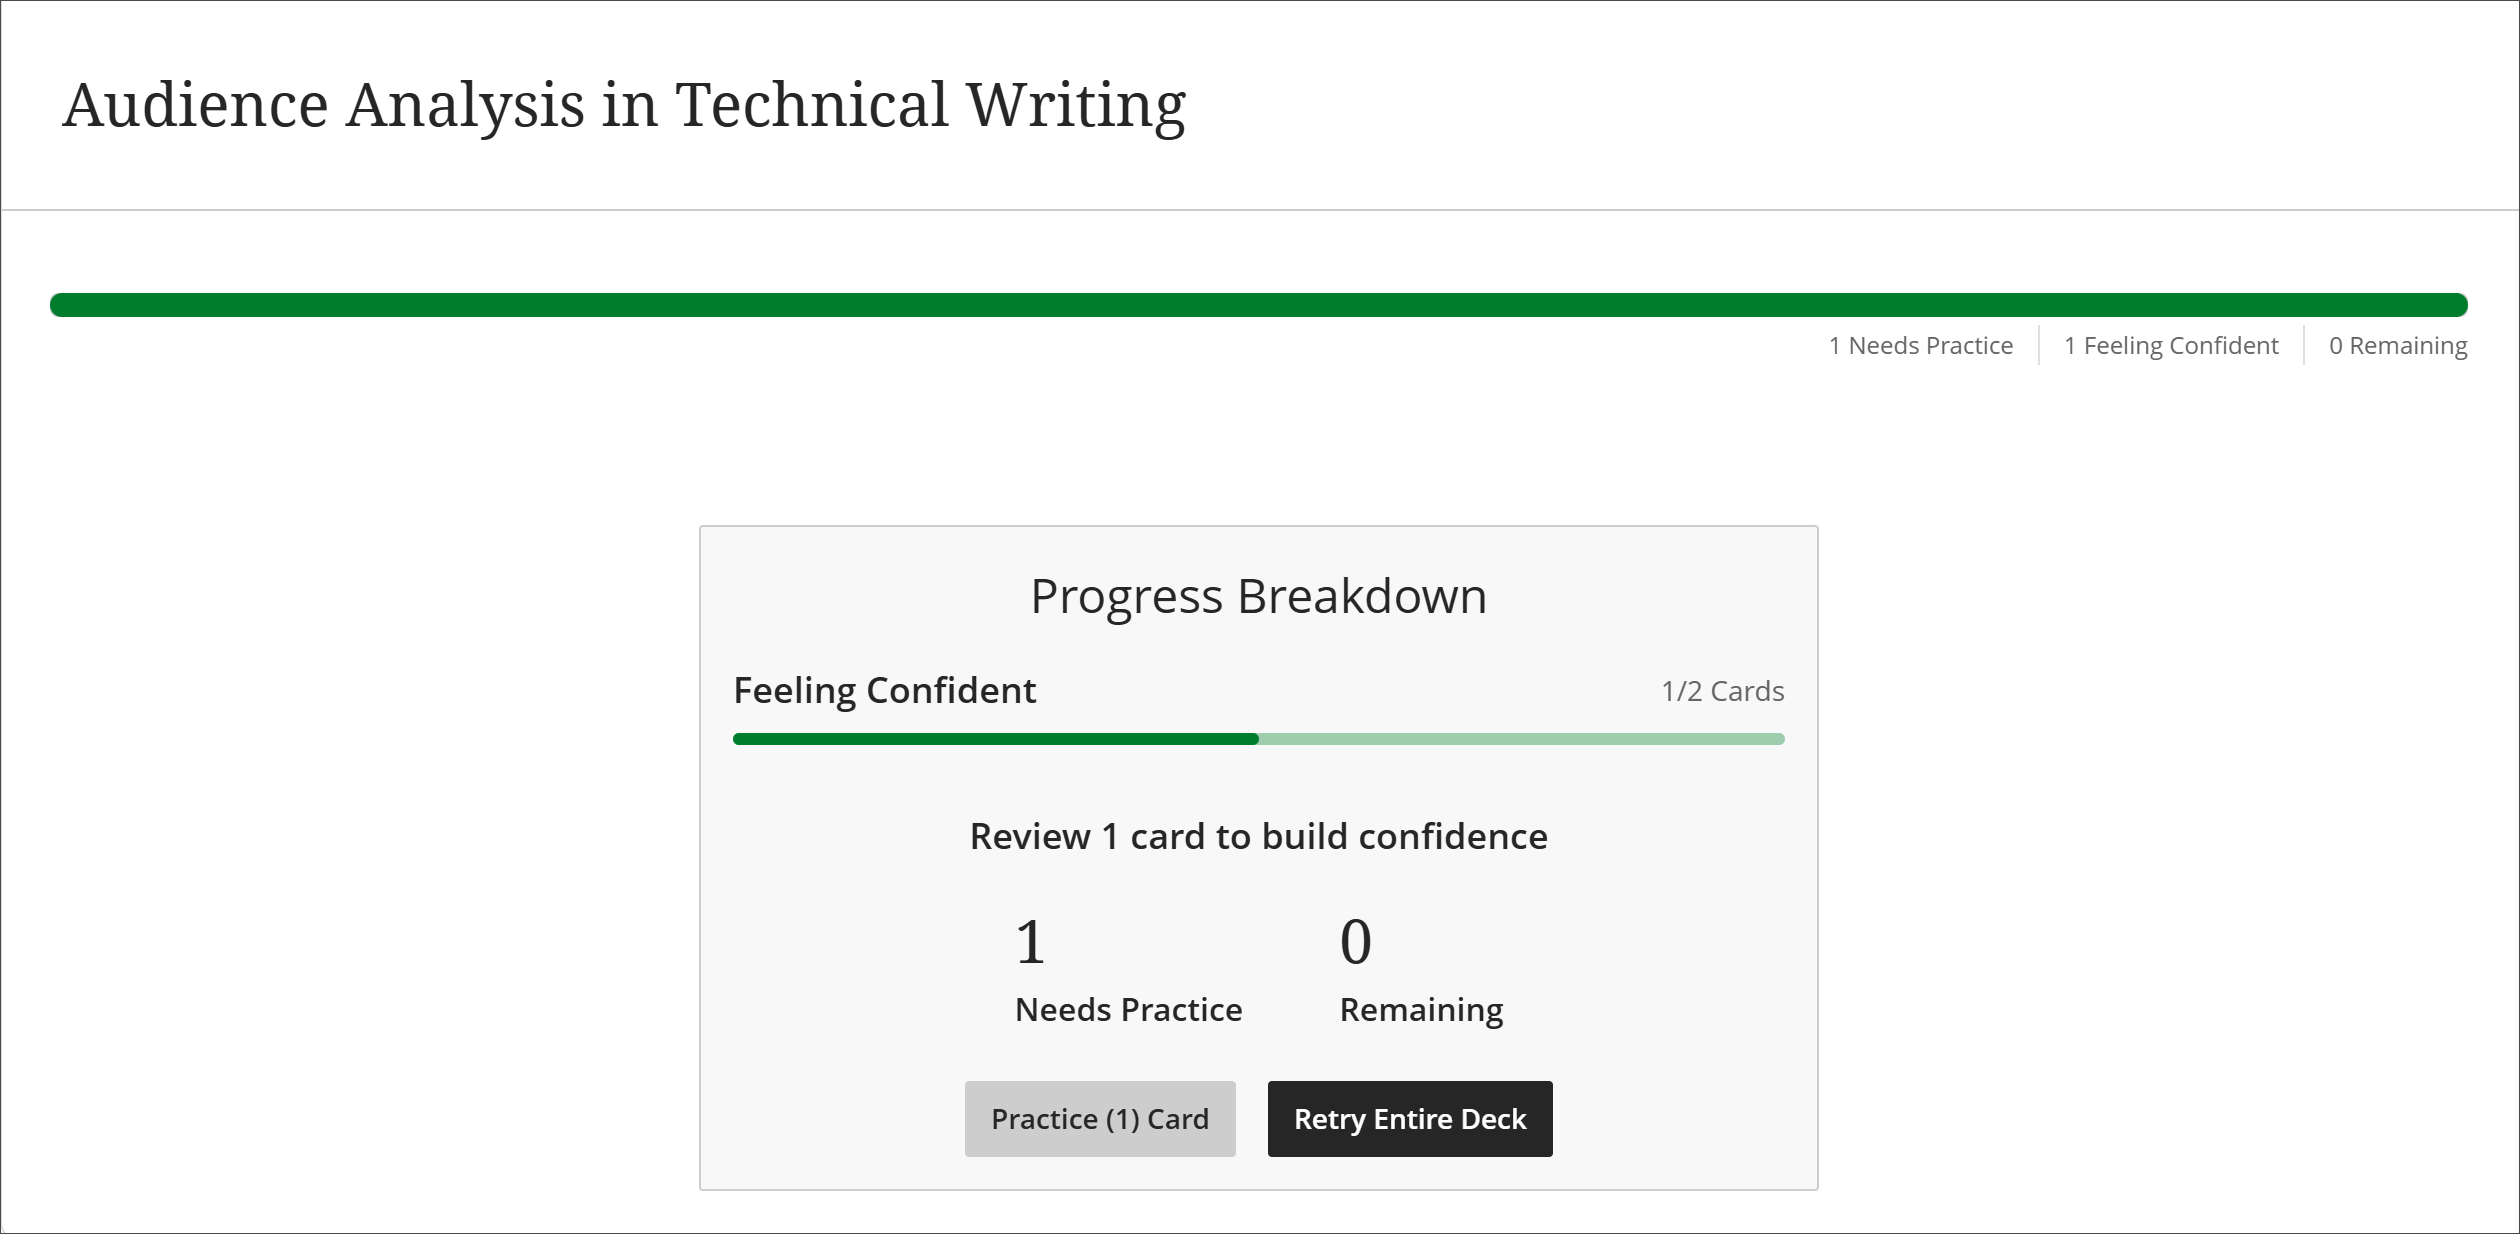
Students can retry a deck as many times as they like. Flashcards are a self-reflection tool rather than a graded assessment, so marking a card as needing practice has no effect on a student's grade.
Progress tracking: entering the activity without interacting with any card marks it as Started. Interacting with the first card marks the activity as Complete.
Administrators
Availability: Available for all Ultra Course View courses.
Activation: Learning Activities is turned off by default under Tools. Institutions that do not want to use Learning Activities must turn it off there. To allow instructors to generate flashcards with AI, go to the Administrator Panel, select Building Blocks, then Installed Tools, then AI Design Assistant and Unsplash, and turn on Generate learning activities.
Configuration: The Tools setting is the master switch for Learning Activities. The Generate learning activities setting controls only whether AI generation is available — it has no effect if Learning Activities is turned off under Tools. Institutions that want AI-generated flashcards must have both turned on.
December improvements to the beta Content Editor for Blackboard Documents
We’ve added a set of improvements to the editor for December. Updates span accessibility, toolbar layout, text formatting, tables, and media. These changes help instructors create and format content more efficiently.
Instructors
Accessibility and keyboard navigation
Toolbar group dividers have higher contrast. This makes toolbar groups easier to tell apart.
Pressing Enter on a toolbar dropdown no longer selects an option automatically. Keyboard users can move through the options and choose one deliberately.
The Keyboard Shortcuts button sits in the top-right corner of the editor. It stays accessible at every screen size, including smaller screens.
Image 1: The Keyboard Shortcuts button is located in the top-right corner of the editor.

Toolbar and menus
A Font Size control is available directly on the toolbar. Instructors can change text size without opening the Format menu.
Image 2: There is a Font Size button on the toolbar.

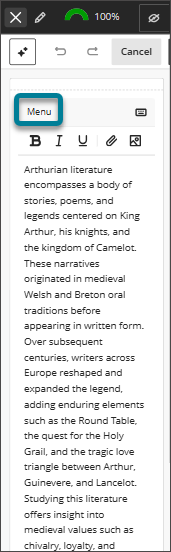
On smaller screens, the Edit, Insert, and Format menus combine into a single Menu Bar. This saves space and keeps every menu option available.
Image 3: The editor on a small screen shows one Menu option on the Menu Bar.
Text formatting and equations
The default blue, red, and green font colors match those in the Classic Editor. Existing content keeps its intended colors, and instructors find the color options they expect.
LaTeX equations render in real time, without saving first. Instructors can select a rendered equation to edit its LaTeX source, adjust its styling, or switch between Inline and Block display. This makes it faster to create and revise mathematical content.
Tables
Table formatting and spacing stay intact when instructors save content. Saving doesn’t add line breaks within tables.
Small file attachments work within table cells. They display and behave consistently with attachments elsewhere in the content.
Resizing a table column adjusts only the two adjacent columns. The rest of the table keeps its layout, which gives instructors more precise control.
Media
Video Studio videos have an inline toolbar. Instructors can edit or delete an embedded video directly within the editor.
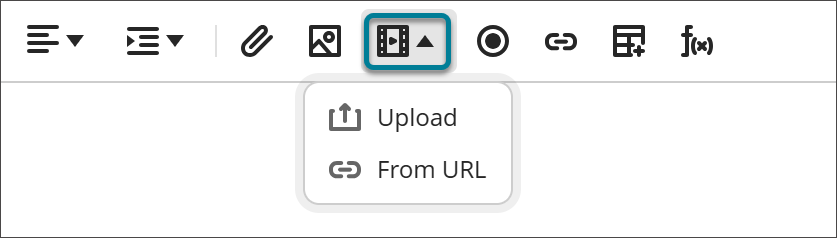
The Embed Media button uses a filmstrip icon that matches the Classic Editor, with a clearer tooltip. The button offers two options: Upload and From URL. Instructors can upload media files or embed content from YouTube, Vimeo, and other supported providers.
Image 4: The Embed Media button has Upload and From URL options.
Embedded media fills 100% of the available content width by default. This makes better use of the editor’s space and reduces manual resizing.
Administrators
Availability: Available to all Ultra courses.
Activation: Disabled by default.
Configuration: In the Admin Panel, select Configure in the The Ultra Experience is Here module. Turn on the New Content Editor for Blackboard Documents (Beta) feature flag.
Privilege Updates: Not applicable
Communication and Collaboration
Fill existing empty groups first when randomly assigning students
When an instructor uses Randomly assign in a group set, students who aren’t yet in a group are now placed into existing empty groups first, and new groups are created only to cover any shortfall. This keeps group sets tidy, so instructors no longer end up with empty groups left behind alongside extra new ones.
Previously, random assignment created brand-new groups even when empty groups already existed, leaving the empty groups unused and the group set cluttered with more groups than intended.
Instructors
When you use Randomly assign (automatic enrollment) on a group set:
Existing empty groups fill first. Students who aren’t in a group are distributed into your existing empty groups before any new groups are created. This includes empty groups you saved earlier and empty groups you created in the current editing session.
New groups cover only the shortfall. If there aren’t enough empty groups for everyone, new groups are created only for the remaining students.
Students already in a group stay put. Random assignment never moves students who are already assigned.
Groups aim for at least two members. Where possible, every group ends up with at least two members, including a reused group.
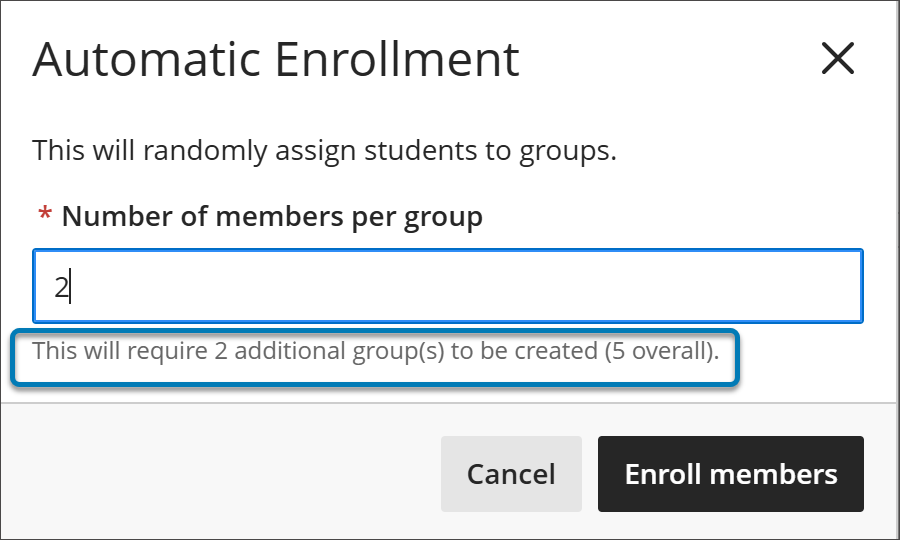
The estimate reflects reused groups. The “groups to be created” count in the Automatic enrollment window now subtracts the empty groups that will be reused. When no new group is needed, it shows that no additional groups are required.
Image 1: Students who aren’t yet in a group are now placed into existing empty groups first and new groups are created only to cover any shortfall.
Administrators
Availability: Available to all Ultra courses.
Activation: None needed.
Configuration: None needed.
Privilege Updates: Not applicable.
Assignments and Tests
Improved accessibility for multiple choice questions
Reordering answer choices in multiple choice questions works better with a keyboard and screen reader.
Instructors
When you create or edit a multiple choice question, you can reorder answer choices with a keyboard. Screen readers announce each step as you pick up, move, and drop an answer choice.
Administrators
Availability: Available to all Ultra courses.
Activation: None needed.
Configuration: None needed.
Privilege Updates: Not applicable.
Gradebook
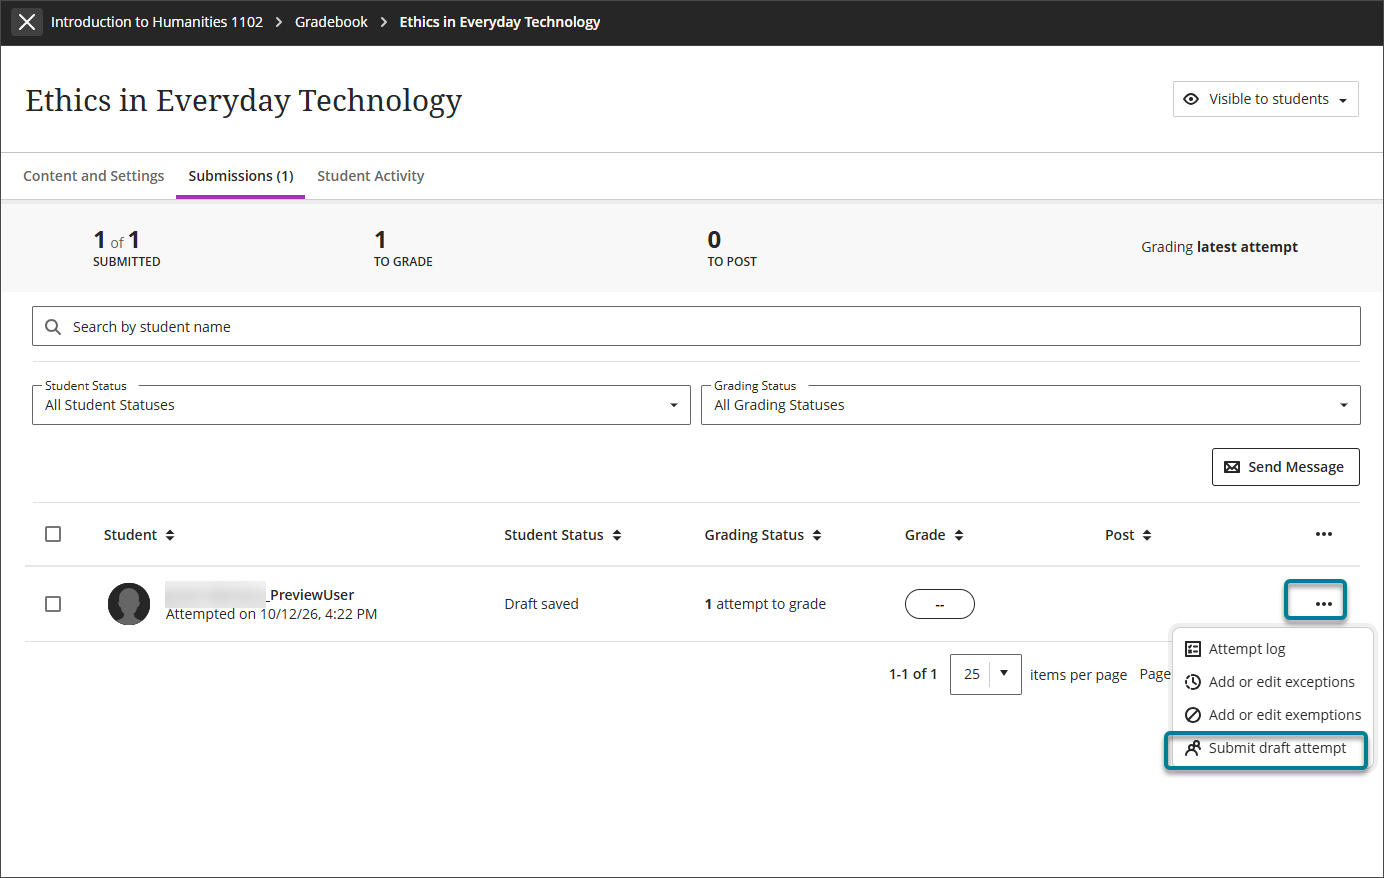
Submit in-progress attempts on behalf of students from the Submissions page
For assessments that aren't graded anonymously, instructors can submit a student's in-progress attempt directly from the Submissions page and record the reason. The submission receipt, the student's emailed receipt, and the submission review all show who submitted the attempt, why, and when.
Instructors
On the Submissions page for an assignment or test, select the ellipsis menu for a student whose status is Draft saved, then select Submit draft attempt. Enter the reason for the submission, then select Submit.
The submission receipt and the submission review show your name, the reason you entered, and the date.
For anonymously graded assessments, submit draft attempts from the student overview in the gradebook.
Image 1: Submit draft attempt on the Submissions page.
Students
When an instructor submits an attempt on your behalf, your emailed submission receipt and the submission review show the instructor's name and the date.
Administrators
Availability: Available to all Ultra courses.
Activation: None needed.
Configuration: None needed.
Privilege Updates: Not applicable.
Core
Add alternative text to images in the Course Content page
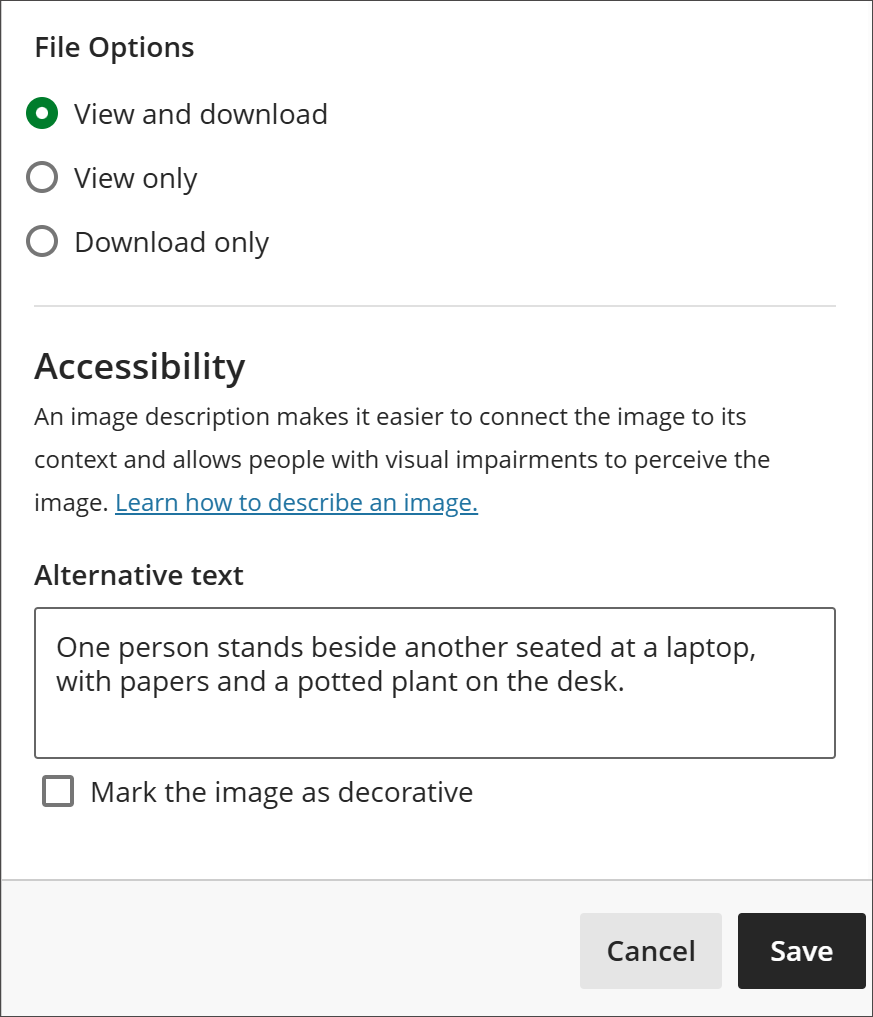
Instructors can now add alternative text to images uploaded directly to the course content page, and mark images as decorative when they carry no meaning. When you upload a JPG, PNG, or GIF to the course content page, an Alternative text field is now part of the dialog, and you can add or edit a description at any time. Alternative text makes course images meaningful to students who use screen readers, gives instructors direct control over how each image is described, and ensures descriptions are saved with the course.
Instructors
Add alternative text on upload. When you upload a JPG, PNG, or GIF to the course content page, an Alternative text field is offered. Whatever you enter is what a student’s screen reader announces.
No filename default. The field starts empty rather than pre-filled with the image’s file name, so descriptions are meaningful rather than something like “IMG_4021.jpg.” Adding alternative text is optional, but an image is not treated as decorative unless you choose to mark it so.
Mark an image as decorative. When an image is purely decorative, select Mark the image as decorative so screen readers skip it. The Alternative text field is disabled while this is selected, and any text you already typed is kept if you clear the option again.
Edit images already in the content page. Open an image that’s already on the course content page to see and change its current alternative text or decorative choice. Changes appear to students without a page reload.
Learn how to describe an image. The component links to guidance on writing effective image descriptions.
A few behaviors worth knowing:
Replacing an image with a different file clears the previous alternative text, since it no longer describes the new image.
The Alternative text and decorative options appear only for images shown inline in the browser (JPG, PNG, GIF).
A user without editing access can see an image’s alternative text and decorative choice but cannot change them.
Descriptions are saved with the course. Alternative text and decorative choices are now stored in Blackboard LMS and are kept when an image item is duplicated, when a course is copied, and when a course is exported and imported. This is a go-forward change: images described before this release keep their existing behavior, and an image that was never described opens as not decorative.
Image 1: Instructors can now add alternative text to images uploaded directly to the course content page, and mark images as decorative when they carry no meaning.
Sharing alternative text across placements
참고
For images added to the Course Content page, only text entered in the alt text description box (or the decorative option selection) will be recognized by screen readers. Anything that was previously added in the descriptions will not be read out by the screen reader.
The same image can be placed on the course content page more than once. How alternative text and decorative choices are shared across those placements depends on whether your institution licenses Ally.
Blackboard LMS without Ally. Each placement of an image on the course content page has its own alternative text and decorative choice, whether the image was uploaded from your device or added from the Content Collection. Describing an image in one place does not change it in another.
Blackboard LMS with Ally. For images uploaded to the course content page from your device, alternative text and decorative choices still apply per placement. For images added to the course content page from the Content Collection, the same alternative text and decorative choice apply to every placement of that image.
Administrators
Availability: Available to all Ultra courses.
Activation: None needed.
Configuration: None needed.
Privilege Updates: Not applicable.
Admin
Manage institutional resources with a new Resources page on the Institution Page
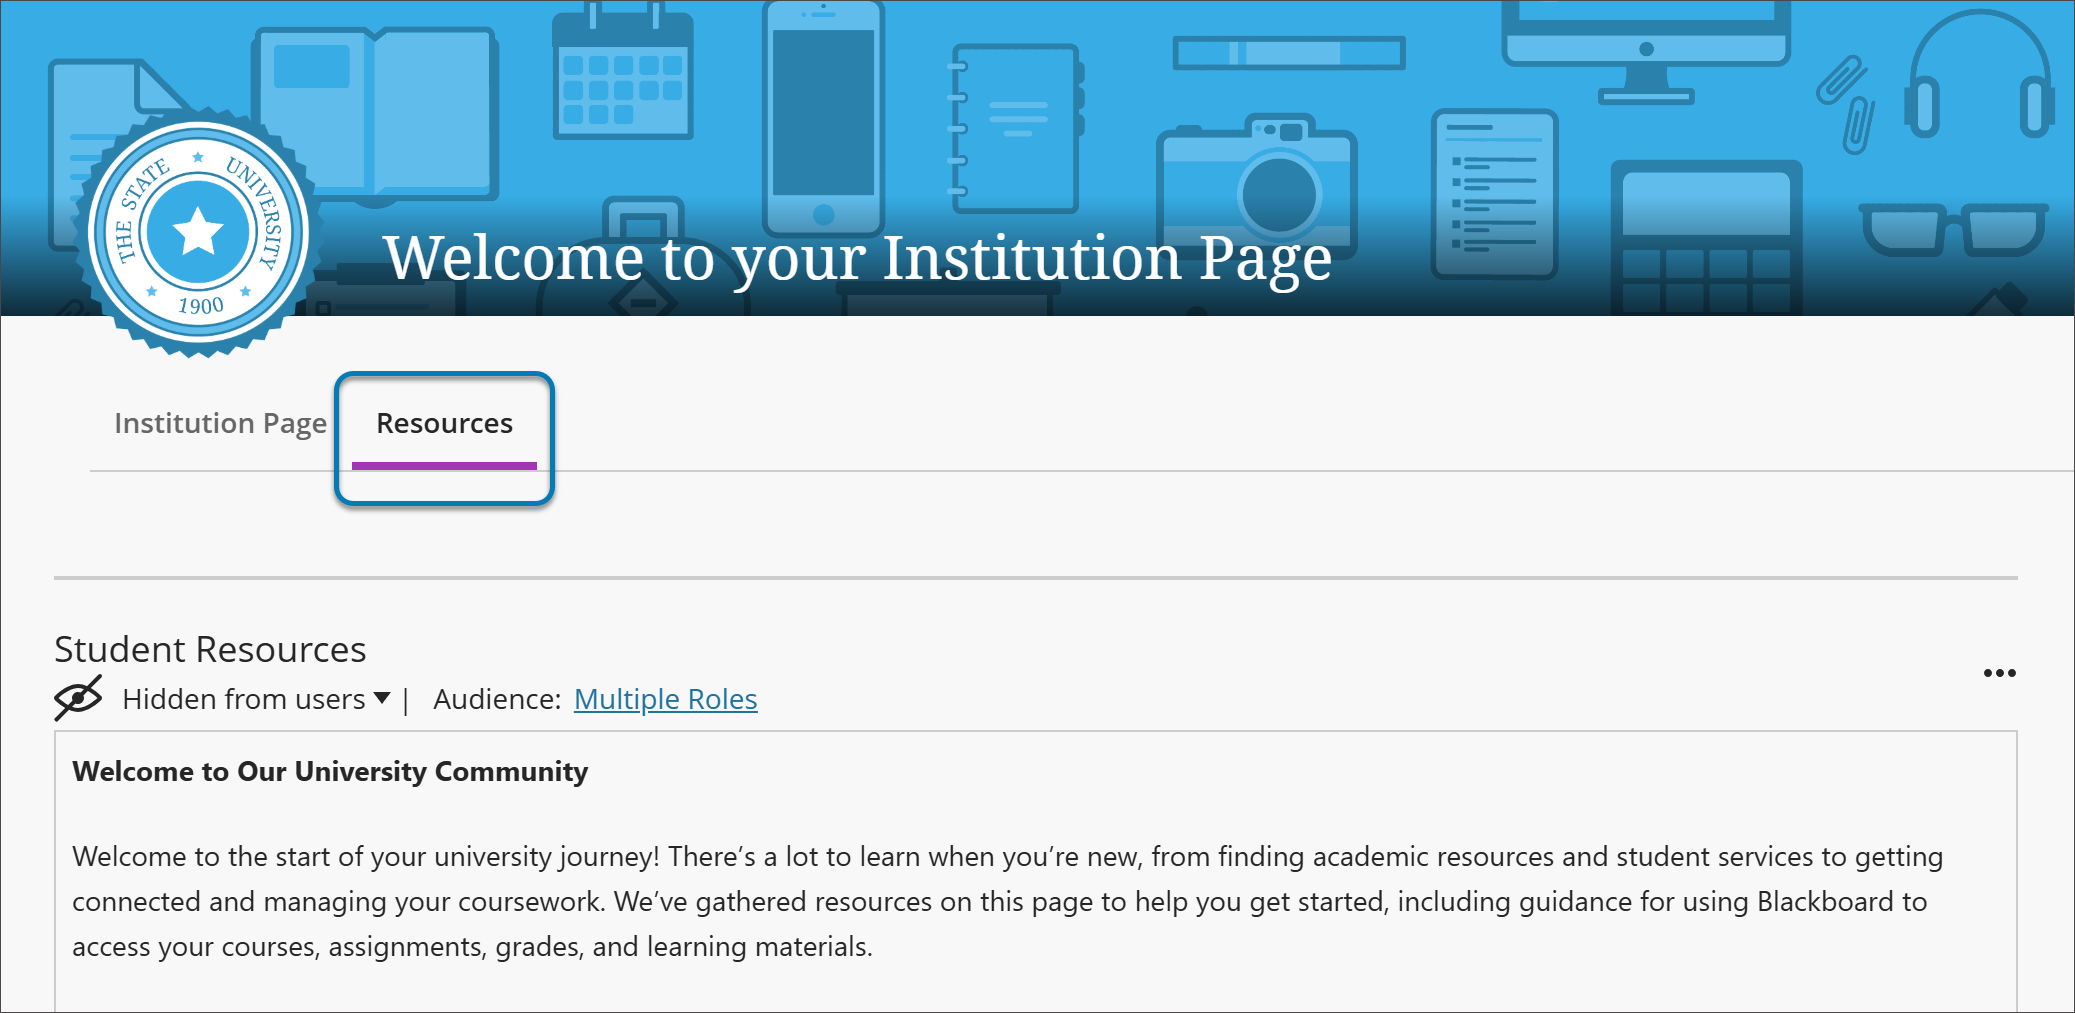
A new configurable Resources page is now available within the Institution Page, giving administrators an additional space to organize and present institutional links, information, and content. The Resources page uses the same modules, layout controls, and branding as the Institution Page itself, so administrators can build a flexible, branded resource experience with familiar tools. It also provides the path for institutions to move content off Blackboard Assist, which is reaching end of life.
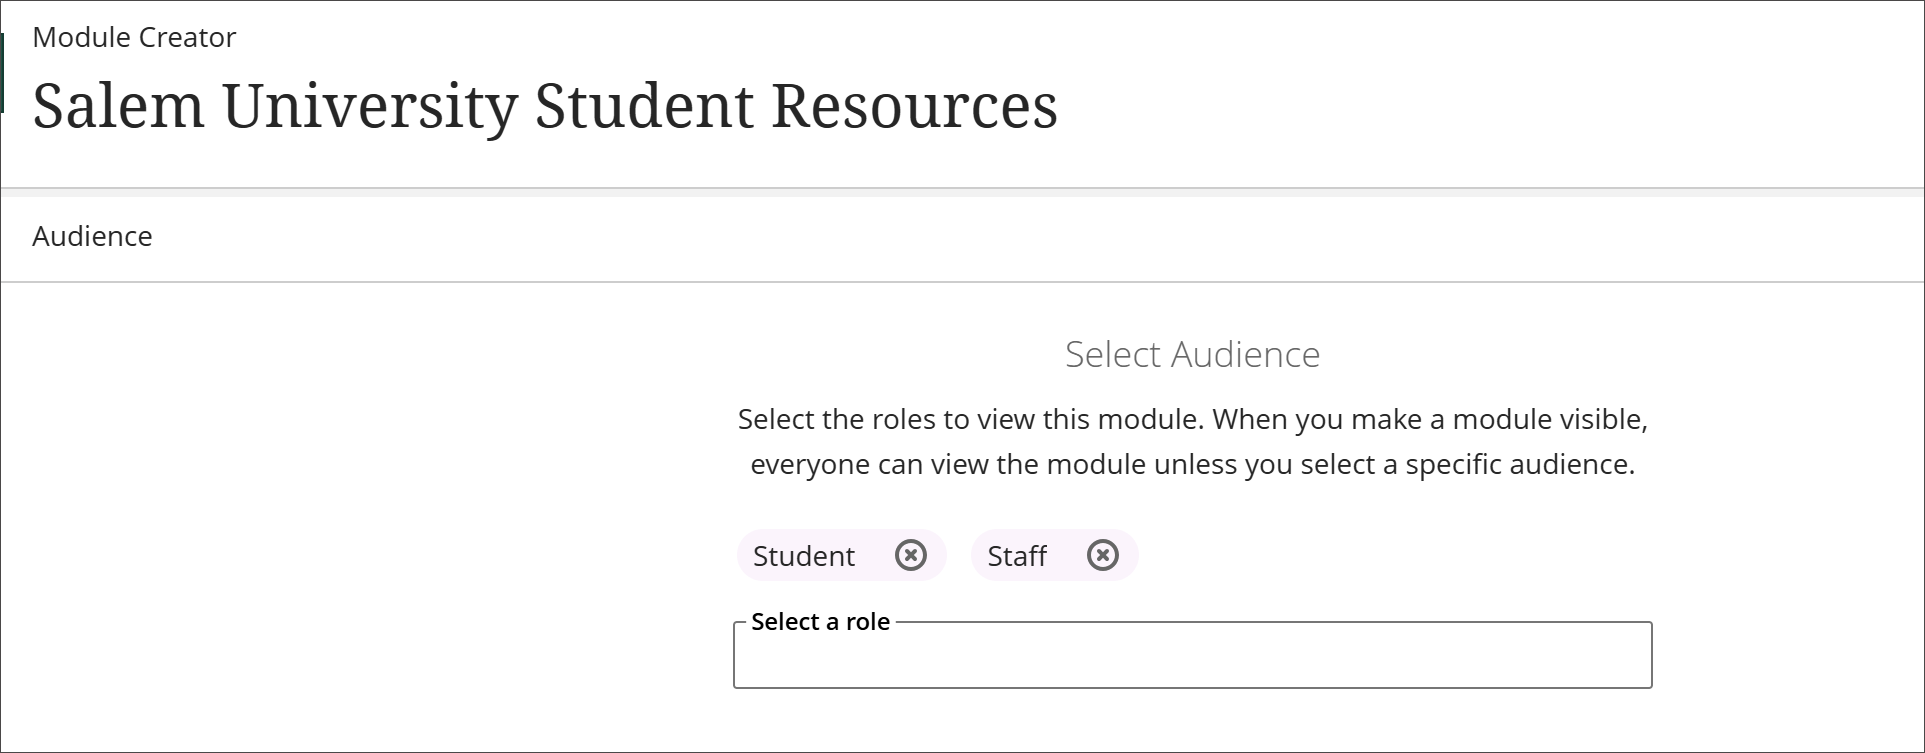
Because the Resources page reuses the Institution Page model, it adds a capability that Blackboard Assist did not offer: role-based delivery. Instead of showing the same content to everyone, administrators can target each module to specific institution roles, so different audiences — staff and students, or students within a particular faculty — can see resources relevant to them.
Image 1: With the new resources page, you can select the audiences for whom the page will be visible.
When the Resources page is turned on, a new Resources tab appears alongside the existing Institution Page. The new page works like the Institution Page you already manage:
Build with the same modules. The Resources page uses the same module types and content options as the Institution Page, and you can add as many modules as you need — links, descriptions, images, and HTML modules for flexible layouts.
Target content by role. Each module supports audience targeting, so you can deliver resources to specific institution roles rather than to everyone. This is useful when different faculties, campuses, or student populations have different support needs.
Manage visibility and layout with familiar tools. Visibility, audience targeting, and layout all work the same way they do on the Institution Page.
Name the tab to suit your institution. You can give the Resources tab a custom name — for example, “Student Information” instead of “Resources” — and the name you set appears on the Institution Page.
The Resources page supports institution-specific branding. In environments with multiple brands or campuses, you can configure the page independently for each brand.
Because Blackboard Assist is reaching end of life, the Resources page is where institutions should rebuild and expand the content they currently host in Assist. For details on the Assist timeline, see the Blackboard Assist end-of-life release note.
Image 2: The new Resources tab appears alongside the Institution Page tab and gives you an opportunity to display resources to specific audiences.
Administrators
Availability: Available to all institutions using Institution Page. No additional license is required.
Activation: The Resources page is controlled by a Feature Flag called Institution Resources Tab that is turned off by default. Turn it on from a brand’s configuration settings.
Configuration: Turn the Resources page on or off in a brand’s configuration settings, which you can open either from the Institution Page (select the Settings gear) or from the Administrator Panel:
Select Brands in The Ultra Experience is Here! module.
Select the brand you want to configure.
Under Resources Page, select Activate Resources Page and give the page a name.
Select Save.
Because the setting lives at the brand level, turn the Resources page on separately for each brand where you want it to appear — enabling it for one brand does not enable it for the others.
Privilege Updates: Not applicable.
Blackboard Assist reaches end of life on December 31, 2026
Blackboard Assist reaches end of life on December 31, 2026. After that date, Blackboard Assist and its functionality will no longer be available, so institutions should move any content and resources they maintain in Assist before then. This is a reminder of the previously announced timeline, shared now because the replacement capability is available.
Institutions can rebuild their Assist content using the new Resources page on the Institution Page, which provides a branded, configurable space for institutional resources and supports role-based delivery. For details, see the Resources page release note.
As Blackboard Assist is retired, its two capabilities move as follows:
Institutional resource content moves to the Resources page. The services and resources you currently present in Assist should be rebuilt on the new Resources page on the Institution Page. See the Resources page release note to get started.
Ally File Transformer moves to the Tools area (in January 2027 release (4001.9)). The Ally File Transformer, which lets students convert files into alternative formats, moves from Blackboard Assist to the Tools area of the base navigation. It remains available to students there and continues to require no Ally license.
To avoid any gap for your users, plan to move your Assist content to the Resources page ahead of the December 31, 2026 end-of-life date.
Administrators
Availability: Pertains to all institutions using Blackboard Assist.
Activation: None needed. The Resources page is controlled by a Feature Flag called Institution Resources Tab that is turned off by default.
Configuration: None Needed. Turn the Resources page on or off in a brand’s configuration settings, which you can open either from the Institution Page (select the Settings gear) or from the Administrator Panel
Select Brands in The Ultra Experience is Here! module.
Select the brand you want to configure.
Under Resources Page, select Activate Resources Page and give the page a name.
Select Save.
Because the setting lives at the brand level, turn the Resources page on separately for each brand where you want it to appear — enabling it for one brand does not enable it for the others.
Privilege Updates: Not applicable.
Upgrade to Ultra
Use REST APIs to bulk download automatic course archives
We’ve added bulk download access to automatic course archives using the Learn REST API. Auto-archives include courses that were deleted, so administrators can recover a course after it’s removed. Logs are also available to feed log monitoring tools. Bulk downloads previously used WebDAV, which is no longer available. This change gives institutions dependable access to the files they need for retention, compliance, and course recovery.
This process has entirely new instructions as well as a new script. The instructions and script that were used for the WebDAV process will no longer work.
Administrators
Availability: Available to all Original and Ultra courses
Activation: None needed.
Configuration: None needed.
Privilege Updates: Not applicable.
Manage content duplication with a dedicated privilege
We’ve added a dedicated privilege for the Duplicate option on course content. Administrators can now control who duplicates content within a course separately from who copies content between courses. This gives institutions more precise control over content permissions and lets them match each role’s access to how that role works in a course.
The new privilege is Course/Organization > Content > Item > ... > Duplicate. This privilege allows users to be able to duplicate only within a course. Previously, the Copy privileges controlled the Duplicate option. Institutions couldn’t allow duplication within a course without also allowing content to be copied between courses.
The privilege is granted by default to the Instructor, Course Builder, and Teaching Assistant course roles. It’s also granted to the Course Administrator, System Administrator, and System Support system roles. Custom roles don’t receive the privilege automatically. Administrators must grant it to any custom role that needs to duplicate content. Copy Items behavior doesn’t change.
Instructors
Instructors can duplicate most content items from the More options menu on the Course Content page. The duplicate is an independent copy that appears directly below the original in the same course. Instructors can reuse an assignment, test, or folder structure for another week or unit without rebuilding it. Course builders and teaching assistants have the same access by default.
Duplicate always creates the copy in the current course. To reuse content in a different course, instructors use Copy Items.
Administrators
Availability: Available to all Ultra courses.
Activation: None needed.
Configuration: None needed.
Privilege Updates:
Label: Course/Organization > Content > Item > ... > Duplicate
ID: course.content-item.duplicate.EXECUTE
New privilege that allows users to be able to duplicate only within a course.
Premium
Video Studio: Require students to watch a video fully before continuing in a forced-sequence module
In a Learning Module with forced sequence enabled, a Video Studio video added to the course outline is now marked complete only after a student has watched it in full. Students can no longer advance past a required video by selecting Next without watching it. This gives instructors confidence that students have viewed required video content before moving on in a learning module.
Instructors
When a Video Studio video from the course outline is part of a forced-sequence module, its completion is now tied to how much of the video the student has watched, rather than being marked complete manually or by moving to the next item. Students must watch the video to progress, and completion is recorded automatically once they do, so no manual step is required from the student.
This applies automatically. Existing courses are included, and a video already marked complete stays complete. If a video is edited or replaced, it follows the same behavior as other items with automatic progress tracking.
Students
In a forced-sequence module, a Video Studio video is marked complete automatically once you’ve watched it, and you can move on to the next item at that point. The item’s progress indicator reflects where you are:
Image 1: When using forced-sequence within a Learning Module, a Video Studio video is marked complete automatically once you’ve watched it, and you can move on to the next item.
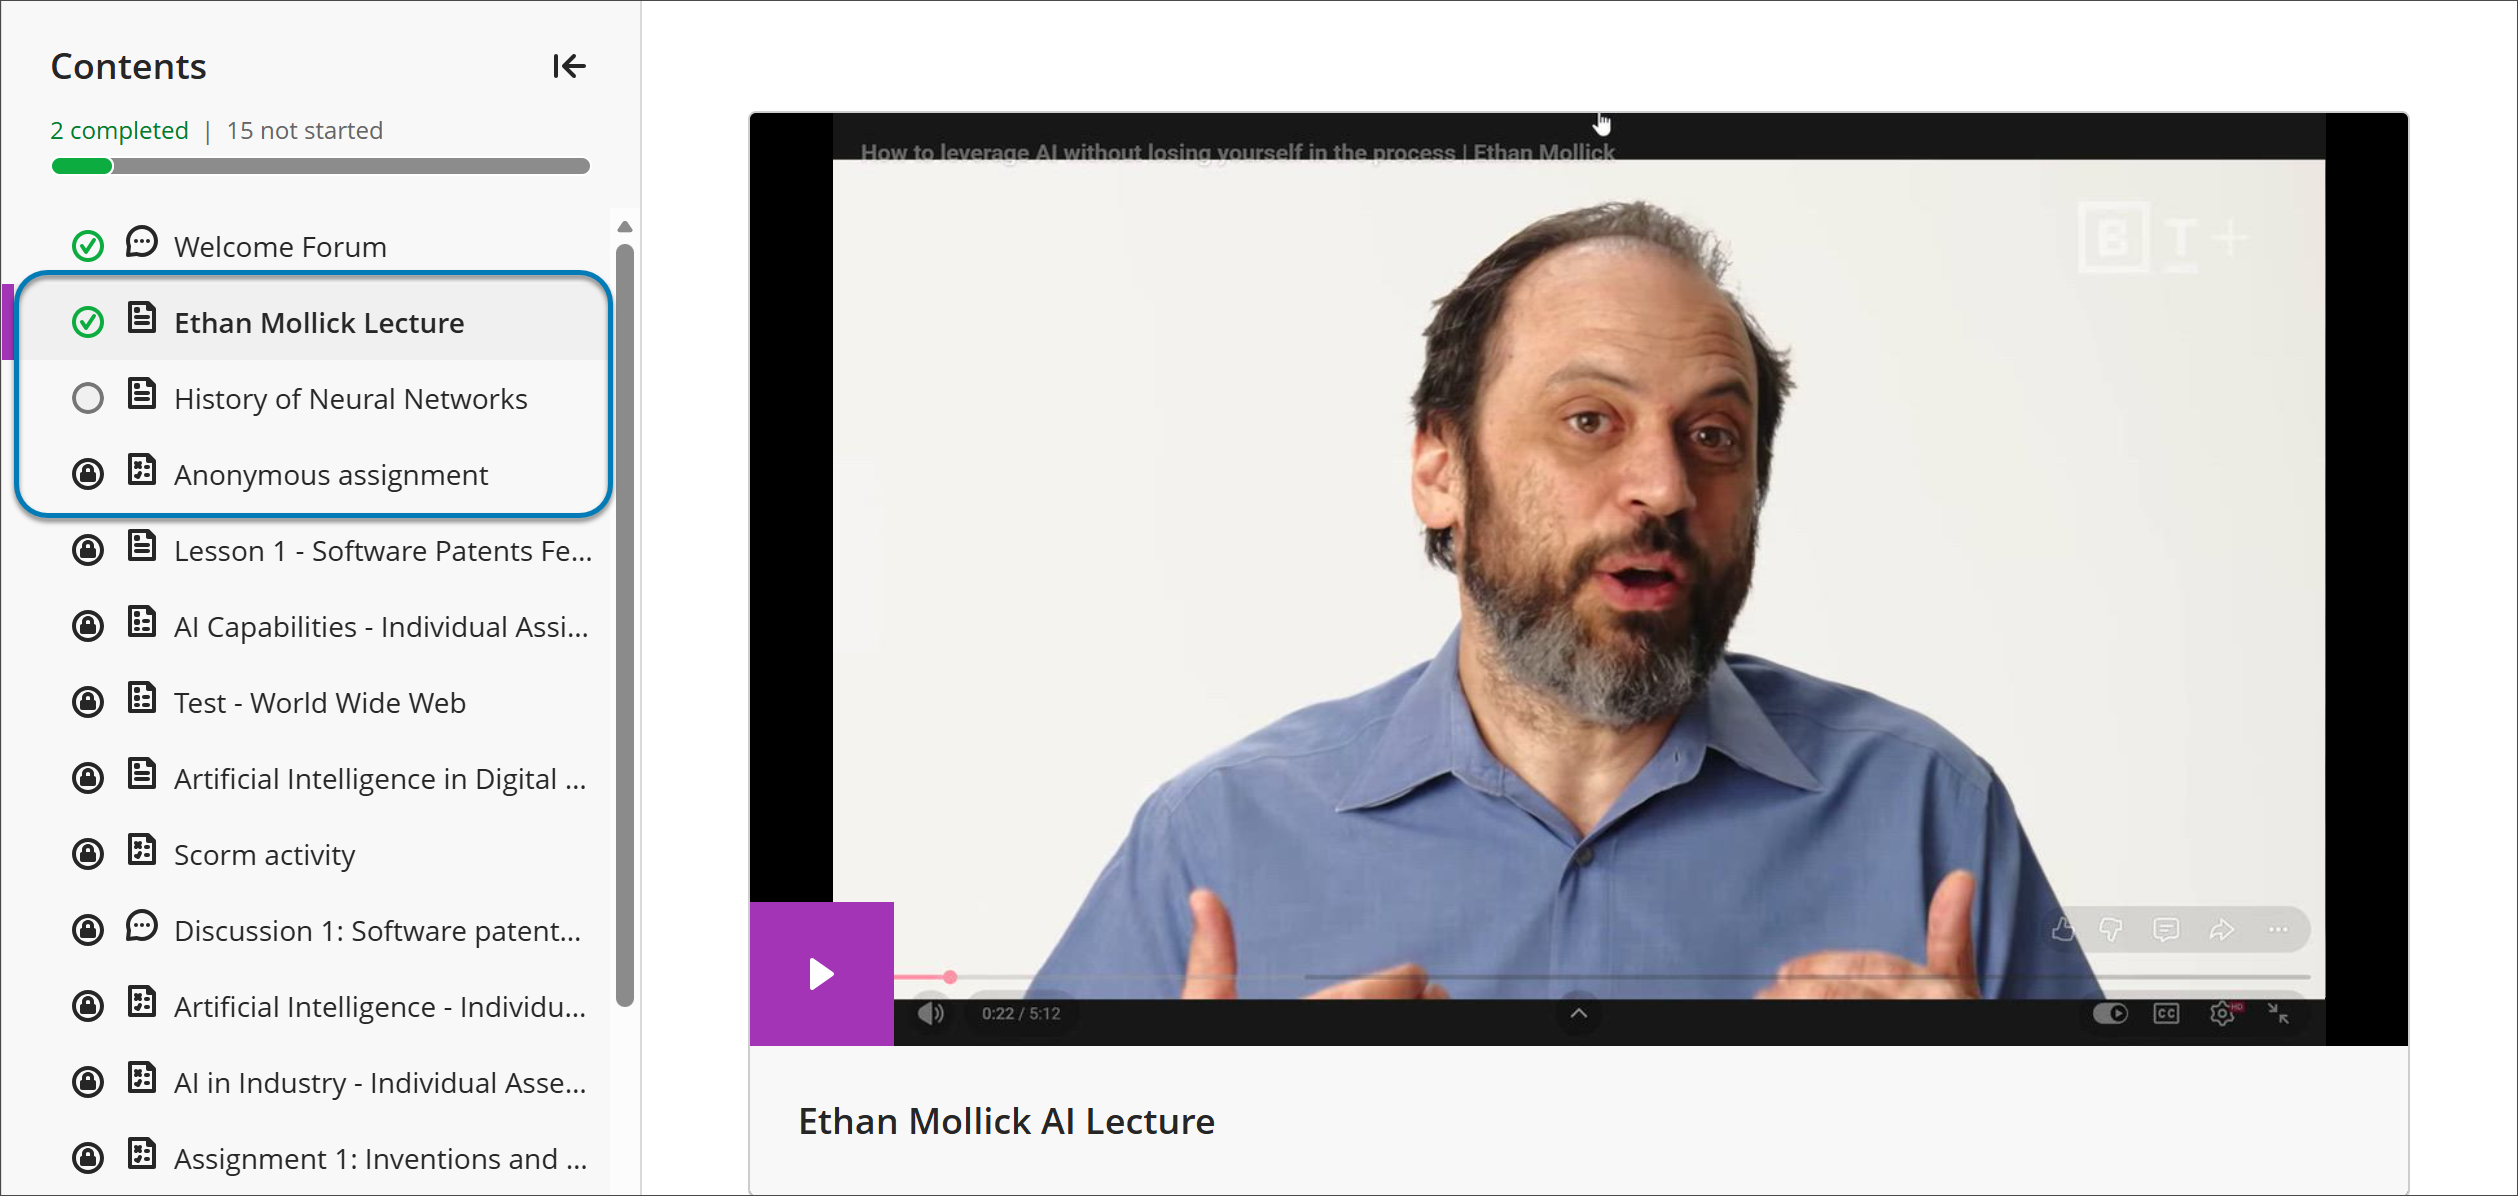
Not started: an empty circle; you haven’t opened the video yet.
In progress: a half-filled circle; you’ve started watching. The tooltip reads that the item will be marked complete when the video is watched, rather than offering a manual “Mark as complete” option.
Complete: a green checkmark; you’ve watched enough of the video to meet the completion threshold, and the next item is available.
You don’t need to take any extra step to mark the video complete — watching it is what records completion.
Administrators
Availability: Feature requires a Video Studio license.
Activation: None needed.
Configuration: None needed.
Privilege Updates: Not applicable.
Video Studio: Keep editing in Video Studio right after recording, without saving first
After recording or uploading a video in Video Studio, instructors can now start editing it right away, without saving and reopening it first. The Edit tab is available as soon as the video finishes uploading, so you can add knowledge checks and audio descriptions, and review the transcript once it’s ready, all in a single continuous flow. This removes the exit-and-re-enter step that previously interrupted the move from recording to editing.
Previously, editing features were hidden until a video was saved, and instructors had to leave the editor and return to reach them. Because processing now begins as soon as a video is uploaded, those features become available sooner and without breaking the workflow.
Instructors
As soon as a recording or upload finishes, the Edit tab appears without saving first, so you can add knowledge checks and audio descriptions before saving your recording.
The Analytics tab isn't displayed in the pre-save workflow. The Transcript tab is going to be available in the pre-save workflow in a future release.
Administrators
Availability: Feature requires a Video Studio license.
Activation: None needed.
Configuration: None needed.
Privilege Updates: Not applicable.