April 2026 Release Notes (4000.12)
Release Information
Tip
For maintenance release build numbers and bug fixes, visit Maintenance Releases.
For release status and delays, visit Blackboard Status.
Instructional Design
Create multiple repositories with support for Institutional Hierarchy in the Learning Object Repository
Note
This feature will be released to Test/Stage environments the week of 23 March 2026.
The Learning Object Repository (LOR) now supports Institutional Hierarchy. A dedicated repository is created for each node in the Institutional Hierarchy. When a course is associated with a specific node, it gains access to that node’s dedicated repository and the repositories for its parent nodes. This structure supports delegated ownership, clearer governance, and granular control over who creates and manages shared content.
The following privileges are recommended for users working with node repositories.
Viewing the Learning Object Repository from the Tools page
Base Navigation > Tools > Learning Object Repository
Base Navigation > Tools > Learning Object Repository > Search
Viewing a Node's Repository from the Learning Object Repository
Base Navigation > Tools > Learning Object Repository > Node Repositories
Viewing the courses/organizations associated with a given object in a Node Repository
Base Navigation > Tools > Learning Object Repository > Node Repositories > Associations
Base Navigation > Tools > Learning Object Repository > Node Repositories > ... > Associations
Creating, editing, and deleting objects in a Node Repository
Base Navigation > Tools > Learning Object Repository > Node Repositories > Create
Base Navigation > Tools > Learning Object Repository > Node Repositories > Edit
Base Navigation > Tools > Learning Object Repository > Node Repositories > Delete
Note
Granting the Create or Delete privilege will implicitly grant the Edit privilege.
Uploading files into a Node Repository
Base Navigation > Tools > Learning Object Repository > Node Repositories > Upload
Copying objects into a Node Repository
Base Navigation > Tools > Learning Object Repository > Node Repositories > ... > Copy Items
Base Navigation > Tools > Learning Object Repository > Node Repositories > ... > Tasks and Logs
Inserting Objects into Courses/Organizations from the Learning Object Repository
Course/Organization > Content > + > Learning Object Repository
Administrators can create a custom role or add these privileges to an existing role, then add users with that role to a specific node. Those users will then have access to that node's repository.
Image 1: The parent nodes for each repository appear as breadcrumbs under the repository’s name in the LOR management view.

Instructors
Instructors who open the LOR from a course can access all the repositories available to that course through the Institutional Hierarchy. Instructors choose an individual repository and then choose objects from that repository.
Image 2: Instructors will have access to the available repositories. For example, the Institutional Repository and repositories for the College of Business and the Department of Economics are available for an economics instructor.

Administrators
Availability: Available to all Ultra courses.
Activation: None needed.
Configuration: None needed.
Filter objects by type in the Learning Object Repository
Administrators can now filter items in the Learning Object Repository (LOR) by type. The filter options include:
All items
Document
File
As the volume and variety of content managed by institutions in the LOR grows, this filter helps users locate and manage objects more efficiently, saving time.
Image 1: The Types filter is located next to the search box in the LOR management view.

Administrators
Availability: Available to all Ultra courses.
Activation: None needed.
Configuration: None needed.
Improved support for Blackboard Ally in the Learning Object Repository
The Learning Object Repository (LOR) management view now displays the accessibility score and alternative format download options to system administrators for files uploaded into the LOR. This feature is available for institutions that use Ally. Accessibility scores do not appear on the Course Content page for items added from the LOR, since instructors cannot edit or improve these centrally managed objects. This update gives administrators a convenient way to manage accessibility directly from the LOR, without navigating away to a separate tool.
Image 1: The Learning Object Repository management view displays the accessibility score and download alternative formats option next to files.

Administrators
Availability: Available to all Ultra courses.
Activation: None needed.
Configuration: None needed.
Communication and Collaboration
Review both sets of Discussion due dates across multiple views in Blackboard
Blackboard now surfaces both sets of due dates and participation requirements for Discussions across key areas of the application. This improvement builds on the recent addition of a second due date and participation requirement. Instructors and students get clearer expectations wherever they access Discussion details.
Instructors and Students
When instructors create a discussion with two due dates and participation requirements, both sets of requirements appear on the Course Content page, Discussion pages, the Gradebook student and instructor views, and the instructor’s Discussion analysis panel. Students can track expectations throughout the workflow without navigating back to the discussion itself.
Image 1: On the Course Content page, both due dates and participation requirements are displayed. For all entry points for Discussions, both dates and requirements are displayed.

On the Course Content and Discussion pages, both due dates and their requirements appear together for quick reference.
In the Gradebook student view, both dates appear.
Instructors also get a new Due Dates and Requirements section in the grading view for an individual student. This section shows both due dates and the student’s progress toward each requirement.
Administrators
Availability: Available for all Ultra Courses.
Activation: None needed.
Configuration: None needed.
AI Conversation: Use Message Limits
Instructors can now guide the length of AI‑supported conversations, including Socratic Questioning, by setting message limits. These controls help students understand when to complete an interaction and keep conversations focused on the intended learning activity.
Instructors
When instructors configure an AI conversation, they can set a maximum message cap to shape the conversation duration.
Image 1: Message limit settings for an AI conversation

Students
Students track their remaining responses during a conversation through a dynamic label. The label shows a caution icon when two responses remain. After the conversation reaches the message cap, students cannot add more responses. The message limit sets clear expectations for participation and completion.
Image 2: Student messaging guidance during an active interaction.

Administrators
Availability: Available for all Ultra courses.
Activation: None needed.
Configuration: None needed.
Handle images as thumbnail links in Announcement emails
Announcement emails now display previews of images included inside a Blackboard announcement. These image previews replace the previous image links that appeared as filenames in the email. When users select an image, it opens on a separate page for a larger, more detailed view. This update makes announcement content clearer and easier to understand directly from the email.
Instructors and students
Announcement emails display a small preview image for each image included in an announcement message. Selecting the image opens to a separate page with a more detailed view of that image. Users can close this page when they want to return to the original email announcement. To navigate to the announcement within Blackboard itself, users can select View Annoucement in the email message.
Image 1: Announcement email showing images as thumbnail links that opens to a separate page for that image.

Administrators
Availability: Available for all Ultra Courses.
Activation: None needed.
Configuration: None needed.
Add Substantive and Non‑substantive Content labels in instructor discussion analysis
Student posts and replies now have Substantive Content and Non-substantive Content labels in the instructor discussion analysis page. The labels clarify the meaning of the green and red highlighted text indicators in student responses and improve the grading process for instructors.
Instructors
When instructors review a student’s posts and replies, the instructor analysis page displays text labels with highlighted content. Green highlights include a Substantive Content label. Red highlights include a Non‑substantive Content label. The labels appear consistently across the analysis panel and meet accessibility requirements.
Image 1: Instructor analysis view showing posts labeled Substantive Content and Non‑substantive Content.

Administrators
Availability: Available for all Ultra courses.
Activation: None needed.
Configuration: None needed.
Assignments and Tests
Specify assignment submission type
We introduced new assignment submission options that allow instructors to specify the type of submission they expect from students. This update improves clarity for students and optimizes the submission workflow based on the selected submission type.
Instructors
When creating or editing an assignment, instructors can define the expected submission type to guide how students submit their work. Selecting a specific submission type streamlines the student experience and reduces ambiguity about what is required.
Instructors can select one or more expected submission types when configuring an assignment:
File upload
Text entry
By default, File upload and Text entry are both selected.
The selected submission type is visible in assignment settings and student‑facing details. Instructors can change the selected submission type until students have started submitting attempts.
Image 1: Instructors can choose one or more submission types when configuring an assignment.

Students
Students are informed of the expected submission type and see a submission workflow optimized for that format.
File submissions display a dedicated file drop zone where students can upload, preview (when supported), and remove files.
Text submissions provide a streamlined rich text editor experience without a general file attachment option and include access to the Content Market for supported tools.
Image 2: Students have a submission workflow optimized for the selected submission type.

Administrators
Availability: Available to all Ultra courses.
Activation: None needed.
Configuration: None needed.
Improvements to multiple choice and multiple answer questions
Based on client feedback, we made several improvements:
For the multiple choice question, we modified the default number of answer options a student can select from 4 to 1.
When creating or editing a multiple choice or multiple answer question, instructors can change the number of answer options that a student can select.
Multiple choice answer options alphabetical labels (A, B, C, D) have also been restored.
Administrators
Availability: Available to all Ultra courses.
Activation: None needed.
Configuration: None needed.
Gradebook
Adjust grades for individual student attempts in group submissions
We extended Flexible Grading to allow instructors to adjust attempt grades for individual students within a group submission. This update ensures that grades for group submissions can accurately reflect each student’s individual contribution, even when work is submitted as a single group attempt.
Instructors can override a group attempt score for individual group members directly from the grading interface. The interface clearly indicates when grades differ across group members, and adjustments can be removed by restoring a student’s grade to match the group attempt score.
Image 1: Instructors can adjust grades for individual students within a group submission.

Administrators
Availability: Available to all Ultra courses.
Activation: None needed.
Configuration: None needed.
Increased SafeAssign file size limit to 25 MB for DirectSubmit
We increased the SafeAssign file size limit to 25 MB for DirectSubmit submissions. This change supports larger documents that include images, tables, and complex formatting, reducing submission issues for students.
Existing submissions and SafeAssign reports remain fully compatible, and related system limits were reviewed to ensure continued stability.
Administrators
Availability: Available to all Ultra courses using SafeAssign DirectSubmit.
Activation: None needed.
Configuration: None needed.
Student names display in chosen sort order in Flexible Grading
We’ve improved how student names appear in Flexible Grading. The name display format is now linked to the selected sort order. By default, student names are now shown as Surname, First Name to help instructors quickly locate students. When sorting by First Name (ascending or descending), names display as First Name Surname.
Administrators
Availability: Available to all Ultra courses.
Activation: None needed.
Configuration: None needed.
Mastery and Learning Pathways
Student access to Mastery powered by Outcomes
We’ve introduced a student-facing course Outcomes view. Students can securely access their individual mastery progress within their Blackboard course, aligned to defined learning outcomes.
This release extends outcome visibility to learners, strengthening mastery and competency-based learning initiatives and providing institutions with a more connected end-to-end experience—from assessment to student insight.
Image 1: Students can view their own mastery progress powered by Outcomes directly within Blackboard.

Administrators
Availability: Available for all Ultra courses using Mastery and provisioned Outcomes for Blackboard.
Activation: None needed.
Configuration: Permissions are managed through existing Mastery and Outcomes settings.
Associate subjects using Flat File SIS feeds
We expanded SIS integrations to support associating Subjects with Courses and Organizations using Flat File SIS feeds. Institutions can now create, update, and delete these associations through SIS, reducing the need for manual configuration in Blackboard. This enhancement supports more consistent curricular structures and improves alignment with reporting and Outcomes for Blackboard.
Administrators
Availability: Available to all Ultra courses.
Activation: None needed.
Configuration: Subject associations are managed through Flat File SIS integrations.
Learner Progression and Personalized Experience
Copy automations in course copies
Note
This feature is released to both Test/Stage and Production environments on 10 March 2026.
Automations now copy when courses are copied, restored, or imported. Automations are always copied in an inactive state and must be reviewed and activated in the destination course. This update reduces repeated work by removing the need to recreate automations for every course.
Administrators can:
Copy to a new course or an existing course and the automations are copied but the activity log for the automations is not copied.
Make an exact copy and the automations and the activity log are copied.
Import a course package and automations are copied but the activity log is not copied.
Restore a course and the automations and the activity log are copied.
Instructors
Instructors can copy content from the Course Content page. When they copy content at the course level, the course automations copy. If they drill into the course and copy at a more granular level, automations are not listed as an option and do not copy.
Image 1: Instructors select Copy Content on the Course Content page.

Image 2: Instructors can copy content at the course level and automations are included in the copy.

Administrators
Availability: Available to all Ultra courses.
Activation: None needed.
Configuration: None needed.
Integrations
Grades Journey: Apply the Format for date column setting to the Last Attendance Date
The Format for date column setting now applies to the Last Attendance Date column mapping. Previously, the date format for this column mapping was based on the database settings and was not configurable. Administrators can now define the date format to be consistent across all date fields that are mapped in the extract and support SIS specific date formatting requirements. This update provides increased control and consistency.
Image 1: Administrators set the date format in the Format for date column field in the General Settings area.

Administrators
Availability: Available to all Original and Ultra courses.
Activation: This feature requires a Grades Journey license.
Configuration: None needed.
Universal Authentication Solution: Support password-only authentication in secure environments
Administrators can now configure a new authentication type that allows users to sign in with their LMS username and password only, without email token verification. This simplified, single-step login is ideal for trusted network environments such as on-campus or VPN connections. Rate limiting and password expiry enforcement are maintained to preserve security. This provides a faster, streamlined login experience for users.
Administrators can also restrict access to authentication adapters by limiting them to specific IP addresses or network ranges using Classless Inter-Domain Routing (CIDR) notation. This works with all authentication types, including TOKEN, LMS, SAML, and MAC. Individual IPs and subnet ranges are both supported. When a user attempts to sign in from an outside network, clear error messages direct them to an approved network.
Used together, these features let administrators create secure, location-based authentication with a streamlined user experience. For example, on-campus users can authenticate with a password only, while off-campus access is automatically blocked.
Administrators
Availability: This feature requires a Universal Authentication Solution license.
Activation: None needed.
Configuration: For configuration details, contact Professional Services.
Upgrade to Ultra
Preserve activity data for individual Assignments during Original to Ultra conversion through Bulk Copy and Convert
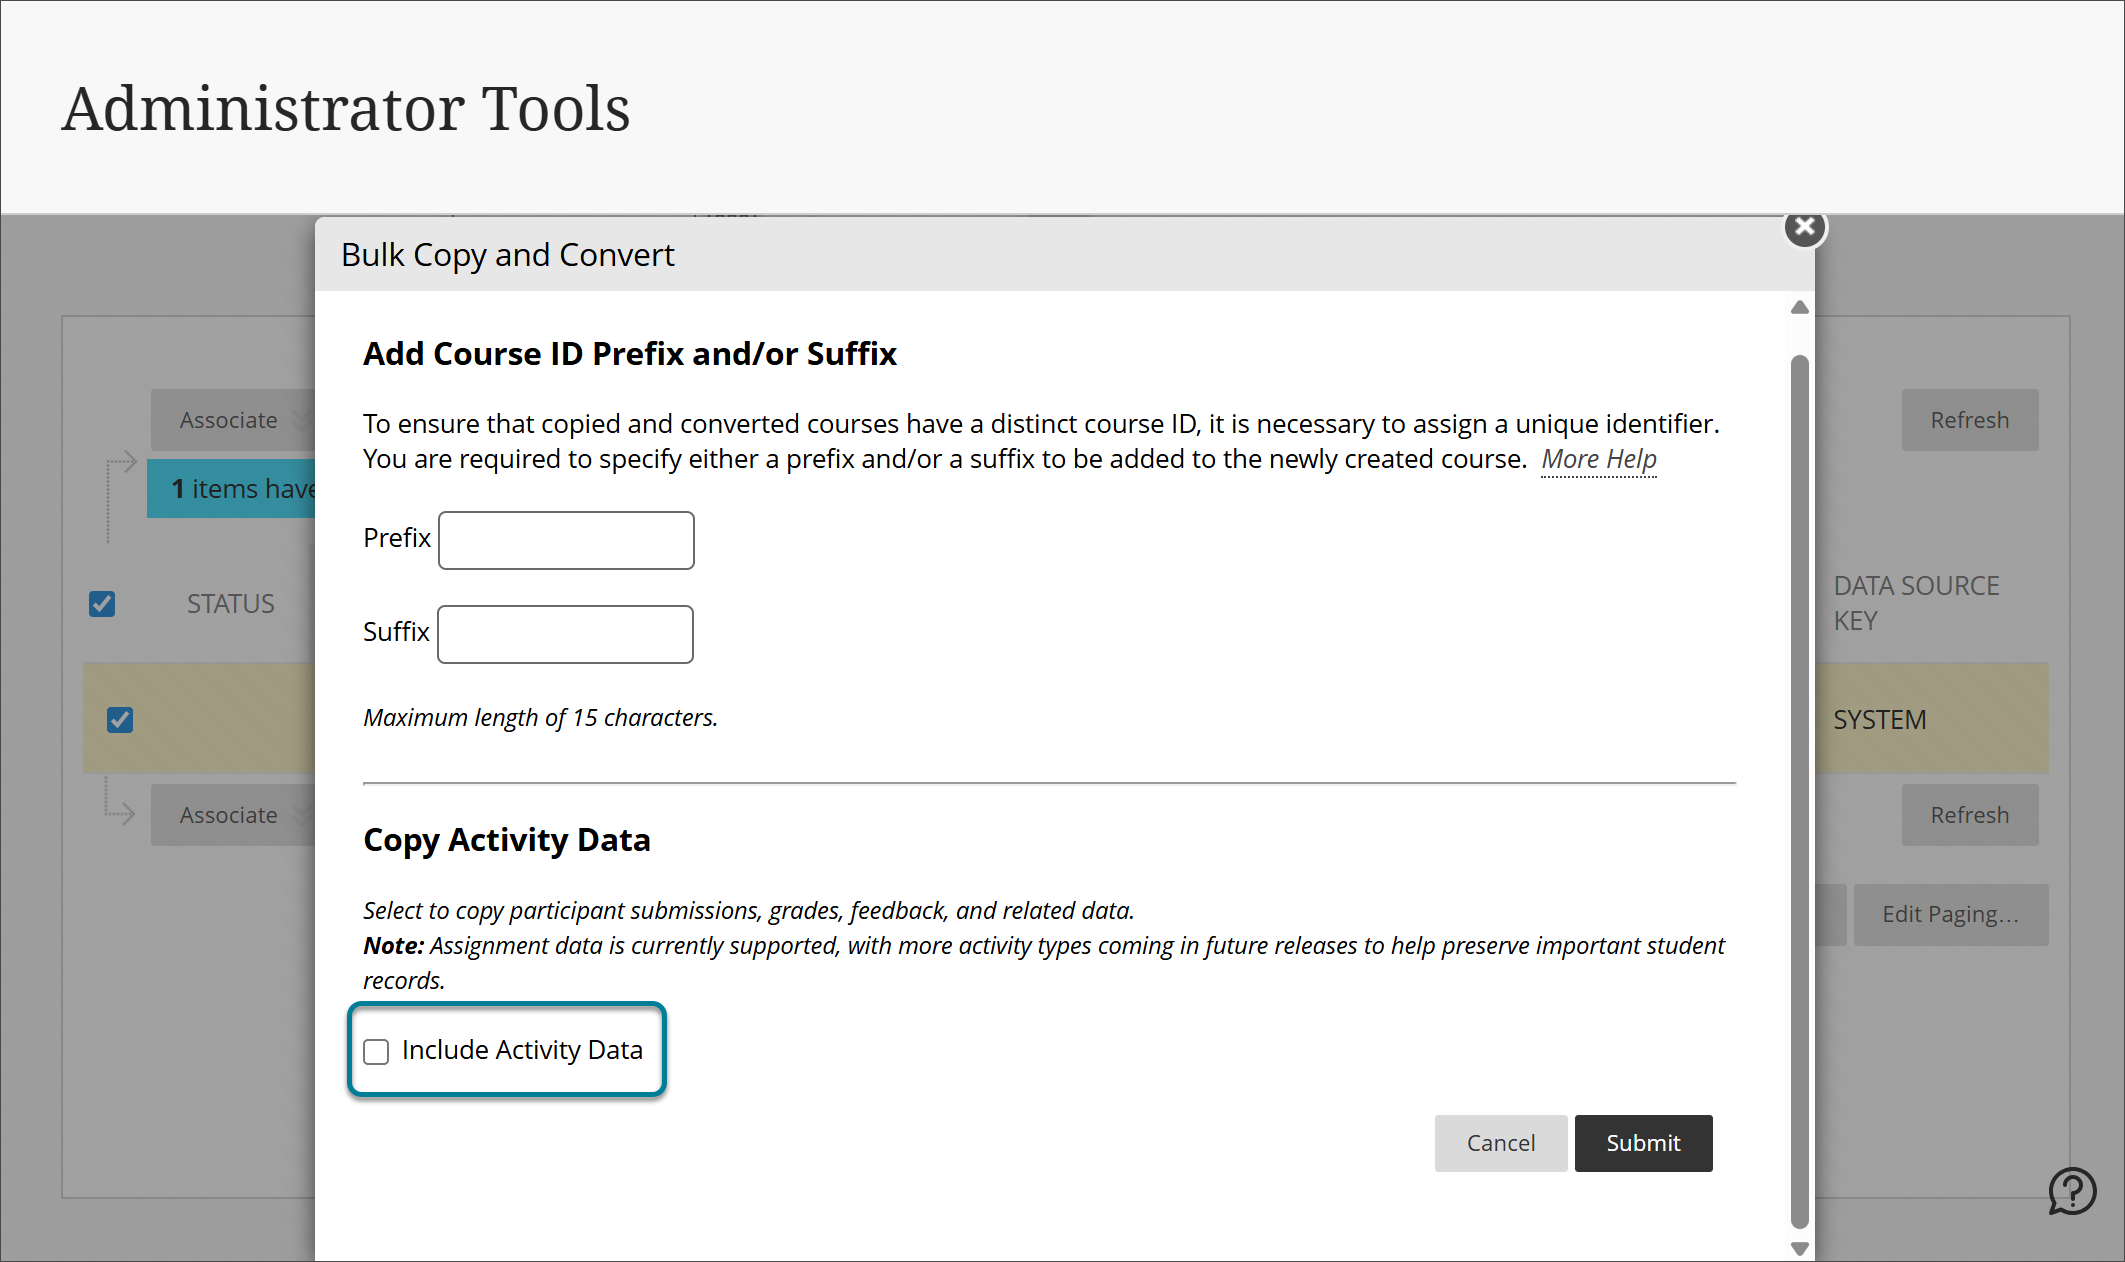
Administrators can now retain activity data for Assignments during the Bulk Copy and Convert conversion process from Original to Ultra. This enhancement allows students to access their historical assignment submissions and instructor feedback in converted Ultra courses.
Retained Assignment activity data for individual students includes:
Student submissions and attempts
Grades
Instructor feedback
Rubric scores and rubric feedback
Image 1: Administrators can select the Include Activity Data option during the Bulk Copy and Convert conversion process.
This update supports the upcoming end of life for Original courses on January 1, 2028. It is the first step in a broader effort to preserve more activity data during conversion. Over the next year and a half, we plan to expand support to additional activity types, including Discussions, Journals, and Tests. These improvements are designed to create a smoother transition to Ultra, maintaining meaningful academic history for both instructors and students.
Administrators
Availability: Available to all Original courses.
Activation: None needed.
Configuration: None needed.
Premium
Video Studio: Control Playback Speed
Users can now control video playback speed in Video Studio. This update supports a wider range of learning preferences and helps students move through content at a pace that matches their comprehension and schedule. Speed controls help students slow down complex explanations or move more quickly through familiar material without interrupting the experience.
Instructors and Students
When users watch a Video Studio recording, they choose from predefined speed options such as 0.5x, 0.75x, 1x, 1.25x, 1.5x, and 2x. Playback starts at 1x speed, and users can switch speeds at any time. Speed controls appear clearly in the player and work with mouse, keyboard, and touch interaction. The experience is consistent on desktop, tablet, and mobile devices.
Image 1: Playback speed menu displayed in the Video Studio player.

This feature improves accessibility, helps students review content more efficiently, and supports instructors who design flexible learning experiences.
Administrator
Availability: Feature included in Video Studio placements in Blackboard Core and premium Video Studio offering.
Activation: None needed.
Configuration: None needed.
Course Catalog: Preview certificates on the Certificate Management page
Certificate managers can now preview the certificate PDF when they add or edit a certificate template. They can also download the certificate PDF from this page, giving them access to make edits when needed. This feature helps managers confirm that the uploaded certificate displays as expected and reduces the need to remember each certificate by name, lowering cognitive load and frustration.
Image 1: The Certificate PDF Upload panel shows a collapsible preview of the certificate.
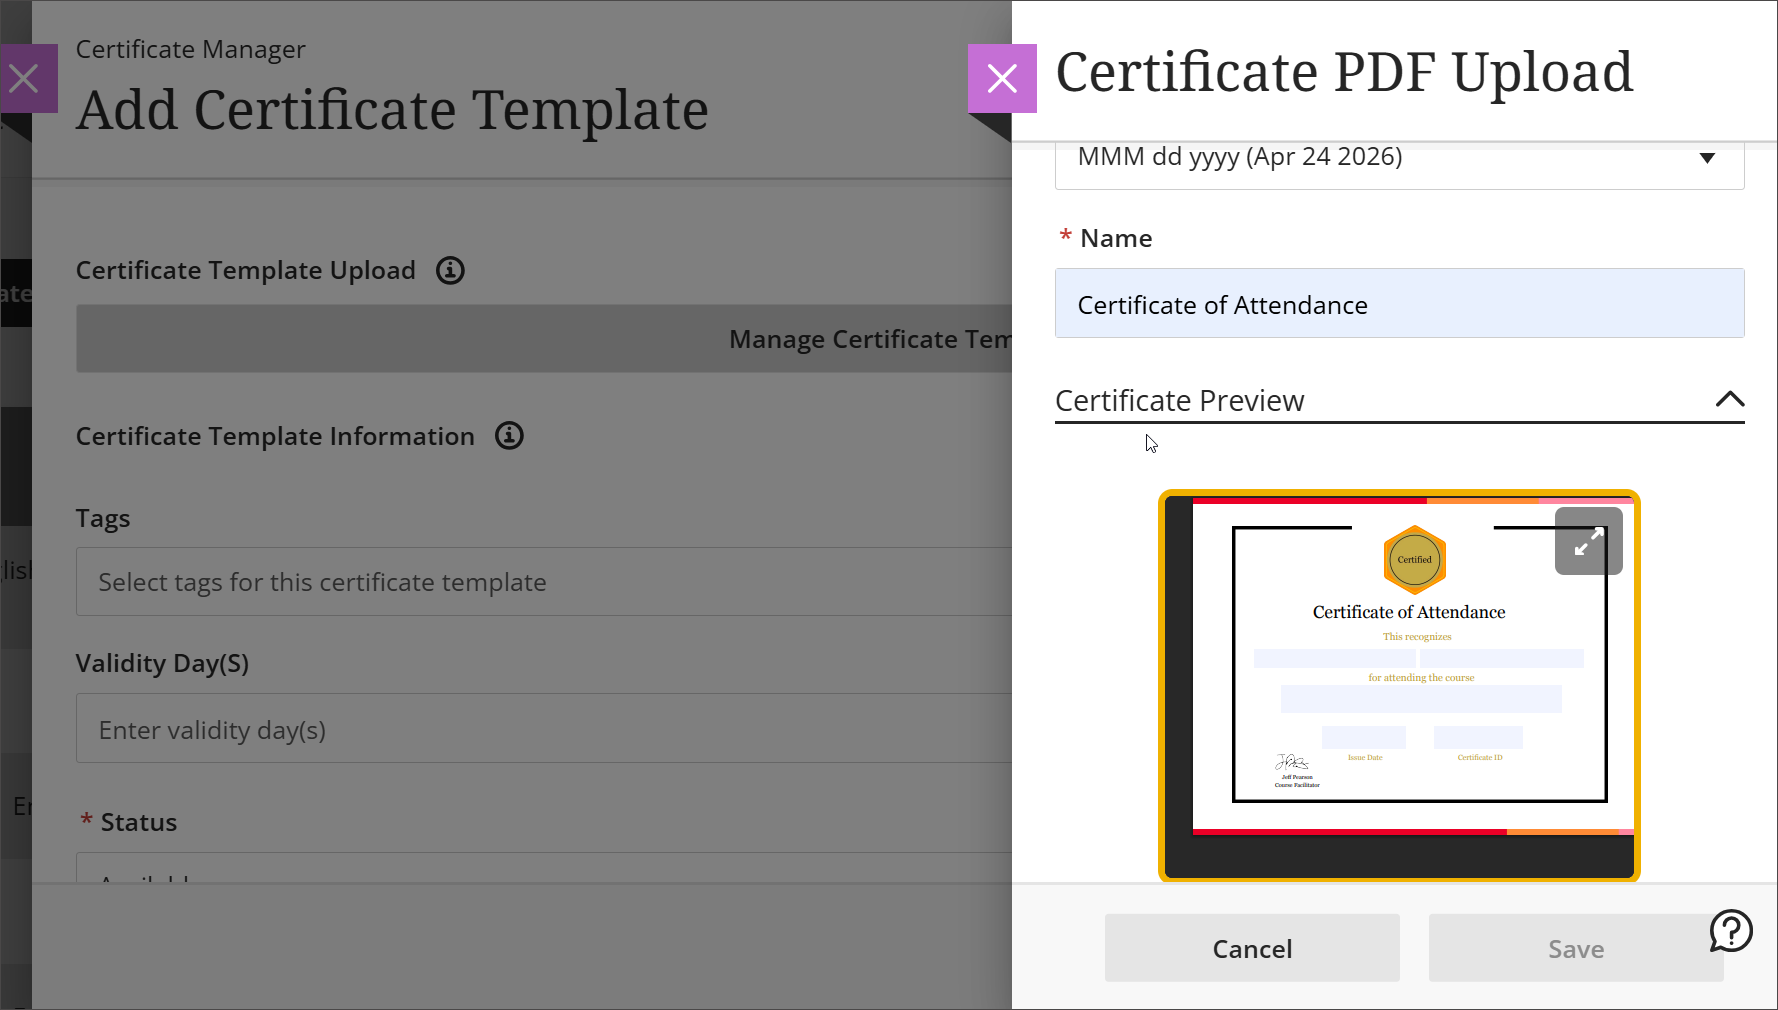
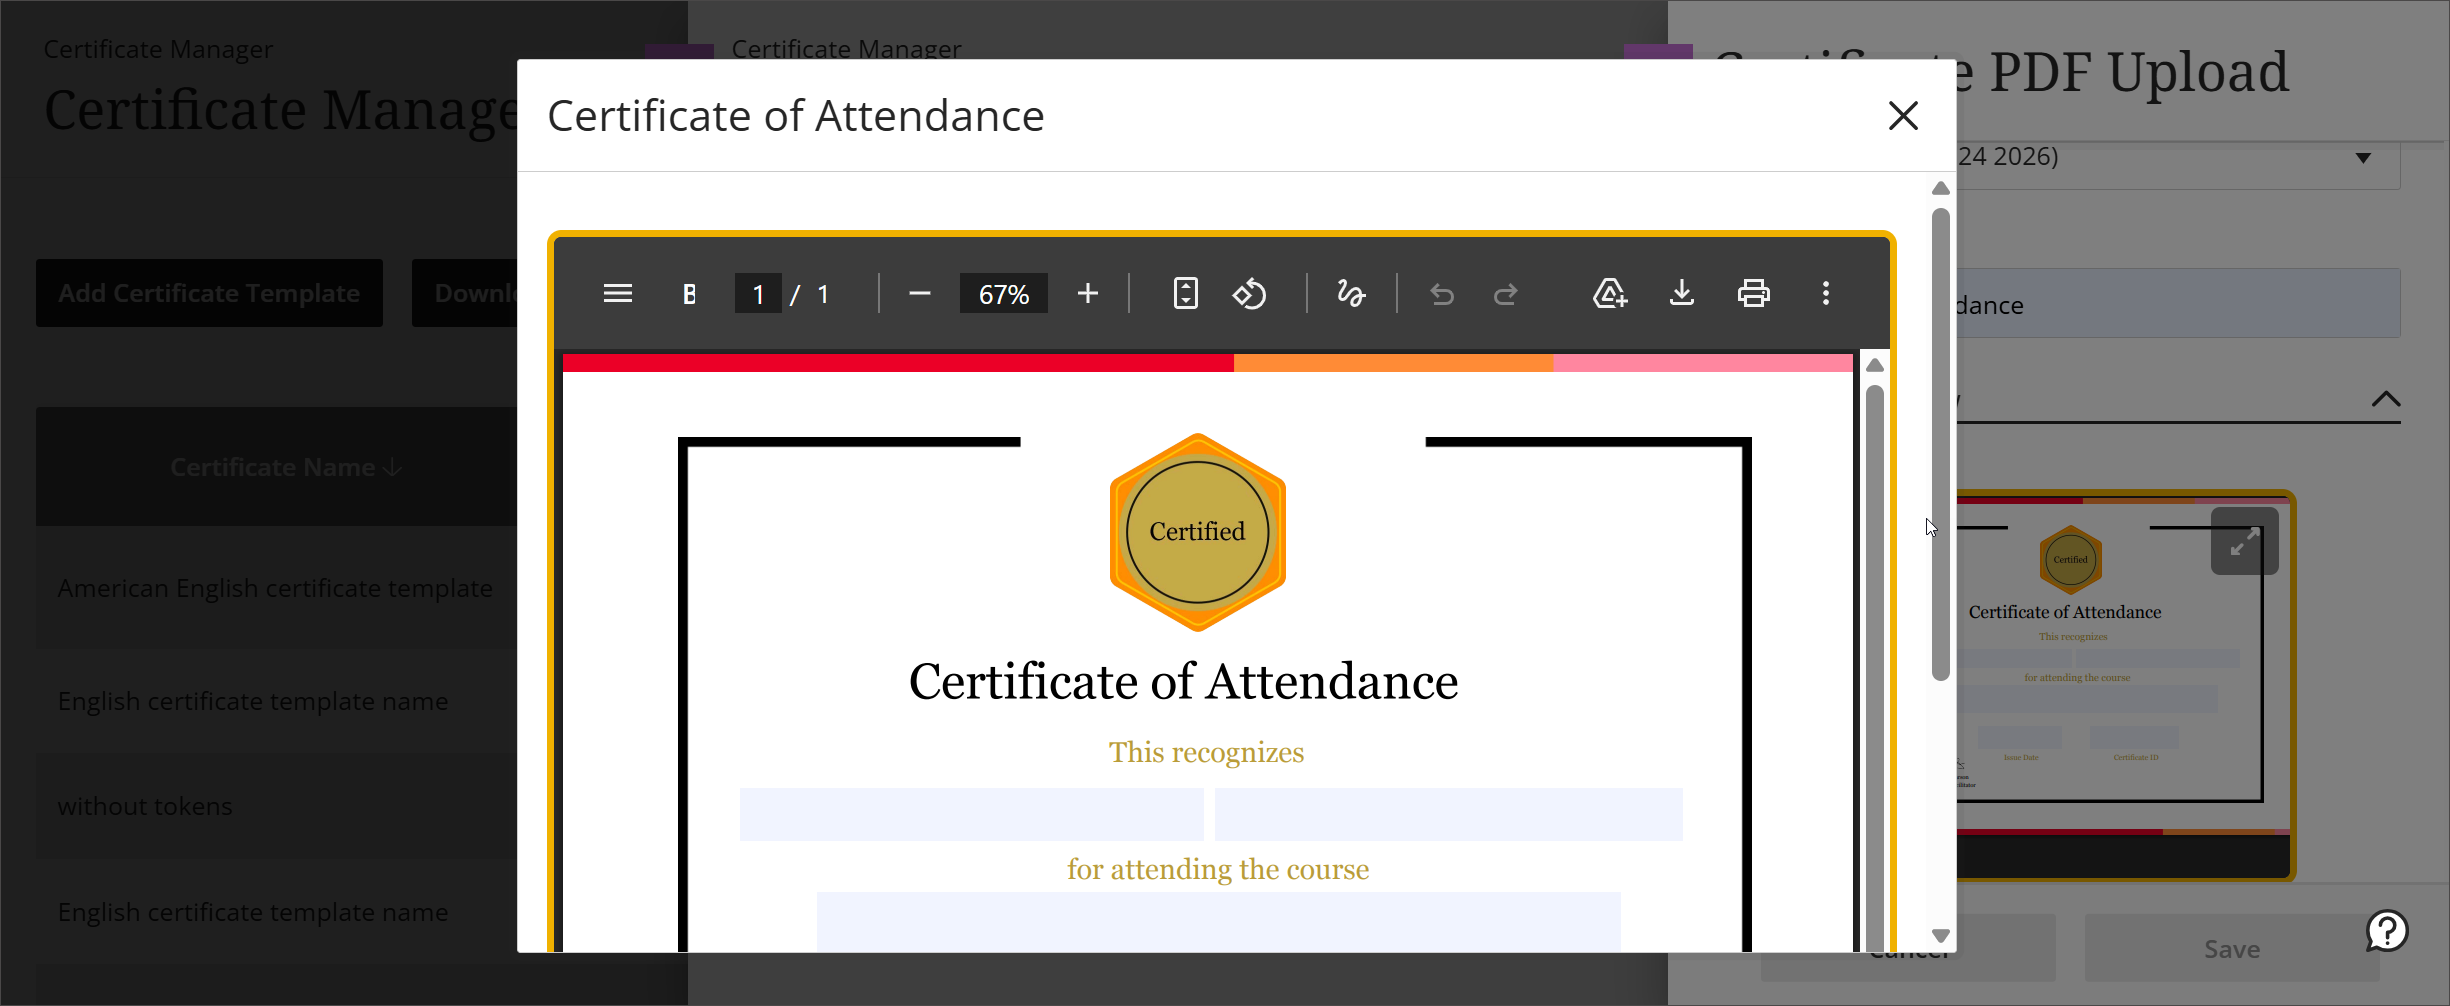
Image 2: The small preview of the certificate can be expanded into a larger window to show the full-size preview.
Administrators
Availability: Available to all Course Catalog courses.
Activation: None needed.
Configuration: None needed.
Milestone: Award macro badges based on earned micro achievements for Open Badges 3.0
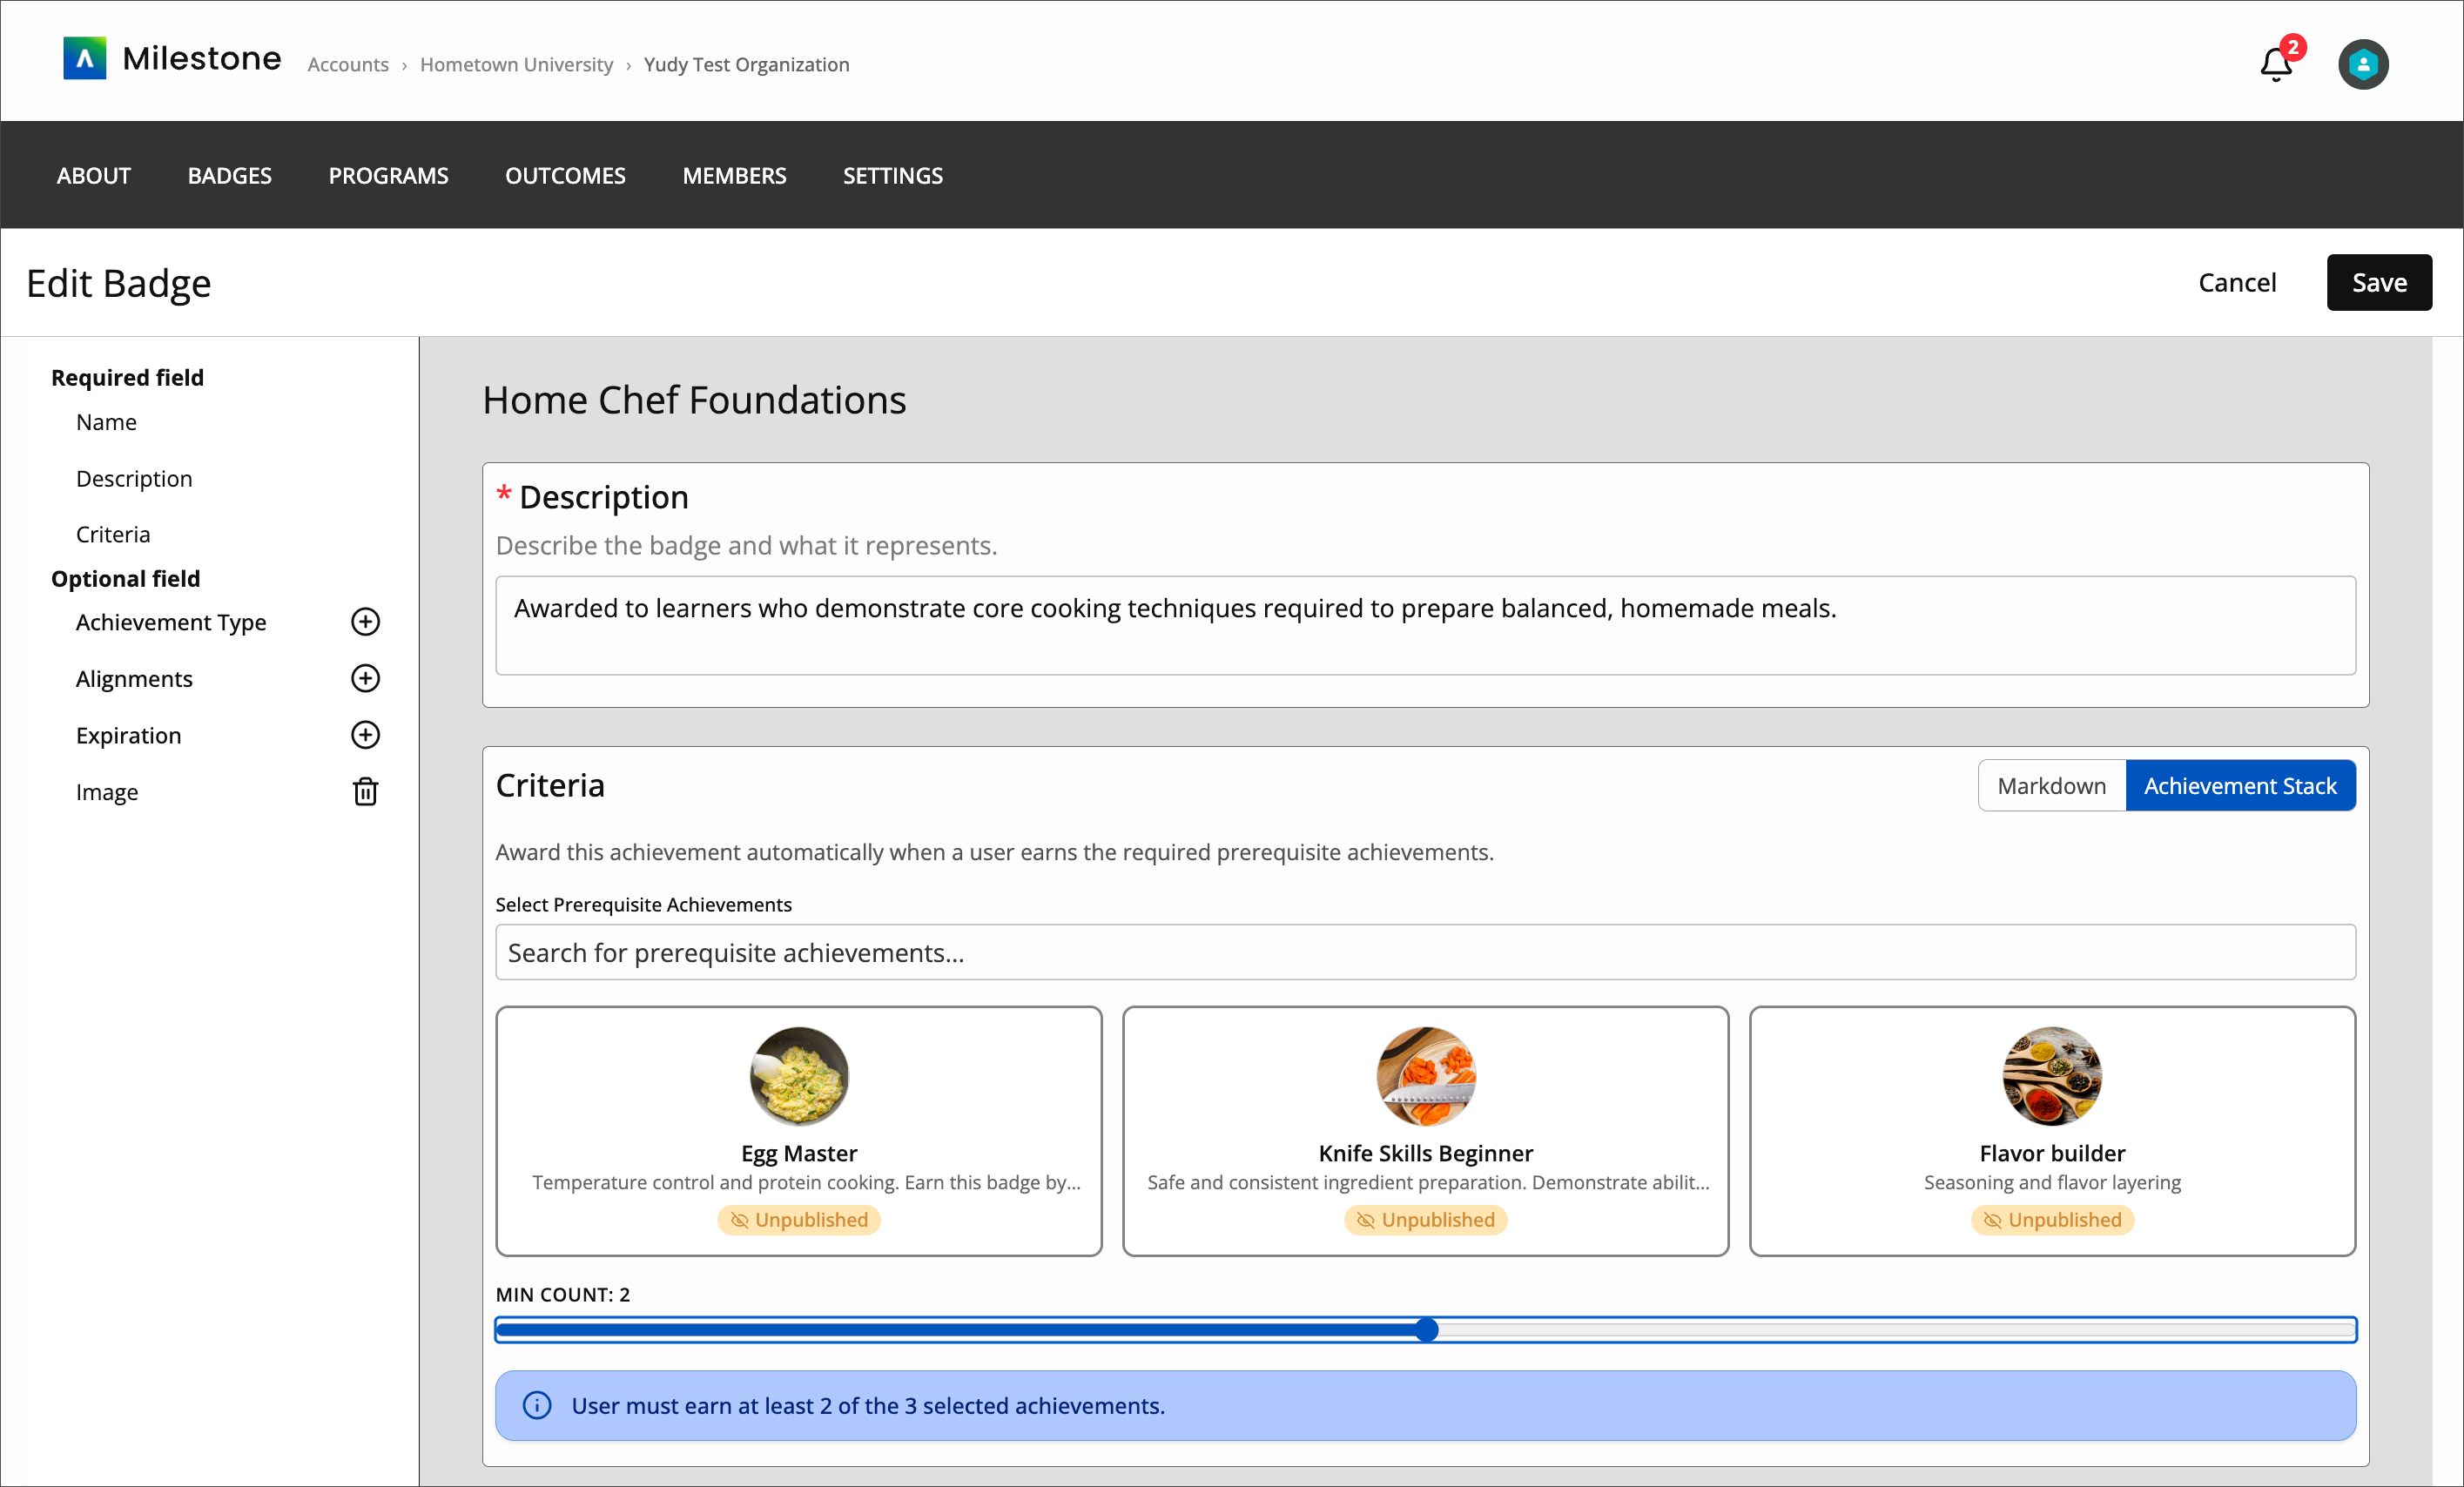
Administrators can now configure achievement-to-achievement criteria when creating Open Badges 3.0 (OB3) achievements. This enhancement allows an achievement to be awarded based on the completion of other badges.
Administrators can define a macro achievement that is automatically awarded once learners earn specific micro achievements.
Two configuration options are supported:
All selected achievements required: the macro badge is awarded when a learner earns all specified prerequisite badges.
Minimum number required: the macro badge is awarded when a learner earns a defined number of badges from a selected group.
This feature allows institutions to recognize broader achievements built from multiple smaller credentials.
Image 1: Administrators can select other achievements as criteria for a badge.
Administrators
Availability: The feature requires a license for Blackboard Milestone.
Activation: None needed.
Configuration: None needed.