Create Users
User management made simple.
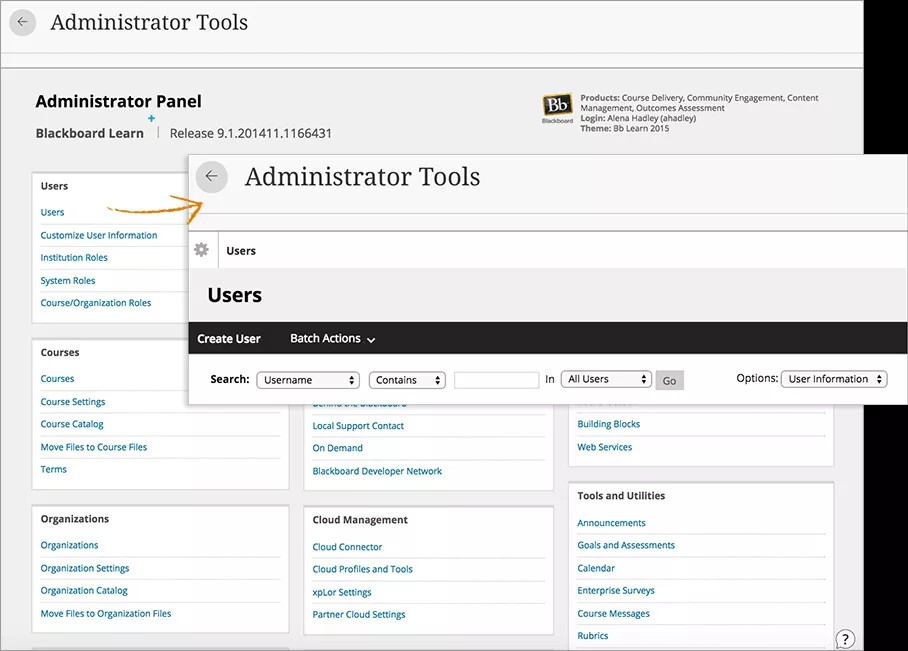
From the base navigation, select Admin then Users then Create User.
Enter user information. Every account must have a first name, last name, username, and password. All other fields are optional.
User account fields
Field | Description |
|---|---|
Personal Information | |
Title | A title is added to the beginning of someone's name to signify many things, such as a position, honor, or qualification. Example: Dr., Mr., or Ms. |
First Name [r] | This is the user's given name. |
Middle Name | Some users have more than one name placed between their first and last names. Middle names can be either given names or surnames. |
Last Name [r] | This is the user's surname. |
Suffix | A suffix is a title added to the end of a user's name. Example: Jr., III, or Ph.D. |
Other Name | Users may have an additional names they use. Example: If a user has changed their name due to a marriage or divorce and the institution has records for this student under both names, provide the other name here. |
Email addresses are used for all local Blackboard features, such as Notifications, Discussion Board, Send Email, and so on. | |
Student ID | This is the unique identification number that is given to students by the institution. |
Account Information | |
Username [r] | Usernames may not contain ASCII characters 0-31, spaces, or any of the following special characters: & # + < > % = / \ The following special characters are explicitly permitted and supported in usernames: _ - . @ The following special characters are not currently disallowed in usernames, but Blackboard recommends against using them, as they may cause unforeseen problems: ( ) [ ] { } : ; , | ? ! ` ~ ' ^ " * $ For example, commas and quotes cause issues with JavaScript or with lists during form handling. Enter a username in lowercase. Uppercase letters in usernames are converted to lowercase in the system database. NoteA username isn't a confidential value and may appear in the user interface to unprivileged users. Never include sensitive or private information in a username, especially information restricted by law or reasonable expectation. |
Password [r] | Passwords must be at least one character in length and contain no spaces. |
Verify Password [r] | Provide the user's password again to ensure accuracy. |
Other Information | |
Gender | Select the user’s gender. Options are: male, female, other, or none. |
Pronouns | Provide the user’s pronoun(s). Separate multiple values with commas. Privileged users who can add this information aren’t limited to the pronoun options defined on the Customize User Information page. |
Pronunciation | Provide a phonetic or descriptive pronunciation guide for the user’s name. |
Birthdate | Select the user's birthday from the lists. |
Education Level | Provide the user's education level. |
Company | Provide the user's company name. |
Job Title | Provide the user's job title. |
Department | Provide the user's department. |
Street 1 | Provide the user's address. |
Street 2 | Provide any additional address information. |
City | Provide the user's city. |
State/Province | Provide the user's state or province. |
ZIP/Postal Code | Provide the user's ZIP code or postal code. |
Country | Provide the user's country. |
Web Site | Provide the URL of the user's personal website. This must be the full URL. For example: |
Home Phone | Provide the user's home phone number. The phone number will display exactly as typed. If your institution has a preferred format for phone numbers, use that format here. For example, (530) 555-1234 or +1 530-555-1234. |
Work Phone | Provide the user's work phone number. The phone number will display exactly as typed. If your institution has a preferred format for phone numbers, use that format here. For example, (530) 555-1234 or +1 530-555-1234. |
Work Fax | Provide the user's fax number. The fax number will display exactly as typed. If your institution has a preferred format for phone numbers, use that format here. For example, (530) 555-1234 or +1 530-555-1234. |
Mobile Phone | Provide the mobile phone of the user. The phone number will display exactly as typed. If your institution has a preferred format for phone numbers, use that format here. For example, (530) 555-1234 or +1 530-555-1234. |
Institution Roles | |
Institution Roles | Select one or more institution roles from the list. Select the right-pointing arrow to move the role into the Primary Institution Role field or the Secondary Institution Roles list. 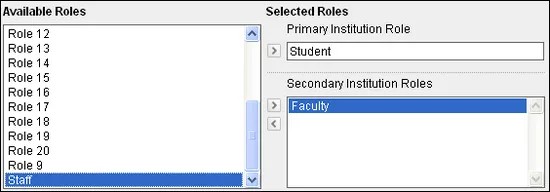 Institution roles control what the user sees on the portal. If your institution has access to community engagement features, you can configure tabs and modules to appear to different groups of users based on institution roles. |
System Roles | |
System Roles | Select one or more system roles from the list. Select the right-pointing arrow to move the role into the Primary System Role field or the Secondary System Roles list. 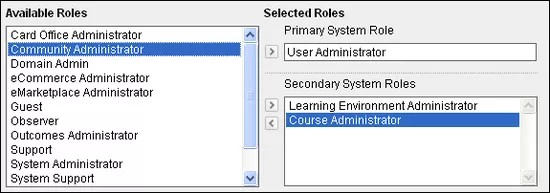 System roles control the user's access to administrative features. |