ロールベースのアクセス
Illuminate Reporting has a variety of reports targeted to high-level institutional leadership such as provosts, heads of distance/online learning, deans, and student success leaders. However, to fully support and facilitate a data-informed decision-making culture, your institution may want to allow other users restricted access to certain types of reports.
By providing greater access to Illuminate Reporting across your teaching and learning management structure, you can support data-informed conversations without the need to export and distribute reporting data. Enabling users to quickly access data can empower them to make confident decisions and facilitate delegation, feedback, and collaboration across roles.
You can use roles to restrict the types of reports Illuminate users can access. The process for enabling role-based access depends on your authentication type:
Anthology Illuminateでのロールベースのアクセスの設定 (新しい方法)
SAMLによる教育機関での認証をIDプロバイダとして使用する管理者は、レポートにログインして関連付けられているノードからのみデータにアクセスする権限を、ユーザに付与できます。権限を管理するには、ユーザはBlackboardまたはSAMLで"BbDataReportViewer"ロールを持ち、少なくとも1回はIlluminateにログインしている必要があります。
ヒント
教育機関の階層 (IH) とコースをあらかじめ設定しておくことをお勧めします。IHの設定方法にアクセスしてください。
Restrict access to Illuminate reports by roles
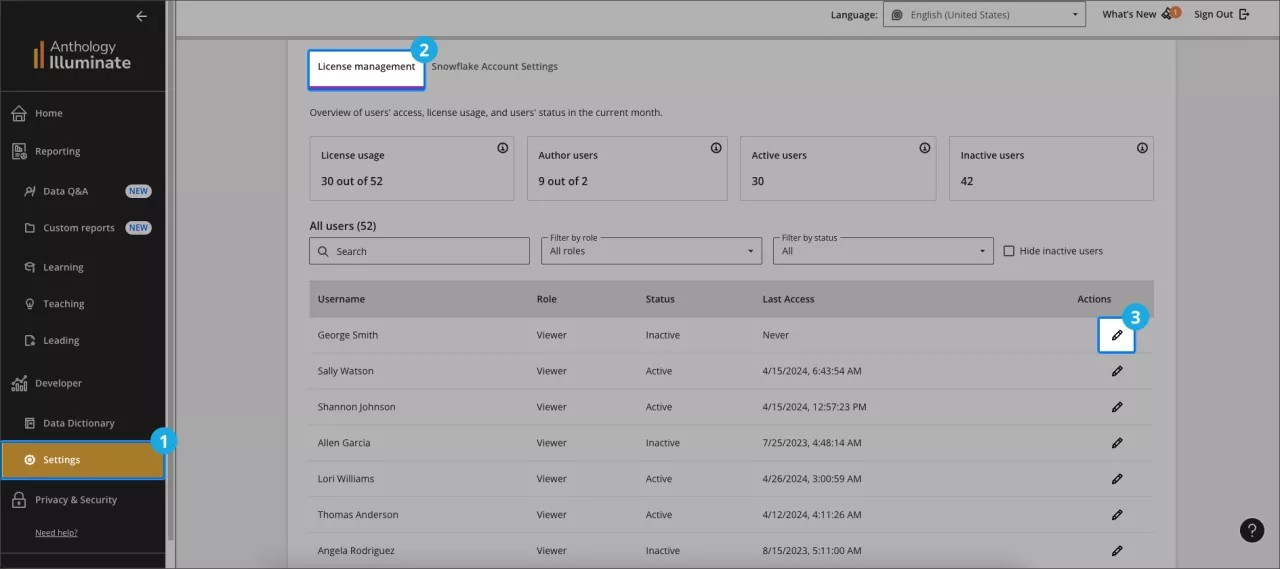
From Developer, Settings, select License management.
Under Actions, select Edit for the user to update. On the Edit User page, under User Roles, select which roles to assign.
Administrators: Have full platform access, including settings, Snowflake access, and read access to all pre-built reports and data.
Authors (exclusive for Illuminate Premium): Can create custom reports, have Snowflake access, and by default can view all pre-built reports and data, with permissions configurable.
Viewers: Have read-only access to pre-built reports by default to ensure data security. You provide restricted access
注記
Users without assigned roles can still log into Illuminate, but they will not have any permissions within the platform. These users do not occupy a licensed user seat, allowing administrators to manage license capacity efficiently.
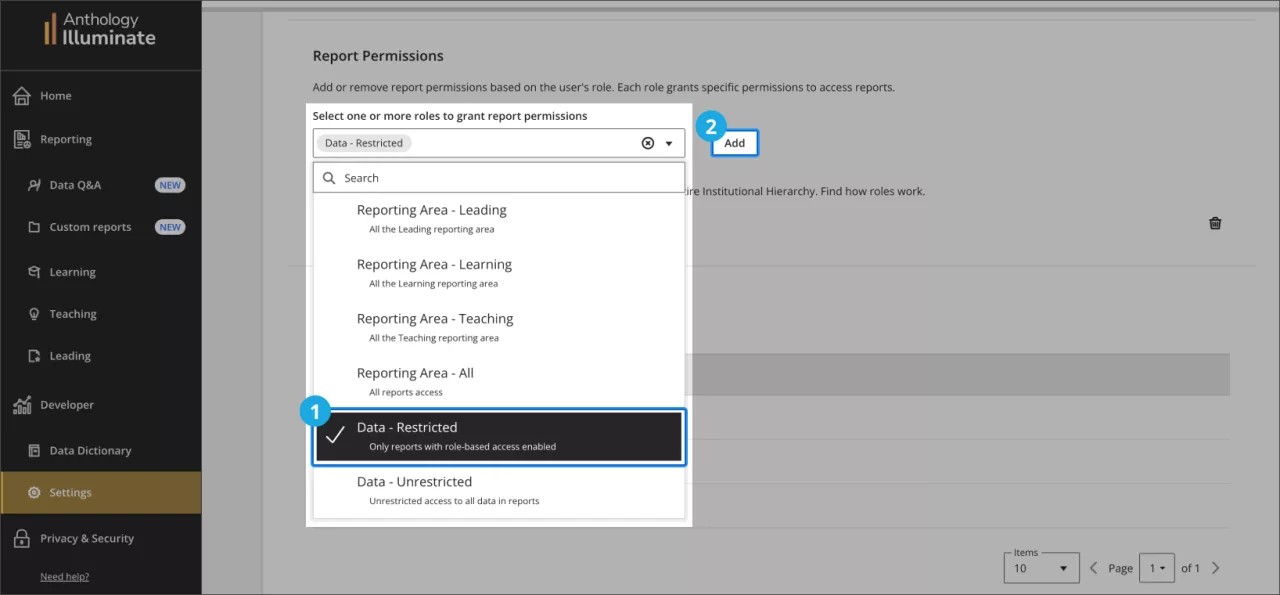
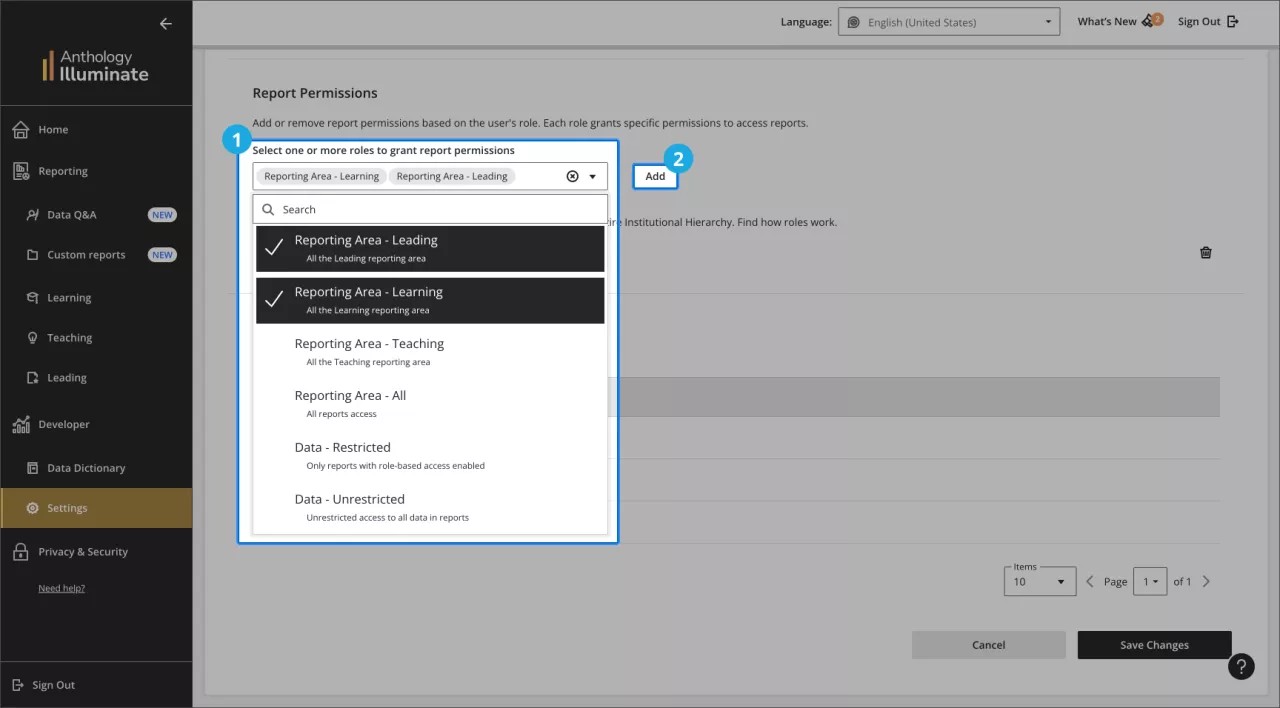
Under Pre-built Report permissions, select a report permission to assign to the user and select Add . For a description of each permission, see Pre-built report permissions for institutional authentication.
ヒント
レポートエリアのアクセスの種類と、データ制限付きアクセスまたはデータ制限なしアクセスを組み合わせて、よりパーソナライズされたエクスペリエンスを作成できます。
Under Institutional Hierarchy, choose the nodes corresponding to the institutional levels the user can access. You can expand each node to view its children.
Select Save Changes.
重要
ルールが適用されるまで一晩待つ。
注記
When role-based access is assigned to a user, their reports initially appear unfiltered and without data due to the user's restricted access. The user needs to select their hierarchy levels to populate the reports with information based on their access rights.
Pre-built report permissions for institutional authentication
ユーザーロールに基づいてレポート権限を追加または削除できます。各ロールは、レポートに対する特定のアクセスレベルを提供します。
Permissions | Description |
|---|---|
Leading reports - Data restricted | Access to all Leading reports and data restricted by permissions granted to the user by institutional hierarchy |
Learning reports - Data restricted | Access to all Learning reports and data restricted by permissions granted to the user by institutional hierarchy |
Teaching reports- Data restricted | Access to all Teaching reports and data restricted by permissions granted to the user by institutional hierarchy |
All reports - Data unrestricted | Access to all reports and data |
All reports - Data restricted | Access to all reports and data restricted by permissions granted to the user by institutional hierarchy |
Blackboard Learnでのロールベースのアクセスの設定 (古い方法)
これらの手順に従うことで、BlackboardをIDプロバイダとして使用する管理者は、レポートにログインして関連付けられているノードからのみデータにアクセスする権限を、ユーザに付与できます。
This method includes two processes:
ヒント
Make sure to configure the Institutional Hierarchy (IH) and courses before you set up role-based access to reports.
Add the Data-restricted role to a user in Illuminate
Anthology Illuminateから設定を選択します。
ライセンス管理タブを選択し、ユーザーリストを見つけてください。
ユーザーが編集できるアクション欄の編集を選択してください。
ユーザー編集ページで、 レポート権限セクションに移動し、ドロップダウンメニューから「データ – 制限の」オプションを選択します。次に、 追加を選択します。
Set access by institutional hierarchy levels in Blackboard LMS
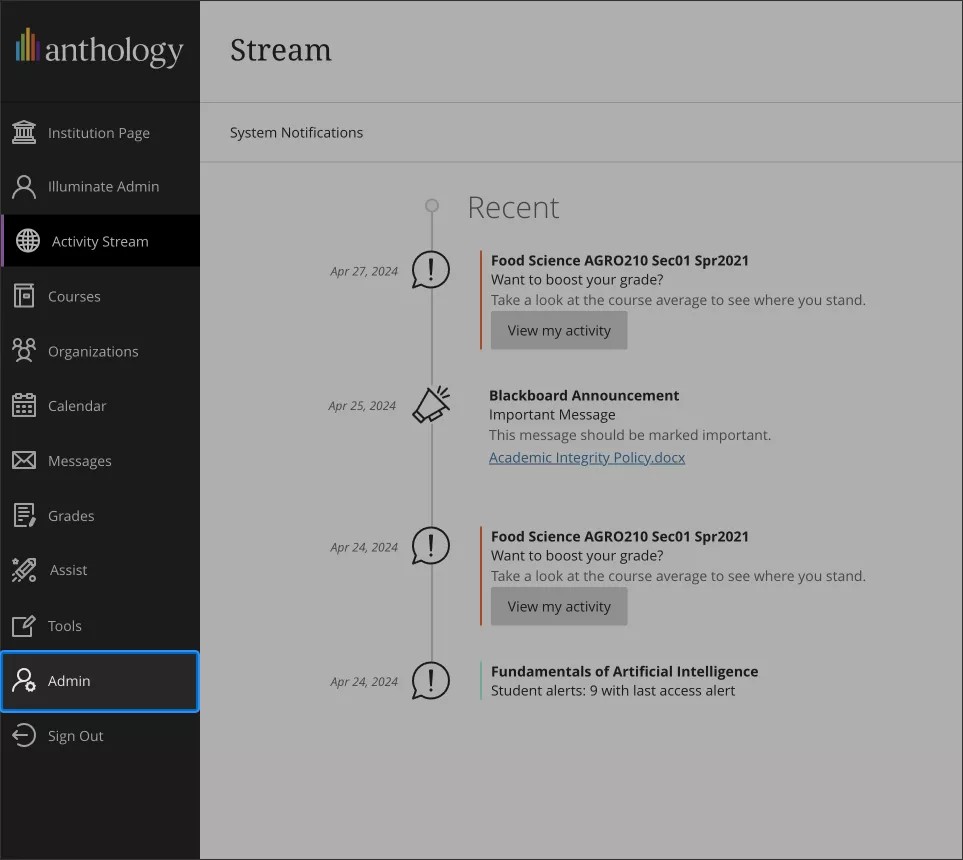
BlackboardではAdministratorパネルに移動します。
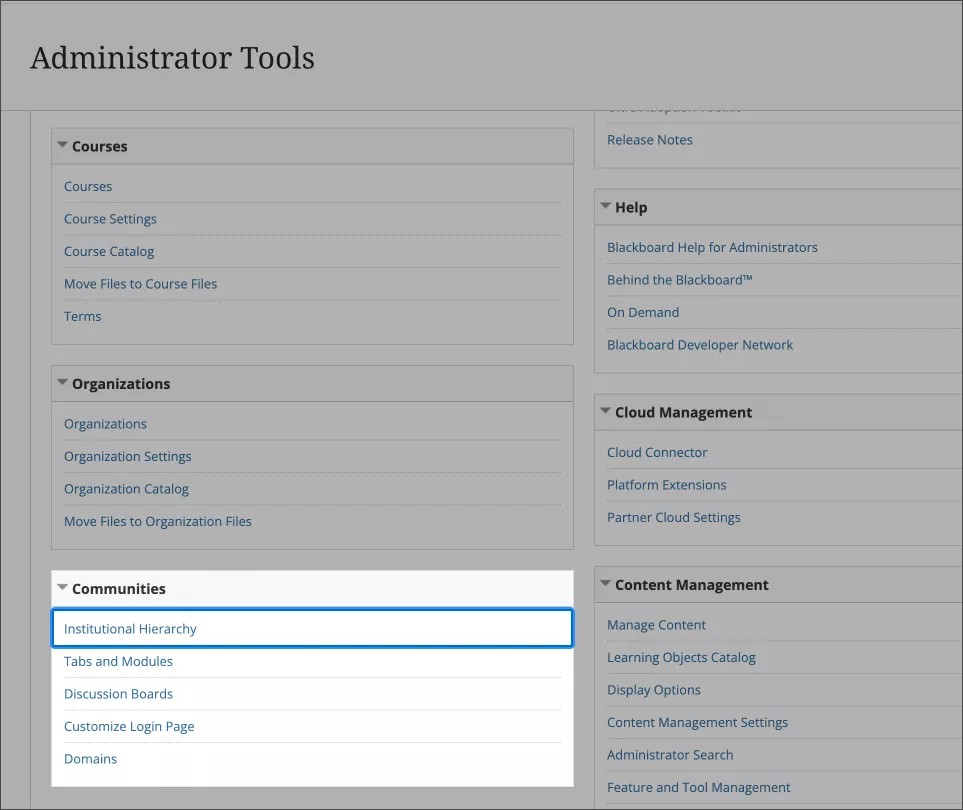
Communitiesセクションに行き教育機関階層を選択してください。これにより階層レベルの管理や設定が可能です。
教育機関の階層内を移動し、ユーザにアクセス権を付与するノードおよび子ノードを選択します。
アクセス権を設定するときは、各ユーザに割り当てるレベルを慎重に選択することが重要です。ユーザーは割り当てられたレベルやそれ以下のレベルの情報にアクセスできますが、同じティア以上のレベルからはアクセスできません。
次の例を考えてみましょう。
教育機関レベル1 - A
教育機関レベル2 - B
教育機関レベル3 - C
教育機関レベル4 - D
教育機関レベル4 - E
この構造では、ユーザ1に教育機関レベル3 - Cへのアクセス権を付与すると、ユーザは教育機関レベル4 - Dと教育機関レベル4 - Eの両方のデータにもアクセスできるようになります。これは、レベル4 - Dと4 - Eがレベル3 - Cの下にネストされ、アクセス権限が下位レベルにまで及ぶためです。
ただし、ユーザ2に教育機関レベル4 - Dへのアクセス権のみを付与した場合、ユーザは教育機関レベル4 - Eのデータにアクセスできません。レベル4 - Dでのアクセスはそのレベルのみに制限され、同じレベル以上の他のノードは含まれません。
目的のノードを選択したら、管理者タブに移動して、[管理者を追加]を選択します。
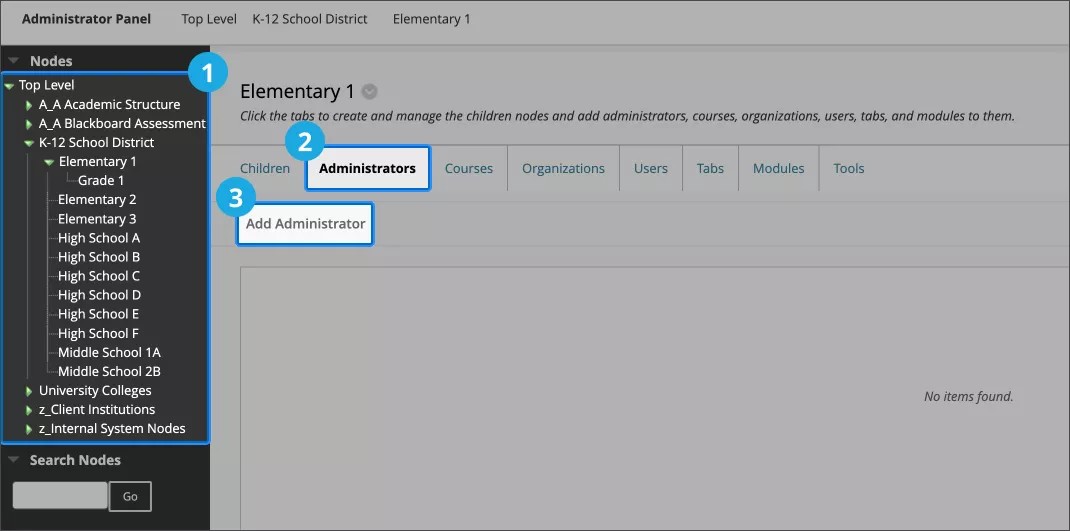
[管理者を追加]ダイアログボックスで、次の操作を行います。
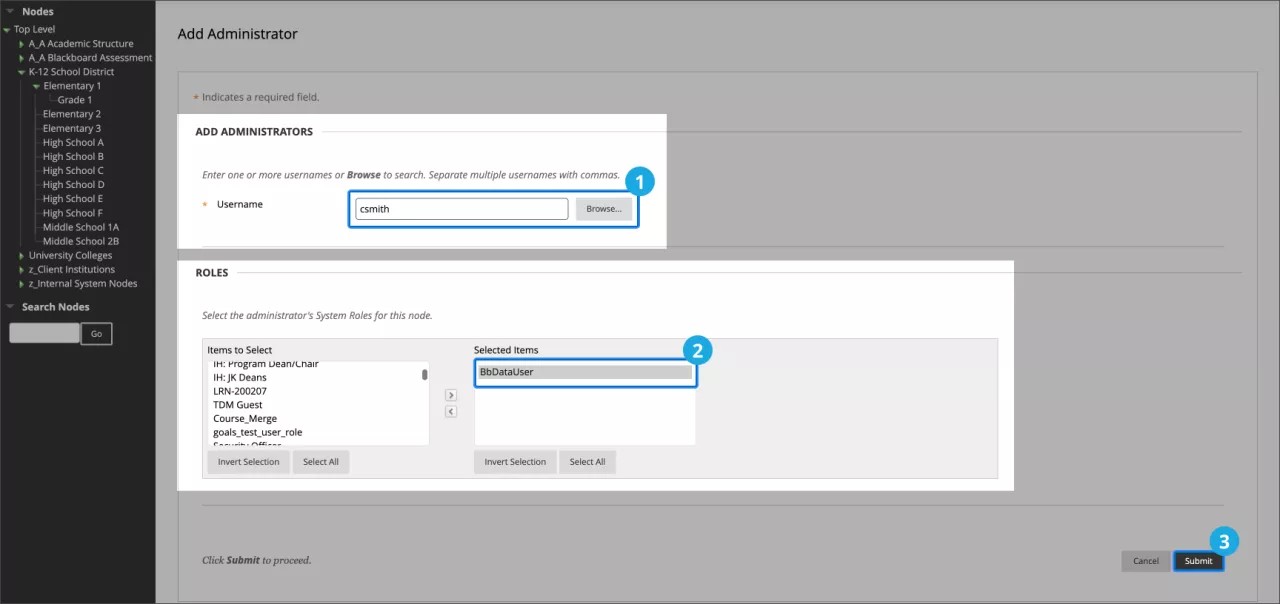
管理者として追加するユーザ名がわかっている場合は、ユーザ名のフィールドに入力します。
それ以外の場合は、[参照]ボタンを選択し、[名前]、[Eメールアドレス]、[システムロール]などのフィールドで検索します。関連する結果をすべて選択し 、[送信]をクリックします。
ロールセクションで、ノードで使用する管理者のシステムロールを選択します。
重要
特定のロールは、Anthology Illuminateの区分化されたレポートには関連しませんが、Blackboard Learnのノード内のユーザの権限に影響を与えます。
関連付けはノード管理者の関連付けを変更することでいつでも変更できます。または、ユーザの教育機関での認証のロール/グループを削除するか、シングルサインオンアカウントを無効にすることで、アクセスを完全に取り消すこともできます。
提出を選択します。
警告
ルールが適用されるまで一晩待つ。
Report permissions for native authentication
ヒント
You can select more than one report permission for a user to create a more personalized experience.
Each role provides specific access levels to reports:
User role | Permissions |
|---|---|
Reporting Area - Leading | Access to all Leading reports |
Reporting Area - Learning | Access to all Learning reports |
Reporting Area - Teaching | Access to all Teaching reports |
Reporting Area - All | Access to all reports |
Data - Restricted | Access to data restricted by permissions granted to the user by institutional hierarchy |
Data - Unrestricted | Access to all data in all reports available for the user. |
レポートの権限を追加または削除する
左パネルの設定に移動します。
ライセンス管理タブを選択し、ユーザーリストを見つけてください。
変更したいユーザーの横にあるEditを選択します。
レポートの権限を割り当てるには、 Report Permissions セクションに移動し、1つ以上のロールを選択し、 Add を選択します。
サポートされているレポート
この表はレポートへの対応を反映するため、レポートのリリースに伴い随時更新されます。
領域 | レポート | 状態 |
|---|---|---|
学習 | 学生の積極的な取り組み | サポート |
学習 | 学生のパフォーマンスと成績 | サポート |
学習 | ソーシャルとコラボレーションの取り組み | サポート |
学習 | 学生の概要 | サポート |
教育 | 指導方法 | サポート |
教育 | アセスメントと採点 | サポート |
教育 | コースの概要 | サポート |
指導 | 学習ツールの導入 | サポート |
指導 | コラボレーションセッションのアクティビティ | サポート |
指導 | 学習プラットフォームの導入 | 進行中 |
指導 | コース管理 | サポート |