Hotspot Questions
About hotspot questions
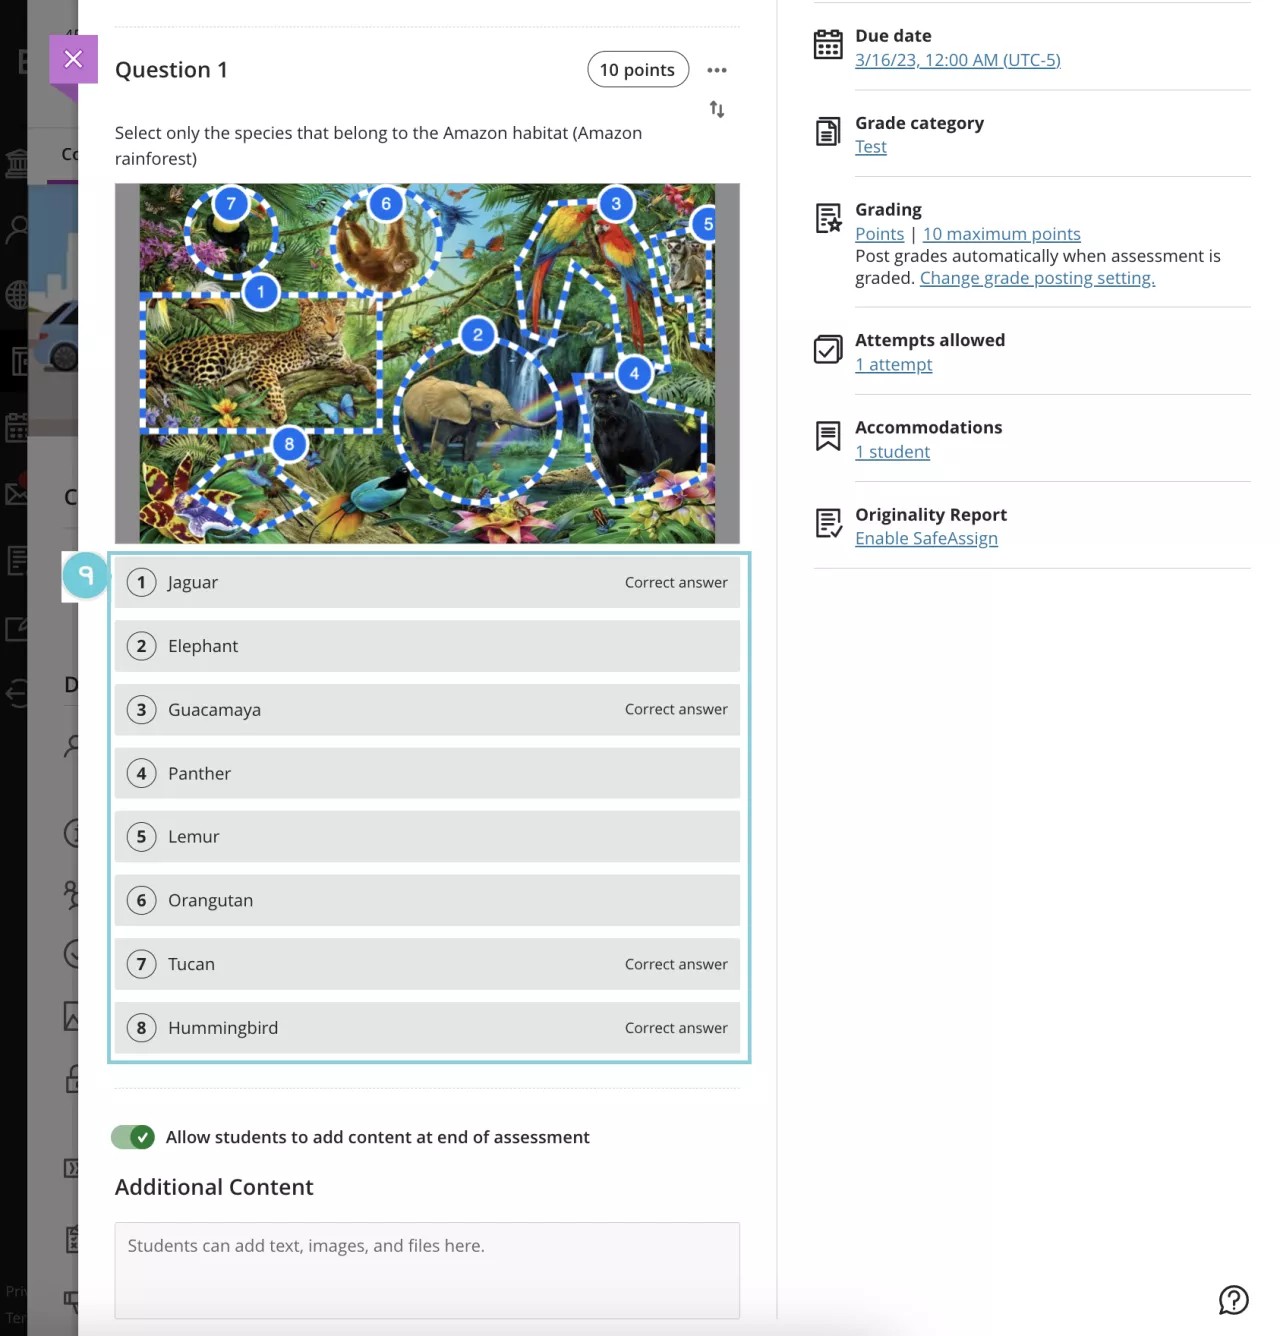
Hotspot questions present students with an image that requires them to drop a pin on one or more hotspots created by you, the instructor, within that image. Hotspot questions are great for a variety of disciplines. In an anatomy course, for instance, you might ask students to identify parts of a body. In a geography course, a specific location on a map. In a foreign language course, specific articles of clothing. In an ecology or biology course, you might ask your students to identify which animal species or individuals belong to the corresponding habitat described by the main image, or don't. Possibilities are endless.
Watch a video about creating a Hotspot Questions
The following narrated video provides a visual and auditory representation of some of the information included on this page. For a detailed description of what is portrayed in the video, open the video on Vimeo, navigate to More actions, and select Open transcript.
Types of hotspot questions
You have a variety of options when creating a hotspot question:
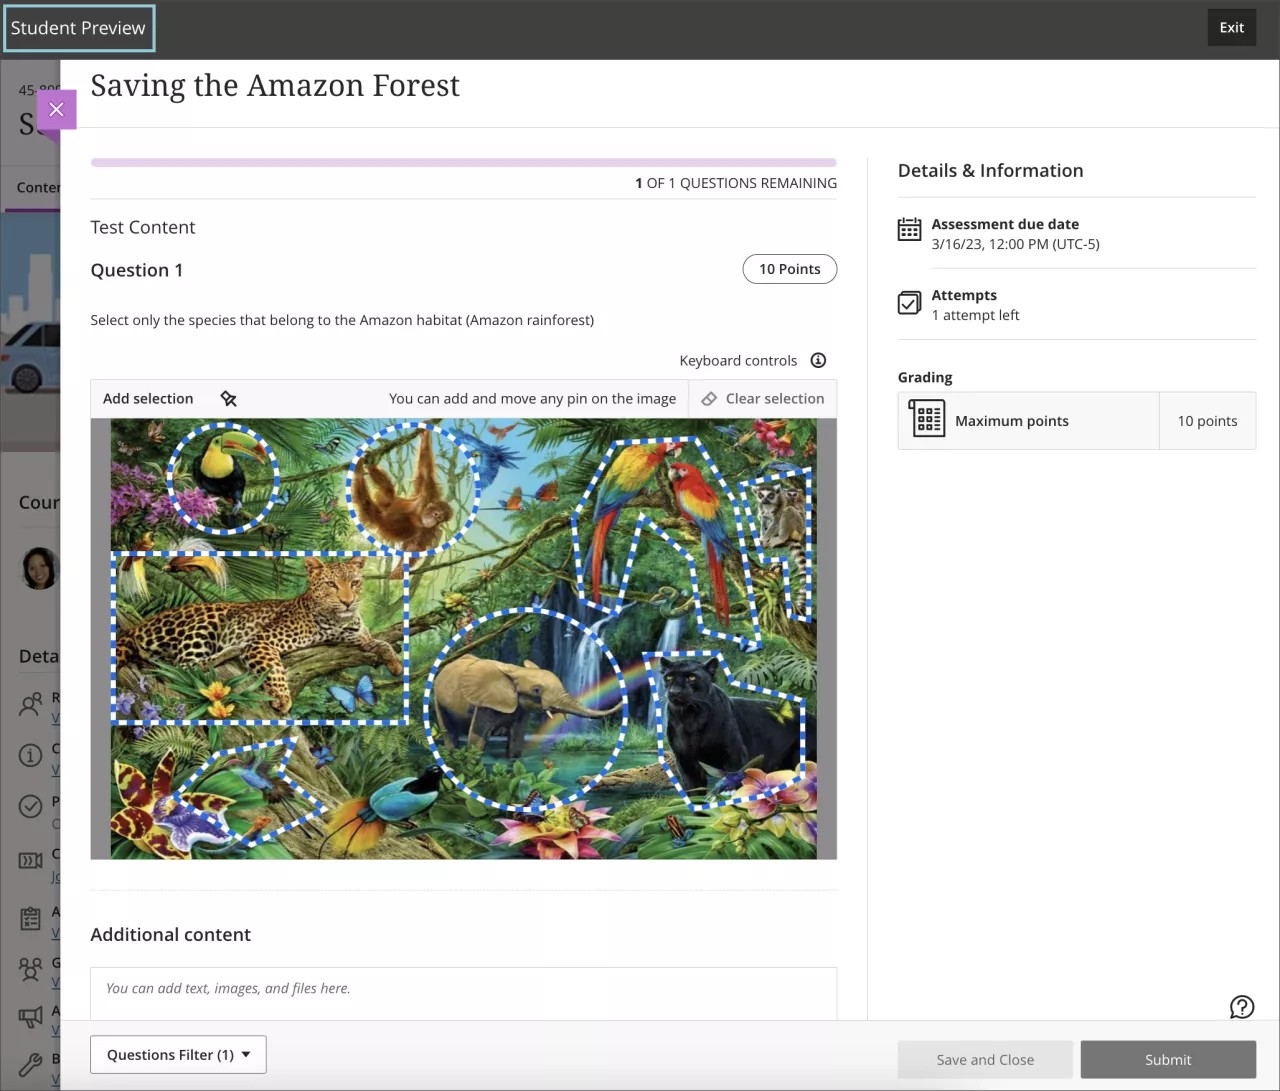
Standard Hotspot: Presents students with an image that requires them to drop a pin inside of one or more hotspots created by you within the image. Students aren't aware of where the hotspots are located.
Multiple Choice Hotspot: Presents students with an image that requires them to drop a pin inside of one or more hotspots created by you. Students are aware of where the hotspots are located. One hotspot is correct and the other hotspots are distractors.
Multiple Answer Hotspot: Presents students with an image that requires them to drop a pin inside of one or more hotspots created by you. Students are aware of where the hotspots are located. One or more hotspots are correct and the remaining hotspots are distractors.
Create a hotspot question
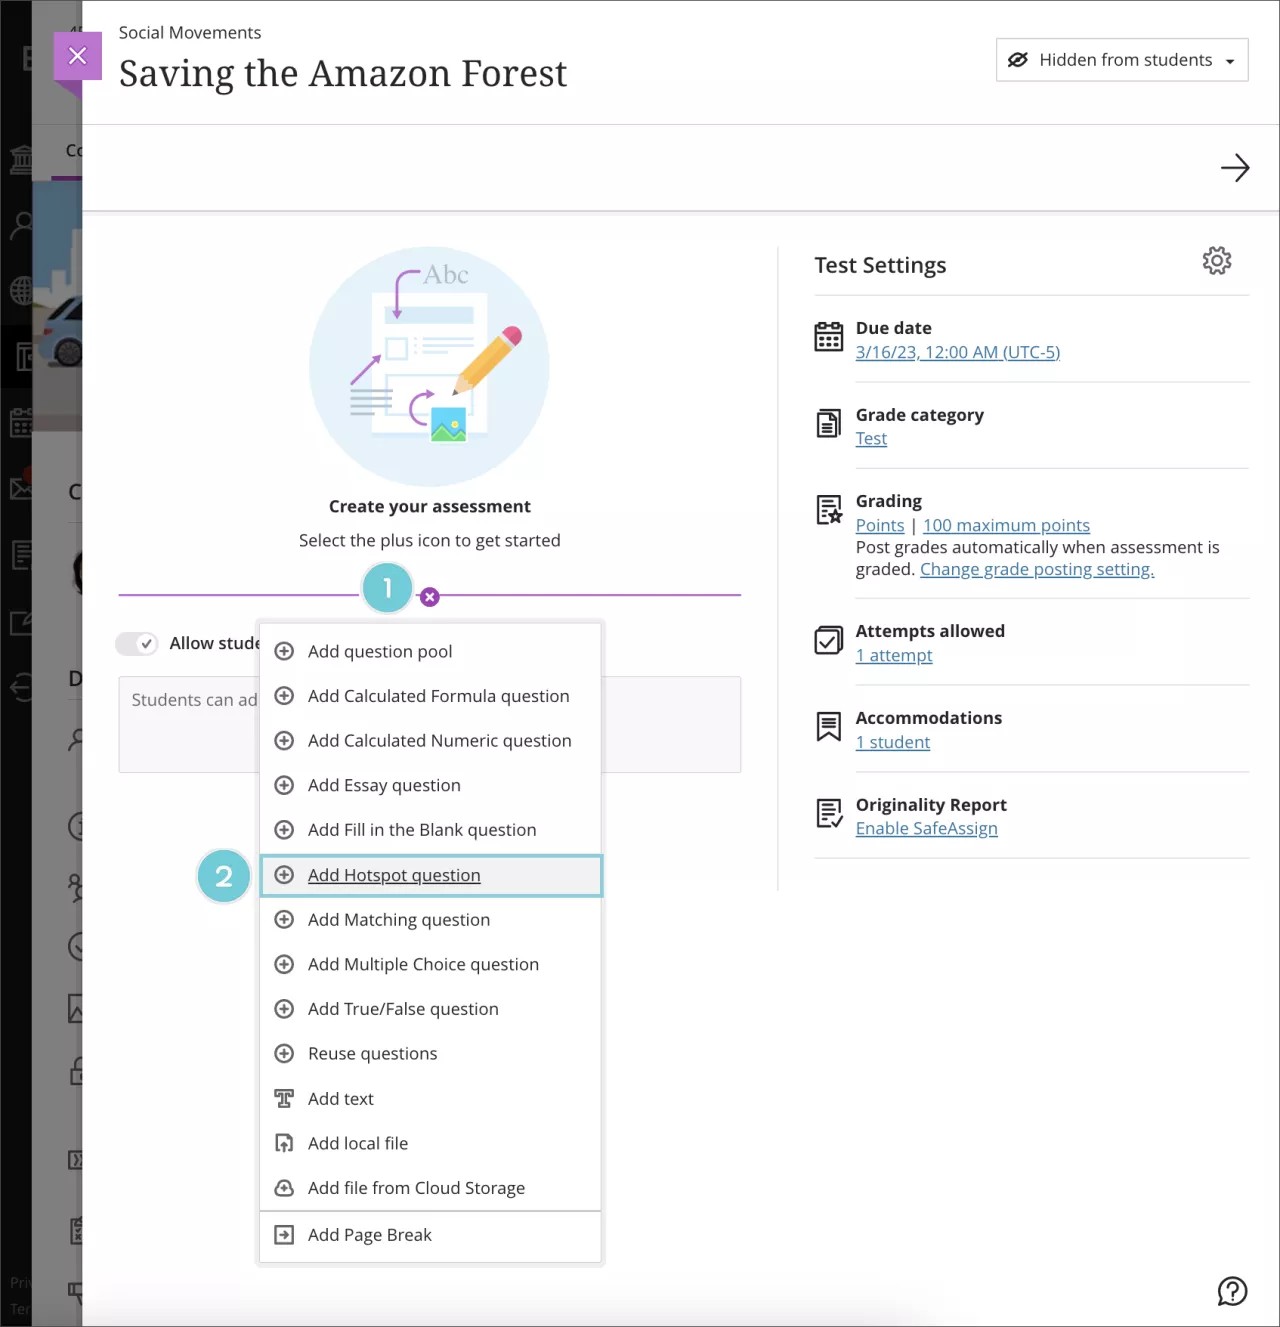
When you create a new assignment or test, select the plus sign to open the menu. In an existing test, select the plus sign wherever you want to add a question.
Select Add hotspot question.
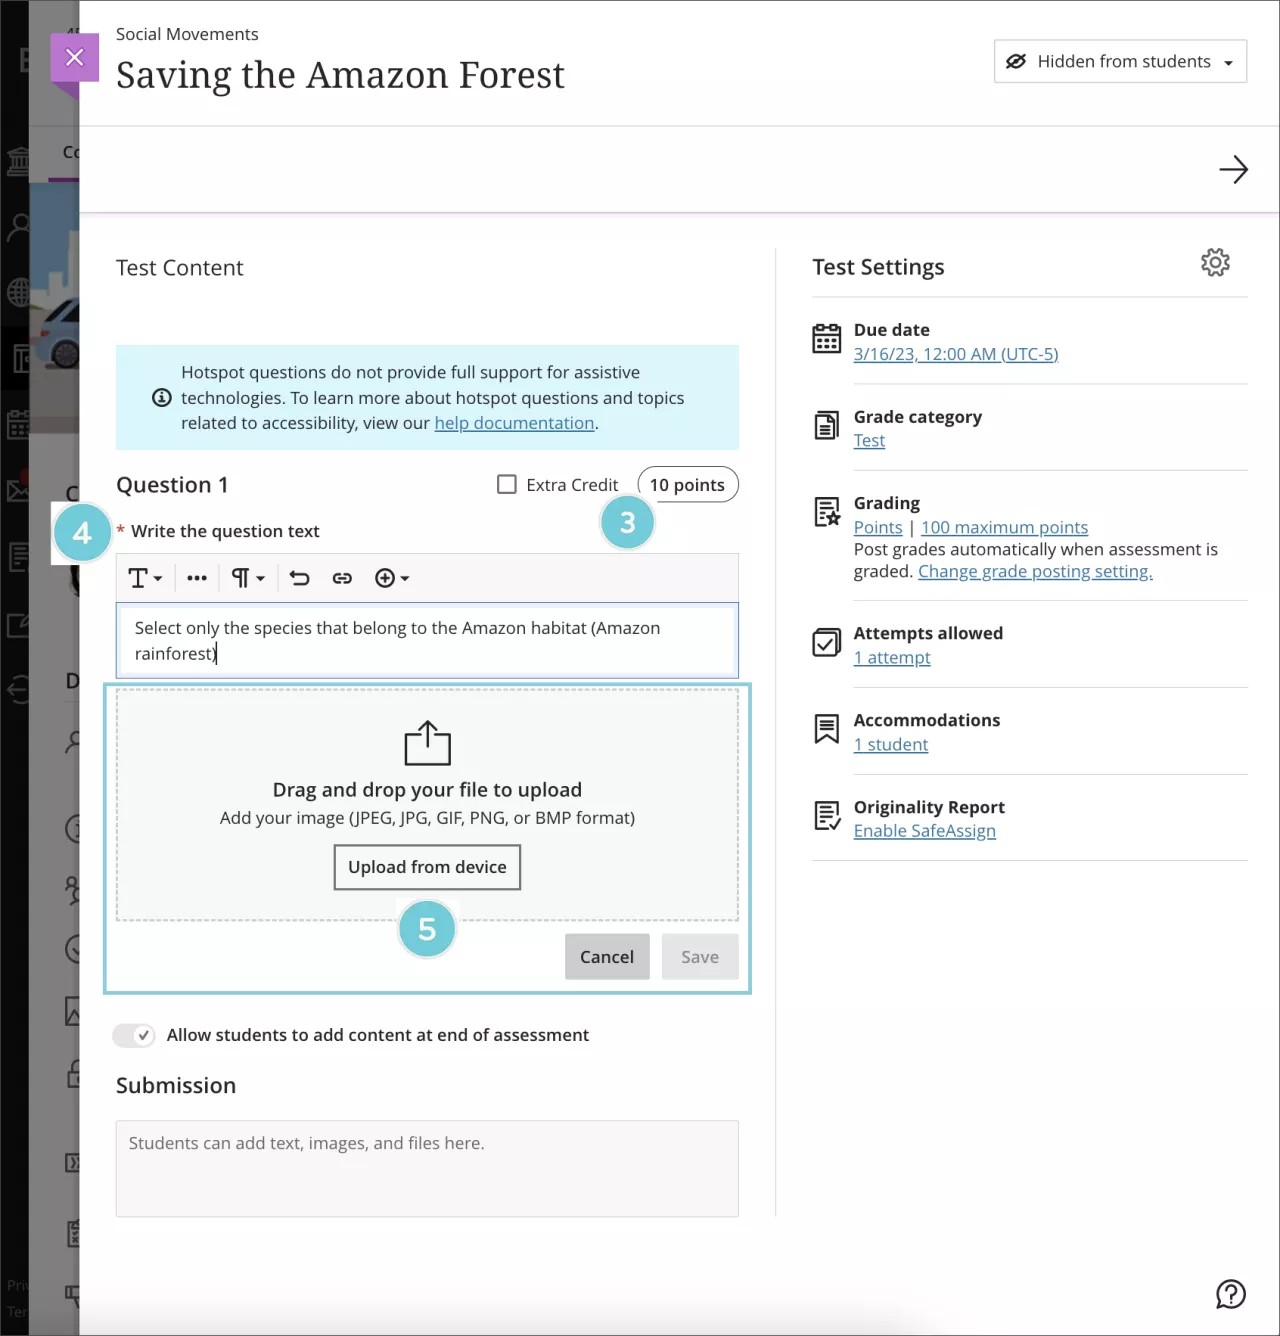
Update the point value of the question by editing the default 10 points value.
Add the question text description into the rich content editor in the Type Question # test field.
Drag and drop an image (JPEG, JPG, GIF, PNG, or BMP) into the Upload Area or select the Upload from device button to use the file picker.
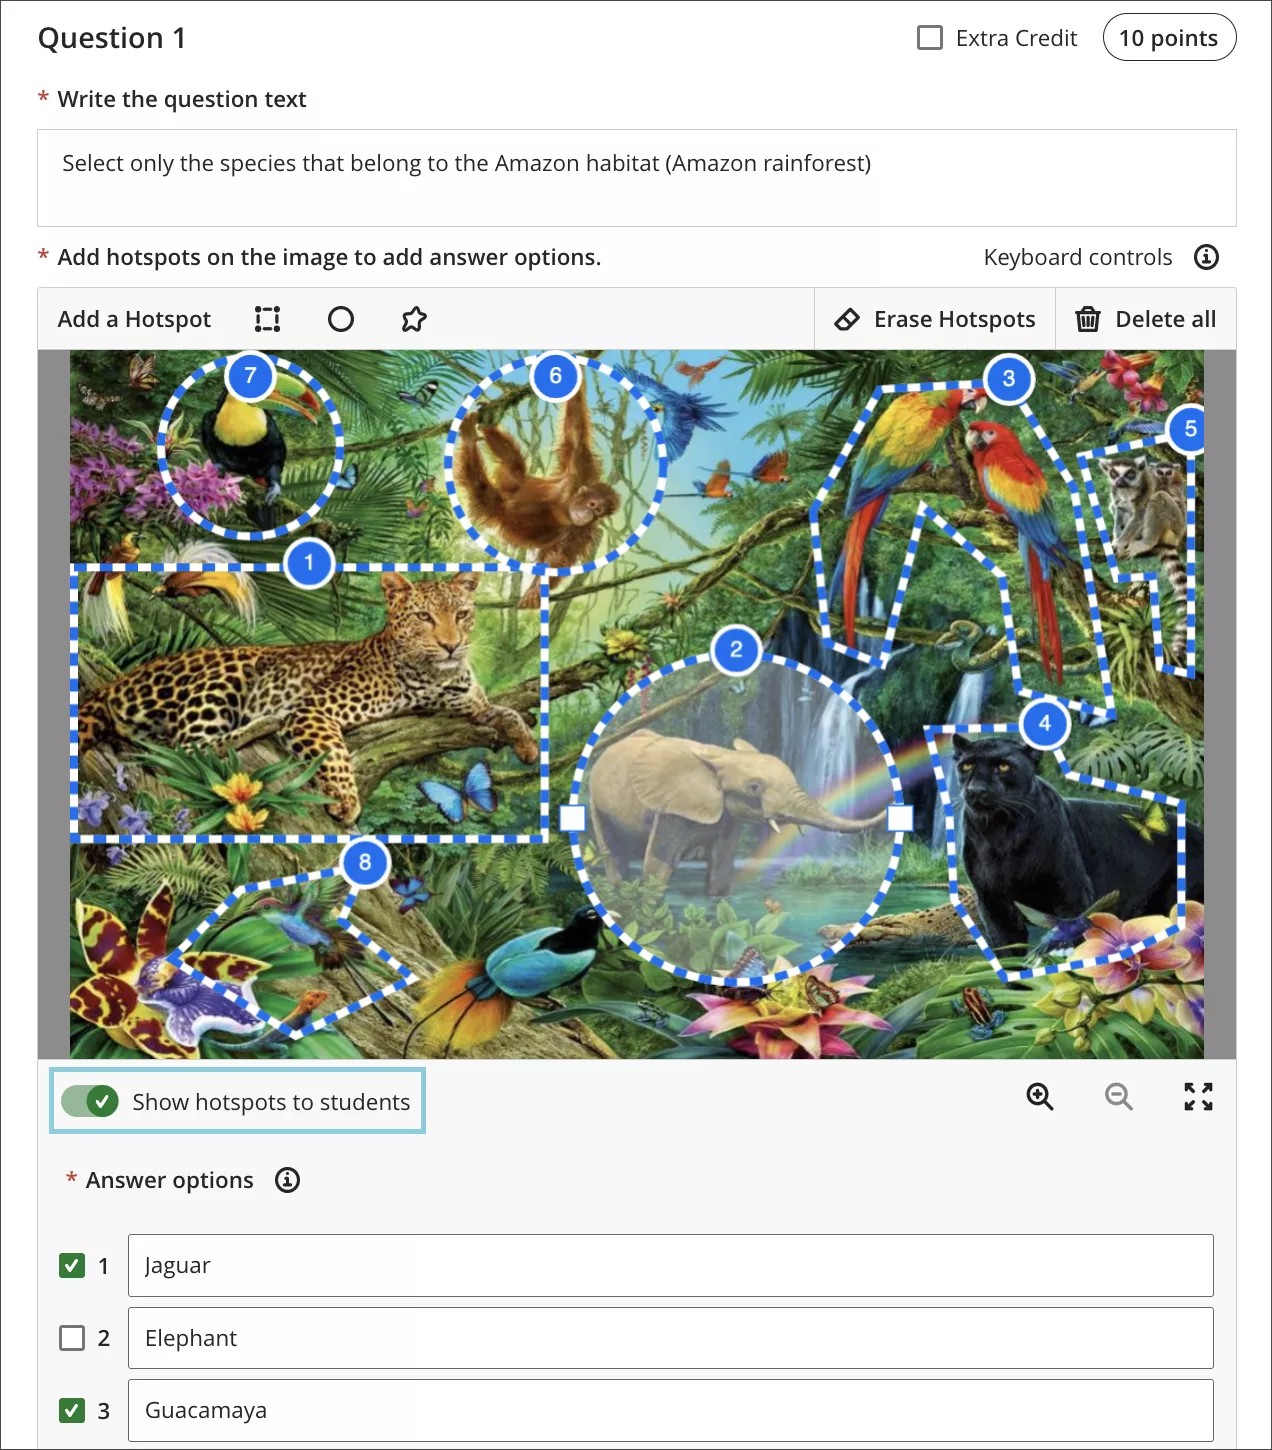
Select the square symbol next to the Add a Hotspot label to generate a square hotspot on the background image you uploaded. You can choose from a rectangular, circular or polygonal hotspot each time.
You can add more than one hotspot to an image. When you do so, there can be multiple correct answers and distractors. Distractors are recommended when you enable the Show hotspots to students option. The Hotspot question type will then function like a multiple choice question type with multiple answers.
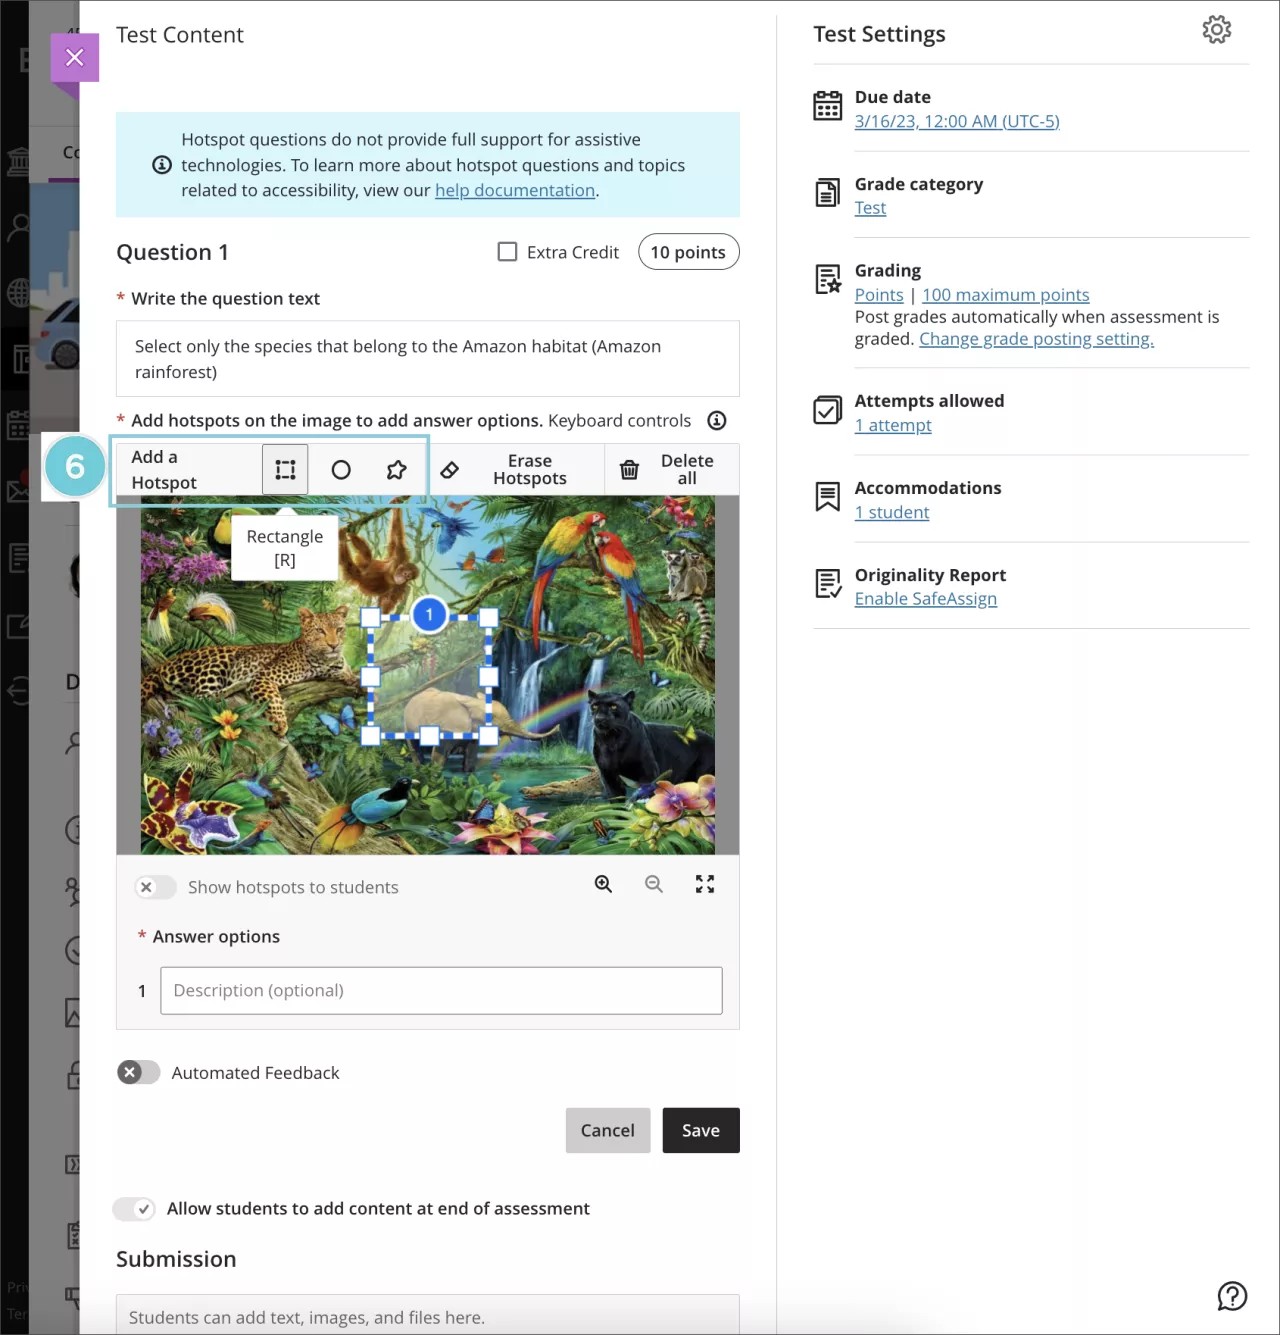
Drag and drop the hotspot to the desired location on the image.
Note
You can use keyboard controls to position hotspots
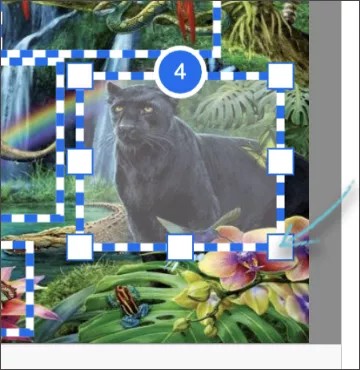
Select a hotspot and use the pull squares on each angle and corner of the hotspot to resize.
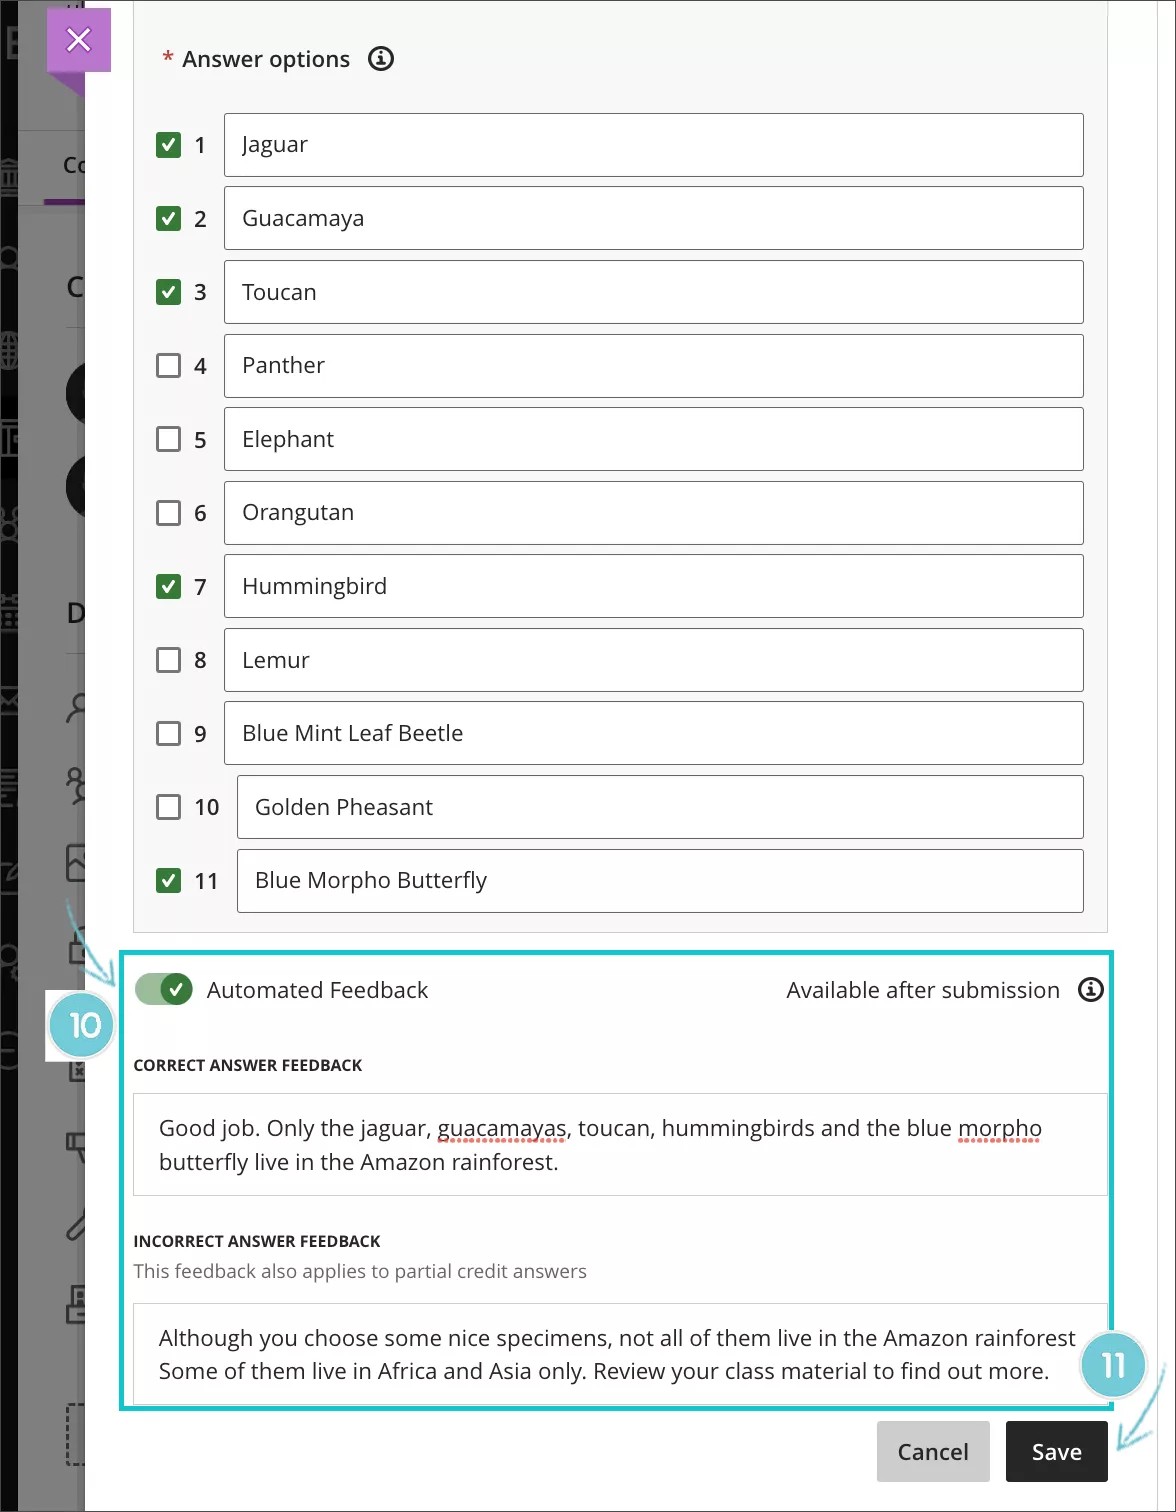
Select the corresponding checkbox for each hotspot that corresponds to a correct answer.
Note
You can add a description for each hotspot. This is optional, and not required, to save the hotspot question.
Activate the toggle for Automated Feedback to provide correct and incorrect feedback to students. This is optional, and not required, to save the hotspot question.
Select Save to add the question to the test or assignment.
Requirements to save a hotspot question
Add content into the question text field that prompts the student to drop a pin at the correct location within the image.
Add an image that will be used for the hotspot question.
Add one or more hotspots to the image. Hotspots can be used for correct answers and/or distractors.
Select at least one hotspot as the correct answer.
Additional options
Update the point value associated with the question. The default value is 10 points.
Add more than one hotspot. Adding more than one hotspot will change the behavior of the question to function similar to that of a multiple choice question with multiple answers. You can use additional hotspots as distractors.
Add descriptions to each hotspot. Hotspot descriptions are a great way to help you identify hotspots when there are multiple hotspots on an image. You can use this information to ensure students selected the right hotspots as correct answers. You can also share this information with your students to provide more information or context about a specific hotspot when they review their attempts. Hotspot descriptions are always visible to you. Your students will see hotspot descriptions when they review their attempt only if you've made visible the correct answers on the assessment. You can choose to display the correct answers and hotspot descriptions: after an individual grade is posted, after the due date, after all grades for the assessment are posted, or on a specific date and time.
Add automated feedback for correct and incorrect answers. Automated feedback can be helpful, especially to students that scored incorrectly. You can use automated feedback to redirect students to the course content location where they can find the correct answer.
Display hotspots to students. This is helpful when you want the hotspot question to function like a multiple choice or multiple answer question. Your students will see the hotspots on the image. Some of them will be correct answers while the others will be simply distractors.
Delete an image uploaded by mistake
Select the Delete all button above the uploaded image you need to replace. This will delete the image and any hotspots associated with that image.
Erase a hotspot you don’t want to use
Select the hotspot you want to erase with your mouse or keyboard combination. Then, select the Erase hotspots button above the uploaded image. This will eliminate all selected hotspots.
Tip
For multiple hotspots selection: Hotspot selections stick, thus with each consecutive selection of a new hotspot, it acquires a selected state. When you finish selecting you can delete all selected hotspots only using the keyboard or the 'Erase hotspots' option.
“Show hotspots to students” option
When this option is active, students will see all hotspots created on an image. It changes the behavior of the hotspot question to function like a multiple choice or a multiple answer question. This is recommended when you have more than one hotspot and some hotspots are used as distractors.
The example below shows how students are tasked to select only the sternum. However, the question presents them with two hotspots. They’ll need to determine which of the two hotspots is the correct one. This hotspot question functions like a multiple choice question.
Accessibility and hotspot questions
The Product Ultra Team continues to work providing new accessibility enhancements and support for assistive technologies. Before, hotspot questions needed the use of a mouse and eye-hand coordination.
Using a keyboard, you can:
Add question text
Upload an image
Delete an image
Add hotspots
Add hotspot descriptions
Select a hotspot
Select correct and incorrect hotspot answer options
Resize hotspots
Reposition hotspots
Delete hotspots
Adjust question settings
Add feedback for correct and incorrect responses
Keyboard interactions and shortcuts
When you have added a Hotspot Question in a test or an assessment the focus will be on the “help documentation” link on the notification banner.
Press tab to access the points field where you can update the point value of the question.
Press tab to access the question text field and add the question text description.
Press tab to access the “Upload from device” button where you can select an image. Allowed image formats: JPEG, JPG, GIF, PNG or BMP.
A modal displays with the image uploading progress. You can cancel the upload before it reaches 100% by pressing the tab key to access the “Cancel” button. When the image has uploaded successfully, the modal is automatically dismissible, and the image will display on the page.
Press tab to read the keyboard controls to perform the following actions:
General Controls
Select hotspots with Tab and Shift+Tab
Move a hotspot with the arrow keys
Use Shift +arrow keys to resize hotspots
Use Alt / Option + arrow keys to move or resize hotspots by a smaller increment (1 px at a time)
Select the Delete key to delete a previously selected hotspot
Zoom in with Shift+Z
Zoom out with Shift+X
Expand view with Shift+F
Close view with ESC
Rectangle and Circle Controls
Resize a hotspot with Shift + arrow keys
Add a new rectangular hotspot (when canvas is focused) with R key
Add a new circle hotspot (when canvas is focused) with C key
Polygon Controls
Draw a new polygon hotspot (when canvas is focused) with P key
Exit draw mode with ESC
Move a draw icon with the arrow keys
Move a draw icon with precision with Option/Alt + arrow keys
Add a new polygon point with Enter
Remove the most recently created point with Delete
You can add a Rectangle, Circle or Polygon hotspot by selecting the button with the same label on the background image you uploaded. The focus is moved to the created hotspot.
Press the Delete All button to delete the image and hotspots created.
After all hotspots have been created, you can continue the navigation with the Tab key to active the “Show hotspots to students” option, to allow students perceive the hotspots on the image.
Press Tab key to include an optional description to each hotspot.
Press Tab key to reach the "Cancel" button.
Press Tab key to save the hotspot question.