Anthology Evaluate LTI 1.3 Instructions
Setting up Anthology Evaluate LTI Tool
Login to Blackboard with an admin account
Open the Admin screen and click LTI Tool Providers
Select Register LTI 1.3/Advantage Tool
Change Client ID to
de9b8b7f-60d2-40fa-a5c3-5502af3f8bc0Click Submit
Tool Status: May be changed to 'Approved' or 'Excluded' to turn on or off the Tool. Leave it on Approved to use this tool.
Click Submit on the bottom of the screen.
*Note: All LTI configuration options in Blackboard must done by a user with admin privileges.
If your institution is an Anthology Outcomes user you may already have this LTI Tool added.
Managing Tool Placements:
Ultra Extension Framework (UEF):
Ultra Extension Framework (UEF) allows students the ability to see their course evaluations status inside of Blackboard Learn Ultra.
UEF Blackboard Ultra Setup steps:
LTI Tool Provider:
Search for the LTI 1.3 tool previously setup in the steps above in "LTI Tool Providers" named
""Anthology REST.LTI - A".
Click on the "Manage Placements" link in the dropdown for the tool.
Click on the “Create Placement” button on the Manage Placements page.
Fill out the following fields:
Label = UEF - Evaluations Home
Description = optional field
Handle = eval_uef
Availability = "Yes"
Type = “Ultra Extension”
Scroll to the Tool Provider Information section:

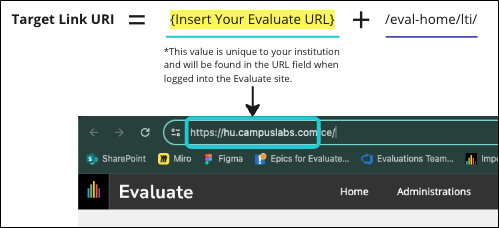
The Target Link URI value will be unique to each institution and will consist of two parts. Follow the template below to create your own value:

*Your institution's URL should start with https:// and end with .com as shown above.
Enter the following values for the Tool Provider Custom Parameters field:
user_name=@X@user.id@X@
realm={COPY/PASTE THE TARGET LINK URI FIELD}

*The final result should look similar to the above image
Click “Submit” once complete.
Rest API Integration
Navigate to the Admin Panel -> Integrations panel. Click on "REST API Integrations".
Click on the "Create Integration" button.
Enter the following information in the fields:
Application ID:
de9b8b7f-60d2-40fa-a5c3-5502af3f8bc0Learn User: The Blackboard User that will be used for all Rest API request. The permissions for this user will be used for Basic Authentication auth. Blackboard recommends creating a brand new user for this. We recommend assigning that user a System Administrator role, as that is the only role that can accomplish the calendar event creation/modification/deletion process without being enrolled in the course.
End User Access: Yes
Authorized To Act As User: Yes
Click on "Submit".
Launching the Tool:
By clicking on the "Courses" tab in the menu, students who have open evaluations will see a slide out panel showing open evaluations.
Evaluations Home Resource Link (System Tool)
This placement allows the ability for users to launch to their evaluations home screen from Blackboard in the "Tools" screen.
Navigate to the LTI 1.3 tool previously setup in the steps above in "LTI Tool Providers" named ""Anthology REST.LTI - A".
Click on the "Manage Placements" link in the dropdown arrow for the tool.
Click on the “Create Placement” button on the Manage Placements page.
Fill out the following fields:
Label = Anthology Evaluate - Home
Description = optional field
Handle = eval_system
Availability = "Yes"
Type = “System Tool”
Launch in New Window: Checked
Scroll to the Tool Provider Information section:

The Target Link URI value will be unique to each institution and will consist of two parts. Follow the template below to create your own value:

*Your institution's URL should start with https:// and end with .com as shown above.
Enter the following values for the Tool Provider Custom Parameters field:
user_name=@X@user.id@X@
realm={COPY/PASTE THE TARGET LINK URI FIELD}

*The final result should look similar to the above image
Click “Submit” once complete.
Launching the Tool:With the Developer Portal placement setup, and the registration of the Tool in Blackboard Ultra, all system tools should appear on the 'Tools' tab of the nav bar.
Navigate to the 'Tools' page.
Look for the Tool: Anthology Evaluate - Home. Click on the link to Launch the tool.
A new tab should be opened with the tool's UI.