Ally LTI 1.3 for Blackboard
Ally uses LTI to integrate with your Learning Management System (LMS). LTI is a standard developed by IMS Global for secure and seamless integrations.
The standard allows users to access Ally without leaving Blackboard. Forget about logging into multiple sites: LTI allows a secure exchange of information that enables a cohesive experience for your users.
There are two versions of LTI: v1.1 and v1.3. Each version requires different configuration steps. The current version is LTI v1.3. The biggest difference from previous versions is the upgraded security model based on OAuth2, OpenID Connect, and JSON Web Tokens.
Ally is moving to LTI 1.3 to take advantage of the upgraded security model.
What does this mean to you? If you are new to Ally, nothing. We do the Ally integration set up with you. But if you already have Ally integrated with your LMS, you’ll need to reconfigure your integration with LTI 1.3.
Disable the existing LTI 1.1 Ally reports
The LTI 1.1 institution report and client configuration are enabled automatically by the Ally building block. They must be disabled before a new LTI 1.3 launch is configured.
Configure your Ally integration with LTI 1.3
You’ll need to configure the LTI 1.3 integration by following this process:
Disable the existing LTI 1.1 reports, if you haven't already.
Register the LTI 1.3 tool in your environment.
Send the LTI Deployment ID to the Ally team for configuration.
Confirm report placements in your environment.
Register the tool
Type the Ally Client ID for the region your institution is hosted in:
US data center: a08b8d26-cc3c-4be3-8506-4d422a1002bd
Canadian data center: aa5149a4-f4d4-4d9a-845a-d5d244dc182c
European data center: 05654011-e6f9-4540-bdc5-060049ae5211
Singapore data center: a2ac36a3-8d0e-4737-911a-479e0b560408
Australian data center: f43327b1-9685-4d19-a7fc-91d635be22f1

Select these options under Institution Policies:
Role in Course
Allow Membership Service Access
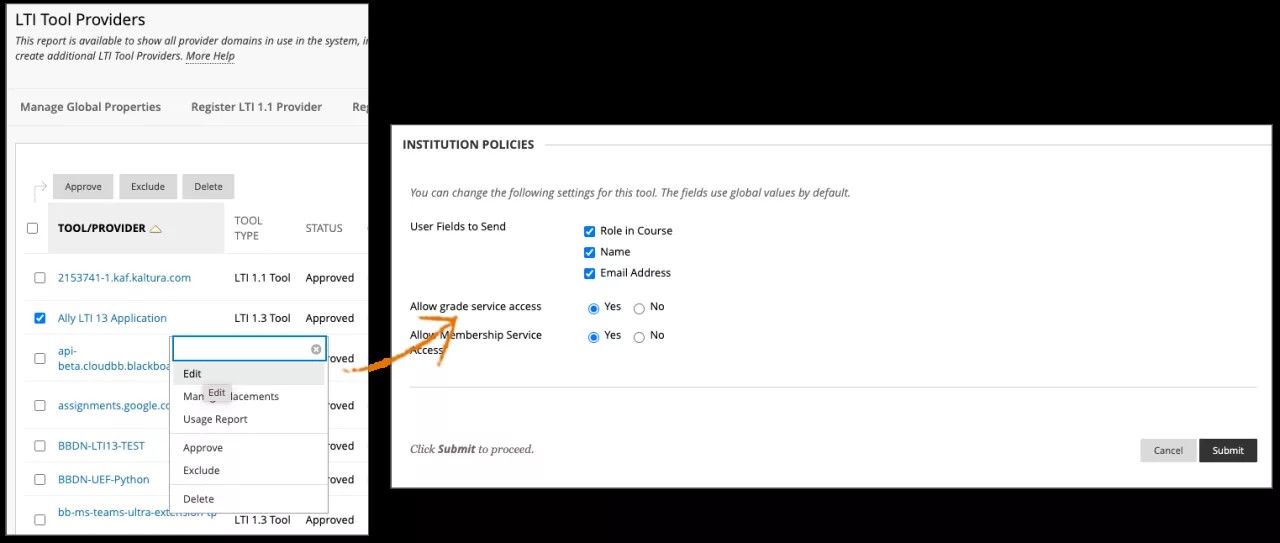
Select Submit.
Send the Deployment ID to Ally
Create a support ticket with the Deployment ID for the tool, so the Ally team can configure the integration within the Ally system.
Include this information in the support ticket:
LTI Deployment ID for the tool
Request to set up the LTI 1.3 tool
For example, My Ally LTI 1.3 integration Deployment ID is: #00000000000000000. Please set up my LTI1.3 report.
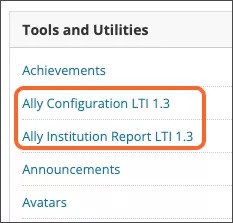
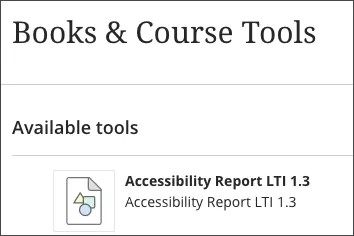
Confirm report placements
Confirm the Institution Report and Ally Configuration appear in the Blackboard Learn Administrator panel under Tools and Utilities.
Go to a course on Blackboard Learn and confirm the Course Accessibility Report is there.
Manage the placement for the Department Reports with this information:
Label: Ally Department Report
Handle: ally.department
Availability: Yes
Type: Administrator Tool
Copy and paste the appropriate link into the Target Link URI field. Replace
[AllyEnvironment]with the environment information your institution is hosted in.Institution report:
https://institution.[AllyEnvironment]/api/v2/auth/lti/1.3/targetClient Configuration:
https://config.[AllyEnvironment]/api/v2/auth/lti/1.3/targetCourse Accessibility report:
https://course.[AllyEnvironment]/api/v2/auth/lti/1.3/target
Copy and paste this information into the Tool Provider Custom Parameters field:
A role based launch
ally_system_roles=@X@user.role@X@ally_secondary_institution_roles=@X@user.secondary_institution_role@X@ally_primary_institution_role=@X@user.institution_role@X@ally_department_id=:roleA specific launch, Replace _123_1 with the department id.
ally_system_roles=@X@user.role@X@ally_secondary_institution_roles=@X@user.secondary_institution_role@X@ally_primary_institution_role=@X@user.institution_role@X@ally_department_id=_123_1Confirm the Departmental Report appears in the Blackboard Learn Administrator panel under Tools and Utilities.
Ally environment for your region
Use the information for the Ally environment your institution is hosted in.
US data center:
prod.ally.acCanadian data center:
prod-ca-central-1.ally.acEuropean data center:
prod-eu-central-1.ally.acSingapore data center:
prod-ap-southeast-1.ally.acAustralian data center:
prod-ap-southeast-2.ally.ac