2026 Release Notes
July 2026
New Developer role for Snowflake access
Administrators can now assign a dedicated Developer role to technical users while keeping Illuminate's administration separate. This enables your data team to work directly with your institution’s data in Snowflake, while your administrators keep control of platform settings.
With this release:
A new Developer role can be assigned to any current or new user. It's intended for data analysts, SQL developers, and integration partners.
The Developer area is now fully dedicated to developer features, including Launch Snowflake to query institutional data and the Data Dictionary to explore the data models.
On the navigation bar, the Settings link was moved outside of the Developer area and it's only available to Administrators now. This keeps administration clearly separated from the Developer experience.
The Developer role does not consume an Author or Viewer license.
Roles are stackable. For example, a user who needs both data and administrative access can hold the Developer and Administrator roles at the same time. A Developer who also needs reports can be given the Viewer role.
To assign a developer role to a user, go to Settings and then select License management. Select Edit for a user, and then select Developer under User Roles. For more information, visit Assign Roles to Users.
February 2026
Manage user roles in Illuminate
Administrators can now assign roles to users in Illuminate Settings, eliminating the need to manage roles through SAML groups or the Blackboard Administrator Panel. This streamlines user management by reducing dependencies on external platforms and prevents operational bottlenecks.
Institutional authentication is still managed through Blackboard or SAML. After the initial connection to the identity provider, administrators can manage all users, roles, and permissions directly from Illuminate Settings.
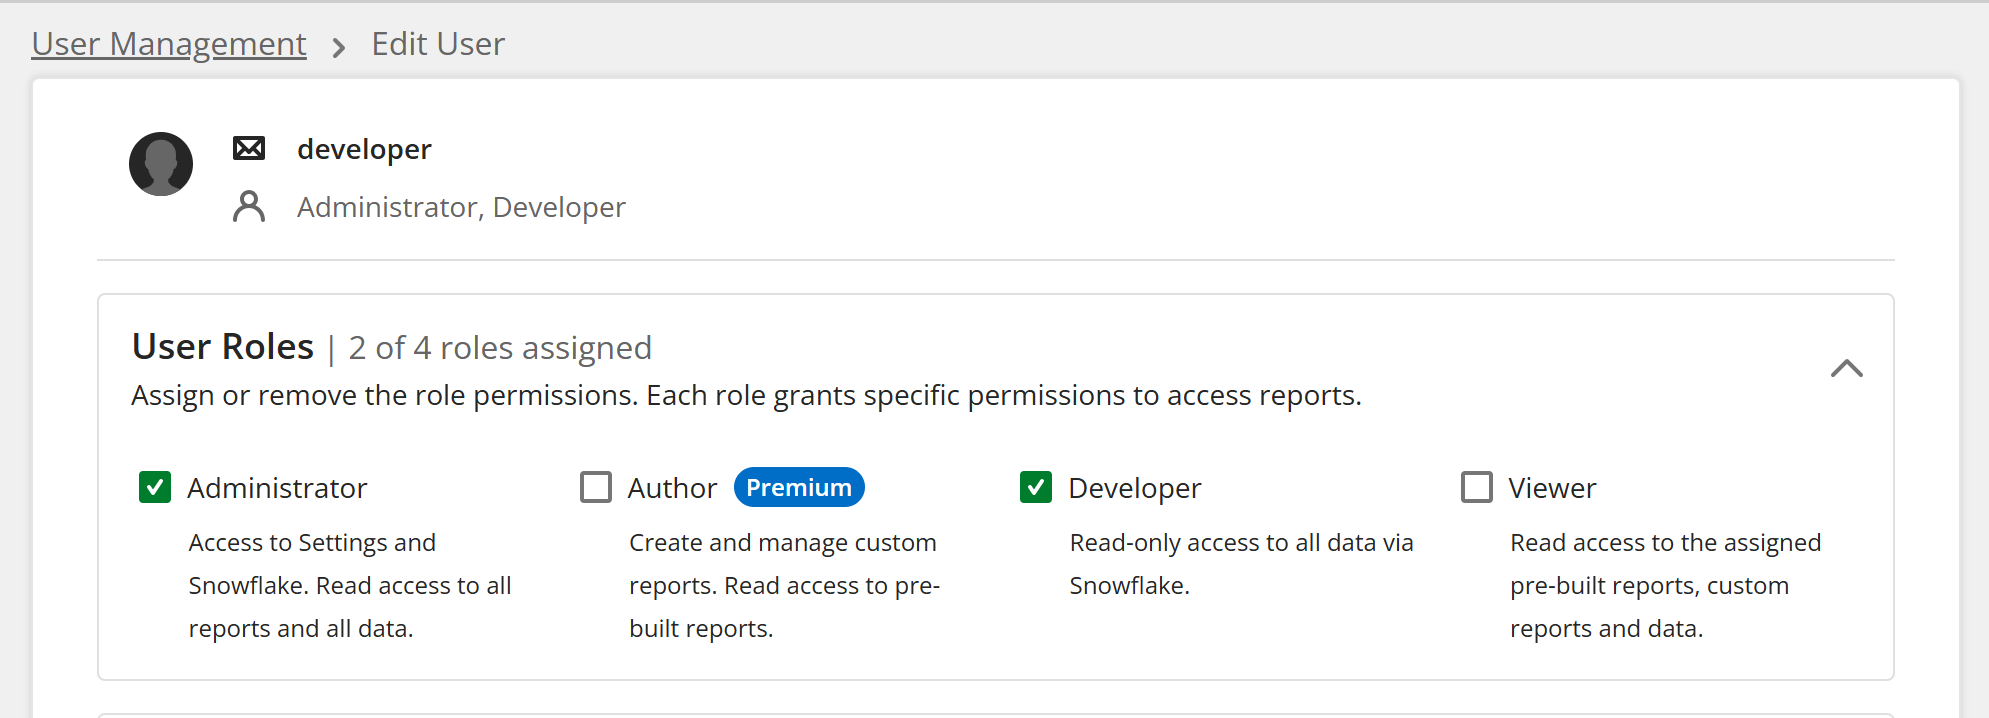
Assign roles to an Illuminate user
To assign role permissions for a user, from Settings in Illuminate, select License management. Then, under Actions, select Edit for the user to update. On the Edit User page, select which roles to assign.
Image 1. Edit user page in Illuminate where you can assign roles and permissions

These are the roles available in Illuminate:
Administrators: Have full platform access, including settings, Snowflake access, and read access to all pre-built reports and data.
Authors (exclusive for Illuminate Premium): Can create custom reports, have Snowflake access, and by default can view all pre-built reports and data, with permissions configurable.
Viewers: Have read-only access to pre-built reports, with no data permissions assigned by default, ensuring data security.
Notes
If institutional authentication is already configured, no additional steps are required.
Existing users currently listed in the user list will remain in place, and their roles will be reflected in Illuminate without requiring any additional configuration.
Users who previously had roles configured in Blackboard or SAML but have never logged into Illuminate will not appear in the user list and will need to be created again.
Users without any assigned roles can still log into Illuminate, but they will not have any permissions within the platform. These users do not occupy a licensed user seat, allowing administrators to manage license capacity efficiently.
Delete Illuminate users or remove their roles
In a recent release, we introduced the ability to delete Viewer users. Administrators can now delete other Administrators or Authors. Administrators can also remove roles from users to reassign them to other users.
Delete a user
From Settings in Illuminate, select License management. Then, under Actions, select Delete for the user to remove.
Image 1. The Delete option for removing users

Note
Because Authors can create and own custom report content, additional safeguards are in place to ensure data security. When you delete an Author with saved content, you can choose to transfer their content to another Author or to all Authors. If the content transfer fails, the deletion process stops automatically to prevent any data loss.
Image 2. Content transfer prompt for choosing where to transfer the deleted author's content.

Notes
Once a user is deleted, they immediately lose access to the platform. This action cannot be undone.
Administrators cannot delete themselves or remove their own Administrator role.
Remove roles from an Administrator or Author
From Settings in Illuminate, select License management. Under Actions, select Edit for the user to update. On the Edit User page, clear the checkboxes for the roles to remove.
AI conversations data included in Blackboard Source Tables for Illuminate Premium
For customers with Illuminate Premium, data for AI Conversations is now included in the Blackboard source tables in Illuminate. The new data is available in the LEARN schema in Snowflake. This update is retroactive and includes historical AI Conversations data.
With this data, you can identify these items:
AI conversation’s name and type (Socratic or role play)
Number of conversations per course
Whether the AI conversation was created with AI Identify if the AI conversation is a test or formative
Number of student messages in an AI conversation
Texts of questions and answers
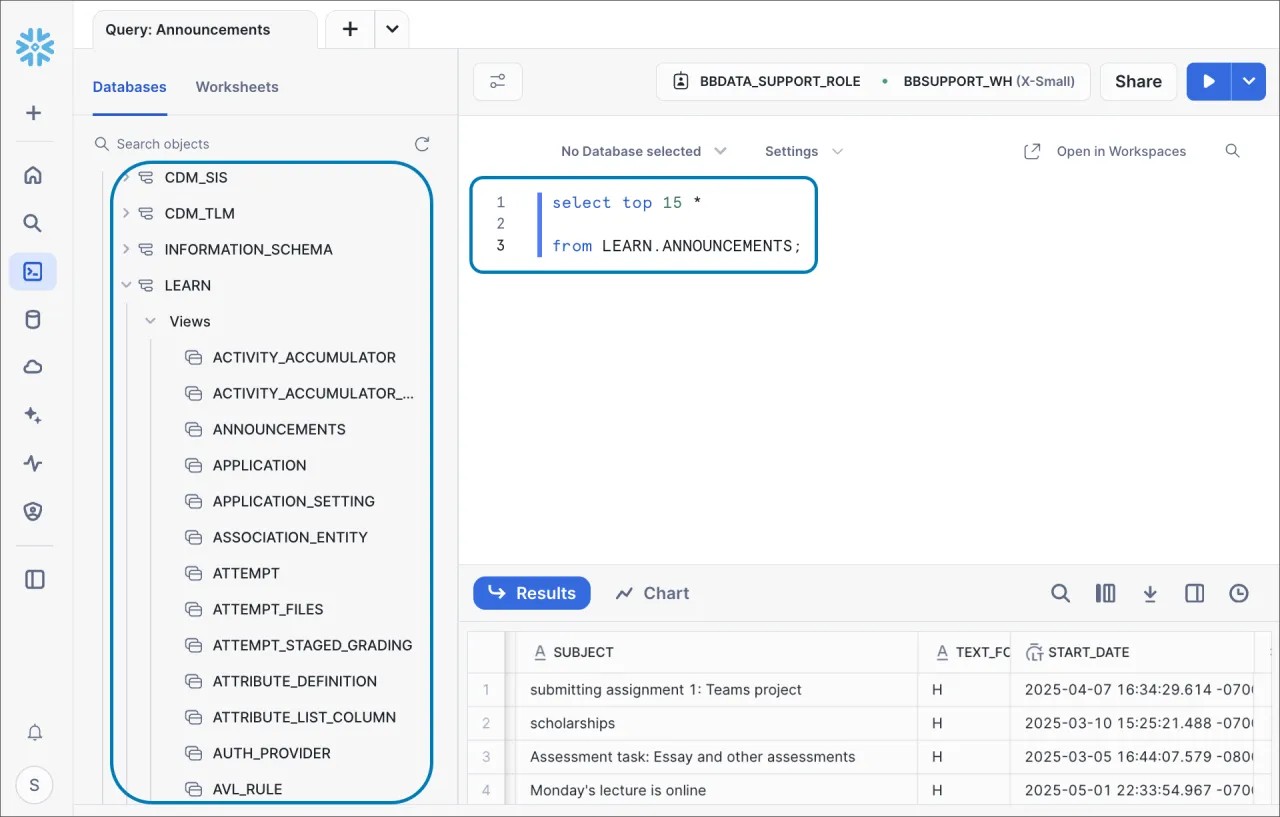
A new AI Conversations folder has been added to the GitHub query repository with sample Snowflake queries, including:
Image 1. Query to analyze AI Conversations in Snowflake

New columns included in LEARN schema are:
Date (YYY-MM-DD) | Status | Entry | Source | Description |
|---|---|---|---|---|
2026-2-15 | Added | LEARN.QTI_ASI_DATA.DATA | Blackboard | Contains raw XML markup for assessment, section, item data |
2026-2-15 | Added | LEARN.QTI_RESULT_DATA.DATA | Blackboard | Contains raw XML markup for questions in assessments such as tests |
January 2026 Release
Blackboard source tables available in Snowflake for Illuminate Premium clients in America region
Blackboard source tables are now available for Illuminate Premium clients hosted in the US AWS region, covering North, Central, and South America. This means Blackboard source tables are now deployed across all supported Illuminate regions.
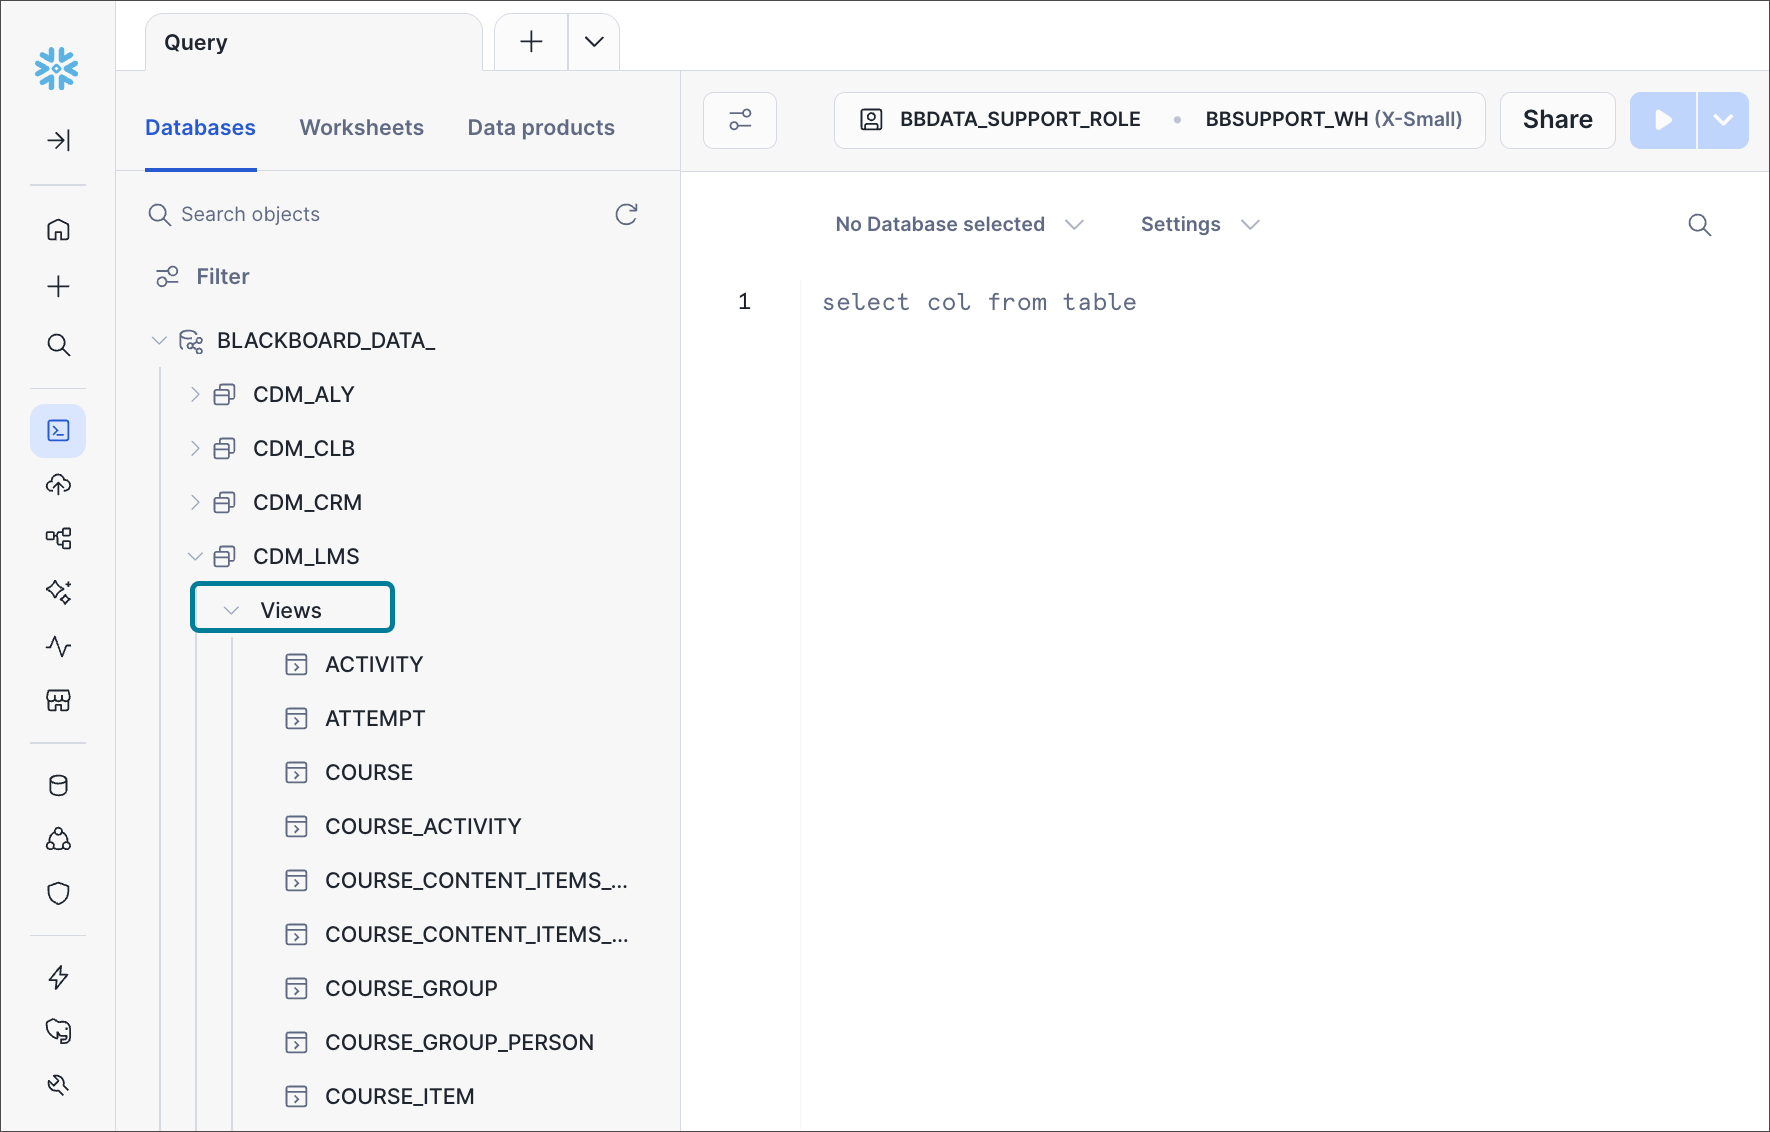
Illuminate Premium includes 183 tables from Blackboard’s Open Database Schema. These source tables are available in Snowflake as views in the LEARN schema and refresh every 4 hours. Note: These tables are not documented in the data dictionary. Learn more about Illuminate Premium and Blackboard source tables included in Illuminate.
Image 1. A query with LEARN schema source tables in Snowflake.
Important
If you have Illuminate Premium, these source tables are included in your current license with no additional setup required.
Note
In some accounts, source tables will appear in the LEARN schema by the first week of February 2026 due to incremental delivery processes.
America region migration to Multi-tenant architecture
We completed the migration of the Blackboard Canonical Data Model (CDM_LMS) to a multi-tenant deployment for institutions hosted in the US AWS region. This update provides a more reliable data connection method.
The US region includes institutions in North, Central, and South America. With this milestone, the multi-tenant migration is now complete across all regions supported by Illuminate.
You can check whether your instance is multi-tenant by viewing CDM_LMS in Snowflake. Multi-tenant instances have data organized in views while single-tenant instances have data organized in tables.
Key considerations:
Your Snowflake queries may take longer to load.
If you are extracting data from Illuminate into Power BI, update to the latest version of the Power BI app that supports Snowflake views.
If you are using Looker Studio or Qlik, use SQL queries instead of the Wizard-based connection method.
Image 1: Query in Snowflake showing CDM_LMS views.
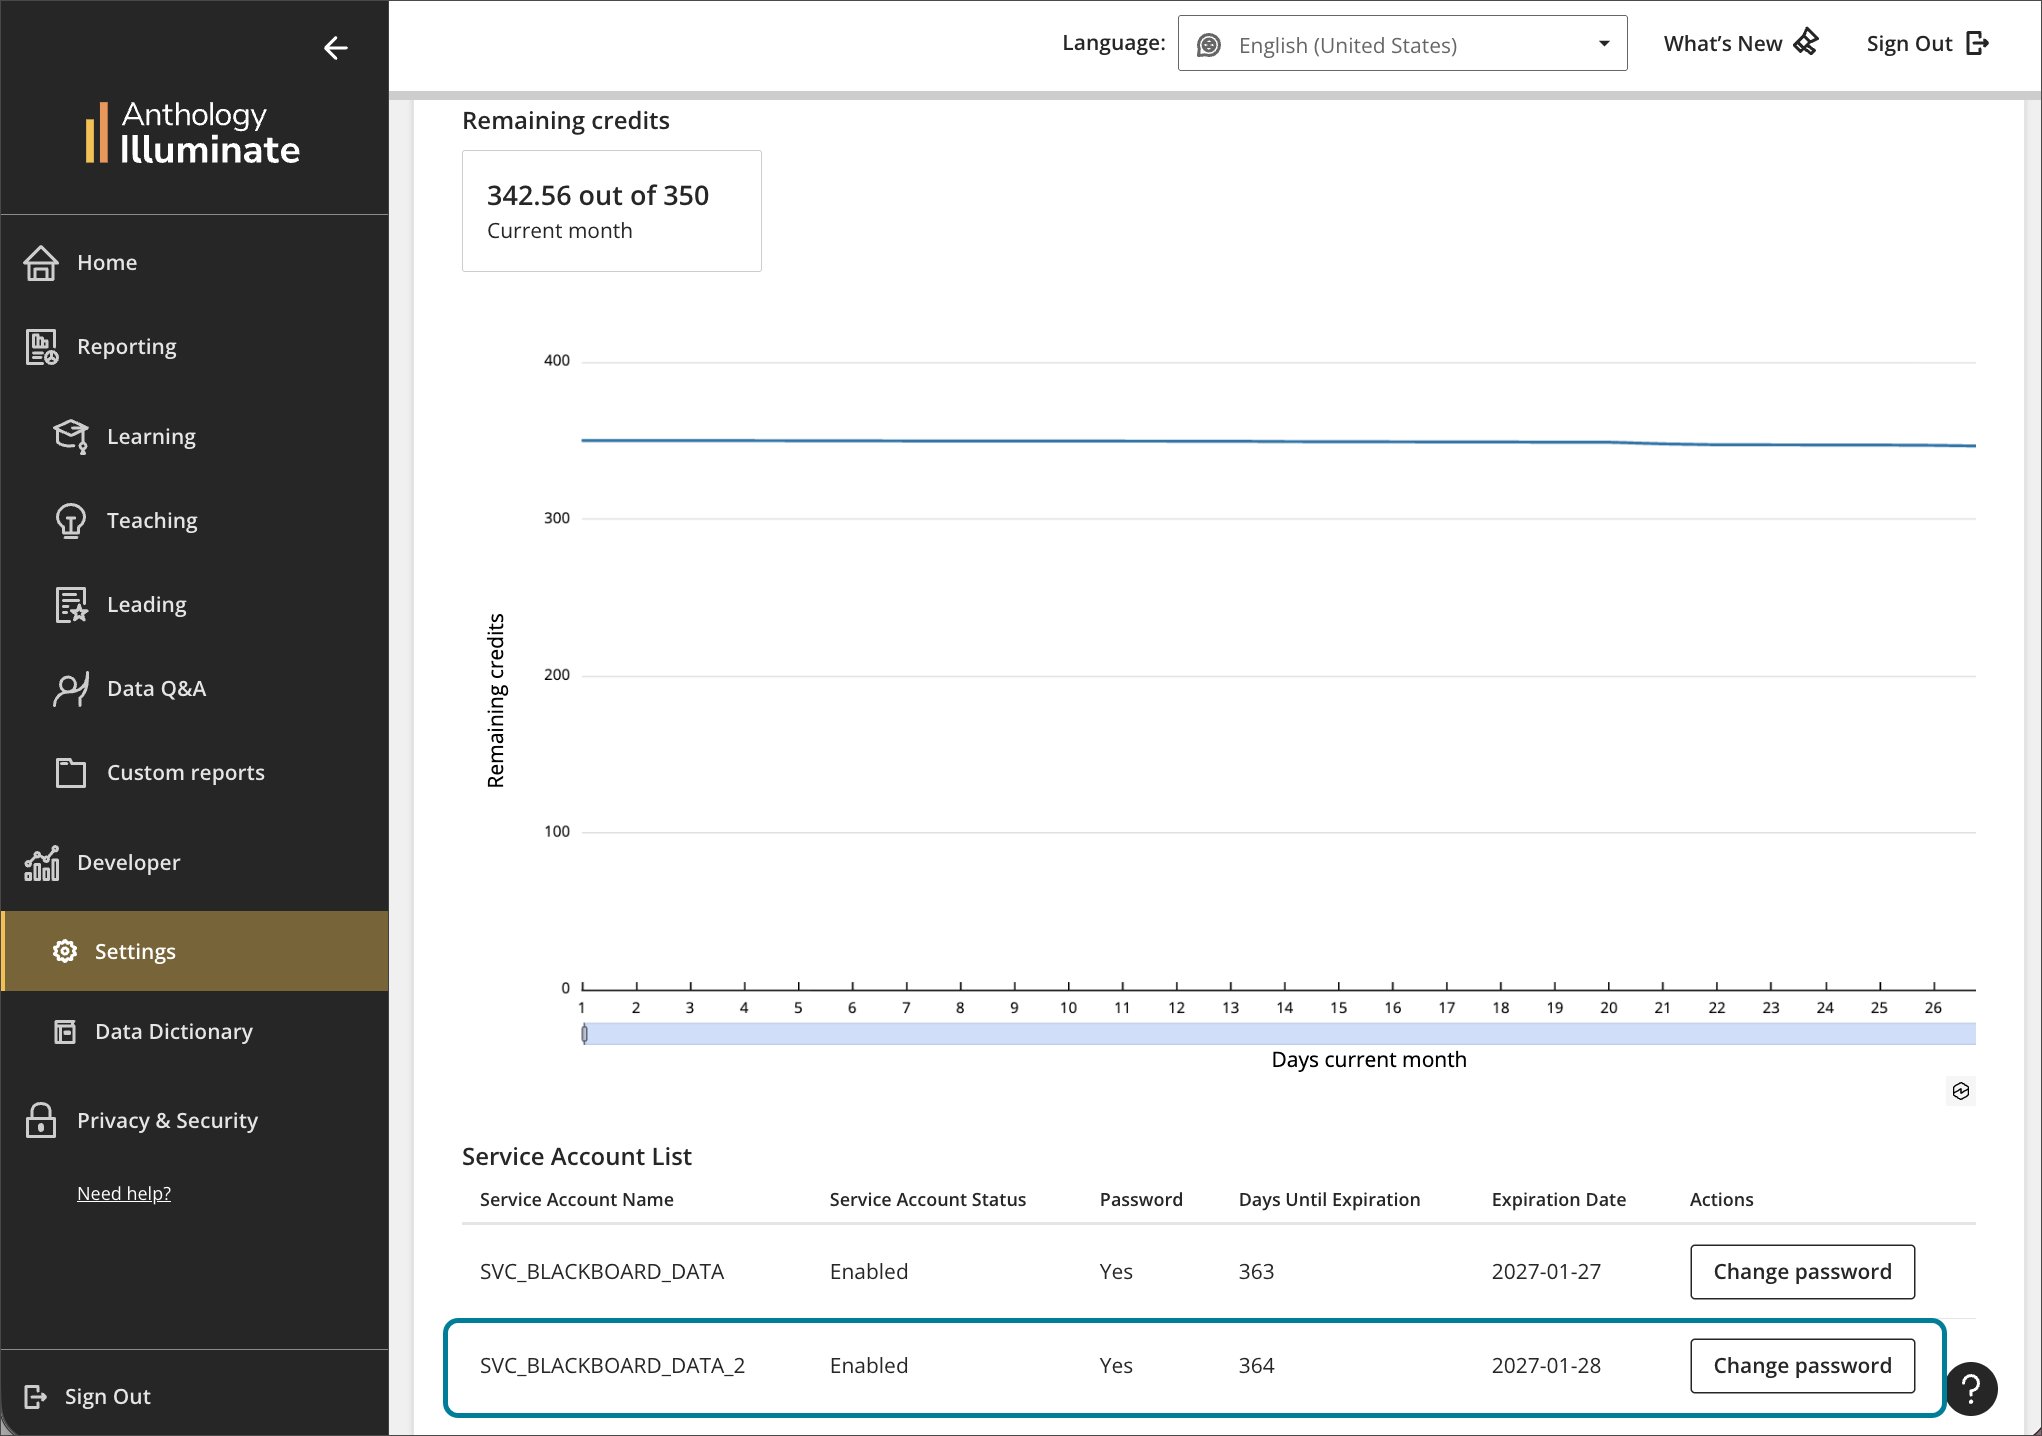
Multiple Snowflake Service Accounts for Premium
Snowflake Service Accounts in Illuminate enable secure machine-to-machine connections for extracting data from Illuminate to external tools, such as BI platforms for reporting or data warehouses.
Illuminate Core includes one Snowflake Service Account. Now, Illuminate Premium clients can request additional Snowflake Service Accounts by submitting a support ticket. Administrators can view all Service Accounts in Illuminate Settings under the Snowflake settings menu.
Multiple Service Accounts provide greater control, allowing administrators to assign dedicated accounts to specific teams or purposes and manage passwords and IP restrictions independently.
Learn more about Snowflake Service Accounts and how to apply IP address restrictions to them.
Image 1. Two Snowflake Service Accounts listed in Illuminate settings.