Activity and Email History
When you have the student selected, you can access activity and email history for the student record.
To navigate to Student Activity History page:
-
Locate the student record and open the Student Details page.
-
There are multiple methods for locating the student record (see Find A Student).
-
At the top, select Activity History. This opens the Student Activity History page.
-
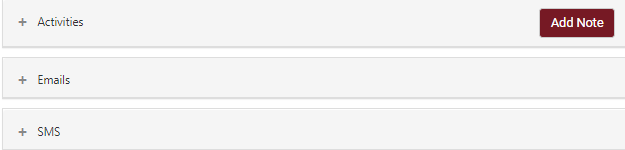
You can view three groupings of information on the Student Activity History page.
-
Activities - Shows any activity that has been performed on the student's account.
-
Emails - Provides a history of emails sent during the verification process associated with the selected student.
-
SMS - Provides a history of text messages sent during the verification process associated with the selected student.
-
To view activity history:
-
Expand the Activities section by selecting the + next to Activities. This exposes the list of activities performed by the verification system on a student.

Once expanded, you can see all activity associated with the selected student's account.
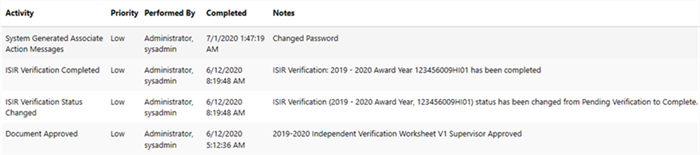
The Notes column indicates details about the type of object and change. For example, when the Preferred Name is changed in the Staff Portal, Student Portal, or via the Student Import process, the Notes column will indicate the old and new value for the Preferred Name field and the process that triggered the change.
-
You may filter the activity list by selecting an activity type from the Activity Types list.
Important: Selecting an activity type limits the activities you see in the list by your selection.

To manually add an Activity History Note, see Add an Activity Note to the Activity History.
To view email history:
-
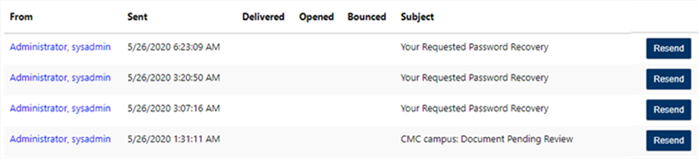
Expand the Email section by selecting the + next to Emails. This exposes the list of email sent to the student through the verification system.

Once expanded, you can see all sent email associated with the selected student's account.
-
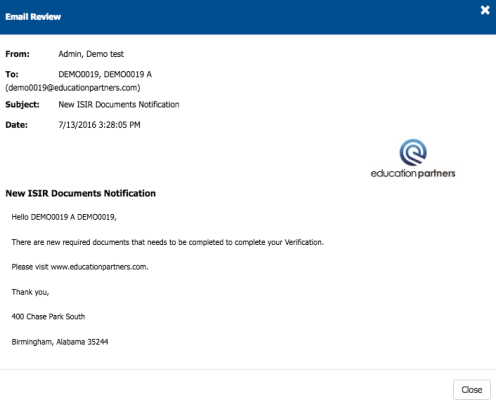
Select the name in the From column to view a copy of the email that was sent.
To view SMS history:
Expand the SMS section by selecting the + next to SMS. This exposes the list of text messages sent to the student through the verification system.

Once expanded, you can see all text messages associated with the selected student's account.
The Status column indicates whether the message delivery succeeded or failed.

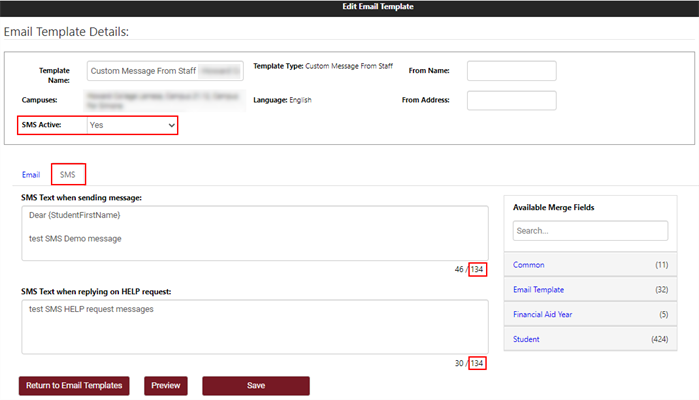
When SMS is enabled for the campus, the Email Template Details form under Administrator > Site Administration > Email Templates form displays the SMS tab. On the SMS tab, you can enable or disable the SMS and specify template details. You can use merge fields as needed. The SMS Text field can hold up to 134 characters. The template will not be saved if you specify more than 134 characters.
SMS messages will be sent when the email message specified on the Email tab of the template is sent and the student has selected Opt in for Text Messages in the Student Portal. You can view the student's selection on the Student Profile Information page in the Staff Portal and in the Cell Phone Opt In value of the batch import file (see Student Batch Import).
Add an Activity Note to the Activity History
The Student Activity History page allows you to view records of the actions that have been performed on a student's account. Each activity has information such as who performed the action, the time it was completed, and associated notes.
To add a note to the student activity history:
-
Locate the student record and open the Student Details page.
-
There are multiple methods for locating the student record (see Find A Student).
-
Select Activity History from the top menu.
-
Select the Add Note button on the right side of the screen.
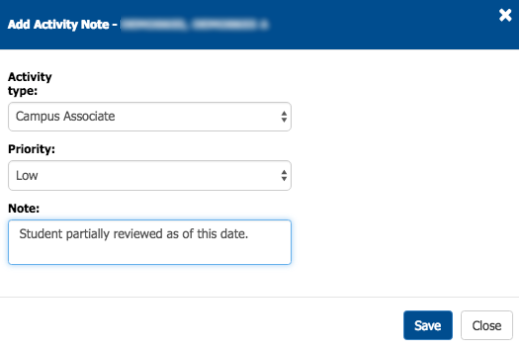
This opens the Add Activity Note dialog box.
-
Select an Activity Type.
The following Activity Types are available for you to select:
-
Campus Associate - This is an activity added by a campus staff member.
-
Processing Center - This is an activity added by a processing center staff member at institutions where applicable.
-
File Reviewer Note - This is an activity added by a first or second-level file reviewer.
-
-
Select a Priority.

The following Priorities are available for you to select:
-
Low - This is the lowest priority.
-
Medium - This is medium priority.
-
High - This is the highest priority.
-
-
Enter applicable notes associated with the activity in the Note field.
-
Select Save.
After the changes are saved, the new activity is shown in the student's activity history.

Any notes specified in the Activity History are displayed on the Student Demographics tab of the Student Details page and added to the Dashboard and Worklist using notes icons (![]() ) to the left of the student names (see Dashboard Overview and Worklist Overview).
) to the left of the student names (see Dashboard Overview and Worklist Overview).