Set Up Student Accounting Parameters
To work with the Student accounting module, various parameters must be set up in the Student accounting parameters form (under Student accounting > Setup > Student accounting parameters).
This topic provides information on how to set up the student accounting parameters for a legal entity.
Roles and Privileges
Users with any of the following role can view and edit the configurations in this page:
CMC: Student accounting administrator / CMC: Federal work study administrator / CMC: Federal work study manager / System administrator
Steps
-
Click Student accounting > Setup > Student accounting parameters.

-
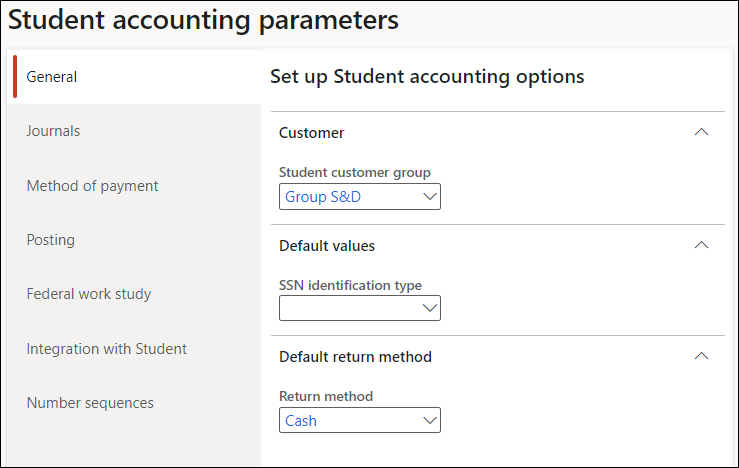
Click the General tab.
-
Expand the Customer FastTab, and in the Student customer group field, select the customer group that will be used for the customer linked to the created student.
-
Expand the Default values FastTab, and in the SSN identification type field, select the identification type that is associated with the Social Security Number.
-
Expand the Default return method FastTab, and in the Return method field, select the return method that will be used by default for the Refund and Stipend transactions. You can choose one of the following values:
-
EFT
-
Check
-
NET
-
-
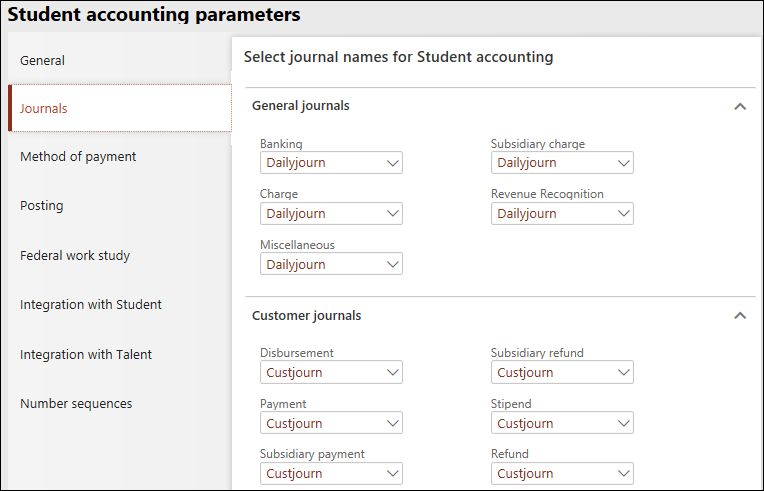
Click the Journals tab to set up the default names of journals for different student transactions that are released to Anthology Finance & HCM.
Prerequisite - Create Journal Names
-
In General journals, for each transaction type select a journal name of type Daily journal.
-
In Customer journals, for each transaction type select a journal name of type Customer payment journal.
When a transaction is sent from Anthology Student to Anthology Finance & HCM, a journal is created in Anthology Finance & HCM using the journal name configured in the General journals and Customer journals sections.

-
-
Click the Method of payment tab and create mappings of the Anthology Student payment methods with Anthology Finance & HCM.
Prerequisite - Create Customer Methods of Payment
-
In the Customer methods of payment FastTab, click New and map the payment types related to the various types of transactions.
- (Optional) Set the Use 'Net' as 'NonCash' method of payment option to Yes to enable the Net option in Anthology Finance & HCM to behave as Non-Cash method of payment for a refund transaction.
-
-
Click the Posting tab and configure the options for posting pending checks and pending deposit transactions in Anthology Finance & HCM:
Set up Posting Options for Pending Checks
Prerequisite - Create a Customer, Create a Chart of Accounts and Main Accounts
Expand the Pending checks FastTab and set Automatically post transactions to Yes to automatically post transactions when checks are generated.
Expand the Clearing accounts for group checks FastTab and select an account in the Customer account and Ledger account fields.
Set up Posting Options for Pending Deposits
-
Expand the Pending deposits FastTab and set Enable Pending Deposits to:
-
No - To enable the Ledger journals batch creating and posting batch job to update the payment transactions (check, cash, miscellaneous receipts) as posted.
-
Yes - To enable the Ledger journals batch creating and posting batch job to move the payment transactions (check, cash, miscellaneous receipts) to the Pending deposits form for further processing.
-
-
Select an account in the Ledger account field for processing the payment transactions, when Enable Pending Deposits is Yes.
Note: When Enable Pending Deposits is changed to No, the Ledger account field will be cleared and cannot be edited.
-
Click the Federal work study tab and configure the options to work with the Federal Work Study feature when FWS Integration is enabled in Anthology Student:
Prerequisite - Create FA Fund Source Types, Create an Earning Code
Expand the Set up work study fund source type FastTab and select a fund source of type Work Study in the Fund source type field.
Expand the Set up automatic generation of earning statement line(s) for work study award overflow FastTab and configure the Generate earning statement line and the Earning code fields.
Note: When integrated with Anthology Payroll, the Earning code field is populated with active earning codes of type Hourly from Anthology payroll when the 'Update Data for Anthology Payroll' Batch Job is run. The earning codes listed are specific to the selected legal entity.
-
Click the Integration with Student tab to view or update the Anthology Student integration configurations.
Note: When an integration is broken, the Pending SIS flag will retain the default value. Fix the integration and post the transaction to generate the payment and notice that re-issue check button is enabled. -
Click the Number sequences tab to view the number sequences for the Student accounting module that are generated by running the Load number sequence batch job (under Student accounting > Setup).
For details, see Configure Number Sequences.
-
Click Save and close the form.
Prerequisite - Create a Customer Group