Configure Tenant Environments
The process of configuring tenant environments will be completed by Anthology staff.
- The DevOps Cloud team will configure resources in the Azure environment.
- The Professional Service team will configure the Anthology Reach environment.
This procedure has two parts:
Create an App Registration
-
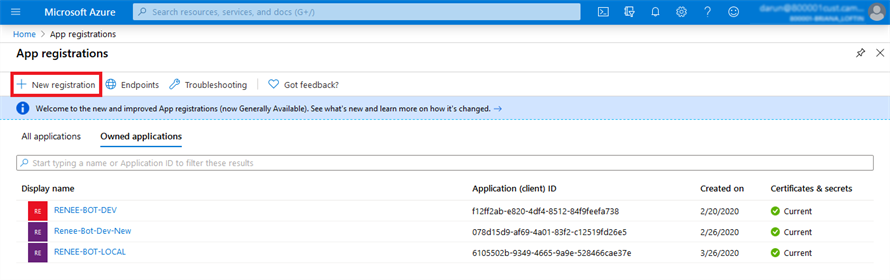
Log in to the Azure Portal (Anthology Reach Tenant Azure Directory).
-
Navigate to App registrations and click New registration.

-
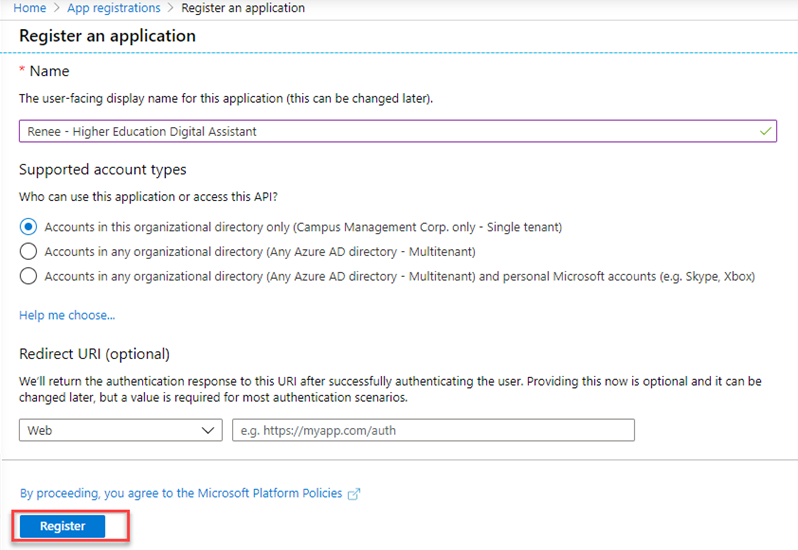
Specify the App Registration Name and click Register.
Note: The following naming convention should be followed:
<Product Name, Marketing>, <Marketing Purpose>
The convention would look like this:
- Production Environment
- Renee - Higher Education Digital Assistant
- Non-Production Environment
- Renee - Higher Education Digital Assistant – Non-Production
- Production Environment
-
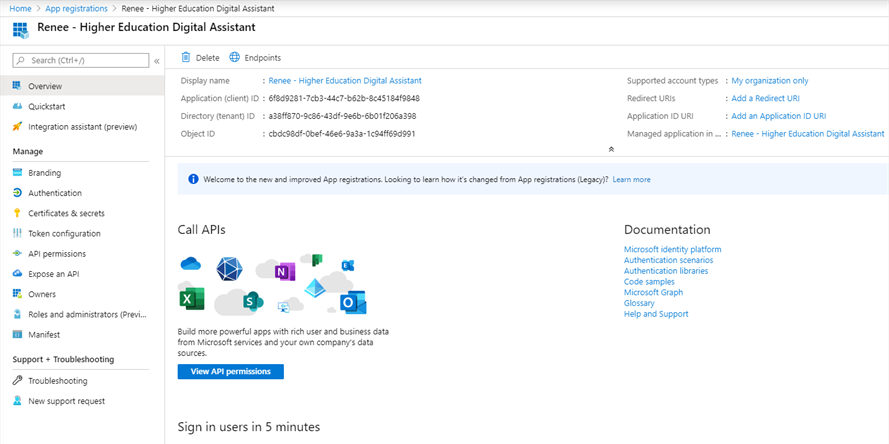
The created ReneeBot app registration page will be displayed.
-
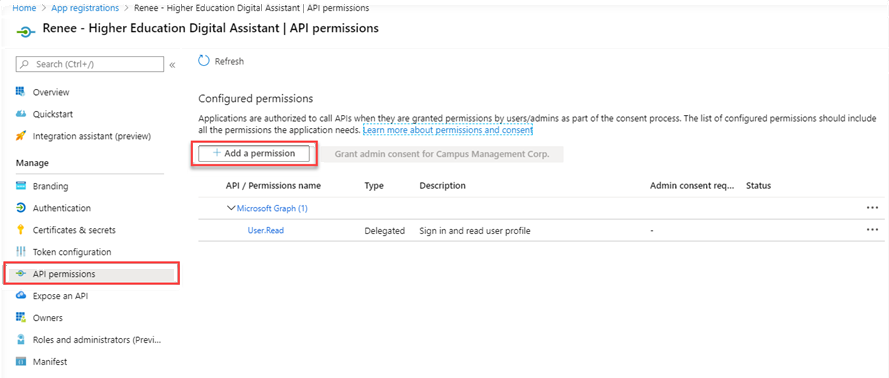
Navigate to API permissions and click Add a permission.
-
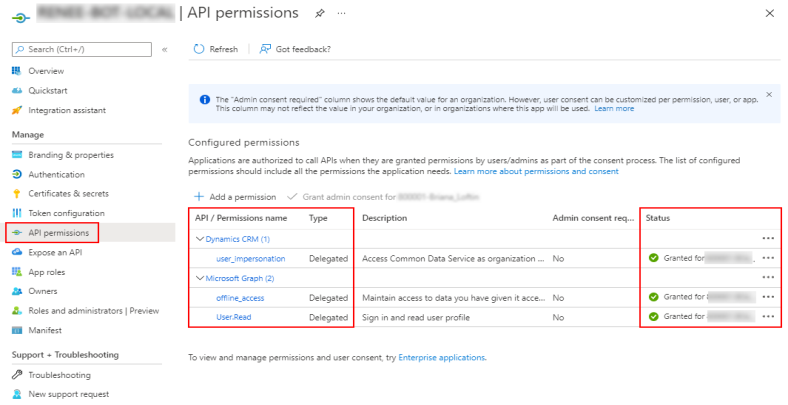
Add the following permissions which are required to authorize OAuth API calls.
Note: The administrator has to explicitly Grant Permission to the permission types listed below. For more information, see Customer Administration Portal > Permissions.
-
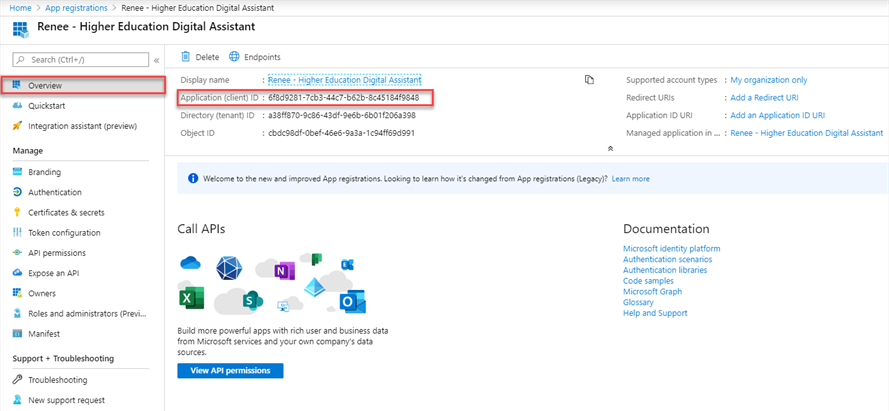
Navigate to Overview and copy the Application (client) ID by clicking the Copy to clipboard button.
This ID will be specified as the Client ID in the Internal Administration Portal when mapping the tenants (see Add Tenant in Internal Administration Portal).
This ID will also be needed for the Application User. See Create Application User, step 5.
-
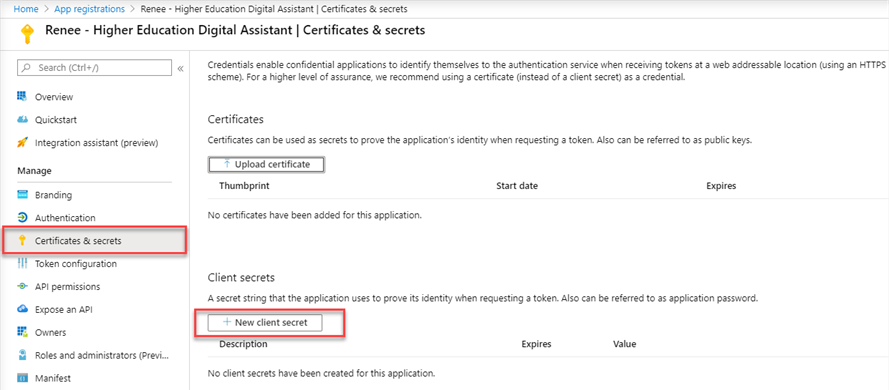
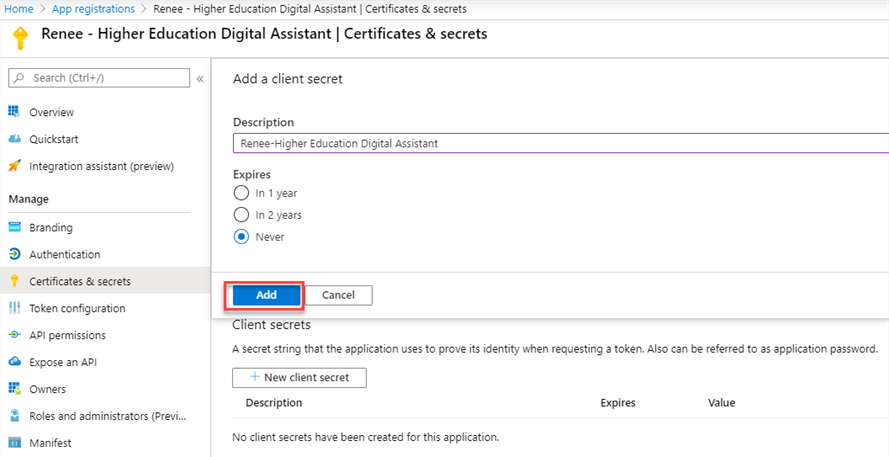
Navigate to Certificates & secrets and click on New client secret.
-
Add a client secret by keeping Expires as Never.
-
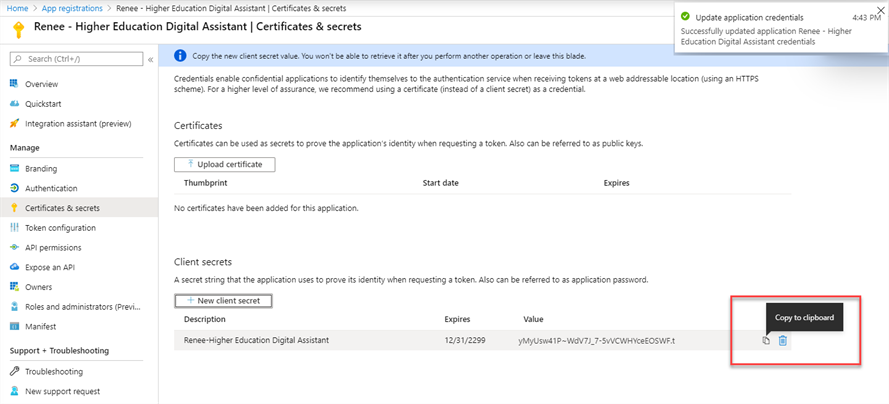
Copy the created Client Secret value by clicking the Copy to clipboard button. This Client Secret will be entered in the Internal Administration Portal when mapping the tenants.
This ID will be specified as the Client Secret in the Internal Administration Portal when mapping the tenants (see Add Tenant in Internal Administration Portal).
Add Tenant in Internal Administration Portal
The Anthology Digital Assistant Internal Administration Portal (previously known as ReneeAdminWebApp) is used to manage configurations and environment variables for a new client/tenant. These variables are stored in an Azure SQL database and are retrieved by Digital Assistant.
In Digital Assistant version 1.2 and later, clients have access to the Customer Administration Portal which enables them to configure tenant settings, skills, and channels used by the bot. The tenant configuration in the Internal Administration Portal has to occur before clients can configure their instances of the Digital Assistant in the Customer Administration Portal.
-
Log in to the Internal Administration Portal site.
-
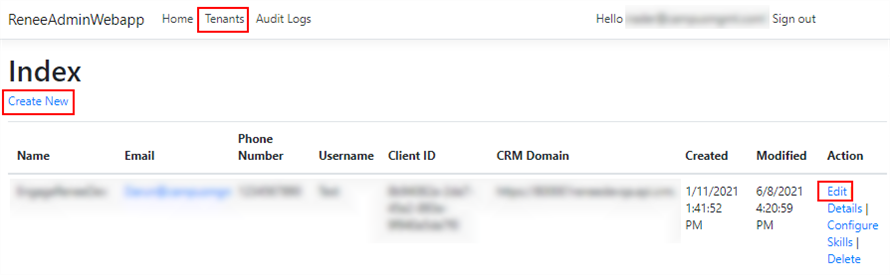
In the top menu, select Tenants and click the Create New link. To edit data for an existing tenant, scroll to the right and select the Edit link.
-
Specify the tenant details.
-
Name
Specify the tenant's name (e.g., name of the institution).
-
Email
Specify the email address of the tenant's contact person.
-
Phone Number
Specify the phone number of the tenant's contact person. .
-
The App ID is a required field for bot authentication. It cannot be empty and must be a valid GUID. The maximum number of characters allowed is 128.
The App ID is retrieved from the tenant's bot channels registration. See Bot Channels Registration, step 10.
-
On the Azure Services page, select the Bot Channels Registration resource.
-
On the Bot Channels Registration page, select Settings under Bot Management in the left pane.
-
Locate the Microsoft App ID field under Configuration in the main page. Copy and paste this ID into the Internal Administration Portal.
-
Click the Manage link above the Microsoft App ID field and locate the Client Secrets section.
-
Click the New client secret button to generate a password. Copy and paste the new password into the Internal Administration Portal.
-
-
App Password
The App Password is a required field for bot authentication. It cannot be empty and must match the password in the bot's Azure directory. The password is masked while entering. The maximum number of characters allowed is 128.
The App Password is retrieved from the tenant's bot channels registration. See Bot Channels Registration, step 13.
-
Client ID
This is the Application (client) ID copied during the Create an App Registration process. The Client ID is a required field for multi-factor authentication (MFA).
-
Client Secret
This is the Client Secret created and copied during the Create an App Registration process. The Client Secret is a required field for multi-factor authentication (MFA).
-
The Tenant ID is a required field for multi-factor authentication (MFA) and multi-tenancy in Digital Assistant version 1.1 and later. It cannot be empty and must be a valid GUID from the client's Azure directory. The maximum number of characters allowed is 128.
The Tenant ID value is specified when you Configure Messaging Endpoints (see step 3).
-
Web Chat Secret
This field needs to be populated to configure web chat for the Digital Assistant. For more information, see Web Chat Configuration.
-
CRM Domain
This field is populated only for Anthology Reach clients.
Note: If the CRM domain is “https://900002renee.crm.dynamics.com”, it should be added as “https://900002renee.api.crm.dynamics.com”.
-
-
Click Create if you are creating a new tenant or Save if you are editing an existing tenant.
-
The tenant will be listed on the tenant Index (List) page.


Review Tenant Details
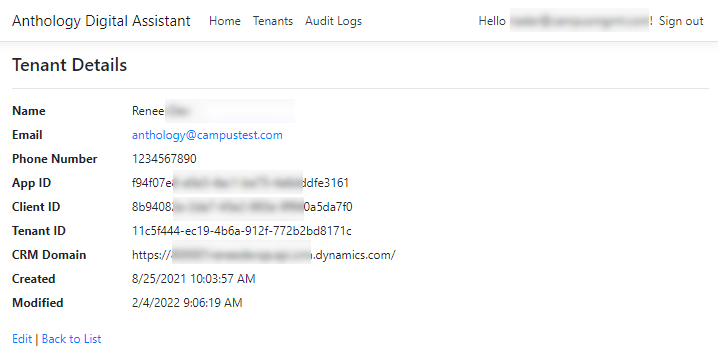
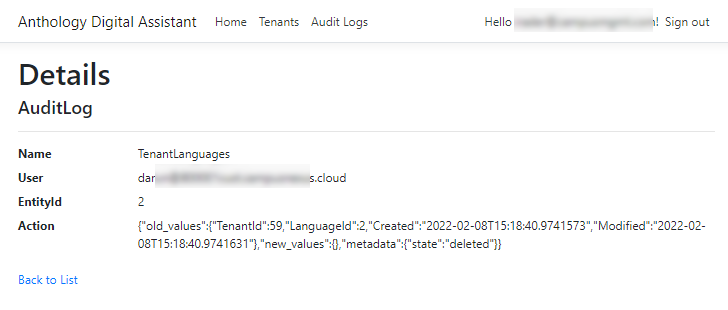
To review the configuration for an existing tenant, scroll to the right on the list page and select the Details link. The tenant details are displayed. ![]()
Remove a Tenant
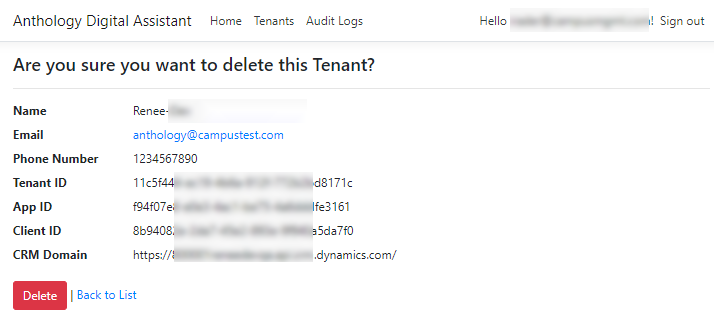
To remove a tenant, scroll to the right in the Index page, select the Delete link, and click the Delete button on the Delete page. ![]()
Review Audit Logs
The Internal Administration Portal enables Anthology staff to review changes done by a client in the Customer Administration Portal. Select the Audit Logs link in the Internal Administration Portal. The log will show old and new values for settings configured in the Customer Administration Portal. ![]()
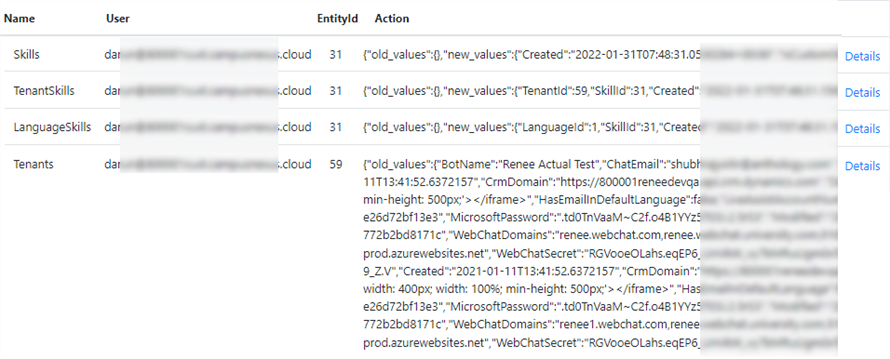
You can scroll to the right of the log page and click the Details link to view a single log entry. ![]()
The process of configuring tenant environments will be completed by Anthology staff.
- The DevOps Cloud team will configure resources in the Azure environment.
- The Professional Service team will configure the Anthology Reach environment.
This procedure has three parts:
- Create an App Registration
- Add Tenant in Internal Administration Portal
- Update QnA Pairs in Anthology Reach
-
Log in to the Azure Portal (Anthology Reach Tenant Azure Directory).
-
Navigate to App registrations and click New registration.
-
Specify the App Registration Name and click Register.
Note: The following naming convention should be followed:
<Product Name, Marketing>, <Marketing Purpose>
The convention would look like this:
- Production Environment
- Renee - Higher Education Digital Assistant
- Non-Production Environment
- Renee - Higher Education Digital Assistant – Non-Production
- Production Environment
-
The created ReneeBot app registration page will be displayed.
-
Navigate to API permissions and click Add a permission.
-
Add the following permissions which are required to authorize OAuth API calls.
Note: The admin has to explicitly Grant Permission to the permission types listed below.
-
Navigate to Overview and copy the Application (client) ID by clicking the Copy to clipboard button.
This ID will be specified as the Client ID in the Internal Administration Portal when mapping the tenants (see Add Tenant in Internal Administration Portal).
This ID will also be needed for the Application User. See Create Application User, step 5.
-
Navigate to Certificates & secrets and click on New client secret.
-
Add a client secret by keeping Expires as Never.
-
Copy the created Client Secret value by clicking the Copy to clipboard button. This Client Secret will be entered in the Internal Administration Portal when mapping the tenants.
This ID will be specified as the Client Secret in the Internal Administration Portal when mapping the tenants (see Add Tenant in Internal Administration Portal).
Add Tenant in Internal Administration Portal
The Internal Administration Portal is used to manage customer configurations and environment variables for a new customer/tenant. These variables are stored in an Azure SQL database and are retrieved by Digital Assistant to determine which cognitive models the institution has access to.
The Internal Administration Portal is used to specify the identity and skills of the Digital Assistant for different tenants in the Azure cloud.
The Digital Assistant will evolve over time to have different cognitive models, or Lu-down files, that will understand conversations about specific use cases. The Digital Assistant will need to know which models to reference when people from a specific institution converse with it. Feature flags have been added to the cognitive models.
Skills are available when adding a new tenant to be able to set the cognitive models an institution can use. Skills are re-usable conversational building-blocks based on specific combinations of cognitive models. One institution may have the ability to access FAQ, General, and Chitchat while another institution may have a specific model for Student Verification and Chitchat but none of the other features like logging or opening a case.
-
Log in to the Internal Administration Portal site. The Internal Administration Portal Index (List) page is displayed.
-
In the top menu, select Tenants and click the Create New link. To edit data for an existing tenant, scroll to the right and select the Edit link.
-
Specify the tenant details.
-
Name
Specify the tenant's name.
-
Email
Specify the tenant's email address.
-
Phone Number
Specify the tenant's phone number.
-
Username
Specify a CRM User account in the Anthology Reach tenant. This account needs to be assigned the System Administrator security role.
Note: This field is deprecated in Digital Assistant version 1.1. See Create Application User.
-
Bot Name
This field is applicable only for clients using channels other than Live Assist. The maximum number of characters allowed is 50. If the Bot Name field is empty in the Internal Administration Portal and the tenant is not using Live Assist, the Bot will be named "Renee" by default.
Clients using Live Assist can customize the Bot name as described here: Change the Bot Name.
-
The App ID is a required field for bot authentication. It cannot be empty and must be a valid GUID. The maximum number of characters allowed is 128.
The App ID is retrieved from the tenant's bot channels registration. See Bot Channels Registration, step 10.
-
On the Azure Services page, select the Bot Channels Registration resource.
-
On the Bot Channels Registration page, select Settings under Bot Management in the left pane.
-
Locate the Microsoft App ID field under Configuration in the main page. Copy and paste this ID into the Internal Administration Portal.
-
Click the Manage link above the Microsoft App ID field and locate the Client Secrets section.
-
Click the New client secret button to generate a password. Copy and paste the new password into the Internal Administration Portal.
-
-
App Password
The App Password is a required field for bot authentication. It cannot be empty and must match the password in the bot's Azure directory. The password is masked while entering. The maximum number of characters allowed is 128.
The App Password is retrieved from the tenant's bot channels registration. See Bot Channels Registration, step 13.
-
Client ID
This is the Application (client) ID copied during the Create an App Registration process. The Client ID is a required field for multi-factor authentication (MFA).
-
Client Secret
This is the Client Secret created and copied during the Create an App Registration process. The Client Secret is a required field for multi-factor authentication (MFA).
-
The Tenant ID is a required field for multi-factor authentication (MFA) and multi-tenancy in Anthology Digital Assistant version 1.1 and later. It cannot be empty and must be a valid GUID from the client's Azure directory. The maximum number of characters allowed is 128.
The Tenant ID value is specified when you Configure Messaging Endpoints (see step 3).
-
WebChat Secret, Embed Code, and Web Chat Domains
These fields need to be populated to configure web chat for the Digital Assistant. For more information, see Web Chat Configuration.
-
LA Account Number
This is the number of the tenant's Live Assist Dynamics 365 account. In can be found in the in the URL of the Live Assist Engagement Portal.
This field needs to be populated if the client is using the Live Assist Enabler Configuration.
-
LA Data Host
This is the hostname of the tenant's Live Assist data services configured in Anthology Reach. Enter the hostname without protocol, for example: "services.nx.lafor365.com"
This field needs to be populated if the client is using the Live Assist Enabler Configuration.
-
Specify the default email address to be used for email messages sent from within the chat window. This email address provides an option for the chat user to send a message when an institution does not have Anthology Reach but has the Digital Assistant implemented.
-
CRM Domain
This field is populated only for Anthology Reach customers.
Note: If the CRM domain is “https://900002renee.crm.dynamics.com”, it should be added as “https://900002renee.api.crm.dynamics.com”.
-
-
Click Create if you are creating a new tenant or Save if you are editing an existing tenant.
-
The tenant will be listed on the tenant Index (List) page.

Continue with Configure Tenant Skills.
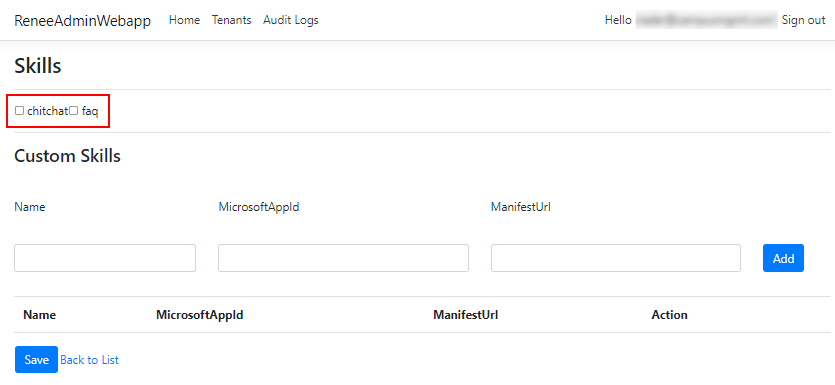
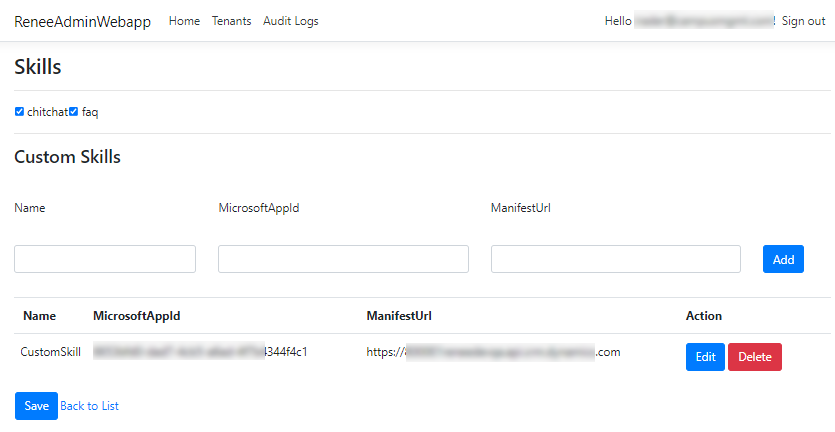
For every tenant, the Digital Assistant needs to be given access to specific skills. The skills can include out-of-the-box skills and/or custom skills.
-
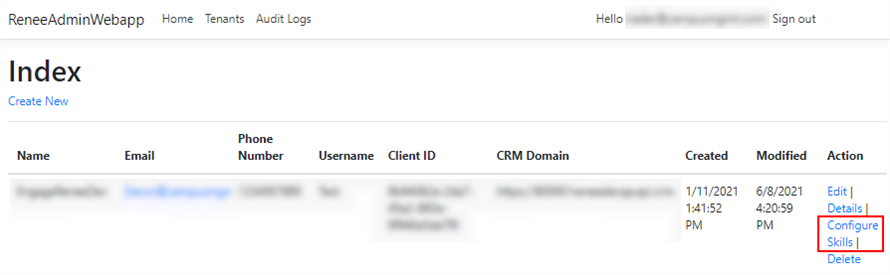
Select the Configure Skills link on the tenant record in the Internal Administration Portal.
-
In the Skills section, select chitchat and/or faq. These are out-of-the-box skills for the Digital Assistant.
-
To configure custom skills, specify the following:
-
Name
Specify a name that identifies the custom skill.
-
MicrosoftAppId
Specify the Microsoft App Id of the custom skill.
-
ManifestUrl
Specify the URL path of the Manifest for the custom skill.
Click the Add button. Repeat this step for any additional custom skills. Use the Edit and Delete options as needed.
-
-
Save the skill configuration. The list of skills will be updated in the Main Menu of the chat bot.
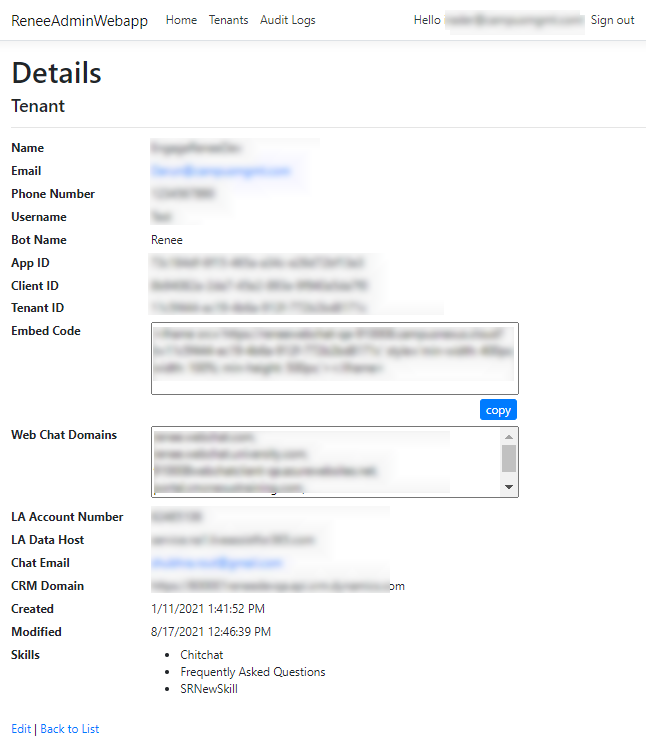
Review Tenant Configuration Details
To review the configuration for an existing tenant, scroll to the right on the Index page and select the Details link. The tenant details are displayed. ![]()
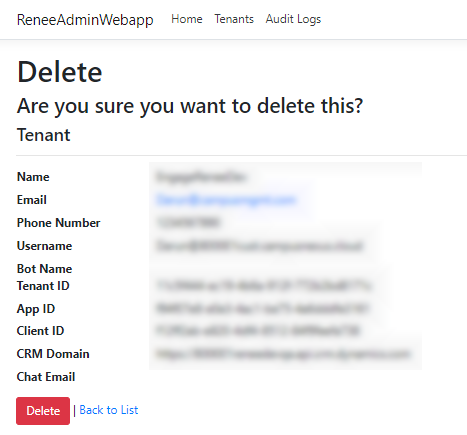
Remove a Tenant
To remove a tenant, scroll to the right in the Index page, select the Delete link, and click the Delete button on the Delete page. ![]()
Update QnA Pairs in Anthology Reach
After the Internal Administration Portal is configured, the deployment of the QnA pairs to the Anthology Reach instance needs to occur. Deployment instructions are in the Azure DevOps BOTs project repository. Please see the Deployment.md file.
-
This update requires Node LTS to be installed on your computer. If Node LTS is not installed, download and install it from https://nodejs.org/en/download/.
-
Download the Renee repo from https://dev.azure.com/campusmgmt-product-development/BOTs/_git/Renee and place it in a directory on your computer.
-
Navigate to the directory where you placed the Renee repo and navigate to Services\ReneeDigitalAssistant.
-
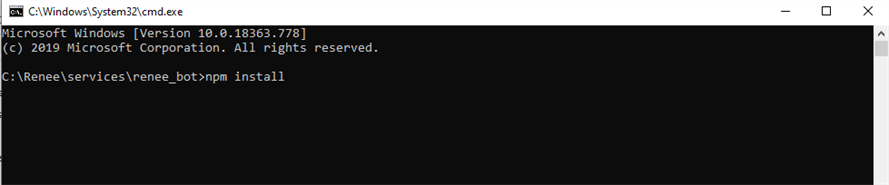
Open a Command Prompt for the above mentioned location and run npm install.
-
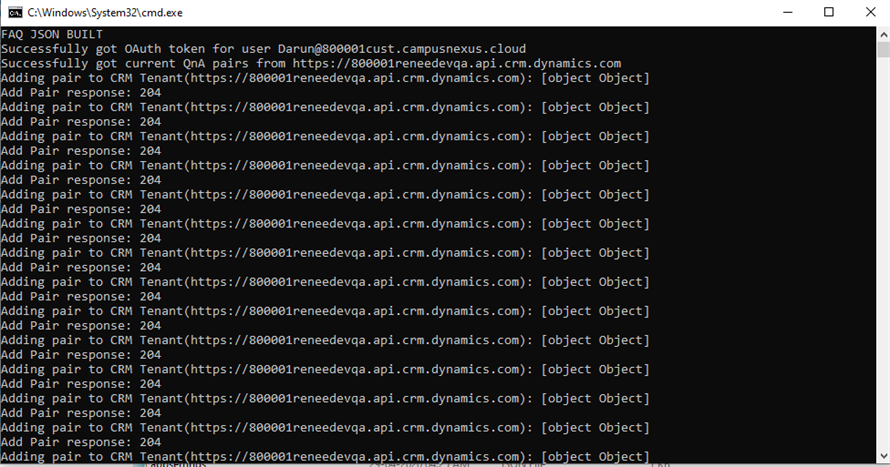
Once npm is installed, run the following command substituting your variables as applicable. These variables are used in the Internal Administration Portal for tenant mapping.
Variable Value -d CRM domain -u Username -p Password -i Client ID -s Client Secret
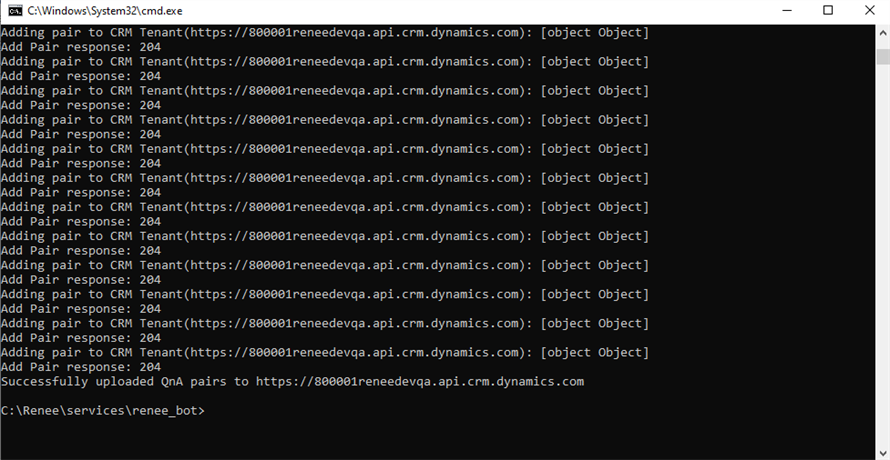
node publishPairsToCRM.js -d https://somedomain.api.crm.dynamics.com -u someuser@somedomain.onmicrosoft.com -p somepassword -i some-client-id -s some-client-secretCommand response
-
Once the command runs successfully, verify that the QnA pairs are updated in Anthology Reach under Settings > Bot Question Responses.
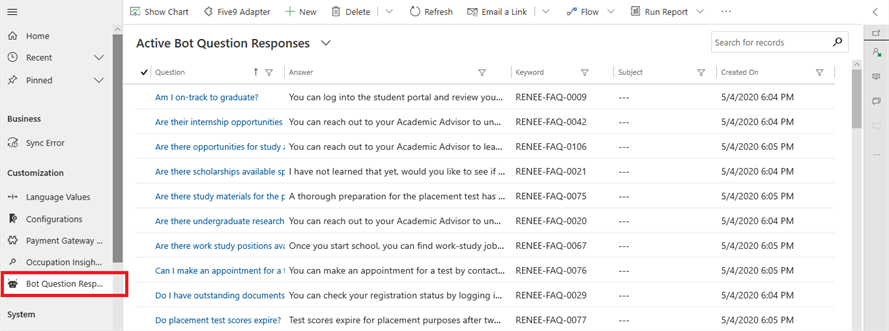
After the QnA Pairs are deployed, users can Manage Answers on the Bot Question Responses Entity in Anthology Reach.
The Internal Administration Portal is used to manage customer configurations and environment variables for a new customer/tenant. These variables are stored in an Azure SQL database and are retrieved by the Digital Assistant to determine which cognitive models the institution has access to. The process for Configuring Tenant Environments will be completed by Anthology Inc. staff.
This procedure has three parts:
- Create an App Registration
- Add Tenant in Internal Administration Portal
- Update QnA Pairs in Anthology Reach
-
Log in to the Azure Portal (Anthology Reach Tenant Azure Directory).
-
Navigate to App registrations and click New registration.
-
Specify the App Registration Name and click Register.
Note: The following naming convention should be followed:
<Product Name, Marketing>, <Marketing Purpose>
The convention would look like:
- Production Environment
- Renee - Higher Education Digital Assistant
- Non-Production Environment
- Renee - Higher Education Digital Assistant – Non-Production
- Production Environment
-
The created ReneeBot app registration page will be displayed.
-
Navigate to API permissions and click Add a permission.
-
Add the following permissions which are required to authorize Outh API calls.
Note: The admin has to explicitly Grant Permission to the permission types listed below.
-
Navigate to Overview and copy the Application (client) ID by clicking the Copy to clipboard button. This ID will be entered as the Client ID in the Internal Administration Portal when mapping the tenants.
-
Navigate to Certificates & secrets and click on New client secret.
-
Add a client secret by keeping Expires as Never.
-
Copy the created Client Secret value by clicking the Copy to clipboard button. This Client Secret will be entered in the Internal Administration Portal when mapping the tenants.
Add Tenant in Internal Administration Portal
The Digital Assistant will evolve over time to have different cognitive models, or Lu-down files, that will understand conversations about specific use cases. The Digital Assistant will need to know which models to reference when people from a specific institution converse with it. Feature flags have been added to the cognitive models.
Skills are available when adding a new tenant to be able to set the cognitive models an institution can use. Skills are re-usable conversational building-blocks based on specific combinations of cognitive models.
One institution may have the ability to access FAQ, General, and Chitchat while another institution may have a specific model for Student Verification and Chitchat but none of the other features like logging or opening a case.
-
Log in to the Internal Administration Portal site.
-
In the top menu, select Tenants and click the Create New link.
-
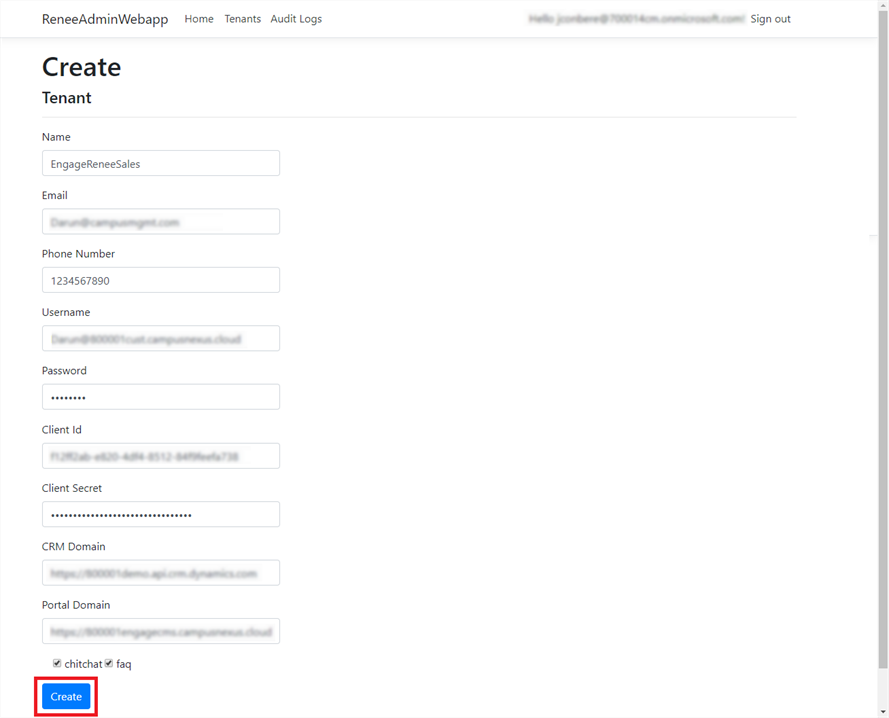
Fill in the tenant details:
- Name
- Phone Number
- Username (This is a CRM User account in the Anthology Reach Tenant. This account needs to be assigned the System Administrator security role.)
- Password (This is the credentials for the CRM User account in the Engage Tenant.)
- Client ID (This is the Application (client) ID copied during the Create New App Registration process.)
- Client Secret (This is the Client Secret created and copied during the Create New App Registration process.)
- CRM Domain
- Portal Domain
Select the required Skills (e.g., chitchat, faq), and click Create.
Note: If the CRM domain is “https://900002renee.crm.dynamics.com”, it should be added as “https://900002renee.api.crm.dynamics.com”.
-
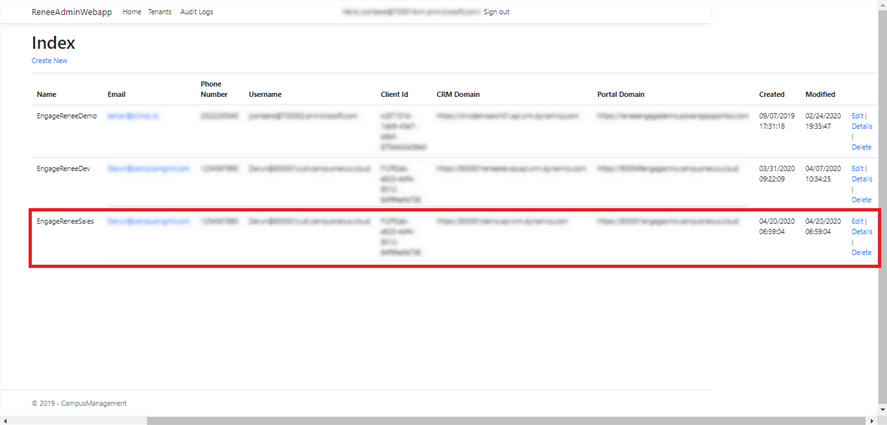
The tenant will be added to the tenant Index page.

Update QnA Pairs in Anthology Reach
After the Internal Administration Portal is configured, the deployment of the QnA pairs to the Anthology Reach instance needs to occur. Deployment instructions are in the Azure DevOps BOTs project repository. Please see the Deployment.md file.
-
This update requires Node LTS to be installed on your computer. If Node LTS is not installed, download and install it from https://nodejs.org/en/download/.
-
Download the repo from https://dev.azure.com/campusmgmt-product-development/BOTs/_git/Renee and place it in a directory on your computer.
-
Navigate to the directory where you placed the repo and navigate to services\renee_bot.
-
Open a Command Prompt for the above mentioned location and run npm install.
-
Once npm is installed, run the following command substituting your variables as applicable. These variables are used in the Renee Admin Web app for tenant mapping.
Variable Value -d CRM domain -u Username -p Password -i Client ID -s Client Secret
node publishPairsToCRM.js -d https://somedomain.api.crm.dynamics.com -u someuser@somedomain.onmicrosoft.com -p somepassword -i some-client-id -s some-client-secretCommand response
-
Once the command runs successfully, verify that the QnA pairs are updated in Anthology Reach under Settings > Bot Question Responses.
After the QnA Pairs are deployed, users can Manage Answers on the Bot Question Responses Entity in Anthology Reach.