The topic "Web Chat Configuration" is not available in Version 1.0.0
Web Chat Configuration
Anthology Digital Assistant version 1.1 introduces multi-channel support. This means that the bot is now able to connect to other channels and does not have to rely on Live Assist integrated with Anthology Reach. The bot can interact directly with chat users on a web page and can access the cognitive models and skills provided by the Digital Assistant.
Previously, there was a hard dependency on Live Assist to pass contact information to the Digital Assistant so that the bot could identify the chat user, update the time line, send chat logs, retrieve answers, and perform complex actions like opening a case or transferring to a live agent.
The Microsoft Framework Bot Service automatically configures the Web Chat channel and includes the Web Chat control, which provides the ability for users to interact with the bot directly in a web page. All that is needed is to obtain the bot's secret key and embed the control in a web page.
Internal Administration Portal Configuration
The following configuration will be completed by the Anthology staff (DevOps Cloud Team).
Prerequisite: The Internal Administration Portal has been populated as needed for the tenant. See Configure Tenant Environments.
-
In the Internal Administration Portal, specify a value in the Web Chat Secret field (max. 128 characters).
-
Retrieve the Web Chat Secret field value from the Bot Azure Resource Group for the respective tenant.
-
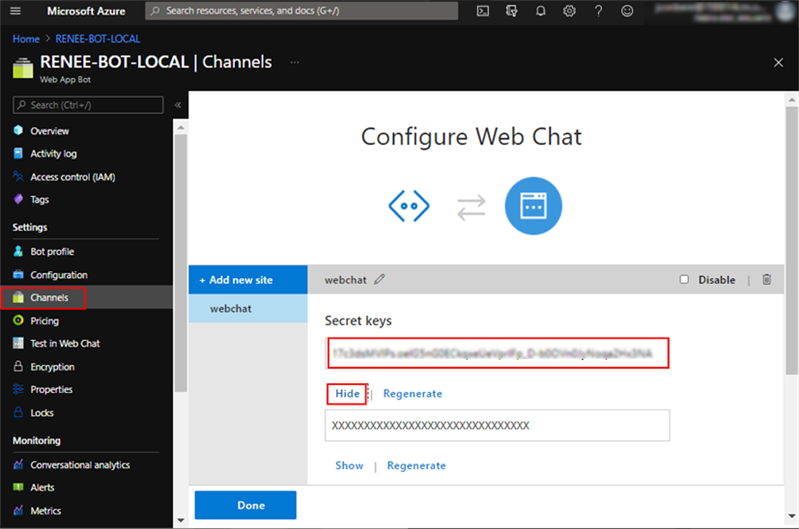
Under Bot Channels Registration, select Channels.
-
Select the Web Chat channel.
-
Click the Show/Hide button for the secret key.
-
Copy the Web Chat Secret from the site.

-
-
Once the Web Chat Secret value is provided, the application will populate the Embed Code field.
The field value is an IFrame tag that clients will add to the web pages where they want the web chat to be enabled. The IFrame code includes the Tenant ID value as well as size values for the IFrame.
The Embed Code will be updated whenever the Web Chat Secret and Tenant ID values change.
-
Copy and save the generated Embed Code so that you can provide it to the web client's web administrator/developer. With this code embedded on a web page, the chat activity will start as soon as the web page is loaded.
For details on how to embed the code on a web page, see Web Chat Widget.
For details on how to embed the code on a Student Portal page, see Add the Bot to Student Portal.
-
The Web Chat Domains field is enabled only when the Tenant ID and Web Chat Secret fields are populated.
Specify the domain(s) or subdomain(s) that will host the web chat (white list). Clients will need to provide the domain name(s) to Anthology staff.
Enter domain names without the values for protocol (http/https) or paths (any values appended to the domain name with / separators). For multiple domains, enter a comma separated list of domain names as shown in the example.
Example:
If the client implements web chat at:
https://community.campusmanagement.com/
andhttps://www.anthology.com/servicesspecify the following in the Web Chat Domains field:
community.campusmanagement.com,anthology.com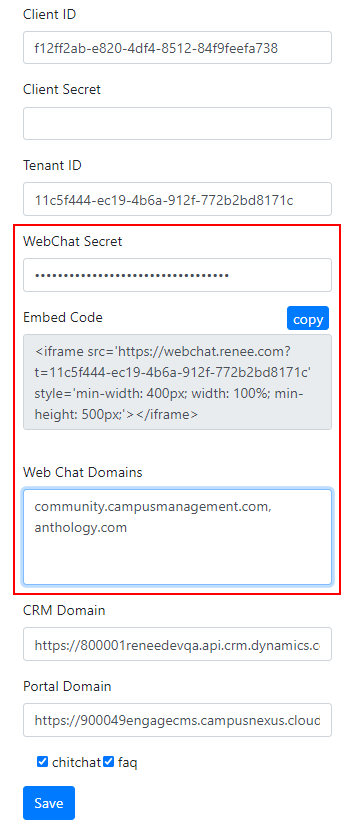
-
Save the changes.