The topic "Add the Bot to Student Portal" is not available in Version 1.0.0
Add the Bot to Student Portal
You can embed Anthology Digital Assistant in the Anthology Student Portal by adding a menu option and a custom page.
Custom pages can be added to new or existing menu groups. Custom pages need to be associated with the user's menu by enabling the menu transactions for given user roles.
Custom pages can include any type of web content such as text, links, images, and videos. The content is stored in a database table.
-
Log in to the Portal Configuration Tool and access your campus.
-
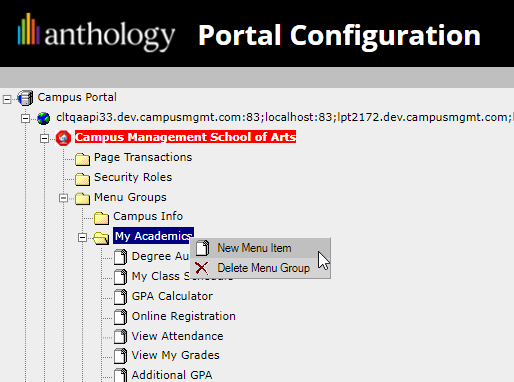
Navigate to Menu Groups.
-
Right-click the Menu Group to which you want to add your custom HTML page and select New Menu Item.

-
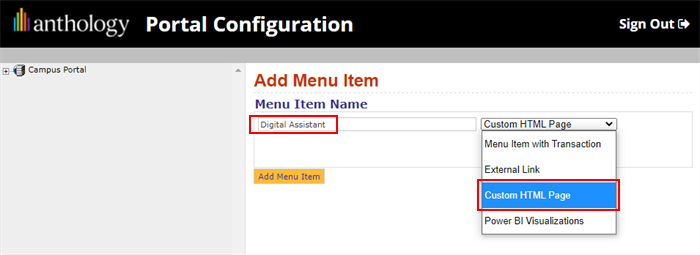
In the Add Menu Item form, specify the Menu Item Name.
-
In the Menu Item Name drop-down list, select Custom HTML Page and click Add Menu Item.
-
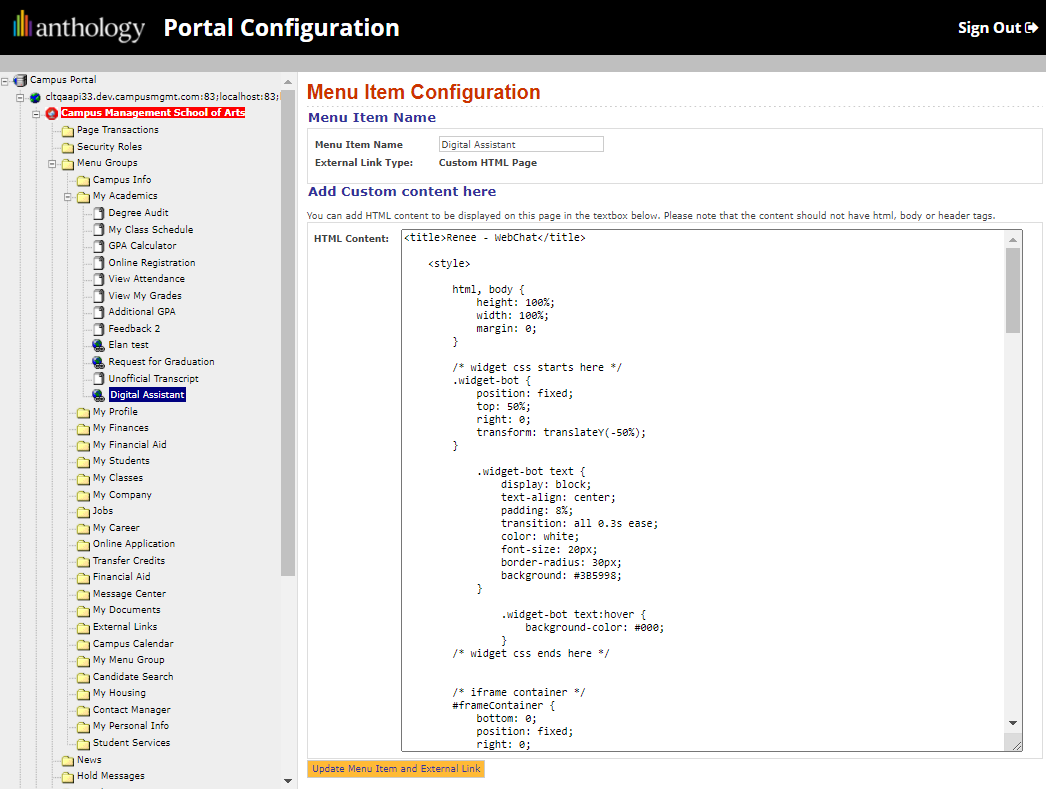
In the left pane, click the new item that was just created. The Menu Item Configuration page is displayed.
-
Open another browser window and go to GitHub at https://github.com/anthology-inc/renee-integration-samples/tree/main/channels/webchat/src. You will download the src files in the following steps.
-
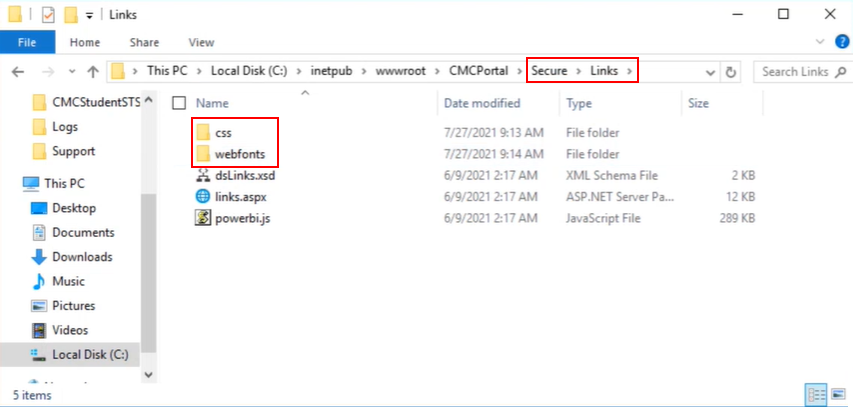
If your Portal is installed locally on IIS, navigate to inetpub > wwwroot > your Portal name > Secure > Links, and create two folders named css and webfonts.
-
Download the all.min.css file from the css folder in GitHub and paste it into the css folder.
-
Download the webfonts from the webfonts folder in GitHub and paste them into the webfonts folder.

If your Portal is hosted in a cloud environment, please contact Anthology Inc. Support (1-800-483-9106) to have the bot resources placed in the appropriate folder on the server. Ask Support for the path to those resources so that it is coded properly in your custom HTML pages. -
-
Return to the Portal Configuration tool and in the HTML Content field, paste the content of the Webchat-ui.html file from GitHub.
Modify the code in the HTML Content field as follows:
-
Since Portal expects an HTML fragment rather than a complete HTML page, remove the following tags from the code you just pasted into the HTML Content field:
<html>,</html><head>,</head><body>,</body>
-
Find the iReneeBot section in the code you just pasted into the HTML Content field. Change the height value from 100% to a pixel value, e.g., 400px or any other pixel value as appropriate for your custom page.
/* iframe size */ #iReneeBot { width: 100%; height: 400px; border: 1px black solid; } -
If your custom page contains resources such as images or scripts, place those resources in the appropriate folder on your Portal server.
Make sure the paths to those resources are coded properly. If there are errors on the custom HTML page, the functionality of the entire Portal can be impacted.
-
-
Click Update Menu Item and External Link to save the custom HTML content.
Ignore the message about tags/attributes containing non-trusted HTML.
-
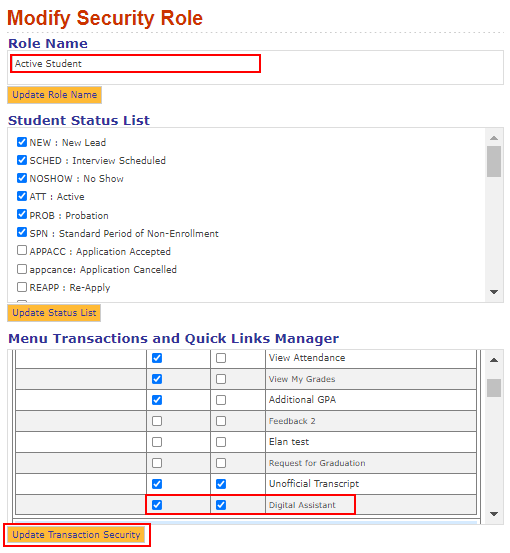
Navigate to Security Roles and select the Role that is supposed to have access to the custom HTML page (e.g., Active Student, Applicant).
-
In the Menu Transactions and Quick Links Manager section, locate the custom HTML page, select the check boxes in the Add Menu and Quick Link columns (as applicable), and click the Update Transaction Security button.
-
Close all browsers and log back into Portal to get the new configuration.
-
Select the appropriate role (e.g., Staff, Student, Applicant, Employer) and click the My Home Page link to refresh the pages.
-
Select the new menu item for the custom HTML page and verify that the content is displayed as expected.
Check Internal Administration Portal Configuration
Before testing chat in Portal, make sure that the Internal Administration Portal is configured properly for the bot instance on the Portal page. In the Internal Administration Portal, you need to configure the following fields:
-
App Password
-
Client Secret
-
Web Chat Secret
-
Web Chat Domains (add the Portal domain)
For more information, see Web Chat Configuration.