The topic "Web Chat Widget" is not available in Version 1.0.0
Web Chat Widget
Anthology Digital Assistant, when configured for web chat (see Web Chat Configuration), provides a sample web chat widget that clients can customize and embed on their web pages.
In compliance with Web Content Accessibility Guidelines (WCAG), the web chat widget is keyboard accessible, i.e., the buttons, links and controls have visible focus indicators when a user tabs through the interactive widget elements on a web page. The IFrame also has a Title that describes the content of the widget (Digital Assistant) and the three top icons have alternative accessible names so users with a screen reader understand the IFrame content.
Disclaimer: Customization of Anthology Digital Assistant voids the Web Content Accessibility Guidelines (WCAG) conformance statement from Anthology.
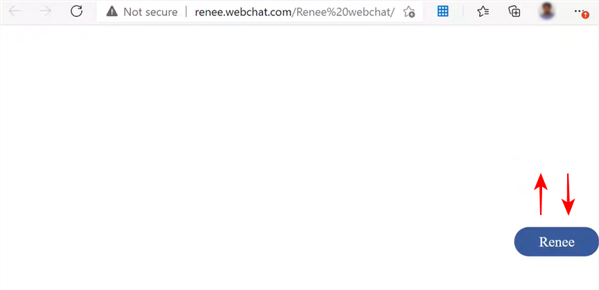
The widget appears when the page is loaded. The user can drag the widget up and down.
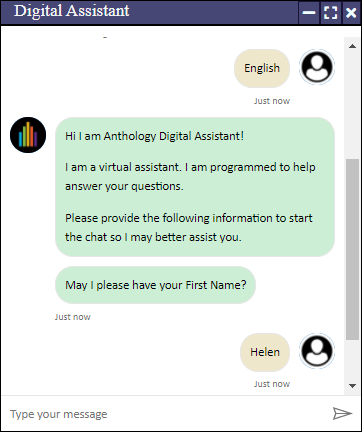
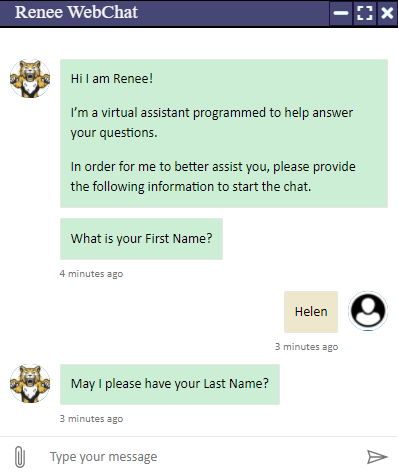
When the user clicks the widget, an iframe appears. The iframe displays the bot's introduction and prompts for the user's name.
A control bar shows the bot name and buttons to minimize, maximize, and close the widget. The project uses styles and libraries from https://fontawesome.com/ for the control bar buttons.
You can download the webchat widget package from GitHub at https://github.com/anthology-inc/renee-integration-samples/tree/main/channels/webchat/src.
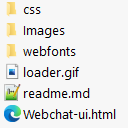
The package includes the following resources:
| Resource | Description | |
|---|---|---|
|
|
/css | Contains a style file (all.min) for the button classes |
| /Images | Contains the avatar images for the bot and the chat user | |
| /webfonts | Contains eot, woff, and truetype files for the control bar buttons | |
| loader.gif | Loader image file | |
| readme.md | Readme file for the download package | |
| Webchat‑ui.html | Contains the embed code, style rules, and jQuery scripts for the control bar |
Contents of Webchat-ui.html File
The Webchat‑ui.html file displays the sample web chat widget. To be able to customize the web chat widget for your environment, you need to understand the contents of this file. The file contains the following:
-
Embed code obtained from the Internal Administration Portal
-
Style rules
-
Images
-
Client-side coding for additional functionality
Embed Code
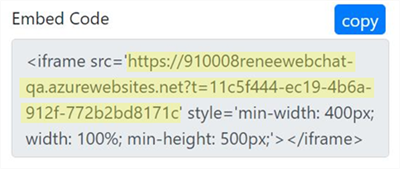
The Embed Code obtained from the Internal Administration Portal appears in a hidden field in the <body> section of the Webchat‑ui.html file. The Embed Code initiates the web chat on page load.
Clients will receive the embed code from Anthology Inc. staff once their tenant is configured in the Internal Administration Portal.
<body>

    <input type="hidden" id="iframe-src" value="https://910008reneewebchat-qa.azurewebsites.net?t=11c5f444-ec19-4b6a-912f-772b2bd8171c">
In our example, the Embed Code was copied from the Internal Administration Portal as shown below. You will need to copy/paste your Embed Code into the HTML file.
If you customize the Webchat-ui.html file, be sure that you do not change the HTML tags <input type="hidden" id="iframe-src" value="...">.
Styles and Labels
The <head> section of the Webchat‑ui.html contains several CSS rules enclosed in <styles> </styles> tags. Comments are provided to explain the code.
To customize the appearance of the widget, you can edit style attribute values such as height, width, margins, colors, font size, etc.
Note: Be careful not to change any style names or classes because they need to match the style sheet referenced in <link type="text/css" rel="stylesheet" href="css/all.min.css" />.
    <style>

        html, body {
            height: 100%;
            width: 100%;
            margin: 0;
        }

        /* widget css starts here */
        .widget-bot {
            position: fixed;
            top: 50%;
            right: 0;
            transform: translateY(-50%);
        }

        .widget-bot text {
            display: block;
            text-align: center;
            padding: 8%;
            transition: all 0.3s ease;
            color: white;
            font-size: 20px;
            border-radius: 30px;
            background: #3B5998;
        }

        .widget-bot text:hover {
            background-color: #000;
        }
        /* widget css ends here */


        /* iframe container */
        #frameContainer {
            bottom: 0;
            position: fixed;
            right: 0;
            padding-bottom: 2.5%;
            padding-right: 3.5px;
        }


        /* iframe size */
        #iReneeBot {
            width: 100%;
            height: 100%;
            border: 1px black solid;
        }

        /* chat window size styles starts here */
        .restoresize {
            min-width: 300px;
            width: 400px;
            min-height: 400px;
            height: 450px;
        }

        .maxsize {
            width: 100%;
            Height: 90%;
        }

        .minimize {
            bottom: 0;
            position: fixed;
            min-width: 250px;
            right: 50px !important;
            padding-bottom: 0% !important;
        }
        /* chat window size styles ends here */

        /* loader styles */
        #loadergif {
            display: block;
            margin: 50%;
        }

        /* chat window button styles starts here */
        .fa-style{
            max-height: 25px;
            float: right;
            color: azure;
            padding: 4px;
            border: 1px #191438 solid;
        }

        .fa-style:hover{
            color: gray;
        }
        /* chat window button styles ends here */
    </style>
Widget Label
You can change the widget label  by editing the text value in <div id="draggable"> in the <body> section of the Webchat-ui.html file:
<body>

    <input type="hidden" id="iframe-src" value="https://910008reneewebchat-qa.azurewebsites.net?t=11c5f444-ec19-4b6a-912f-772b2bd8171c">

    <div id="draggable" style="width: 120px;" onclick="InitiateChat()" class="widget-bot">
        <text>Renee</text>
    </div>
Widget Styles
The styles rule under the <scripts> section enables you to customize the look of the web chat widget.
//customizing the styles for widget
styles: {
    botAvatarImage: 'https://910008webchatclient-qa.azurewebsites.net/Images/Anthology Logo.jpg',
    botAvatarInitials: 'BM',
    userAvatarImage: 'https://910008webchatclient-qa.azurewebsites.net/Images/Visitor.jpg',
    userAvatarInitials: 'VS',
    bubbleBackground: 'rgba(130, 214, 155, 0.42)',
    bubbleFromUserBackground: 'rgba(214, 197, 130, 0.42)',
},
Avatars and Initials
You can customize the bot by adding images (avatars) and/or initials that represent the chat visitor and the bot in the chat window. The images shown below are included in the Images folder in GitHub at https://github.com/anthology-inc/renee-integration-samples/tree/main/channels/webchat/src.
To customize the avatars and initials, specify the botAvatarImage path and file name and botAvatarInitials. Likewise, specify the userAvatarImage path and file name and userAvatarInitials as shown in the example below. The referenced images can be stored in any publicly available location; you just need to specify the URLs. Initials are displayed when images are not available.
Bubble Background Color
The bot and user chat bubbles have defined styles for the background color. You can edit the rgba color values for the bot (bubbleBackground) and for the user (bubbleFromUserBackground) .
Note: Edit only the rgba values. Do not edit the styles keyword or any other attributes.
Status Bar Label
In our example the label in the status bar is set to "Renee Webchat". You can change the label by editing the highlighted value of the <div> below in the <body> section.
        <div id="reneeBotContainer" style="display: none;">
            <div style="background: #464775; overflow: hidden; min-height: 20px; height: 25px; width: 100%; border:1px black solid;">
                <div style="position: absolute;font-size: larger !important;margin-left: 15px; color: whitesmoke;">Digital Assistant</div>
Scripts
The <head> section of the Webchat‑ui.html contains JQuery code enclosed in <script> </script> tags. Comments are provided to explain the code. This code provides functionality such as:
-
Loading the iframe and initiating the chat window
-
Minimizing, maximizing, and restoring the chat window
-
Making the widget draggable
-
Triggering the end of conversation through messaging events: contentWindow.postMessage("endOfConversation",'*');
|
|
If you customize the script section, be aware that there are some function calls that must NOT be changed or removed. These items are highlighted below. |
    <script src="https://code.jquery.com/jquery-1.12.4.js"></script>
    <script src="https://code.jquery.com/ui/1.12.1/jquery-ui.js"></script>

    <script>

        $(function () {
            //function to drag widget
            $("#draggable").draggable({
                axis: "y",
                containment: "window"
            });

            //send message bubble styles when iframe is loaded
            $('#iReneeBot').on('load', function () {
                $("#loader").hide();
                $("#reneeBotContainer").show();
                iReneeBot.contentWindow.postMessage(JSON.stringify(ReneeWidget.styles), '*');
            });

            //handles page reload and refresh.
            window.onbeforeunload = function (event) {
                if (ReneeWidget.hasActiveChat === true) {
                    iReneeBot.contentWindow.postMessage("endOfConversation", '*');
                    setTimeout(function () { location.reload() }, 2000);
                }
            };
        });

        ReneeWidget = {

            hasActiveChat: false,

            //style message bubble colour
            styles: {
                botAvatarImage: 'https://910008webchatclient-qa.azurewebsites.net/Images/Anthology Logo.jpg',
                botAvatarInitials: 'BM',
                userAvatarImage: 'https://910008webchatclient-qa.azurewebsites.net/Images/Visitor.jpg',
                userAvatarInitials: 'VS',
                bubbleBackground: 'rgba(130, 214, 155, 0.42)',
                bubbleFromUserBackground: 'rgba(214, 197, 130, 0.42)'
            },

            //load iframe which initiate the chat
            InitiateChat: function () {
                $("#draggable").hide();
                $("#frameContainer").show();
                this.hasActiveChat = true;
                $('#iReneeBot').attr('src', $("#iframe-src").val());
            },

            //endOfConversation message event to End the chat.
            EndChat: function () {
                iReneeBot.contentWindow.postMessage("endOfConversation", '*');
                $("#frameContainer").hide();
                $("#draggable").show();
                this.hasActiveChat = false;
            },

            //maximize the chat window
            MaximizeChat: function () {
                $("#maximizeChat").hide();
                $("#minimizeChat").show();
                $("#restoreChat").show();
                $("#iReneeBot").show();
                $("#frameContainer").attr('class', 'maxsize');
            },

            //restore the chat window
            RestoreChat: function () {
                $("#restoreChat").hide();
                $("#minimizeChat").show();
                $("#maximizeChat").show();
                $("#iReneeBot").show();
                $("#frameContainer").attr('class', 'restoresize');
            },

            //minimize the chat window
            MinimizeChat: function () {
                $("#minimizeChat").hide();
                $("#iReneeBot").hide();
                $("#restoreChat").show();
                $("#maximizeChat").show();
                $("#frameContainer").attr('class', 'minimize');
            }
        }

    </script>
The functions defined in the <script> section are referenced by elements in the <body> section of the HTML page. Keep this interdependence in mind. For example, the widget's "draggable" feature relies on the function below:
        $(function () {

                //function to drag widget
                $("#draggable").draggable({
                    axis: "y",
                    containment: "window"
                });
The <body> section of the html file references id="draggable".
    <div id="draggable" style="width: 120px;" onclick="InitiateChat()" class="widget-bot">
        <text>Renee</text>
    </div>
Note: Be sure not to alter any script code unless you have JQuery expertise.
Anthology Digital Assistant, when configured for web chat (see Web Chat Configuration), provides a sample web chat widget that clients can customize and embed on their web pages.
In compliance with Web Content Accessibility Guidelines (WCAG), the web chat widget is keyboard accessible, i.e., the button, links and controls have visible focus indicators when a user tabs through the interactive widget elements on a web page. The IFrame also has a Title that describes the content of the widget (Digital Assistant) and the 3 top icons have alternative accessible names so users with a screen reader understand the IFrame content.
Disclaimer: Customization of Anthology Digital Assistant voids the Web Content Accessibility Guidelines (WCAG) conformance statement from Anthology.
The widget appears when the page is loaded. The user can drag the widget up and down.
When the user clicks the widget, an iframe appears. The iframe displays the bot's introduction and prompts for the user's name.
A control bar shows the bot name and buttons to minimize, maximize, and close the widget. The project uses styles and libraries from https://fontawesome.com/ for the control bar buttons.
You can download the webchat widget package from GitHub at https://github.com/anthology-inc/renee-integration-samples/tree/main/channels/webchat/src.
The package includes the following resources:
| Resource | Description | |
|---|---|---|
|
|
/css | Contains a style file (all.min) for the button classes |
| /Images | Contains the avatar images for the bot and the chat user | |
| /webfonts | Contains eot, woff, and truetype files for the control bar buttons | |
| loader.gif | Loader image file | |
| readme.md | Readme file for the download package | |
| Webchat‑ui.html | Contains the embed code, style rules, and jQuery scripts for the control bar |
Contents of Webchat-ui.html File
The Webchat‑ui.html file displays the sample web chat widget. To be able to customize the web chat widget for your environment, you need to understand the contents of this file. The file contains the following:
-
Embed code obtained from the Internal Administration Portal
-
Style rules
-
Images
-
Client-side coding for additional functionality
Embed Code
The Embed Code obtained from the Internal Administration Portal appears in a hidden field in the <body> section of the Webchat‑ui.html file. The Embed Code initiates the web chat on page load.
Clients will receive the embed code from Anthology Inc. staff once their tenant is configured in the Internal Administration Portal.
<body>

    <input type="hidden" id="iframe-src" value="https://910008reneewebchat-qa.azurewebsites.net?t=11c5f444-ec19-4b6a-912f-772b2bd8171c">
In our example, the Embed Code was copied from the Internal Administration Portal as shown below. You will need to copy/paste your Embed Code into the HTML file.
If you customize the Webchat-ui.html file, be sure that you do not change the HTML tags <input type="hidden" id="iframe-src" value="...">.
Styles and Labels
The <head> section of the Webchat‑ui.html contains several CSS rules enclosed in <styles> </styles> tags. Comments are provided to explain the code.
To customize the appearance of the widget, you can edit style attribute values such as height, width, margins, colors, font size, etc.
Note: Be careful not to change any style names or classes because they need to match the style sheet referenced in <link type="text/css" rel="stylesheet" href="css/all.min.css" />.
    <style>

        html, body {
            height: 100%;
            width: 100%;
            margin: 0;
        }

        /* widget css starts here */
        .widget-bot {
            position: fixed;
            top: 50%;
            right: 0;
            transform: translateY(-50%);
        }

        .widget-bot text {
            display: block;
            text-align: center;
            padding: 8%;
            transition: all 0.3s ease;
            color: white;
            font-size: 20px;
            border-radius: 30px;
            background: #3B5998;
        }

        .widget-bot text:hover {
            background-color: #000;
        }
        /* widget css ends here */


        /* iframe container */
        #frameContainer {
            bottom: 0;
            position: fixed;
            right: 0;
            padding-bottom: 2.5%;
            padding-right: 3.5px;
        }


        /* iframe size */
        #iReneeBot {
            width: 100%;
            height: 100%;
            border: 1px black solid;
        }

        /* chat window size styles starts here */
        .restoresize {
            min-width: 300px;
            width: 400px;
            min-height: 400px;
            height: 450px;
        }

        .maxsize {
            width: 100%;
            Height: 90%;
        }

        .minimize {
            bottom: 0;
            position: fixed;
            min-width: 250px;
            right: 50px !important;
            padding-bottom: 0% !important;
        }
        /* chat window size styles ends here */

        /* loader styles */
        #loadergif {
            display: block;
            margin: 50%;
        }

        /* chat window button styles starts here */
        .fa-style{
            max-height: 25px;
            float: right;
            color: azure;
            padding: 4px;
            border: 1px #191438 solid;
        }

        .fa-style:hover{
            color: gray;
        }
        /* chat window button styles ends here */
    </style>
Widget Label
You can change the widget label by editing the text value in <div id="draggable"> in the <body> section of the Webchat-ui.html file:
<body>

    <input type="hidden" id="iframe-src" value="https://910008reneewebchat-qa.azurewebsites.net?t=11c5f444-ec19-4b6a-912f-772b2bd8171c">

    <div id="draggable" style="width: 120px;" onclick="InitiateChat()" class="widget-bot">
        <text>Renee</text>
    </div>
Background Colors for Chat Bubbles
The bot and user chat bubbles have defined styles for the background color. You can edit the rgba color values for the bot (bubbleBackground) and for the user (bubbleFromUserBackground) in the styles rule under the <scripts> section.
    //customizing the styles for widget
    styles: {
        botAvatarImage: 'https://910008webchatclient-qa.azurewebsites.net/Images/Boomer.png',
        botAvatarInitials: 'BM',
        userAvatarImage: 'https://910008webchatclient-qa.azurewebsites.net/Images/Visitor.jpg',
        userAvatarInitials: 'VS',
        bubbleBackground: 'rgba(130, 214, 155, 0.42)',
        bubbleFromUserBackground: 'rgba(214, 197, 130, 0.42)'
    },
Note: Edit only the rgba values. Do not edit the styles keyword or any other attributes.
Avatars and Initials
You can customize the bot by adding images (avatars) and/or initials that represent the chat visitor and the bot in the chat window. The images shown below are included in the Images folder in GitHub at https://github.com/anthology-inc/renee-integration-samples/tree/main/channels/webchat/src.
![]()
To customize the avatars and initials, specify the botAvatarImage path and file name and botAvatarInitials. Likewise, specify the userAvatarImage path and file name and userAvatarInitials as shown in the example below. The referenced images can be stored in any publicly available location; you just need to specify the URLs. Initials are displayed when images are not available.
    //customizing the styles for widget
    styles: {
        botAvatarImage: 'https://910008webchatclient-qa.azurewebsites.net/Images/Boomer.png',
        botAvatarInitials: 'BM',
        userAvatarImage: 'https://910008webchatclient-qa.azurewebsites.net/Images/Visitor.jpg',
        userAvatarInitials: 'VS',
        bubbleBackground: 'rgba(130, 214, 155, 0.42)',
        bubbleFromUserBackground: 'rgba(214, 197, 130, 0.42)'
    },
Status Bar Label
In our example the label in the status bar is set to "Renee Webchat". You can change the label by editing the highlighted value of the <div> below in the <body> section.
        <div id="reneeBotContainer" style="display: none;">
            <div style="background: #464775; overflow: hidden; min-height: 20px; height: 25px; width: 100%; border:1px black solid;">
                <div style="position: absolute;font-size: larger !important;margin-left: 15px; color: whitesmoke;">Renee Webchat</div>
Scripts
The <head> section of the Webchat‑ui.html contains JQuery code enclosed in <script> </script> tags. Comments are provided to explain the code. This code provides functionality such as:
-
Loading the iframe and initiating the chat window
-
Minimizing, maximizing, and restoring the chat window
-
Making the widget draggable
-
Triggering the end of conversation through messaging events: contentWindow.postMessage("endOfConversation",'*');
|
|
If you customize the script section, be aware that there are some function calls that must NOT be changed or removed. These items are highlighted below. |
    <script src="https://code.jquery.com/jquery-1.12.4.js"></script>
    <script src="https://code.jquery.com/ui/1.12.1/jquery-ui.js"></script>

    <script>

        $(function () {
            //function to drag widget
            $("#draggable").draggable({
                axis: "y",
                containment: "window"
            });

            //send message bubble styles when iframe is loaded
            $('#iReneeBot').on('load', function () {
                $("#loader").hide();
                $("#reneeBotContainer").show();
                iReneeBot.contentWindow.postMessage(JSON.stringify(ReneeWidget.styles), '*');
            });

            //handles page reload and refresh.
            window.onbeforeunload = function (event) {
                if (ReneeWidget.hasActiveChat === true) {
                    iReneeBot.contentWindow.postMessage("endOfConversation", '*');
                    setTimeout(function () { location.reload() }, 2000);
                }
            };
        });

        ReneeWidget = {

            hasActiveChat: false,

            //style message bubble colour
            styles: {
                botAvatarImage: 'https://910008webchatclient-qa.azurewebsites.net/Images/Boomer.png',
                botAvatarInitials: 'BM',
                userAvatarImage: 'https://910008webchatclient-qa.azurewebsites.net/Images/Visitor.jpg',
                userAvatarInitials: 'VS',
                bubbleBackground: 'rgba(130, 214, 155, 0.42)',
                bubbleFromUserBackground: 'rgba(214, 197, 130, 0.42)'
            },

            //load iframe which initiate the chat
            InitiateChat: function () {
                $("#draggable").hide();
                $("#frameContainer").show();
                this.hasActiveChat = true;
                $('#iReneeBot').attr('src', $("#iframe-src").val());
            },

            //endOfConversation message event to End the chat.
            EndChat: function () {
                iReneeBot.contentWindow.postMessage("endOfConversation", '*');
                $("#frameContainer").hide();
                $("#draggable").show();
                this.hasActiveChat = false;
            },

            //maximize the chat window
            MaximizeChat: function () {
                $("#maximizeChat").hide();
                $("#minimizeChat").show();
                $("#restoreChat").show();
                $("#iReneeBot").show();
                $("#frameContainer").attr('class', 'maxsize');
            },

            //restore the chat window
            RestoreChat: function () {
                $("#restoreChat").hide();
                $("#minimizeChat").show();
                $("#maximizeChat").show();
                $("#iReneeBot").show();
                $("#frameContainer").attr('class', 'restoresize');
            },

            //minimize the chat window
            MinimizeChat: function () {
                $("#minimizeChat").hide();
                $("#iReneeBot").hide();
                $("#restoreChat").show();
                $("#maximizeChat").show();
                $("#frameContainer").attr('class', 'minimize');
            }
        }

    </script>
The functions defined in the <script> section are referenced by elements in the <body> section of the HTML page. Keep this interdependence in mind. For example, the widget's "draggable" feature relies on the function below:
        $(function () {

                //function to drag widget
                $("#draggable").draggable({
                    axis: "y",
                    containment: "window"
                });
The <body> section of the html file references id="draggable".
    <div id="draggable" style="width: 120px;" onclick="InitiateChat()" class="widget-bot">
        <text>Renee</text>
    </div>
Note: Be sure not to alter any script code unless you have JQuery expertise.