Second Level Approval
Second level approval requirements can be set by document type, file reviewer type, and review level type. An assigned file reviewer will be the 1st level of approval for student documents submitted by a student. The second level reviewer will serve as the person that reviews the document after the 1st level review is complete.
The second level review option can be set on the user account profile. This will automatically require second level for all documents approved on a 1st level approval by the associate.
To perform second level approval a user must have appropriate rights and permissions. This includes functions to approve or reject documents.
Document Statuses
On the Student Details page, in the Required Document List (RDL), a staff user examines the submitted documents to ensure they are correct and satisfy the requirement before approving them.
If a second-level approval is required, this approval is all that is necessary to approve the documents.
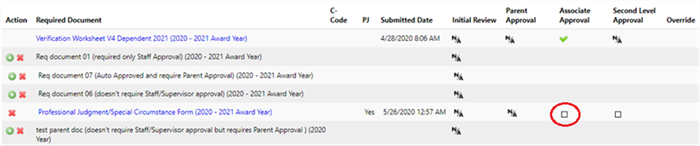
Some documents require approval:
- by the parent,
- the staff member,
- the second-level staff member,
- or a combination of the these.
An ![]() in the column indicates that the approval type is not necessary for that document.
in the column indicates that the approval type is not necessary for that document.
In the RDL, a document can have one of following approval statuses for each approval type:
-
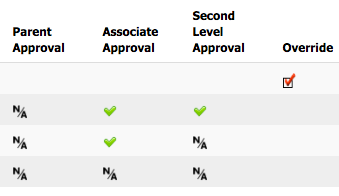
Document Approved - This is indicated by a green check mark (
 ) in the Parent, Associate, and/or Second Level Approval column.
 -
Document Rejected - This is indicated by a red X (
 ) in the Parent, Associate, and/or Second Level Approval columns.
 -
Document is Neither Approved nor Rejected - An empty check box (
 ) indicates the document has neither been approved nor rejected.
 -
Not Available - If there is no approval that can be performed, an
 icon appears in the Parent and/or Second-Level Approval column(s).
 -
Not Submitted - If a student document has not yet been submitted, there will be no information or check boxes in the approval columns.

To perform document approval or rejection:
-
Select the Associate Approval check box in line with the document name (displayed in blue) to be reviewed.
-
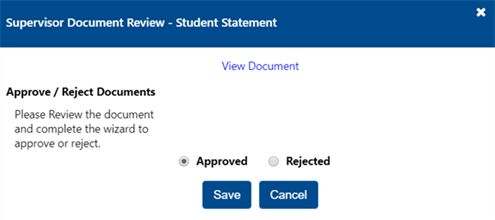
Select View Document at the top of the modal.
-
Review the document to ensure requirements are met. Student Verification has several types of dialog boxes depending on the document type.
-
If the document requires no further action in the review template, select Approved or Rejected at the bottom of the modal.
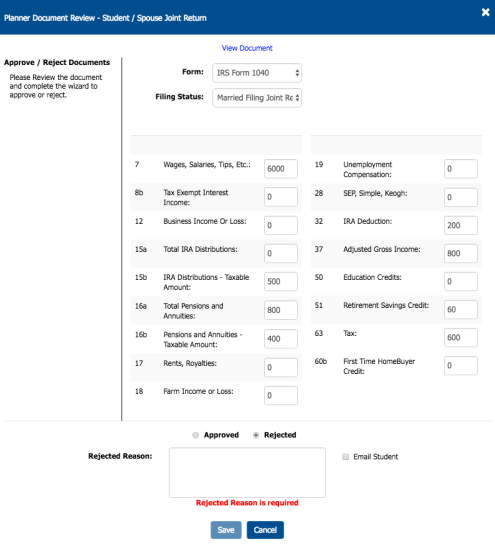
-
If the document provides information needed for verification, the modal will display additional fields to be evaluated.
Example: Student/Spouse Joint Return modal is selected. This requires the user to review the document provided by the student and to enter values from the tax document.
-
-
Review and make any necessary edits/corrections based on the submitted document.
The information on the Document Review dialog box could have data pre-filled based on the student entry, or it could have fields that are empty.
-
If the information is pre-filled: Compare the displayed data with the data on the student-supplied document.
-
If the information is not pre-filled: Enter the data using the values from the student-supplied document.
Note: The type of data you are asked to accept or reject depends on the type of document you are verifying.
For example: The V1 Verification Worksheet Household size section can be edited:
-
Delete a row of information, select the
icon. -
Add a new row of information, select the
 icon.
icon.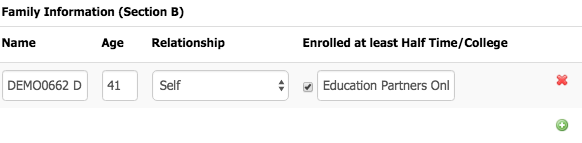
-
Based on the review and any edits/corrections, choose to either reject or approve the document.
-
For an approval, choose the Approved option.
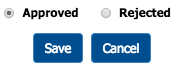
-
For a rejection, choose the Rejected option and enter descriptive text in the Rejected Reason text box to explain the rejection.
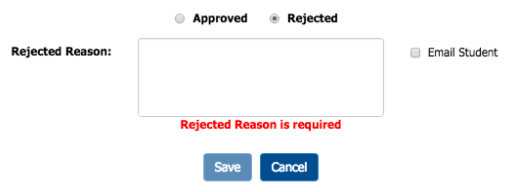
Rejected documents are marked as incomplete in the student's Required Documents section on the Student Verification Portal. The student must address the issue and resubmit the document. The new document submission will require staff document review to be repeated.
If you want to send the student notification that the document is returned to their queue and requires resubmission, select the Email Student check box.
-
-
-
Select Save.
When all documents are approved, each document has:
-
A green check
in the Associate and/or Second Level Approval columns, -
Or a red check
 in the Override column,
 -
Or an
in columns where approval is not necessary.
Note: For more information about overriding documents, see Document Override. The Verification Check can now be performed. For more information, see Verification Check.
-