Forms Builder Renderer

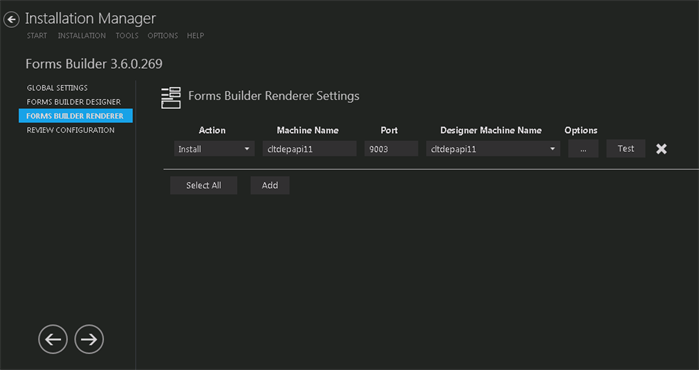
This screen enables you to select the actions to be taken by Installation Manager (e.g., install, uninstall) and to specify the machine name and configuration options for Forms Builder Renderer.

NoteForms Builder Designer and Renderer can be installed on the same machine or on different machines.

Set Up Forms Builder Renderer

  1. In the Installation menu, click Forms Builder Renderer. The Forms Builder Renderer Settings screen is displayed. Closed

    Forms Renderer Settings

  2. Click Add to add a line to the Settings screen.

  3. Select an appropriate Action. The following Action values are available:

    • None – Performs no action.

    • Install – Performs a fresh installation or upgrade of a component. You can install or upgrade multiple components at same time.

    • Uninstall – Removes all subcomponents on that machine and uninstalls the component from Programs and Features.

    Optional: Click Select All to set the Action field to Install for all components listed on this screen. Click Unselect All to set the Action field to None.

  4. Enter the Machine Name for the component to be installed. This can be a local or remote machine.

  5. Specify the Port number of the Forms Builder Renderer or accept the default (9003).

  6. Select the Designer Machine Name in the drop-down list.

  7. Click Options (ellipsis) icon to view and edit the Options form.

    General Tab

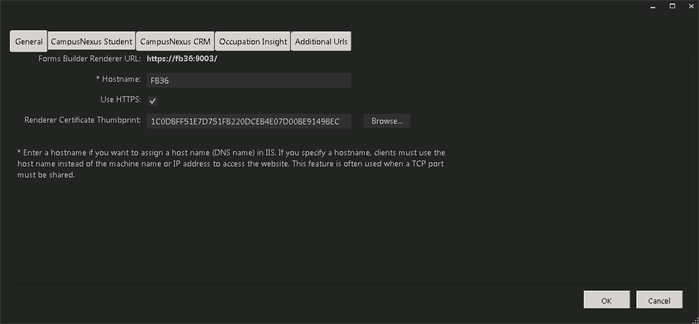
    Settings on this tab are required and common to all components of Forms Builder Renderer. Closed

    Forms Builder Renderer Options - General tab  

    General Tab Fields
    Field Description
    Forms Builder Renderer URL This is a friendly URL to access Forms Builder Renderer. The default port for Renderer is 9003.

    The default format is: http(s)://machinename.domain.com:port

    Hostname This is an optional field. When selected, the host header will be added to the Forms Builder Renderer web site, and the web.config file of Renderer will be updated with the custom host URL.

    If this field is left blank, the URL for Renderer accessed by end users and the URL in the config files will be
    http(s)://machinename.domain.com:port

    Use HTTPS Select this check box if you want the Forms Builder Renderer to be accessed through HTTPS. When this option is selected, the Renderer Certificate Thumbprint field is enabled.
    Renderer Certificate Thumbprint Certificate thumbprint from IIS.

    This certificate is required only when HTTPS is selected and is not added to the web.config file. This certificate is used only for Forms Builder Renderer.

    Click Browse to navigate to the IIS Server Certificates to select the thumbprint. Closed

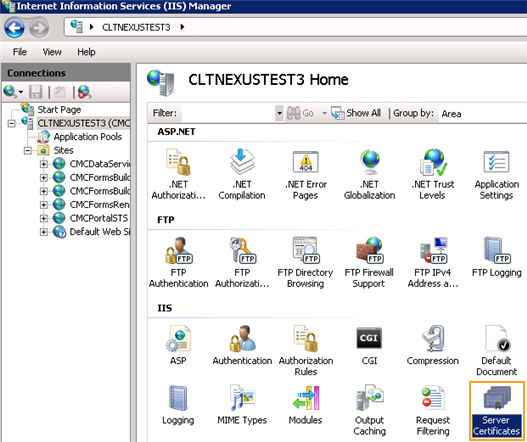
    1. Open Internet Information Services (IIS) Manager and choose the certificate to be used from Server Certificates.

      IIS Manager

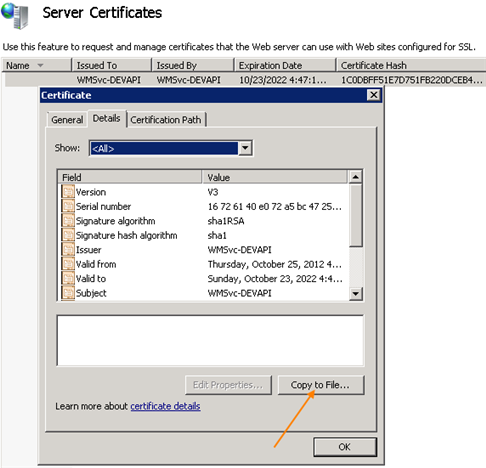
    2. Double-click to open the certificate properties.

      Server Certificates

    3. Select Root level and in the Details tab, click the Copy to File… button.

    4. Click Next. Select No, do not export the private key and click Next.

    5. Select DER encoded binary X.509 (.CER) and click Next.

    6. Specify a file path and name (root) to export to and click Next.

    7. Click Finish

    CampusNexus Student Tab

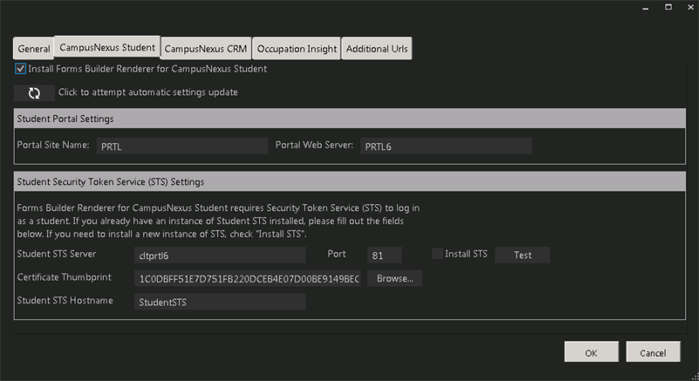
    Settings on this tab are required if Forms Builder for CampusNexus Student is installed. Closed

    Forms Builder Renderer Options - CampusNexus Student tab  

    CampusNexus Student Tab Fields
    Field Description
    Install Forms Builder Renderer for CampusNexus Student Select this check box to install Forms Builder Renderer for CampusNexus Student.
    Update Settings Click Refresh to update the settings by querying the database. (Syregistry table in the CampusNexus Student database)
    Student Portal Settings
    Portal Site Name Site Name configured for the Portal ('legacy' portal) login page. The Portal Site Name is PRTL by default. It changes to PRTL1, PRTL2 so on when multiple Portals are installed on single IIS server. The Portal Site Name value is found in the web.config file under Appsettings of Portal ('legacy'). The Site Name value is used for CampusNexus Student STS.
    Portal Web Server Specify the Portal Web Server name. The SySiteSettings of the CampusNexus Student database will be modified with Portal Server Name in the Portal WebService URLs. For a Load Balanced Portal environment, enter the name of load balancer server.
    Student Security Token Service (STS) Settings
    Student STS Server Name of the STS server used to authenticate applicants, students, and employers.
    Port Specify the port number of the installed Student STS server or accept the default (81).
    Install STS Select this check box if you want to install a new Student STS instance.
    Test Click Test to verify that the Student STS is active and that login is successful.
    Certificate Thumbprint Certificate thumbprint from IIS.

    This certificate is required only when HTTPS is selected. It is not added to the web.config file. This certificate is used only for the Student STS, which provides authentication for Renderer (and Portal) to applicants, students, and employers.

    Click Browse to navigate to the IIS Server Certificates to select the thumbprint. Closed

    1. Open Internet Information Services (IIS) Manager and choose the certificate to be used from Server Certificates.

      IIS Manager

    2. Double-click to open the certificate properties.

      Server Certificates

    3. Select Root level and in the Details tab, click the Copy to File… button.

    4. Click Next. Select No, do not export the private key and click Next.

    5. Select DER encoded binary X.509 (.CER) and click Next.

    6. Specify a file path and name (root) to export to and click Next.

    7. Click Finish

    Student STS Hostname This is an optional field. When selected, the web.config file of the Student STS will be updated with the custom host URL.

    If this field is left blank, the URL in the config files will be
    http(s)://machinename.domain.com:port

    CampusNexus CRM Tab

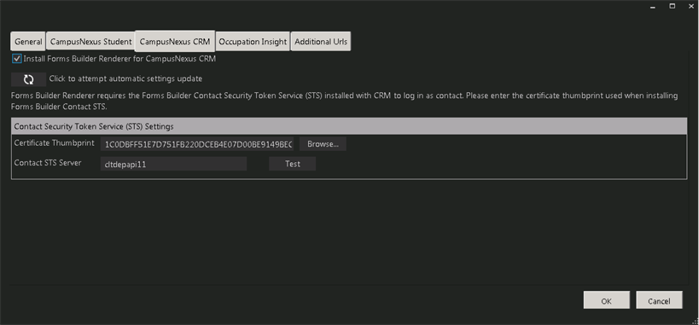
    Settings on this tab are required if Forms Builder for CampusNexus CRM is installed. Closed

    Forms Builder Renderer Options - CampusNexus CRM tab  

    CampusNexus CRM Tab Fields
    Field Description
    Install Forms Builder Renderer for CampusNexus CRM Select this check box to install Forms Builder Renderer for CampusNexus CRM.
    Update Settings Click Refresh to update the settings by querying the database.
    Contact Security Token Service (STS) Settings
    Certificate Thumbprint Certificate thumbprint from IIS.

    The same certificate thumbprint that is used on the Staff STS must be used here. Copy and paste the thumbprint from the Staff STS into this field, or click Browse to navigate to the IIS Server Certificates to select the thumbprint. The thumbprint is added to the Designer web.config file. Closed

    1. Open Internet Information Services (IIS) Manager and choose the certificate to be used from Server Certificates.

      IIS Manager

    2. Double-click to open the certificate properties.

      Server Certificates

    3. Select Root level and in the Details tab, click the Copy to File… button.

    4. Click Next. Select No, do not export the private key and click Next.

    5. Select DER encoded binary X.509 (.CER) and click Next.

    6. Specify a file path and name (root) to export to and click Next.

    7. Click Finish

    Contact STS Server Specify the machine name of the Contact Security Token Service (STS) Server.
    Test Click Test to verify that the Contact STS Server is active and that login is successful.
    Occupation Insight Tab

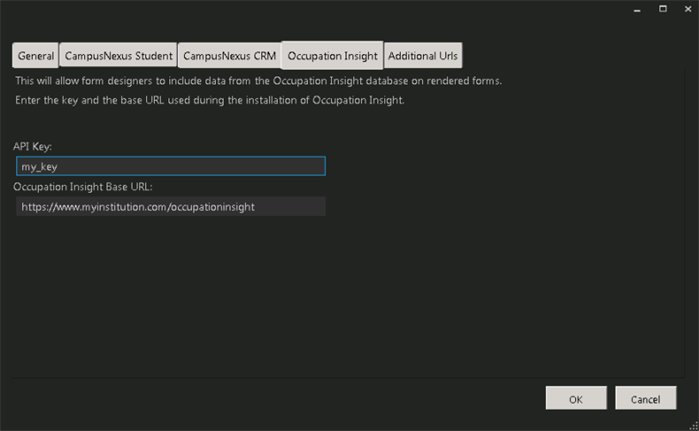
    Settings on this tab are required only if Occupation Insight is used as a database source for Forms Builder. The settings are stored in the Forms Builder Renderer web.config file. Closed

    Occupation Insights Tab

    Occupations Insight Tab Fields
    Field Description
    API Key Enter the API key used during the installation of Occupation Insight.  See Occupation Insight.

    Note: This is a specific key for the Occupation Insight APIs. It is not the same as the API key used for the CampusNexus framework APIs.

    Occupation Insight Base URL This URL is used by Forms Builder to access Occupation Insight data through OData queries.
    Additional Urls Tab

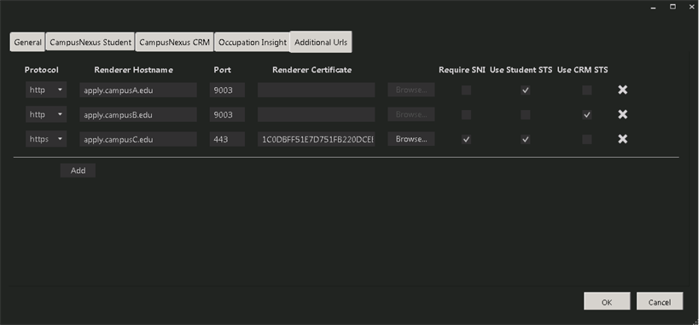
    Settings on this tab are required only if the Renderer instance is accessed from additional URLs associated with individual campuses. These campuses are served forms from the main Renderer instance, however, the forms use branding and authentication services that are specific to individual campuses. To provide authentication for users accessing the rendered forms from the additional URLs, Installation Manager creates redirect URLs for the STS services. The STS service used depends on whether Forms Builder accesses CampusNexus Student, CampusNexus CRM, or both products. The settings are stored in the Forms Builder Renderer web.config file. Closed

    Addtional Urls Tab  

    Additional Urls Tab Fields
    Field Description
    Add Click the Add button to add a line to the form.
    Protocol Select HTTP or HTTPS protocol. If HTTPS is selected, the Renderer Certificate and Require SNI fields are enabled and must be completed.
    Renderer Hostname Specify the hostname for an additional Renderer URL. This hostname will the url value in the <realms> section of the Renderer web.config file (see below). It will be added to the IIS bindings of main Renderer instance.
    Port Specify the port number used by the additional Renderer URL or accept the default (9003).
    Renderer Certificate Certificate thumbprint from IIS is required if HTTPS is selected.

    Copy and paste the thumbprint from Renderer into this field, or click Browse to navigate to the IIS Server Certificates to select the thumbprint. The thumbprint is added to the Renderer web.config file. Closed

    1. Open Internet Information Services (IIS) Manager and choose the certificate to be used from Server Certificates.

      IIS Manager

    2. Double-click to open the certificate properties.

      Server Certificates

    3. Select Root level and in the Details tab, click the Copy to File… button.

    4. Click Next. Select No, do not export the private key and click Next.

    5. Select DER encoded binary X.509 (.CER) and click Next.

    6. Specify a file path and name (root) to export to and click Next.

    7. Click Finish

    Require SNI Server Name Indication (SNI) is required if HTTPS is selected. SNI allows a server to present multiple certificates on the same IP address and TCP port number and hence allows multiple secure websites to be served by the same IP address without requiring all those sites to use the same certificate.
    Use Student STS Select this check box if the Student STS is used to authenticate CampusNexus Student users.
    Use CRM STS Select this check box if the Contact STS is used to authenticate CampusNexus CRM users.

    The settings specified on the Additional Urls tab are written to the <authenticationConfigSection> section in the Renderer web.config file.

    • The <realms> section contains a key and value for each additional incoming Renderer URL.

    • The <issuers> section contains a key and value for the authentication services, i.e., Student STS and CRM STS.

    • The <mappings> section contains the mapping between realm keys and STS keys.

     <authenticationConfigSection>
    <!-- incoming urls -->

    <realms>
    <!-- <url key="" value="" /> -->
    <url key="CampusA" value="http://apply.CampusA.edu/" />
    <url key="CampusB" value="http://apply.CampusB.edu/" />
    <url key="CampusC" value="http://apply.CampusC.edu/" />
    </realms>

    <!-- STS redirect urls -->

    <issuers>
    <!-- <url key="" value="" /> -->
    <url key="CampusASTS" value="https://studentsts.CampusA.edu:81"/>
    <url key="CampusBSTS" value="https://crmsts.CampusB.edu:81"/>
    <url key="CampusCSTS" value="https://studentsts.CampusC.edu:81"/>
    <url key="Student STS" value="https://<server>.campusmgmt.com:811"/>
    <url key="CRM STS" value="https://<server>.campusmgmt.com/cmc.crm.sts/"/>
    </issuers>

    <mappings>
    <!-- <mapping realmKeys=" comma separated realm keys or * for wildcard match "
    product=" name of the product or * for wildcard match "
    issuerKey=" url key of the issuer " /> -->

    <mapping realmKeys="CampusA" product="Student" issuerKey="CampusASTS"/>
    <mapping realmKeys="CampusB" product="CRM" issuerKey="CampusBSTS"/>
    <mapping realmKeys="CampusC" product="Student" issuerKey="CampusCSTS"/>
    <mapping realmKeys="*" product="Student" issuerKey="Student STS"/>
    <mapping realmKeys="*" product="CRM" issuerKey="CRM STS"/>
    </mappings>

    </authenticationConfigSection>

  8. Click OK to save changes on the Options form. The form is closed.

  9. Click Delete icon to delete a selected line.

  10. Click Test to ensure the setup for the corresponding line is correct. If a test on a particular line fails, check all associated fields and click Test again.

  11. If all tests pass, click right arrows.