Internationalization
With the enhancements for internationalization and localization, you can use Forms Builder 3.5 and later to create form sequences in multiple languages.
Definitions
Internationalization (or globalization) refers to the design and development of a culture-neutral and language-neutral product that enables easy localization for target audiences in all parts of the world.
Internationalization requires:
-
Enabling the code to support language, local, or cultural preferences (e.g., use of Unicode internally, support for right-to-left and vertical text direction, time zone awareness, local date and time formats, local calendars, local number formats, and so on).
-
Separating localizable content from the source code so that localized alternatives can be loaded based on the user's selection.
Internationalization is often written as i18n, where 18 is the number of letters between i and n.
Localization refers to the adaptation of a product to meet the language, cultural and other requirements of a specific target market (a locale). A locale is a collection of specific numeric, date and time formats, currency, symbols, and other requirements.
The localization process involves translating text and selecting locale-specific components. Translatable text, including labels and validation messages, is extracted from the source code, translated, and rendered based on the user's language/culture choice.
Localization is sometimes written as l10n, where 10 is the number of letters between l and n.
Internationalization and Localization in Forms Builder
The Gettext library of tools was added to the Forms Builder 3.5 code. The Gettext utilities cover all phases of the translation process:
-
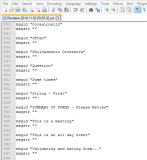
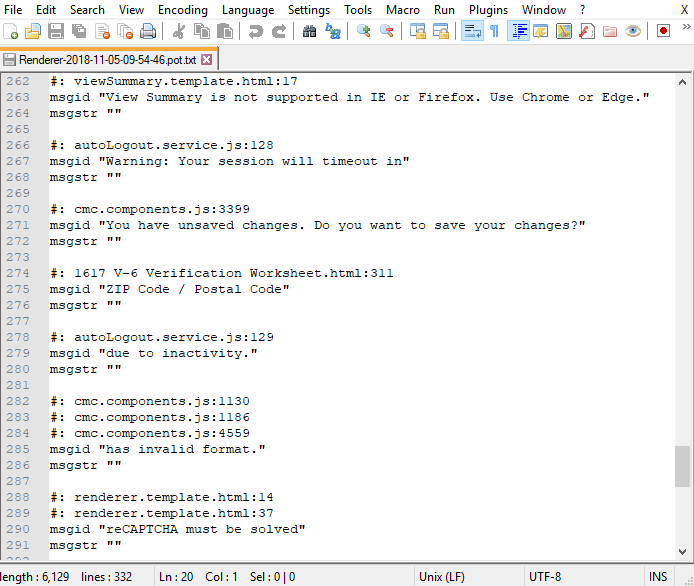
Gettext scans the code and places the translatable text strings (case sensitive) in a .pot (portable object template) file. The .pot file has all the translation strings (the
msgstrparts) left empty, for example:msgid "Hello world"
msgstr "" -
You use the .pot file to create one .po (portable object) file per locale (e.g., fr.po, de.po, es.po). The .po files have all the translation strings (the
msgstrparts) filled in, for example:msgid "Hello world"
msgstr "Bonjour le monde"
In components that are shared with other CampusNexus products (core UI components), an attribute that marks translatable text was added to properties that can contain text, such as Label, Required Message, Selection Text, Tooltip, etc. The Gettext tools extract the marked text strings.
All custom Forms Builder and Kendo components that have properties with translatable text run the angular-gettext tools. The text to be translated is marked with a translate directive. The Gettext tools extract the marked text strings.
In addition to form text, the .pot file includes non-form text so that text strings for the following items can be translated using .po files:
- Button labels:
- Next/Back
- View Summary/Hide Summary (View Summary page)
- Submit (internal page displayed after the DocuSign process)
- Show Filter Row and Select & Cancel (in Single-select Search components)
Note: If button labels are changed in workflows, you will have to manually add the translations to the .pot file, unless the labels are already in the file and translated.
- Version information
- Form Titles
- Form Section Titles
- Messages generated by Forms Builder Settings
- Error messages from Forms Builder (Error messages from CampusNexus CRM or Anthology Student are not captured in the .pot file.)
- Error messages, warnings, and notifications triggered by form validations
- Values of Custom Value Lists in Drop-down and Multiselect components
- Model Data in Grid and Calendar/Scheduler components
- Grid Column validations
Note: Credit Card Payment forms using PayPal, ACI, or IATS payment gateways will not be translated as these vendors do not support localization at this time.
Culture Scripts for Kendo Components
Forms Builder uses a set of Kendo components that support localization around formats of dates and currency. The Kendo components in Forms Builder are:
- Calendar/Scheduler
- Date Picker
- Date Time Picker
- Masked Text Box (globalized mask literals)
- Numeric Text Box
- Time Picker
When a Locale component is included on the first form of a sequence, all Kendo components within the sequence will run the culture scripts to apply the setting selected in the Locale component.
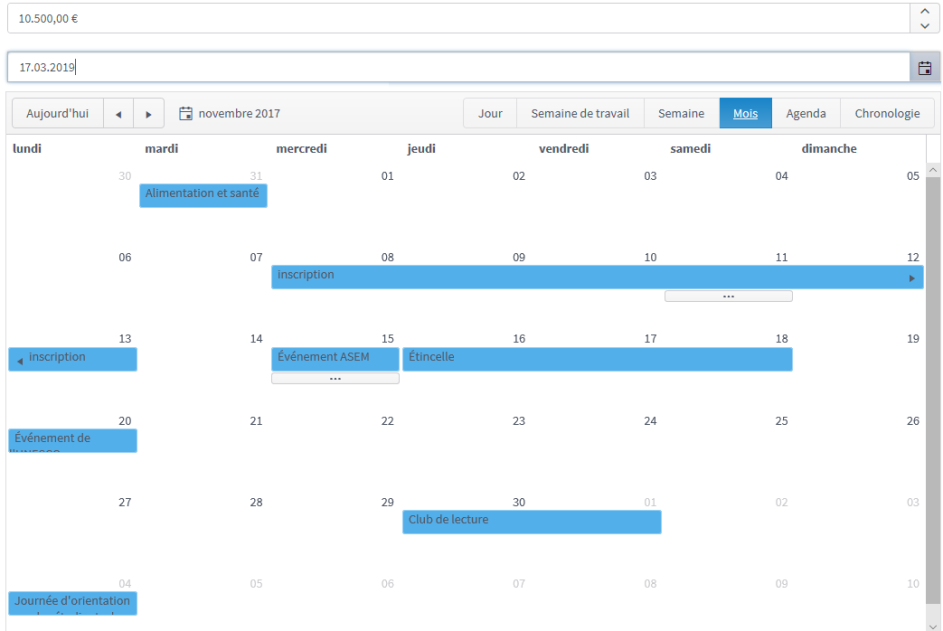
Example
A Locale component offering a drop-down list with multiple languages, including French, is placed on the welcome form of a sequence. The user selects French and proceeds to a form that includes a Numeric Text Box with Euro currency symbol, a Date Picker, and a Calendar/Scheduler. ![]()
For more information, see https://docs.telerik.com/kendo-ui/framework/globalization/overview.
The translation of labels and validation messages in Kendo controls is handled by the Gettext tools.
Localization of DocuSign Forms
Users can set the display language for DocuSign from the selection menu at the bottom of the DocuSign Iframe page.

Steps to Localize Sequences
-
Add the Locale component to the first form in a sequence. Use this component to set up the language and culture selections supported in a sequence.
-
Re-save all forms that were created in Forms Builder 3.4 and earlier.
Note: In forms created prior to Forms Builder 3.5 with File Upload component, the File Upload button will not be translated. If the component is replaced with the new File Upload component created in 3.5, the button is translatable.
Any additional tasks depend on the types of components used in the sequence.
-
For HTML components, apply the
translateattribute to the text you want to localize. The attribute can be added to any HTML element. For example:<div translate>Translate me!</div>If the HTML component has a <p> or <div> element (or any other valid HTML element) that contains text and a link, enclose the text in a <span> element and add the
translateattribute to the <span>. Do not include non-alphabetic character at the end of sentences (e.g., !, ..., ?) into the span with translate tag. For example:<p style="color:green; word-wrap:break-word;"><span translate>For more info, please visit</span>: <a href=" http://anthology.com ">Campus Tech Website</a></p>Do not use the & symbol within HTML text because it will not be properly pulled into .pot file or translated. Replace & with the word "and".
-
If the optional Header Template property is used for Multiselect components, apply the
translateattribute to the Header Template property. For example, to translate the Header Template property value<div><b>Degrees</b></div>, specify:<div><b translate>Degrees</b></div> -
If your sequences include text that originates in a workflow (e.g., custom validation items), perform the steps needed to add TranslateText activities.
-
If your sequences include Drop-down List, Multiselect, Single-select Search, or Calendar/Scheduler components, use the Lookup Translation Members or OData Translation Members (on Calendar/Scheduler) property to extract translatable text from an OData query (e.g., names of table columns). This property is a comma separated list of items for a Select statement in an OData query. The query results will be included in the POT file generation.
Note: Avoid using text in your forms that can be interpreted as an HTML tag by a browser (i.e., text wrapped in < and >, for example, <Select>). This text may not be translated properly in the current version (2.4.1) of angular-gettext with Internet Explorer and Microsoft Edge browsers.
-
-
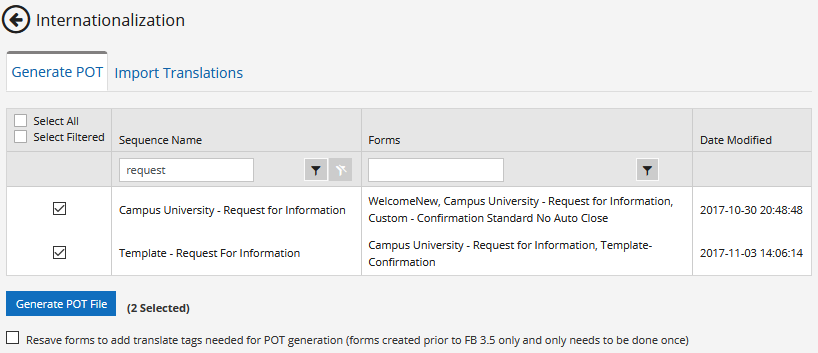
Go to the Forms Builder home page and click the Internationalization tile.
The Generate POT tab is displayed by default. It contains a grid listing sequence names, forms contained with the sequences, and date modified.

-
Use one of the following options to select sequences. The number of selected sequences will be displayed next to the Generate POT File button.
-
Click Select All.
-
Use the column filters to narrow your search and click Select Filtered.
-
Clear "Select All" and "Select Filtered" and select individual sequences.
Most often you would Select All sequences to extract all text in all forms. The text will be translated outside of Forms Builder and stored in .po files for the supported languages. If sequences are added or updated, select all sequences again. The generated .pot file will be updated to include the changes. The .po files will retain all previously translated text and just need to be updated to include the changes.
In cases where an institution uses different forms for different locales/campuses, you might want to generate .pot files with a subset of sequences.
-
-
If you selected forms that were created prior to Forms Builder 3.5, select the check box below the Generate POT File button to resave the forms. This only needs to be done once to add the translate tags needed for the POT generation to the older forms.
-
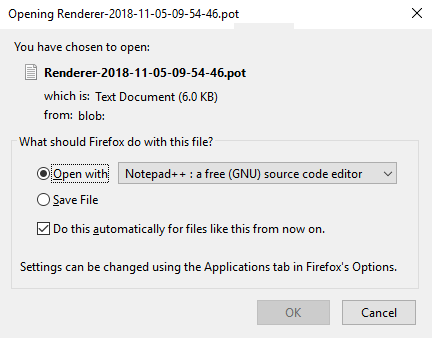
Click Generate POT File. When processing is complete, a message with the name of the .pot file is displayed. We recommend using Notepad++ to open the file.
The .pot file will contain the names of forms where the text was found, the line numbers, and the
msgidswith the text strings to be translated. If the same text appears multiple times in different forms, the .pot file will capture a singlemsgidso that only one text string needs to be translated.If your sequences contain components with Lookup Query properties, manually edit the .pot file in Notepad++. For the selection list values, add text strings enclosed in quotes to the msgid and msgstr fields. To obtain the values in the selection lists, render the sequences or run the OData queries directly in a browser. Be sure to include any trailing spaces on the text strings in the .pot file. Strings have to match exactly for translations. After adding the strings to the .pot file, update the .po files and import them into Forms Builder.
The Lookup Query property is found in the following components:
- Calendar/Scheduler
- Drop-down List
- Grid with Query on a Column
- Multiselect
- Single-select Search
- Typeahead
Note that the Typeahead component does not have a Lookup Value Member property. Therefore, any values in the Typeahead selection list that are translated have to be saved to the database in the original language.
-
Outside of Forms Builder, use a translation tool such as Poedit (see https://poedit.net/) to create and save .po files for each supported locale.
Note that the .pot generation is case sensitive. For example, if the text strings include the words "campus" and "Campus", you will need translations for both words. If only "Campus" is translated in the .po file and a page renders with "campus", the page will indicate that a translation was not found.
You can review the .pot files using a tool like NotePad ++. However, we do not recommend that you manually update the .pot files.
Do not change the file names of the .po files because the locale is part of name and has to be in a specific format. Only 1 .po file per locale is allowed.
-
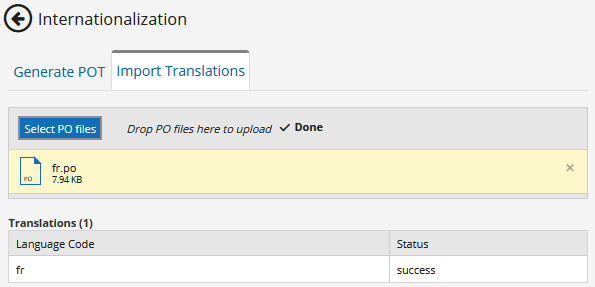
In Forms Builder, click the Internationalization tile and select the Import Translations tab.
-
Click Select PO files and navigate your .po file(s). The imported file(s) will be listed on the Import Translations tab. The Language Code column indicates the locale(s). The Status column indicates the import success/failure.
Note: The imported translations are stored in the formsbuilder.translation database table. The table will contain all translations found in the .po files. Text strings without translations will not be imported.
-
After completing the POT Generation and Import Translations steps, you can view rendered sequences with translated text based on the locale selection.
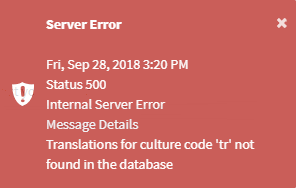
If POT Generation and Import Translations have not been completed for a locale, a warning message is displayed (
), and the translatable text is displayed in the default language set in the Locale component (if used).

In Forms Builder 3.6 and later you can enable the Debug Translations option in the Settings workspace to help troubleshoot translated sequences. When this option is selected, text processed by the translation engine on rendered forms will be wrapped with '[ ]' markers and untranslated text will be prefixed with `[MISSING]:`.
The Login Locale setting can be used to add a drop-down list for locales on the Azure AD login page. For more information, see Login Locales.
If the "Create Account" option is selected on the Azure AD login page, the user is directed to the "New Account Creation" page in Portal. The header bar in Portal has a "Choose language" drop-down that is not linked to the Login Locales setting.