HTML
You can use the HTML component to create form content marked up with standard HTML tags. You can also use this component to add custom style fragments or scripts to a form.
|
|
A custom JavaScript embedded in an HTML component may fail for several reasons outside of Forms Builder. It might be blocked by the newer versions of the browsers, security improvements to our corporate network, or other factors related to the clients' browsers. Embedding JavaScript into an HTML component is considered custom code and is the responsibility of the client. |
Properties
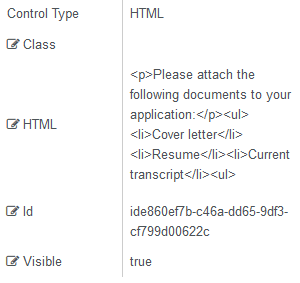
Control Property Settings
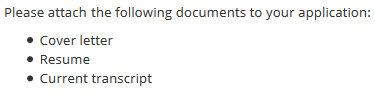
Rendered Component
For more examples of HTML components, please see Welcome and Confirmation Forms.
-
Class is an optional CSS class (or space separated classes) added to the top level of the control. CSS specific to the control can be applied. The class must be defined in a Renderer CSS file. For more information, see Custom Styles.
Note: The Class
forms_builder_page_breakenables you to set page breaks in PDF files with DocuSign signatures. For more information, see Error Code "TAB_OUT_OF_BOUNDS" - DocuSign.
-
The HTML property enables you to format rendered output using a subset of standard HTML markup as a fragment of an HTML page. That is to say, <!DOCTYPE html>, <html>, <head>, <body> and <form> tags are not appropriate in an HTML fragment. While they may not harm the page, they do have the potential to create silent Renderer errors or cause the page rendering to fail completely. The HTML validation parser will point out errors in the HTML fragment and mark them as a warning but will not attempt to enforce rules. Warnings should be corrected to avoid unexpected results.
An example of an HTML fragment is:
<h2 class=”myclass”>Campus View</h2>
<img src="IMG_2671.jpg" alt="Campus View" style="width:304px;height:228px;">
Also possible are <script> and <style> fragments. This allows a great deal of customization. A model value can be addressed in JavaScript with “window.vmModelsRef”. If you had an argument in a workflow “myKey”, which would also be a model value “vm.models.myKey”, then in external HTML JavaScript this can be addressed with “window.vmModelsRef.myKey” or “window.vmModelsRef[‘myKey’]”.
Similarly, parameters for the Renderer URL that are addressed with formInstance.QueryParams.DataDictionary(“myKey”) or special case formInstance.QueryParams.DataDictionary(“addonQueryParams”) in the workflow (see Renderer URL Query Parameter), can be addressed in external HTML JavaScript as “window.vmQueryParamsRef.myKey” or “window.vmQueryParamsRef[‘myKey’]. This would allow you to pass information in the Renderer URL to your custom JavaScript (or even to a custom style via a binding). Of course, depending on how it is to be used, make sure your JavaScript and/or workflow validates the information passed, or this could be a security risk.
In Forms Builder 3.7 and later, you can bind the HTML property to a workflow argument. See Bind HTML to an Argument.
-
Id is required. It can be any valid JavaScript id attribute value. (Must start with a letter followed by 0 to 9, a to z, dash, or underscore characters).
-
Using a globally unique identifier (GUID) from GuidGen or GuidGenerator prefixed by at least one letter prevents a clash with any other id.
-
Id should contain only a to z (uppercase or lowercase), 0 to 9, dash, or underscore. It should not have spaces.
-
Binding is not supported for this property.
-
-
Visible makes the control visible or hidden.
-
Can be bound to a workflow argument or another control's value. This property is dynamic.
-
A property array string index requires single quotes, e.g., vm.models.xxx.CustomProperties['yyyyy'].
-
An expression can be used that evaluates to true or false, e.g., vm.models.myvalue==7 (>,<, !=, ==, >=, <=). If comparing to a string, it must be in single quotes.
-
(true and false must be all lowercase)
-
Access Model Values Using JavaScript
The following is an example of creating client-side code to do something on a page. Suppose you have a name, address, and state that a student has entered on a page and you want to add a check box which adds the functionality to copy that name, address, and state to fields below that. The check box has the text “Mailing address different than residence address?”. The student would select the check box if the mailing address and residence address are different. Furthermore, you want to only make the mailing address fields visible if the student has selected the check box.
The top of the page has 3 fields: 2 text boxes for name and address and a drop-down list to select the state. The job is to copy the model values for the 2 fields and the drop-down list value to fields below.
The models are:
- vm.models.studentName
- vm.models.studentResidenceAddress
- vm.models.studentResidenceState.
Below that you have the fields:
- vm.models.studentName
- vm.models.studentMailingAddress
- vm.models.studentMailingState
Note that the first field has the same model name (because it is assumed the student’s name is not going to change).
The following HTML will achieve the goals above:
<div>
   <input type="checkbox" ng-model="vm.models.myCheckBoxValue" onclick="myChange(this)" />
</div>
<script type="text/javascript">
   function myChange(chkBx) {
   if (chkBx.checked){
   // vm.models values can be accessed externally with the global variable vmModelsRef (Forms Builder 3.3. or above only)
   vmModelsRef.studentMailingAddress = vmModelsRef.studentResidenceAddress;
   vmModelsRef.studentMailingState = vmModelsRef.studentResidenceState;
   } else {
   // Clear the fields (not really necessary if you use the checkbox model value to determine if it was checked)
   vmModelsRef.destination1 = "";
   vmModelsRef.studentMailingState = "-1";  // Basically a value that is not in the State list
   }
   }
</script>
Explanation:
-
The
onclickevent of thecheckboxruns the codemyChangein the script block. -
The first statement checks if the
checkboxis selected. If it is, copy the values. -
The internal
vm.models.xxxvalues are accessed with the global variablevmModelsRef.xxx. -
The
checkboxvalue can be made accessible in the workflow with an argument you createmyCheckBoxValue(Boolean). -
The Visible property of the mailing fields is set to
vm.models.myCheckBoxValue. When the checkbox is selected, they appear. -
It is not necessary to handle the
studentNamein the code because it is the same value for both residence and mailing fields. -
The value of the drop-down list is not the same as the text shown, so the way to set the mailing state is to set the same value. This is the vm.models value for both. This means they both must have the same Lookup Query, Workflow Initialized List, or Value List and the same Text Member (Lookup Display Member) and Value Member (Lookup Value Member). (See Drop-down List component).
Hint: If you are debugging this in a browser developer tool (F12), the statement “debugger;” inserted in the code will cause the code to break in the debugger so that values can be examined.
DatePicker Widget
You can implement a custom DatePicker control on a form with Forms Builder's HTML component using the HTML code and script below.

The documentation for the example it was derived from and the API for the DatePicker is found here:
- https://demos.telerik.com/kendo-ui/datepicker/index (see 2nd control on page for a live example of what it does)
- https://docs.telerik.com/kendo-ui/api/javascript/ui/datepicker (API for control - all properties, methods, and events used below)
<!-- Note in the following example "myDate" is defined in a workflow as a string argument. In order to store it as a DateTime object, that can either be done by converting it to and from one in a workflow, or by changing the control below to handle a date object for both input and output. -->
<div id="example">
    <div class="k-content">
        <!-- Regardless of what other HTML you use with this custom control, "input" is the element the script works on to create the control. Styling is something you work on after the functionality works. The "value" below is input to the control from the workflow or from a durable instance if the page is returned to after picking a value. It is interpolated from the model value when the view is loaded. If no value is available, it displays default input text. -->
        <input id="myMonthpicker" value="{{vm.models.myDate}}" title="monthpicker" style="width: 100%" />
    </div>
</div>
<script>
    $(document).ready(function() {
        function onMyDateChange() {
            // Using this event handler makes it easier to manipulate the output of the control.
            // The value of the control is obtained with the value function on the control "this".
            var val = this.value();
            // You define the string format you want to present to the workflow with this format.
            var dtStr = kendo.toString(val, 'MMMM yyyy');
            // The model is accessed externally with "vmModelsRef" so we assign "vm.models.myDate" with this statement.
            // This will appear in the workflow as argument "myDate" defined as string.
            vmModelsRef.myDate = dtStr;
            // For FB 3.5 and above you can update Debug JSON displayed at the bottom of the page with the following method.
            // Debug JSON does not update automatically from outside the FB application.
            vmModelsRef.mergeVmModelsRef();
            // Otherwise you can see the new value in the F12 console window of the browser.
            console.log("My Date = " + dtStr);
        }

    // This is the definition of the kendo control using some of the properties and one event
        $("#myMonthpicker").kendoDatePicker({
            // When the value is changed in the control, this event is fired.
            change: onMyDateChange,
            start: "year",
            depth: "year",
            // This defines the format the control is expecting for input. Change this if a different format is used.
            format: "MMMM yyyy",
            dateInput: true
        });
    });
</script>
Set Default Values for Form Fields
You can use script in the HTML property of the HTML component to set default values for fields at the form level. The script references the argument specified in the Model property of the component whose default value is set. The script is case sensitive.
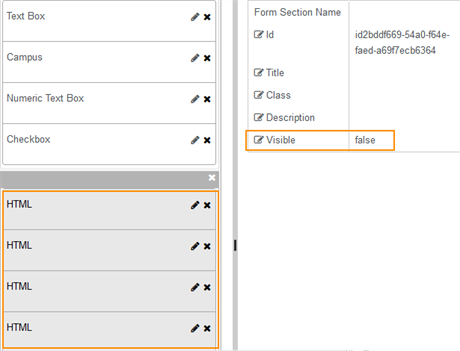
It is best practice to put all the HTML components used to set default values in a separate, invisible (Visible=false) form section so that they don’t take up extra white space.
Examples:
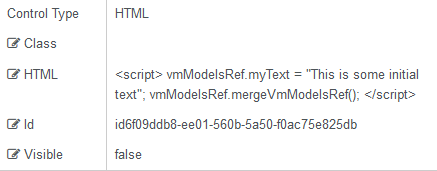
Text Box
For a Text Box with Model = vm.models.myText, a hidden HTML component with the following script will set the default value displayed on the rendered form to "This is some initial text".
<script>
   vmModelsRef.myText = "This is some initial text";
   vmModelsRef.mergeVmModelsRef();
</script>
Drop-down List
For a Drop-down List with Model = vm.models.studentEntity.CampusId, a hidden HTML component with the following script will set the default value to the name of the Campus with Id = 1.
<script>
   vmModelsRef.studentEntity.CampusId = 1;
   vmModelsRef.mergeVmModelsRef();
</script>
This example requires a CreateEntity or GetEntity activity for the studentEntity in the sequence workflow. If no entity object is created, the default value cannot be set.
Numeric Text Box
For a Numeric Text Box with Model = vm.models.myNum, a hidden HTML component with the following script will set the default value displayed on the form to 12.
<script>
   vmModelsRef.myNum = 12;
   vmModelsRef.mergeVmModelsRef();
</script>
Checkbox
For a Checkbox with Model = vm.models.myBool, a hidden HTML component with the following script will set the default value to true (selected).
<script>
   vmModelsRef.myBool = true;
   vmModelsRef.mergeVmModelsRef();
</script>
HTML components that set default values should be made invisible, either by setting Visible=false on the HTML components or by placing the HTML components in a form section where Visible=false.
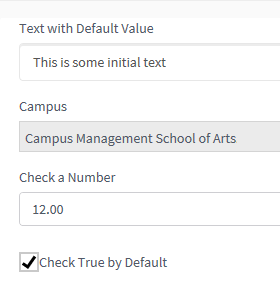
The Text Box, Drop-down List, Numeric Text Box and Checkbox examples with hidden HTML components setting default values will be rendered as shown below.
Bind HTML to an Argument
In Forms Builder 3.7 and later, you can populate content on a form by binding the HTML property to an argument and then use the argument in an Assign activity.
-
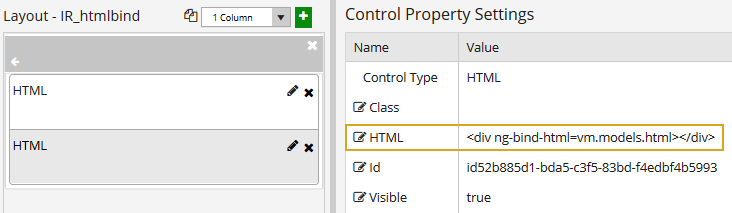
Specify the value of the HTML property in the HTML component as:
<div ng-bind-html=vm.models.html></div>
-
Drop an Assign activity into the workflow and specify the HTML content as a String value (i.e., enclosed in quotes).
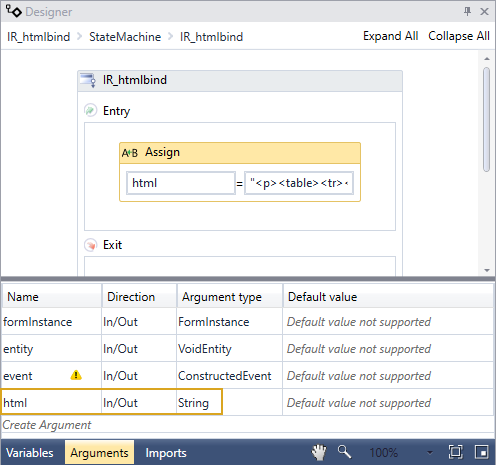
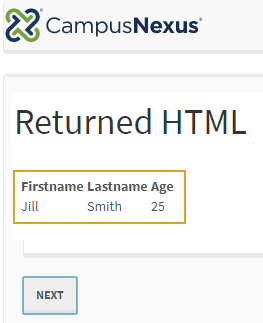
In our example, the html argument is assigned the following value:
"<p><table><tr><th>Firstname </th><th>Lastname </th><th>Age </th></tr><tr><td>Jill</td><td>Smith</td><td>25</td></tr></table></p>"
-
The rendered form displays the value of the argument.