The topic "Custom Skill" is not available in Version 1.1.0
The topic "Custom Skill" is not available in Version 1.0.0
Custom Skill
You can use the Bot Framework Composer to create custom skill bots that support dialogs about specific topics that are relevant for your institution. Each skill bot will represent an "activity" that can be integrated with Anthology Digital Assistant via the "activities" values in the manifest.json file.
The example described below can be downloaded from GitHub at https://github.com/anthology-inc/renee-integration-samples/tree/main/skillbot/src/botFrameworkComposer/1.simple%20flow
Prerequisites:
-
You must have an Azure subscription.
-
You must have installed Bot Framework Composer. See Install Bot Framework Composer.
Choose a Template
-
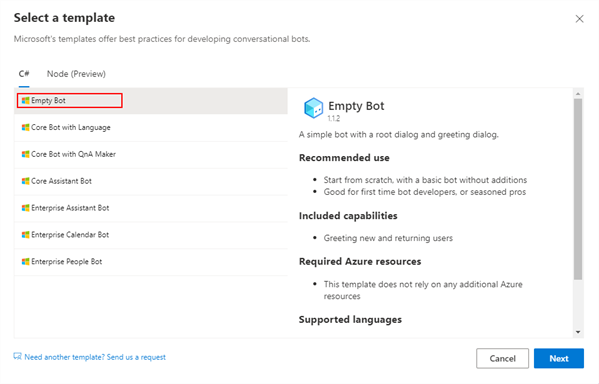
Open Bot Framework Composer and click Create new.
-
Select the Empty Bot template and click Next.

The template is the starting point for your bot dialog; once created, you can customize and extend the dialog as needed. For more information, see https://docs.microsoft.com/en-us/composer/concept-templates.
-
Assign a Name to the project.
Note: The project name is the label for the conversation flow and will be displayed as a, activity (clickable option) in Anthology Digital Assistant. Choose a name that is meaningful to a bot user.
Use Runtime type Azure Web App (default) and click Create.
It takes a few minutes for Composer to download the template, create the project, build the runtime, and merge packages.
-
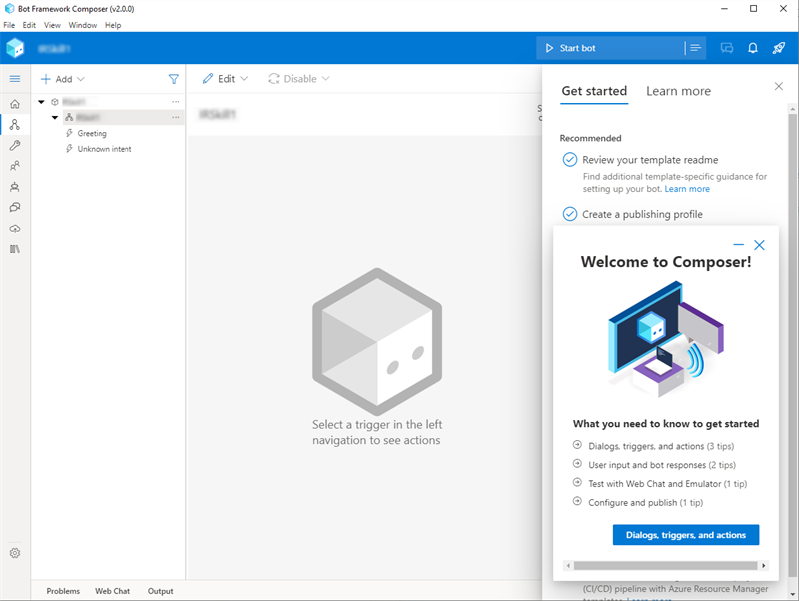
Once, the Welcome screen is displayed, you can start building your custom skill bot.
Create a Conversation Flow
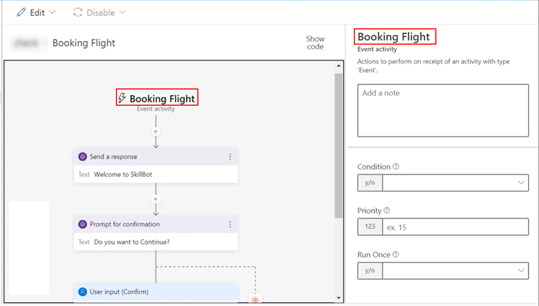
In the next steps, you will build the dialog flow for the custom skill bot. The dialog will be initiated by an Event received trigger.
-
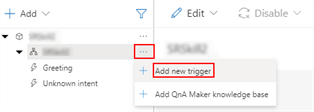
Click the ellipsis next to the project name and select Add new trigger.
-
In the "What is the type of this trigger?" field, select Activities.
-
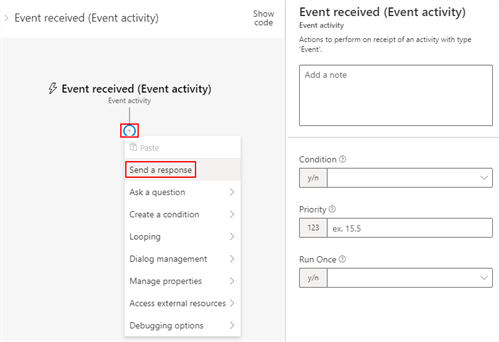
In the "Which activity type?" field, select Event received (Event activity) and click Submit. This trigger is added to handle and manage the activity that the skill bot is going to consume.
The "Create a trigger" modal is closed and the "Event received" activity is added to the project.
-
-
Click the + icon on the canvas to add an activity to the flow.
-
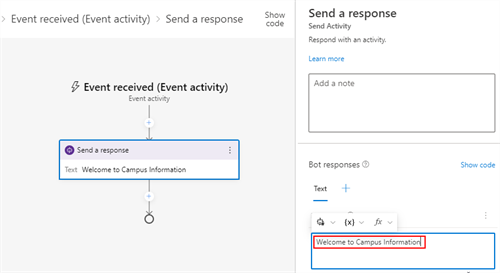
Select Send a response in the Add activity drop-down.
-
In the properties pane for the Send a response activity, specify the response Text that will be displayed when the custom skill selected in the Digital Assistant.
-
-
If your custom skill bot supports multiple activities, you need to route each activity to a separate dialog flow. You can do this using a branch component.
Note: The activities supported by the custom skill bot are defined in the manifest.
-
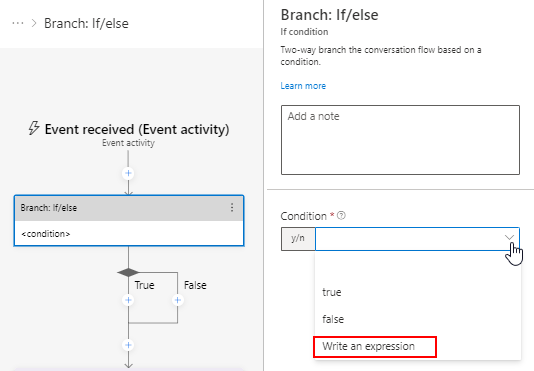
Click the + icon on the canvas, select Create a condition > Branch: If/Else.
-
In the Properties pane, click the drop-down in the Condition field and select Write an expression.
-
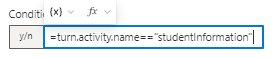
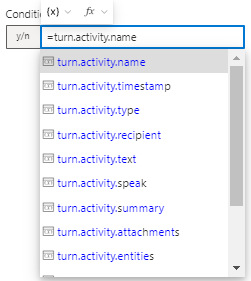
In the Condition field, specify or select the following expression: =turn.activity.name
-
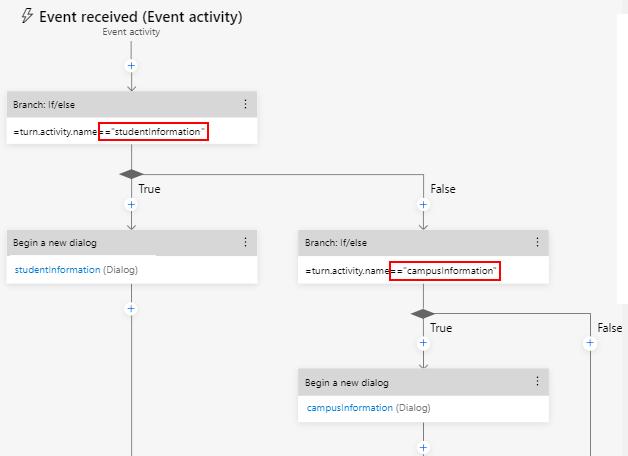
Append the name of the activity as defined in the manifest to the expression in the Condition field.
Example:
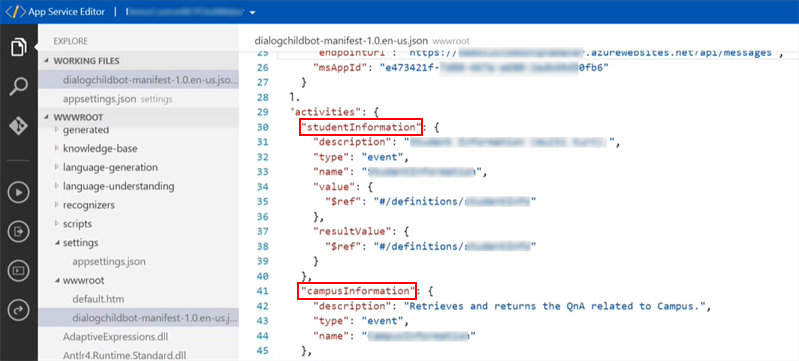
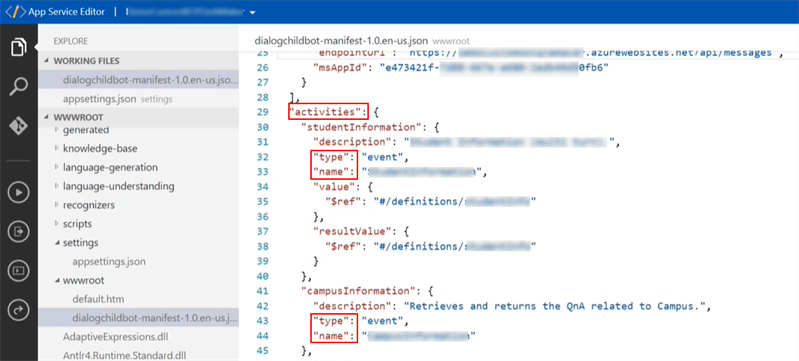
If your manifest includes an activity named "studentInformation", specify =="studentInformation" as the value for the turn.activity.name variable.
-
Click the + icon in the "true" branch, and select Dialog Management > Begin a new dialog, and assign a name to the dialog.
-
Click the + icon in the "false" branch, and insert a Branch: If/Else flow for another activity as described above.
In our example, the manifest includes a second activity named "campusInformation". So the value of the turn.activity.name variable is =="campusInformation". Another "Begin new dialog" section follows.
-
Continue building the new dialogs for each branch.
-
-
Go to respective dialog to create a conversation flow. Click on the + icon.
-
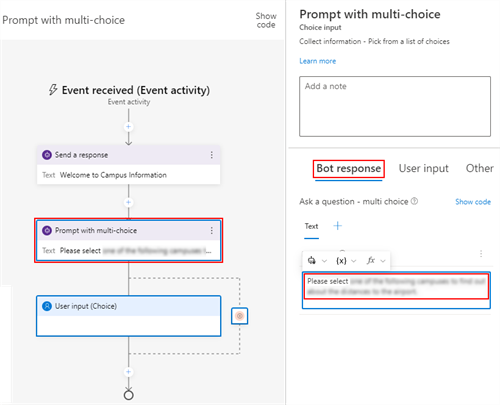
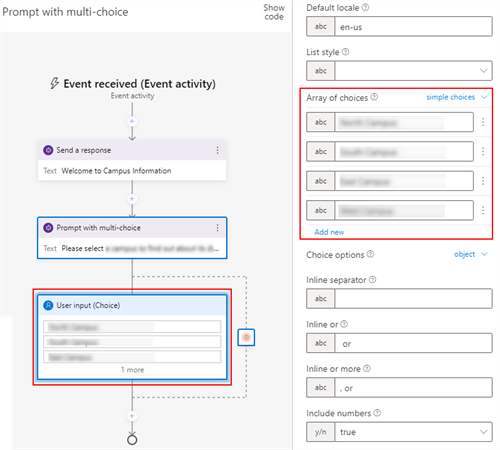
Select Ask a question > Multi-choice in the Add activity drop-down. Placeholders for the "Prompt with multi-choice" and "User input (Choice)" activities are added to the canvas.
-
Select Prompt with multi-choice in the canvas.
-
In the properties pane on the Bot response tab, specify the prompt Text, e.g., "Please select ...".
-
Select User input (Choice) in the canvas.
-
In the properties pane on the User input tab, scroll down to Array of choices.
-
Click Add new and specify the label for the first choice. Repeat this step for each choice. The bot will display the choices on clickable cards.
-
On the User input tab, scroll up to Property and specify user.<variable>. Name the variable as appropriate for your multi-choice option. The user’s choice will be stored in user state variable. The variable will be re-used during the conversation flow.
-
Scroll down to List style and select heroCard. This list style enables users to click on a card that displays a question from the knowledge base.
-
-
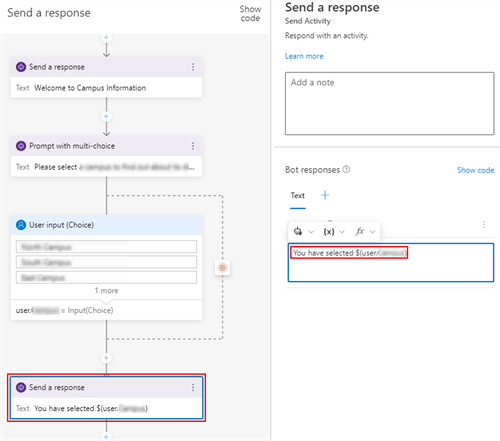
Click the + icon below the previous activity.
-
Select Send a response.
-
In the properties pane, specify some Text to echo the selected choice using the variable, e.g., You have selected $(user.<variable>).
-
-
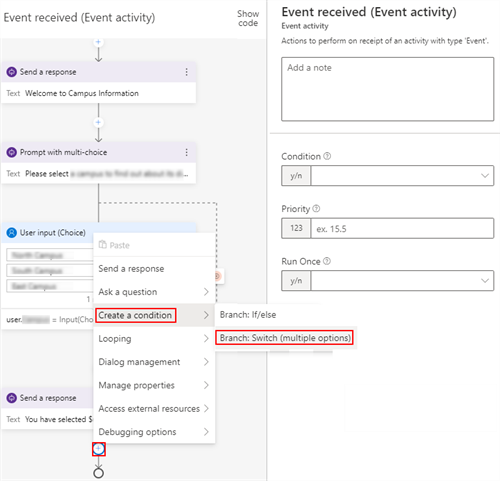
Click the + icon below the previous activity.
-
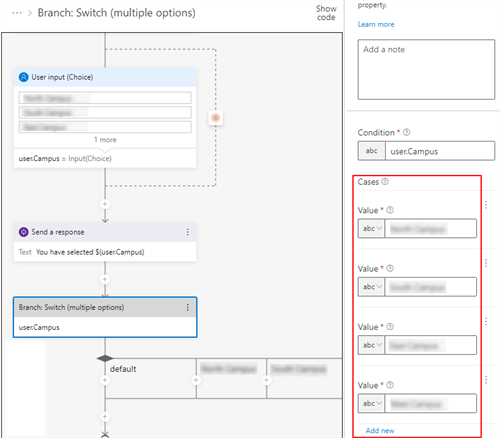
Select Create a condition > Branch: Switch (multiple options).
-
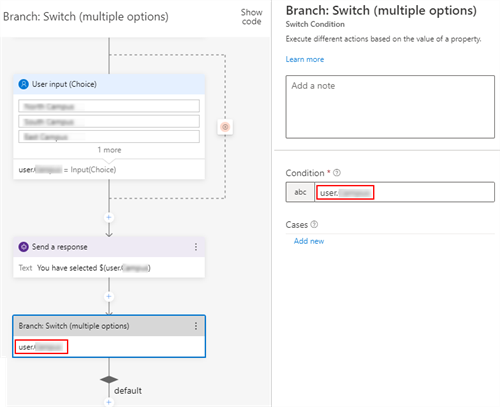
Select the Branch activity on the canvas.
-
In the properties pane in the Condition field, specify user.<variable>.
-
In the properties pane for the Branch activity, specify the values for the Cases.
-
-
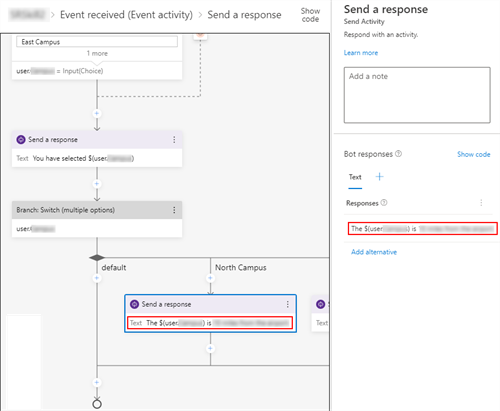
Click the + icon below the first case.
-
Select the Send a response activity.
-
Specify the response Text for the case, e.g., "The $(user.<variable>) is...."
Repeat this step for all cases.
-
-
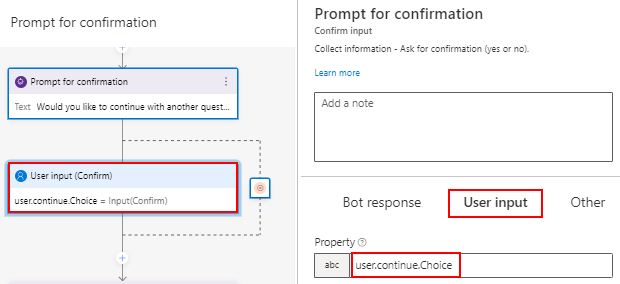
Insert a prompt asking the user if they would like to continue conversation.
-
Click the + icon and select Ask a question > Confirmation.
-
In the properties pane, on the Bot response tab, specify a question, for example, "Would you like to continue with another question?"
-
On the User input tab, in the Property field, specify the variable user.continue.Choice.
-
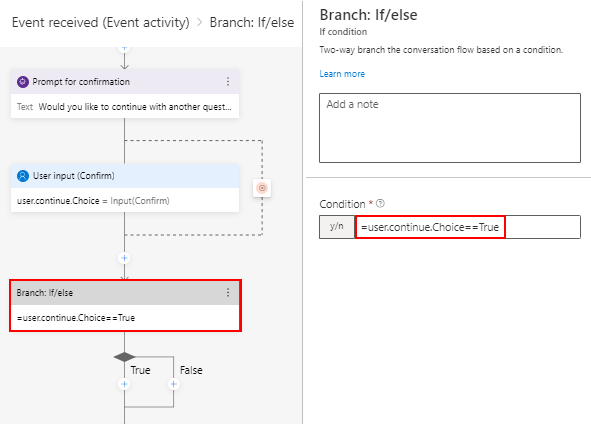
Click the + icon on the canvas, select Create a condition > Branch: If/Else.
-
In the Properties pane, click the drop-down in the Condition field and select Write an expression.
-
In the Condition field, specify the following expression: =user.continue.Choice==True
-
-
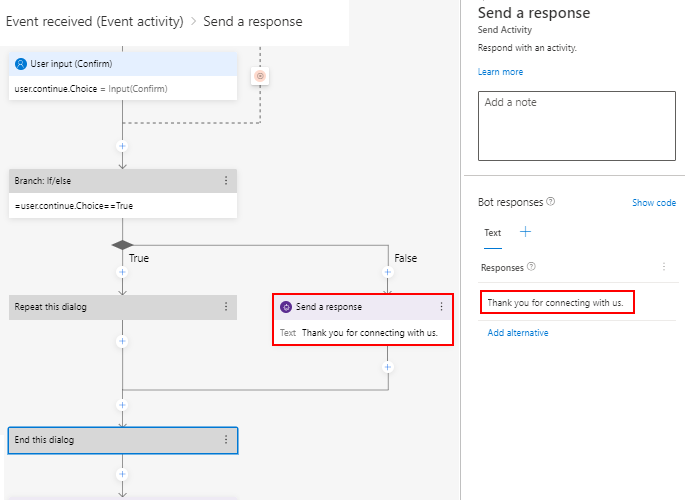
Create the flow that handles the user's choices of either repeating or ending the dialog.
-
In the True branch, click the + icon and select Dialog Management > Repeat this dialog.
-
In the False branch, click the + icon, and select Send a response.
-
In the Properties pane, specify the response Text, for example, "Thank you for connecting with us."
-
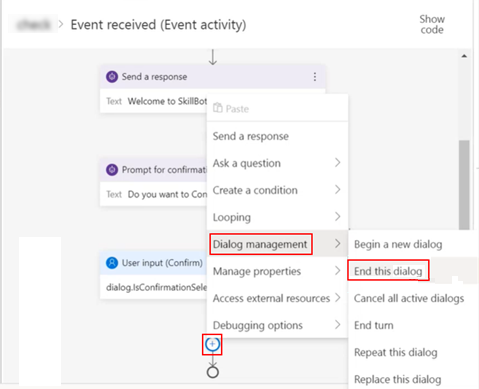
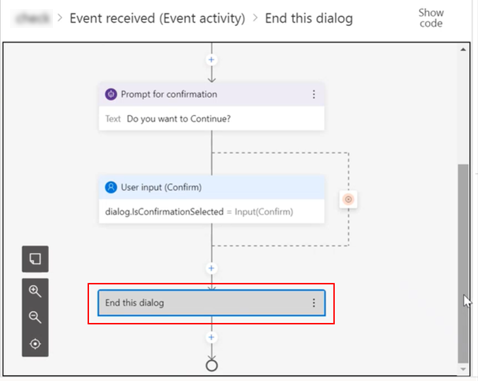
Click the + icon below the branch and select Dialog Management > End this dialog.
-


Build the event flow for your custom skill bot as needed based on your business rules.
|
Important: Integration with the Digital Assistant requires that an event flow created in Bot Framework Composer includes:
|
Localize a Skill Bot
Bot Framework Composer supports the localization of custom skill bots that are integrated with the Digital Assistant.
-
Open Composer, select Configure in the menu at the left, and click the Localization tab.
-
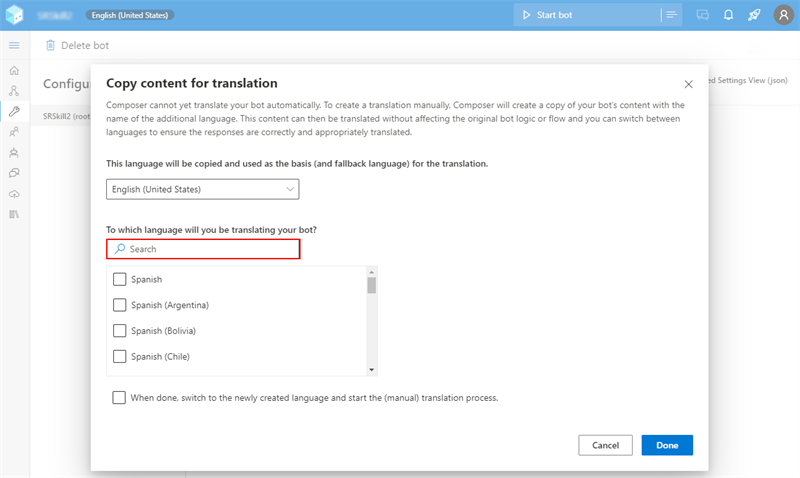
Click the Manage bot languages link, select the language(s), and click Done. Currently, the Digital Assistant supports English, French, and Spanish.
Composer will create a copy of your bot’s content with the name of the additional language. This content can then be translated without affecting the original bot logic or flow and you can switch between languages to ensure the responses are translated correctly .
-
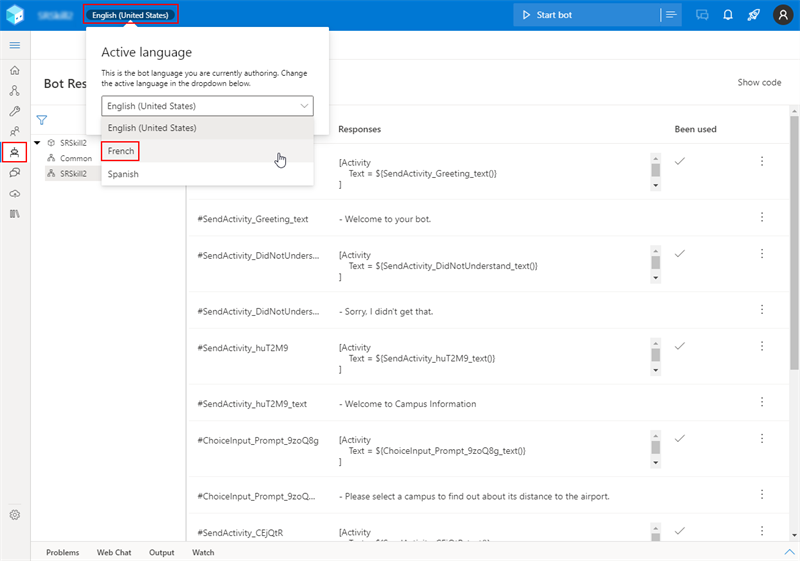
Select Bot responses in the menu at the left, click the language field in the top menu bar, and select the language you want to translate into.
-
The Bot Responses page displays all responses in two columns for the selected language and English. Initially, the text responses in the selected language column are in English. You need to go through the page and replace the English text with appropriate translations.


Once you have completed the response text translations, you can publish the skill bot.
Publish a Skill Bot
When you have completed building the skill bot dialog, publish it to your Azure subscription.
-
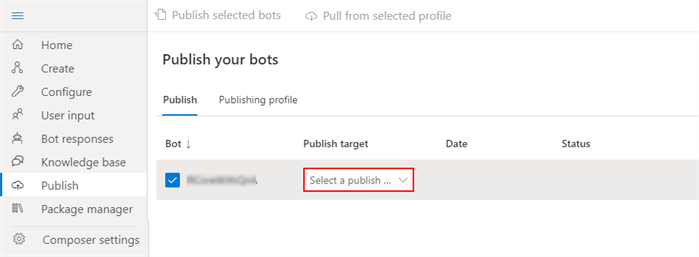
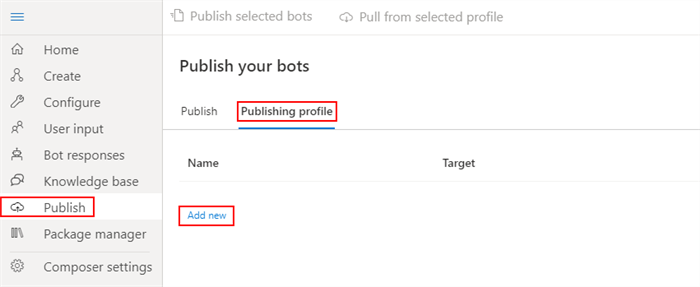
In the left menu of Bot Framework Composer, select Publish.
-
If you have previously created a publishing profile and want to republish your project after some edits, select your project on the Publish tab and select your Publish target.
If you are publishing the first time, select the Publishing profile tab and click the Add new link. Continue with the steps below.
-
Specify a Name for your profile. In the Publishing target field, select Publish bot to Azure, and click Next.
-
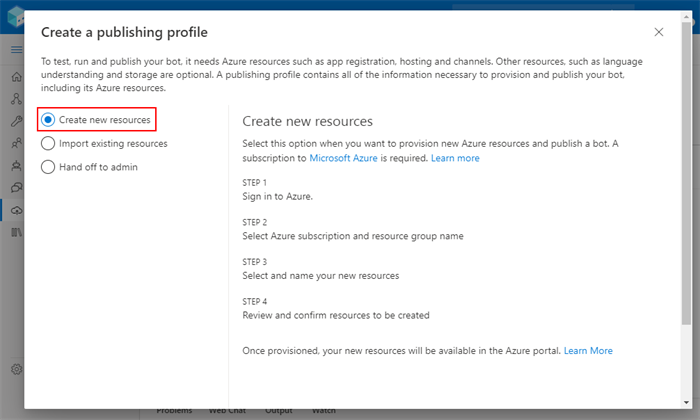
Select Create new resources and click Next.
-
You will be prompted to sign into your Azure account.
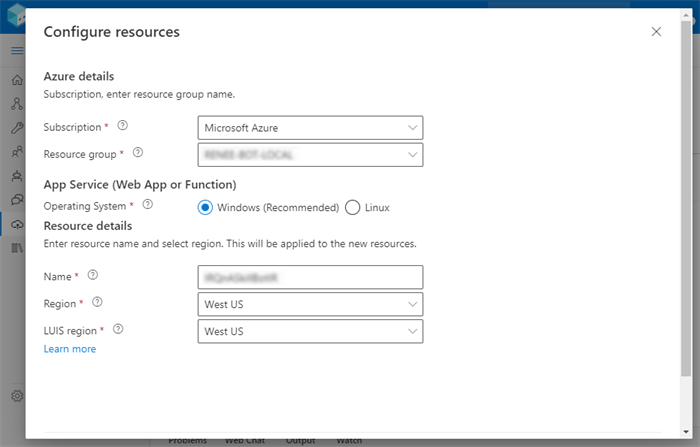
On the Configure resources modal, specify your subscription, resource group, operating system, and resource details. Click Next to continue.

-
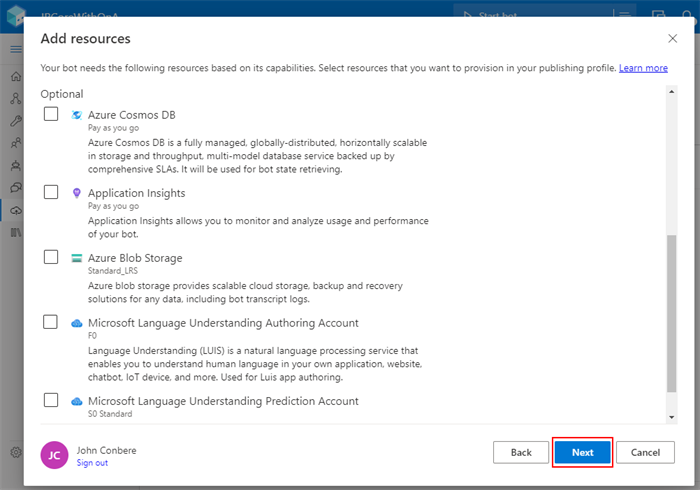
On the Add resources modal, the Required resources are automatically selected.
-
Select from the optional resources as applicable.
-
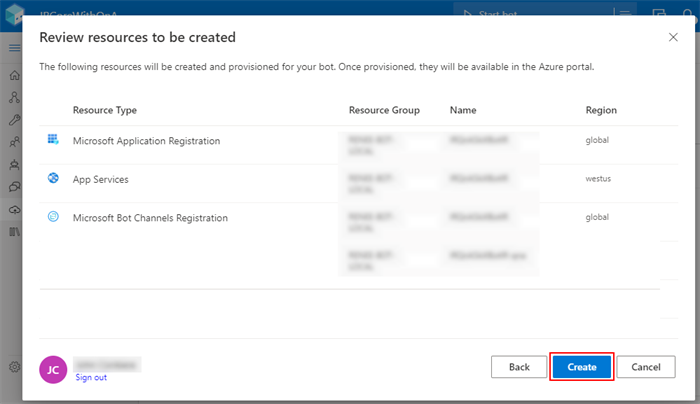
Select Next and review the list of resources to be created. To proceed, click Create. The resources will be provisioned and deployed in Azure. This may take a few minutes.
-
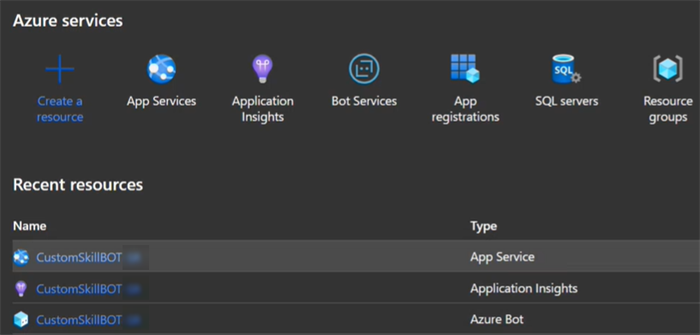
For a custom skill bot (without QnA Maker), three services are created:
- App Service
- Application Insights
- Azure Bot
The AppServiceRegistration is created implicitly.
-
You need to get the MicrosoftAppIds/Keys for the resources you intend to use.
-
Copy and save the MicrosoftAppId and/or Key so that you have it available later to paste it into the AppSettings.json file.
The MicrosoftAppId also needs to be specified in the Customer Administration Portal > Skills > Custom Skills
Add a Manifest.json
After you have published the custom skill bot (with or without knowledge base), you need to create a manifest.json file and upload it to wwwroot under the AppService for the skill bot.
-
Log in to your Azure subscription, select the App Service that was created for the skill bot, and open the App Service Editor under Development Tools.
-
Create a new manifest file in the wwwroot folder of your subscription. Refer to the instructions provided at https://docs.microsoft.com/en-us/azure/bot-service/skills-write-manifest?view=azure-bot-service-4.0&tabs=v2-2.
— OR —
Retrieve a manifest.json sample file from https://github.com/anthology-inc/renee-integration-samples/tree/main/skillbot/src/botFrameworkSdkV4_C%23/wwwroot/manifest, copy it to wwwroot in your subscription, and modify its content.
Note: If you have localized your custom skill bot, you need to add manifest.json files for each language.
For ease of reference, use a naming convention that indicates the language and locale, e.g.,
- dialogchildbot-manifest-1.0.en-us.json
- dialogchildbot-manifest-1.0.en-gb.json
- dialogchildbot-manifest-1.0.es-es.json
- dialogchildbot-manifest-1.0.fr-fr.json
Make sure the json syntax is valid in your customized manifest.json.
-
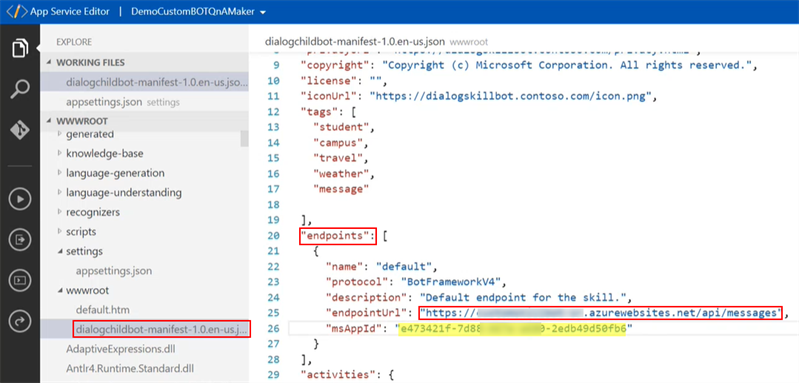
In your manifest.json file, locate the endpoints section and provide the msAppId and endpointUrl values.
-
Populate the msAppId field with the Microsoft AppId of your custom skill bot. At least one endpoint must be defined. Each endpoint must be unique.
-
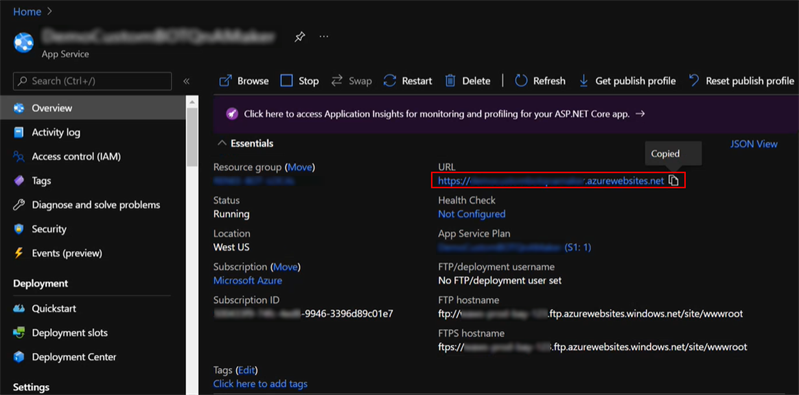
Populate the endpointUrl field with the URL of your skill bot followed by /api/messages. Anthology Digital Assistant uses the endpoint Url to communicate with the skill bot.
To get the endpoint Url, go to the App Service details page of your custom skill bot in Azure and copy the URL value.
Provide the endpoint URL value to Anthology. Anthology staff will configure the URL in the Customer App Portal (see Custom Skill
-
-
In the activities section of the manifest, specify appropriate name and type values for the activities in your custom skill bot. All other properties are optional and depend on the purpose of the activity.
-
Save your manifest.json file(s).
Edit the AppSettings.json
The appsettings.json file supports the overall configuration for the skill bot. For example, it can be used to configure logging, any external connection details the skill bot requires, etc.
A sample appsettings.json file is available at https://github.com/anthology-inc/renee-integration-samples/blob/main/skillbot/src/botFrameworkSdkV4_C%23/appsettings.json.
-
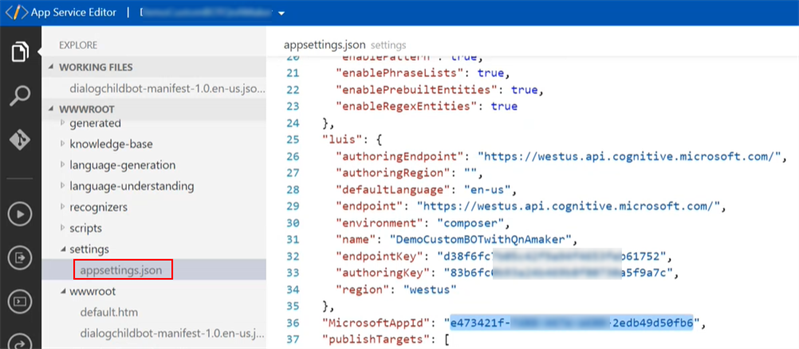
In your Azure subscription, navigate to the appsettings.json file in the wwwroot folder and edit it using the App Service Editor.
-
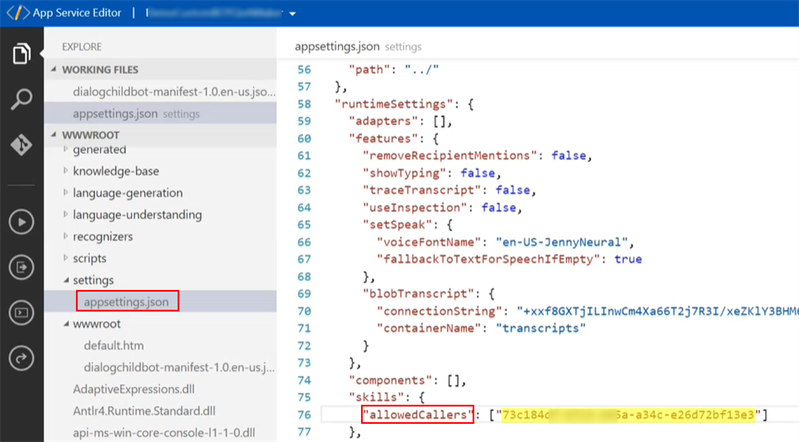
In the allowedCallers field, specify the MicrosoftAppId of Anthology Digital Assistant. This is required to ensure that only the Digital Assistant (and no other bot) can invoke your custom skill bot. The MicrosoftAppId of Anthology Digital Assistant is displayed in the About window of the Customer Admin Portal.
-
The appsettings.json is automatically populated with the MicrosoftAppId for the custom skill bot. Copy and paste this key into the manifest.json.
Configure Skills in the Customer Administration Portal
-
Log in to the Customer Administration Portal and select the Skills tile (see Configure Skills).
-
In the Settings pane, select Custom Skills and click the Add Skill button.
-
In the Add Skill dialog, specify the following values:
-
Skill Name
-
Microsoft AppId
-
Manifest Url
If your custom skill is available in multiple languages, click the Add Locale button, select the Locale value and specify the Locale Name.
-
-
Click the Save button.
Test
-
Go to your Azure portal.
-
Test the published bot by selecting Test in Web Chat.
You can use the Bot Framework Composer to create custom skill bots that support dialogs about specific topics that are relevant for your institution. Each skill bot will represent an "activity" that can be integrated with Anthology Digital Assistant via the "activities" values in the manifest.json file.
The example described below can be downloaded from GitHub at https://github.com/anthology-inc/renee-integration-samples/tree/main/skillbot/src/botFrameworkComposer/1.simple%20flow
Prerequisites:
-
You must have an Azure subscription.
-
You must have installed Bot Framework Composer. See Install Bot Framework Composer.
Choose a Template
-
Open Bot Framework Composer and click Create new.
-
Select the Empty Bot template and click Next.
The template is the starting point for your bot dialog; once created, you can customize and extend the dialog as needed. For more information, see https://docs.microsoft.com/en-us/composer/concept-templates.
-
Assign a Name to the project.
Note: The project name is the label for the conversation flow and will be displayed as a, activity (clickable option) in Anthology Digital Assistant. Choose a name that is meaningful to a bot user.
Use Runtime type Azure Web App (default) and click Create.
It takes a few minutes for Composer to download the template, create the project, build the runtime, and merge packages.
-
Once, the Welcome screen is displayed, you can start building your custom skill bot.
Create a Conversation Flow
In the next steps, you will build the dialog flow for the custom skill bot. The dialog will be initiated by an Event received trigger.
-
Click the ellipsis next to the project name and select Add new trigger.
-
In the "What is the type of this trigger?" field, select Activities.
-
In the "Which activity type?" field, select Event received (Event activity) and click Submit. This trigger is added to handle and manage the activity that the skill bot is going to consume.
The "Create a trigger" modal is closed and the "Event received" activity is added to the project.
-
-
Click the + icon on the canvas to add an activity to the flow.
-
Select Send a response in the Add activity drop-down.
-
In the properties pane for the Send a response activity, specify the response Text that will be displayed when the custom skill selected in the Digital Assistant.
-
-
Go to respective dialog to create a conversation flow. Click on the + icon.
-
Select Ask a question > Multi-choice in the Add activity drop-down. Placeholders for the "Prompt with multi-choice" and "User input (Choice)" activities are added to the canvas.
-
Select Prompt with multi-choice in the canvas.
-
In the properties pane on the Bot response tab, specify the prompt Text, e.g., "Please select ...".
-
Select User input (Choice) in the canvas.
-
In the properties pane on the User input tab, scroll down to Array of choices.
-
Click Add new and specify the label for the first choice. Repeat this step for each choice. The bot will display the choices on clickable cards.
-
On the User input tab, scroll up to Property and specify user.<variable>. Name the variable as appropriate for your multi-choice option. The user’s choice will be stored in user state variable. The variable will be re-used during the conversation flow.
-
Scroll down to List style and select heroCard. This list style enables users to click on a card that displays a question from the knowledge base.
-
-
Click the + icon below the previous activity.
-
Select Send a response.
-
In the properties pane, specify some Text to echo the selected choice using the variable, e.g., You have selected $(user.<variable>).
-
-
Click the + icon below the previous activity.
-
Select Create a condition > Branch: Switch (multiple options).
-
Select the Branch activity on the canvas.
-
In the properties pane in the Condition field, specify user.<variable>.
-
In the properties pane for the Branch activity, specify the values for the Cases.
-
-
Click the + icon below the first case.
-
Select the Send a response activity.
-
Specify the response Text for the case, e.g., "The $(user.<variable>) is...."
Repeat this step for all cases.
-
-
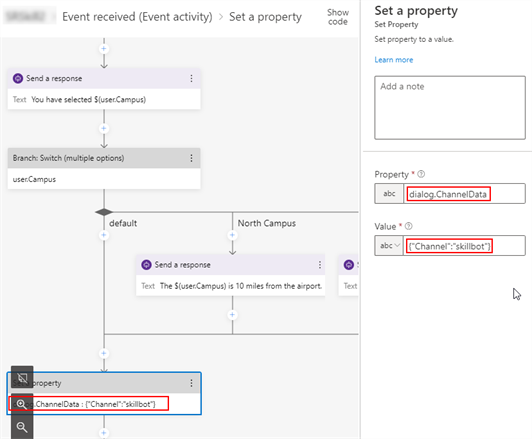
Click the + icon below the Branch activity and select Manage Properties > Set a property.
In the Property field, specify dialog.ChannelData. In the Value field, specify {"Channel":"skillbot"}. This activity passes the conversation flow to the skill bot channel. The skill bot channel will be linked to the Digital Assistant.
-
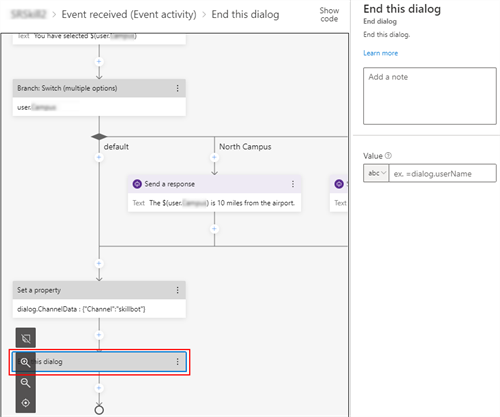
As the last step, click the + icon below the previous activity and select Dialog management > End this dialog.
Build the event flow for your custom skill bot as needed based on your business rules.
|
Important: Integration with the Digital Assistant requires that an event flow created in Bot Framework Composer includes:
|
Localize a Skill Bot
Bot Framework Composer supports the localization of custom skill bots that are integrated with the Digital Assistant.
-
Open Composer, select Configure in the menu at the left, and click the Localization tab.
-
Click the Manage bot languages link, select the language(s), and click Done. Currently, the Digital Assistant supports English, French, and Spanish.
Composer will create a copy of your bot’s content with the name of the additional language. This content can then be translated without affecting the original bot logic or flow and you can switch between languages to ensure the responses are translated correctly .
-
Select Bot responses in the menu at the left, click the language field in the top menu bar, and select the language you want to translate into.
-
The Bot Responses page displays all responses in two columns for the selected language and English. Initially, the text responses in the selected language column are in English. You need to go through the page and replace the English text with appropriate translations.
Once you have completed the response text translations, you can publish the skill bot.
Publish a Skill Bot
When you have completed building the skill bot dialog, publish it to your Azure subscription.
-
In the left menu of Bot Framework Composer, select Publish.
-
If you have previously created a publishing profile and want to republish your project after some edits, select your project on the Publish tab and select your Publish target.
If you are publishing the first time, select the Publishing profile tab and click the Add new link. Continue with the steps below.
-
Specify a Name for your profile. In the Publishing target field, select Publish bot to Azure, and click Next.
-
Select Create new resources and click Next.
-
You will be prompted to sign into your Azure account.
On the Configure resources modal, specify your subscription, resource group, operating system, and resource details. Click Next to continue.
-
On the Add resources modal, the Required resources are automatically selected.
-
Select from the optional resources as applicable.
-
Select Next and review the list of resources to be created. To proceed, click Create. The resources will be provisioned and deployed in Azure. This may take a few minutes.
-
For a custom skill bot (without QnA Maker), three services are created:
- App Service
- Application Insights
- Azure Bot
The AppServiceRegistration is created implicitly.
-
You need to get the MicrosoftAppIds/Keys for the resources you intend to use.
-
Copy and save the MicrosoftAppId and/or Key so that you have it available later to paste it into the AppSettings.json file.
The MicrosoftAppId also needs to be specified in the Customer Administration Portal > Skills > Custom Skills
Add a Manifest.json
After you have published the custom skill bot (with or without knowledge base), you need to create a manifest.json file and upload it to wwwroot under the AppService for the skill bot.
-
Log in to your Azure subscription, select the App Service that was created for the skill bot, and open the App Service Editor under Development Tools.
-
Create a new manifest file in the wwwroot folder of your subscription. Refer to the instructions provided at https://docs.microsoft.com/en-us/azure/bot-service/skills-write-manifest?view=azure-bot-service-4.0&tabs=v2-2.
— OR —
Retrieve a manifest.json sample file from https://github.com/anthology-inc/renee-integration-samples/tree/main/skillbot/src/botFrameworkSdkV4_C%23/wwwroot/manifest, copy it to wwwroot in your subscription, and modify its content.
Note: If you have localized your custom skill bot, you need to add manifest.json files for each language.
For ease of reference, use a naming convention that indicates the language and locale, e.g.,
- dialogchildbot-manifest-1.0.en-us.json
- dialogchildbot-manifest-1.0.en-gb.json
- dialogchildbot-manifest-1.0.es-es.json
- dialogchildbot-manifest-1.0.fr-fr.json
Make sure the json syntax is valid in your customized manifest.json.
-
In your manifest.json file, locate the endpoints section and provide the msAppId and endpointUrl values.
-
Populate the msAppId field with the Microsoft AppId of your custom skill bot. At least one endpoint must be defined. Each endpoint must be unique.
-
Populate the endpointUrl field with the URL of your skill bot followed by /api/messages. Anthology Digital Assistant uses the endpoint Url to communicate with the skill bot.
To get the endpoint Url, go to the App Service details page of your custom skill bot in Azure and copy the URL value.
Provide the endpoint URL value to Anthology. Anthology staff will configure the URL in the Customer App Portal (see Custom Skill
-
-
In the activities section of the manifest, specify appropriate name and type values for the activities in your custom skill bot. All other properties are optional and depend on the purpose of the activity.
-
Save your manifest.json file(s).
Edit the AppSettings.json
The appsettings.json file supports the overall configuration for the skill bot. For example, it can be used to configure logging, any external connection details the skill bot requires, etc.
A sample appsettings.json file is available at https://github.com/anthology-inc/renee-integration-samples/blob/main/skillbot/src/botFrameworkSdkV4_C%23/appsettings.json.
-
In your Azure subscription, navigate to the appsettings.json file in the wwwroot folder and edit it using the App Service Editor.
-
In the allowedCallers field, specify the MicrosoftAppId of Anthology Digital Assistant. This is required to ensure that only the Digital Assistant (and no other bot) can invoke your custom skill bot. The MicrosoftAppId of Anthology Digital Assistant is displayed in the About window of the Customer Admin Portal.
-
The appsettings.json is automatically populated with the MicrosoftAppId for the custom skill bot. Copy and paste this key into the manifest.json.
Configure Skills in the Customer Administration Portal
-
Log in to the Customer Administration Portal and select the Skills tile (see Configure Skills).
-
In the Settings pane, select Custom Skills and click the Add Skill button.
-
In the Add Skill dialog, specify the following values:
-
Skill Name
-
Microsoft AppId
-
Manifest Url
If your custom skill is available in multiple languages, click the Add Locale button, select the Locale value and specify the Locale Name.
-
-
Click the Save button.
Test
-
Go to your Azure portal.
-
Test the published bot by selecting Test in Web Chat.