Step 2 - View Courses
Step 2 of the Registration process allows you to view your selected courses in a calendar view showing the times and statuses for each class. This step also provides an opportunity to verify the information about the classes you selected (day, time, location, instructor, etc.).
Notes:
-
If you have been viewing the calendar for several minutes, or if you were interrupted and returned, select Refresh Page to ensure that the data being displayed is the most current. This is important, particularly if you have a class reserved or waitlisted and other students are registering or dropping that same class.
-
Select Close Window to exit the registration process without registering. When you close the window, your course selections are saved but you are not registered for any new courses.
Page Sections Overview
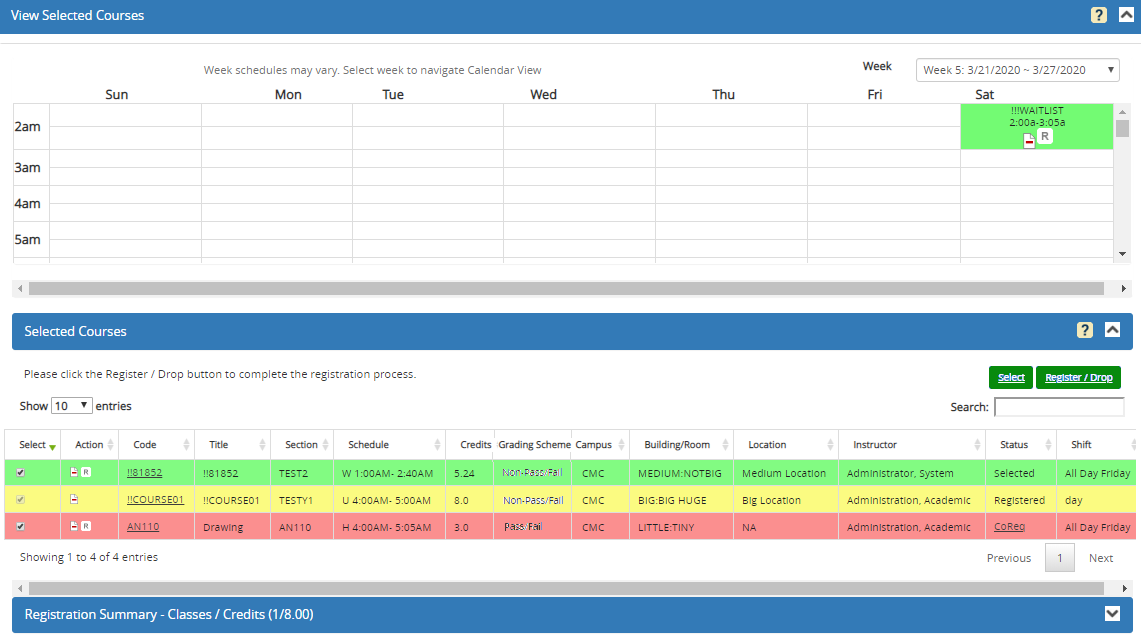
Step 2 of the Registration process displays the Calendar and the Selected Courses section.
To View Schedules and Courses
-
View each week of the proposed schedule. Choose the Week from the drop-down on the top right of the page.

The icons that appear in the calendar are the same ones used in the Selected Courses grid. Select
 in the header to review the legend for the icons
 -
Select
to expand the Selected Courses section. Selected Courses Grid Columns Column Description Select Select the check box to keep the course in your selection and on the calendar. Clear the check box, if you do not want this course to be carried forward to Step 3 of the registration process.
Action Click the icons to place a course on a wait list, reserve a course, drop a course, or remove it from the Selected Courses grid. During the term pre-registration window, the wait list, reserve, and audit options are not available.
Code The course code used to identify a class. Select the Code link to view the class start and end dates, delivery method, location, comments, and schedule for the class.
The Location field displays the building code / room code, N/A if no building and room are assigned, or *Multiple* if multiple rooms/building are assigned.
You can also hover over a class in the calendar view to see the class time, building, room, and instructor.
Title Course title Section Section identifier for the course Schedule Days and times the class section meets. For online classes and classes with variable schedules, the field displays "No scheduled meetings".
When a class section is configured with multiple meeting periods, the Schedule column in the Courses grids in Student Portal > Registration > Steps 1, 2, and 3 displays the class scheduling days/times as semicolon separated string. If the complete scheduling days/times cannot be displayed within the Schedule column, a tooltip shows the details on hover. On mobile devices, users can click to view the schedule details. The weekdays can be configured with 1-letter or 2-letter notation.
Examples:
For multiple periods on different days:
MT 8.00 am to 9.00 am ; WF 11.00 am to 11.30 am
— OR —
MoTh 8.00 am to 9.00 am ; WeFr 11.00 am to 11.30 am
For multiple periods on the same day with different times:
MT 8.00 am to 9.00 am, 11.00 am to 11.30 am ; W 9.00 am to 10.00 am
— OR —
MoTh 8.00 am to 9.00 am, 11.00 am to 11.30 am ; We 9.00 am to 10.00 am
Credits Number of credits the section offers If the section is configured to allow the student to select a variable number of credits, the value is displayed in a drop-down list from which the desired credit value may be selected. The initial value is the "normal" credit value for the section.
Grading Scheme If a course is configured to allow students to select a Grading Scheme, select from the available options: Pass/Fail or Non-Pass/Fail. The default selection indicates the default Pass/Fail setting associated with the course. Campus Name of the campus Building/Room Building or room where the class section meets. If a class section is held in multiple buildings or rooms, the field displays *various*. Location Location where the class section meets. If a class section is held in multiple locations, the field displays *various*. Instructor Name of the instructor teaching the section Status The status will be one of the following: Selected - The course has been selected for registration.
Registered - The class is already part of your enrollment
Waitlist - The class is full or not offered at a convenient time for your schedule, so you have elected to be placed on a wait list for that class to see if a spot opens up or a scheduling change is made.
Conflicts - The class has scheduling conflicts with other classes. You can click the Conflict link to view details about the conflicting courses.
Reserved - This class is not part of your enrollment, but you have a reserved seat in case you want to add it. A clock icon appears to indicate when your reservation will expire.
Pending Drop - The class will be dropped when you finish the registration process.
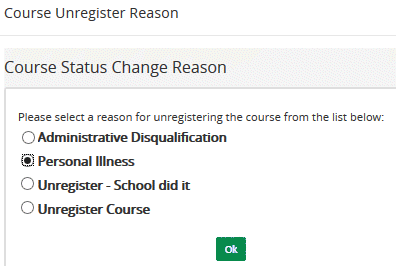
Shift Shift when the class section meets. If a class section meets in multiple shifts, the field displays *various*. Reason The reason for unregistering a course or withdrawing from a course. Note: If the Reason column is already populated with a value, click the link within the column. A new pop-up window will appear allowing you to change the value.
-
By default, the Calendar View shows all courses you selected. If you want to focus on just a few classes, clear the Select check boxes in the Selected Courses panel for the courses you do not want to see in the Calendar.
The course information appears in columns and courses with different statuses appear in different colors.
Color Codes for Registration Statuses Color Registration Status Yellow The course is registered or pending to be registered. Green The course is selected for registration. The chosen course is not waitlisted nor reserved and does not conflict with any other courses in your program. Red The course has a scheduling conflict (classes overlap). Pending classes do not conflict with pending drop classes. Orange The course was on a wait list that has been resolved. The course in now reserved for registration. -
To drop a course, select the Remove
 icon.
icon.Depending on the Portal configuration, you may be prompted to select a reason.
-
To reserve a course, select the Reserve
 icon.
icon. -
Once you have completed your selection review, select Register/Drop to proceed to Step 3 - Register.
Preregistration
During the term pre-registration window, the Register/Drop button label changes to "Save Courses" and "Step 3 - Register" is disabled. Select Save Courses to save your course selection for the actual term registration period. Select OK to confirm.
To return to Step 1 - Select Courses, click the Select button.