The Database Administrator component is a snap-in for the Microsoft Management Console (MMC) and can be used to manage the functioning of CampusNexus CRM databases. The Database Administrator component controls all the administrative tasks performed on CampusNexus CRM databases, Campaign Dispatchers, and Services.
Prerequisite
Identify and install the prerequisite software. See Software Requirements by Component — Database Administrator.
Set Up the Database Administrator
-
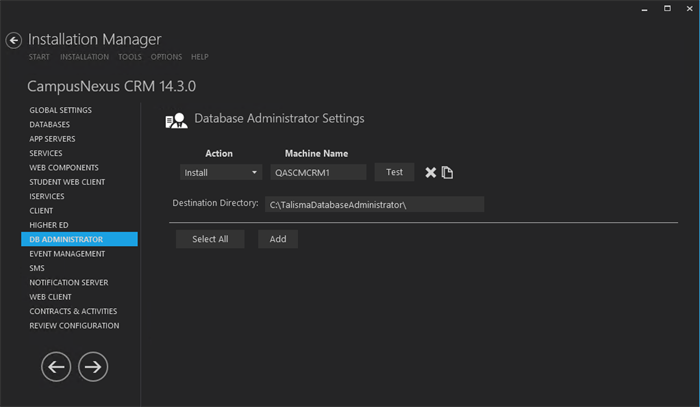
In the Installation menu, click DB Administrator. The Database Administrator Settings screen is displayed.

This screen contains essential information associated with installing the Database Administrator Module.
Note: Ensure that the Database settings are appropriate. Installation Manager allows multiple machine names listed in the Machine Name column.
-
Click Add to add a line to the Settings screen.
-
Select an appropriate Action. The following Action values are available:
-
None – Performs no action.
-
Install – Performs a fresh installation or upgrade of a component. You can install or upgrade multiple components at the same time.
-
Uninstall – Removes all subcomponents on that machine and uninstalls the component from Programs and Features.
-
Reinstall – Retries to install a subcomponent.
Optional: Click Select All to set the Action field to Install for all components listed on this screen. Click Unselect All to set the Action field to None.
-
-
Enter the Machine Name for the component to be installed.
-
Click
 to copy a line. Edit the copied line as needed.
 -
Accept the default Destination Directory or select a directory where the information for this component is stored. Changing this directory will apply across all machines in the Machine Name column.
-
Click
 to delete a selected line.
 -
Click Test to ensure the setup for the corresponding line is correct. If a test on a particular line fails, check all associated fields and click Test again.
-
If all tests pass, click
 .
.
Postinstallation Tasks
Before using Database Administrator, you must perform the following configurations:
-
On the computer where the Main database is installed perform the following steps:
-
On the computer where Database Administrator is installed, download the PsExec.exe and save it in the <Drive name:\Program Files\Common Files\Talisma Shared folder.
-
Double-click PsExec.exe using the Run as administrator option.
-
-
As the Database computer establishes a remote connection with the Services computer, ensure that File and Printer Sharing for Microsoft Networks component is turned on for remote-management functions to work.
