Request for Information Form
In this section, we will build a Request for Information (RFI) form and a workflow that will create a student record in Anthology Student, create the student’s Portal account, and notify the student.
|
|
The screen captures in this topic show an earlier Forms Builder version. While the UI has been updated, the basic functionality is unchanged. |
Build the Form
-
Open your browser and point to the Forms Builder URL.
-
Sign in using your user name and password.
-
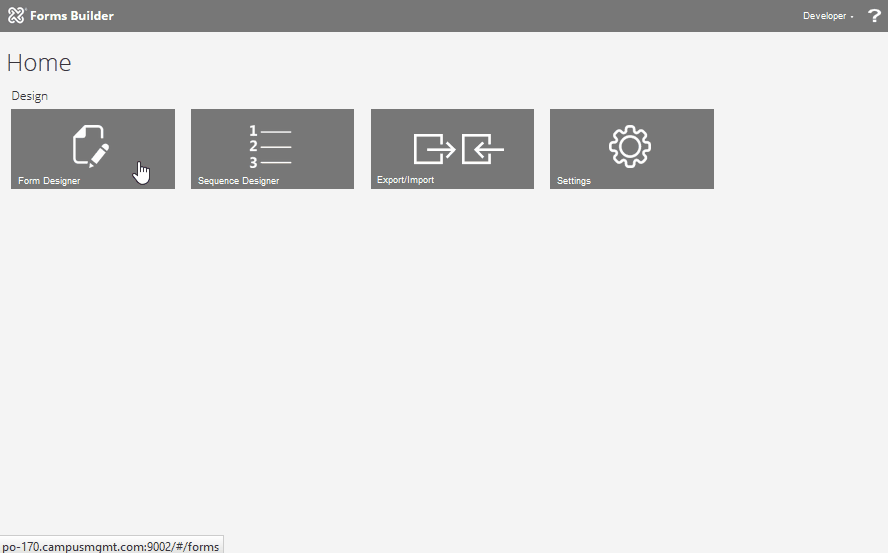
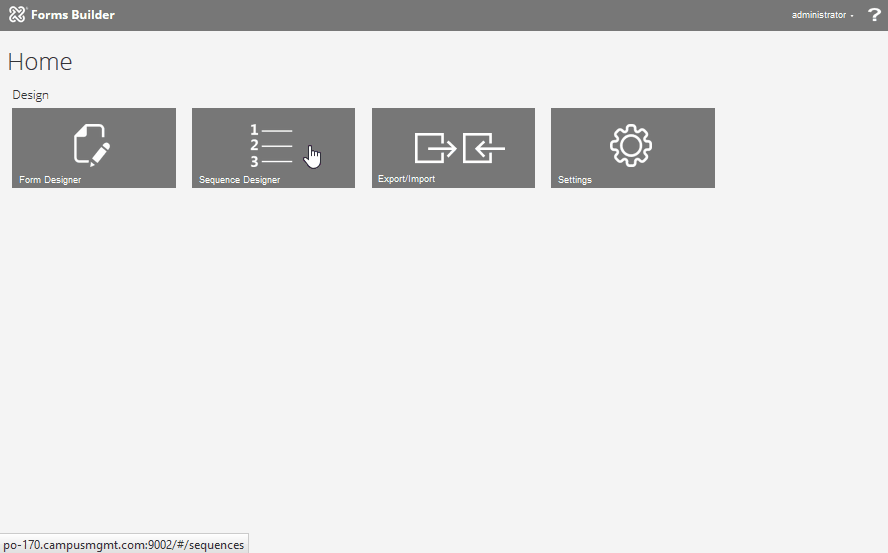
On the Forms Builder home page, click the Form Designer tile. Products (if applicable), Entities and Forms are loaded into Forms Builder.
-
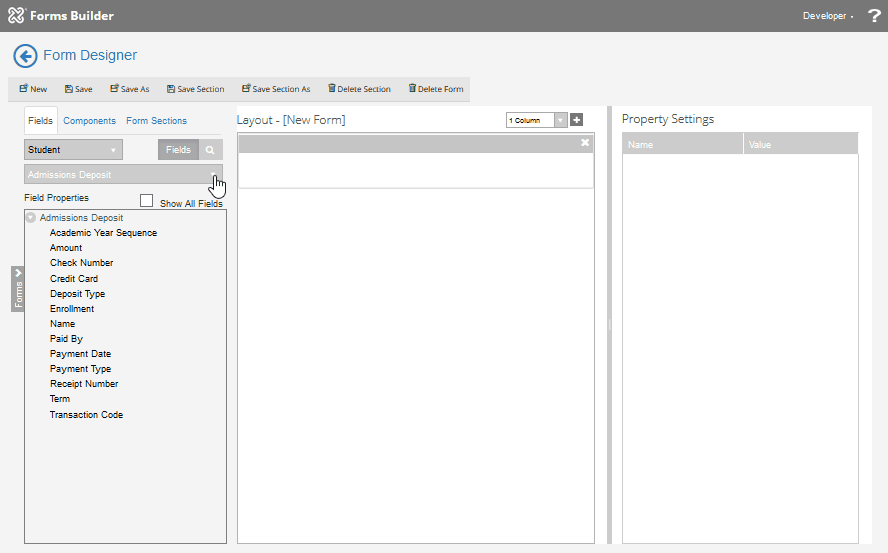
In the Select Provider drop-down list, select Student.
Note: This step is applicable only if your Forms Builder installation uses the databases of both CampusNexus CRM and Anthology Student.
-
Click New. A 1-column panel is added to the Layout pane.
![]() (Click the Show button to view the preceding steps in a looping animated gif.)
(Click the Show button to view the preceding steps in a looping animated gif.)
-
Select the Prospect Inquiry entity from the drop-down list.
Note: Any time a prospective student inquires about possible enrollment, a prospect inquiry record is created, and the information is tracked within Anthology Student. The Campus is a required attribute of the prospect inquiry record.
-
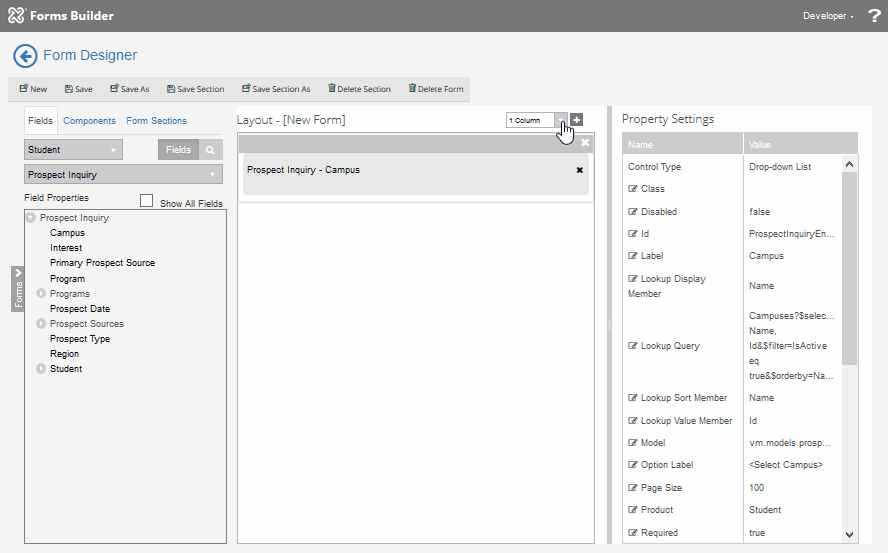
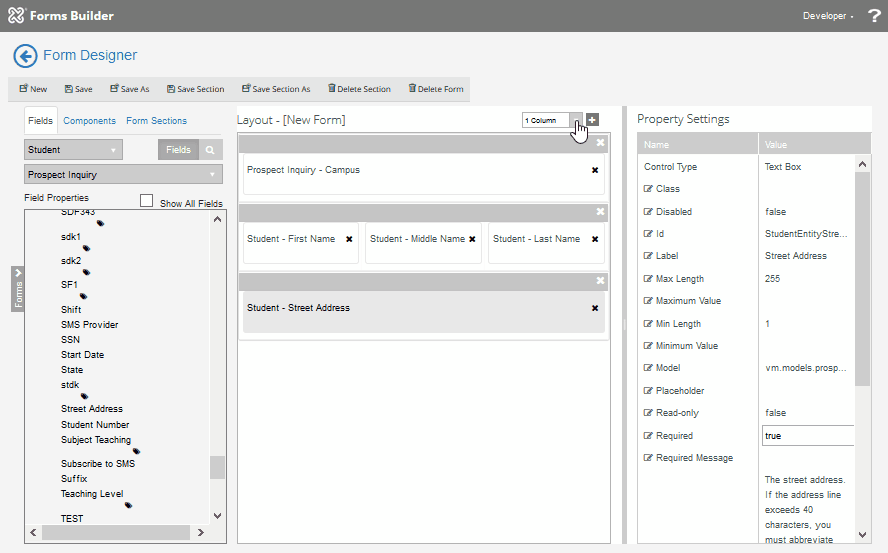
Drag the Campus field into the Layout pane.
Note: The Campus field is a drop-down control that is populated with values from the Anthology Student database. The binding to the database is accomplished by the Model value vm.models.prospectInquiryEntity.CampusId, which is automatically populated in the Property Settings. The values for the drop-down list are obtained by the Lookup Query Campuses?$select=Code, Name, Id&$filter=IsActive eq true&$orderby=Name, which is also populated automatically.
-
In the Property Settings panel, change the Option Label property to <Select Campus>.
![]() (Click the Show button to view the preceding steps in a looping animated gif.)
(Click the Show button to view the preceding steps in a looping animated gif.)
-
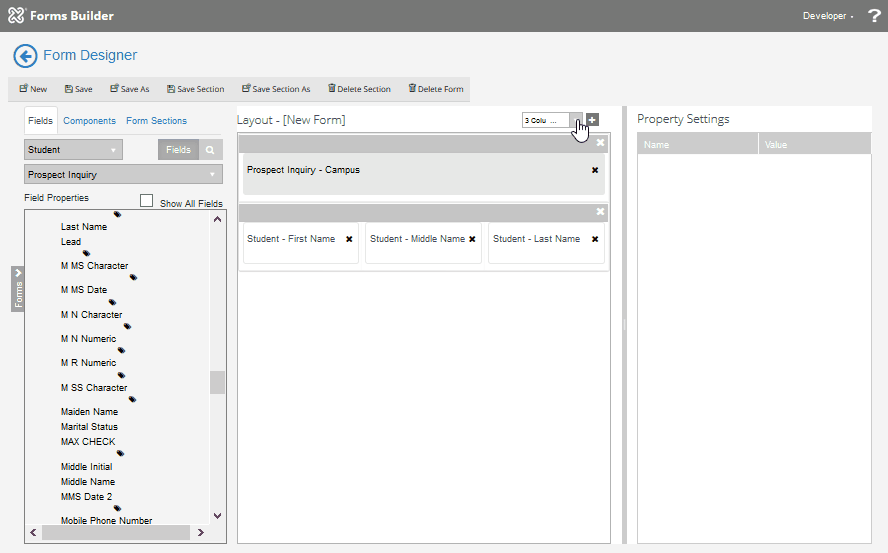
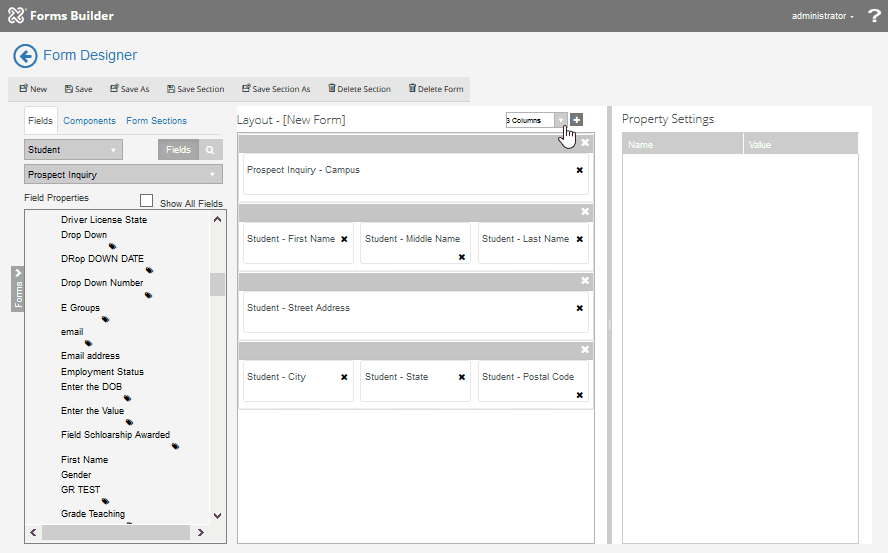
In the Column drop-down list, select 3 Columns and click
 to add a new panel to the form layout.
 -
From the Prospect Inquiry entity, under Student, drag First Name, Middle Name, and Last Name into the Layout pane.
Note: The name fields are text box controls with a default type of text. The fields are bound to the database under the prospectInquiryEntity.Student model (vm.models.prospectInquiryEntity.Student.LastName, vm.models.prospectInquiryEntity.Student.MiddleName, and vm.models.prospectInquiryEntity.Student.LastName).
The Required property for these fields is set to true by default.
![]() (Click the Show button to view the preceding steps in a looping animated gif.)
(Click the Show button to view the preceding steps in a looping animated gif.)
-
In the Column drop-down list, select 1 Column and click
to add a new panel to the form layout. -
From the Prospect Inquiry entity, below Student, drag Street Address into the new layout panel.
Note: You can use the Tooltip property on any field to provide additional information to the user, e.g., If an address has more than 40 characters, the additional characters in the address line will not be extracted to be sent to COD but will be truncated.
-
Change the Required property for Street Address to true.
Required makes the control required and will raise a validation error on the form. It is set to false by default. If input is required, set the property value to true. The rendered form will display a red asterisk (
 ) next to the component.
-
Can be bound to a workflow argument or another control's value.
-
A property array string index requires single quotes, e.g., vm.models.xxx.CustomProperties['yyyyy'].
-
An expression can be used that evaluates to true or false, e.g., vm.models.myvalue==7 (>,<, !=, ==, >=, <=).
-
If comparing to a string, it must be in single quotes.
-
(true and false must be all lowercase)
-
![]() (Click the Show button to view the preceding steps in a looping animated gif.)
(Click the Show button to view the preceding steps in a looping animated gif.)
-
In the Column drop-down list, select 3 Columns and click
to add a new panel to the form layout. -
From the Prospect Inquiry entity, below Student, drag City, State, and Postal Code into the layout panel.
-
Change the Required property for all three fields to true.
-
Change the Option Label property for State to <Select State>.
![]() (Click the Show button to view the preceding steps in a looping animated gif.)
(Click the Show button to view the preceding steps in a looping animated gif.)
-
In the Column drop-down list, select 3 Columns and click
to add a new panel to the form layout. -
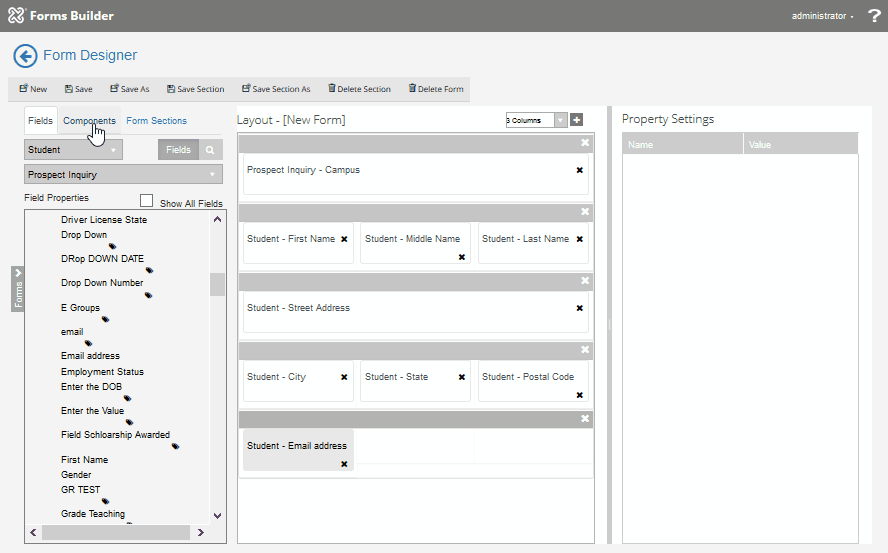
From the Prospect Inquiry entity, below Student, drag Email address into the layout panel. Specify the following properties:
-
Required: true
-
Type: email
Note: The Email address field is a text box that is bound to vm.models.prospectInquiryEntity.Student.EmailAddress. This text box control does not use the default text box type of text, but instead uses the text box type of email. When the email type is selected, Forms Builder validates the entry in the text box for proper format.
-
![]() (Click the Show button to view the preceding steps in a looping animated gif.)
(Click the Show button to view the preceding steps in a looping animated gif.)
-
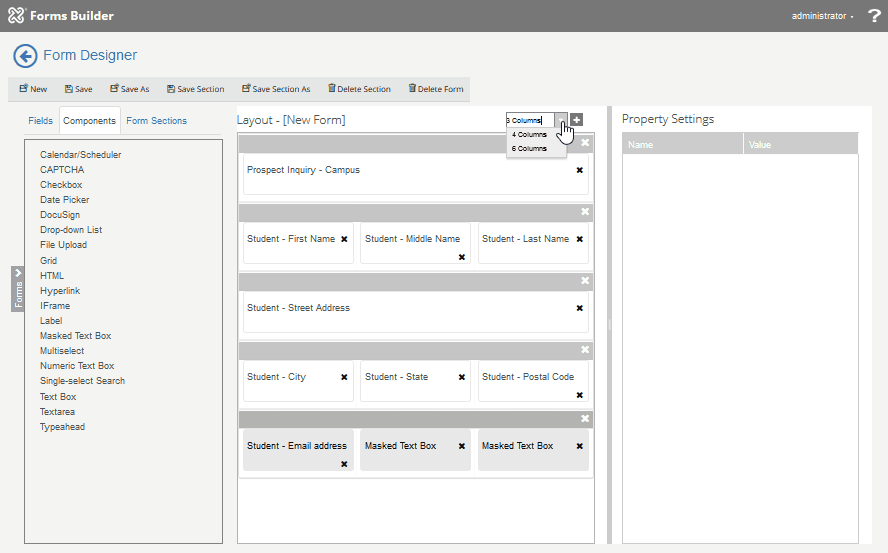
From the Components tab, drag a Masked Text Box into the panel next to Email address. Specify the following properties:
-
Format: (###)###-####
-
Label: Phone Number
-
Model: vm.models.prospectInquiryEntity.Student.PhoneNumber
Note: Some of the controls listed on the Components tab provide a Model property, but unlike controls that are listed on the Fields tab, the Model property value is not automatically populated for components. If the Model value is not specified, the component will be displayed on the form, but any values the end user enters on the form cannot be used in the workflow. If you want the component to be bound to the workflow, specify a Model value. The Model value is always prefixed with vm.models. The string that is appended to vm.models can be added as an In/Out argument in the associated workflow.
-
Required: true
-
![]() (Click the Show button to view the preceding steps in a looping animated gif.)
(Click the Show button to view the preceding steps in a looping animated gif.)
-
From the Components tab, drag another Masked Text Box into the panel next to the Masked Text Box for the Phone Number. Specify the following properties:
-
Format: (###)###-####
-
Label: Mobile Phone Number
-
Model: vm.models.prospectInquiryEntity.Student.MobilePhoneNumber
-
Required: true
-
Note: The Model property binds the Masked Text Boxes for Phone Number and Mobile Phone Number the corresponding database fields. The masking must be (###)###-#### because this is the format of phone numbers in the Anthology Student database.
![]() (Click the Show button to view the preceding steps in a looping animated gif.)
(Click the Show button to view the preceding steps in a looping animated gif.)

-
In the Column drop-down list, select 1 Column and click
to add a new panel to the form layout. -
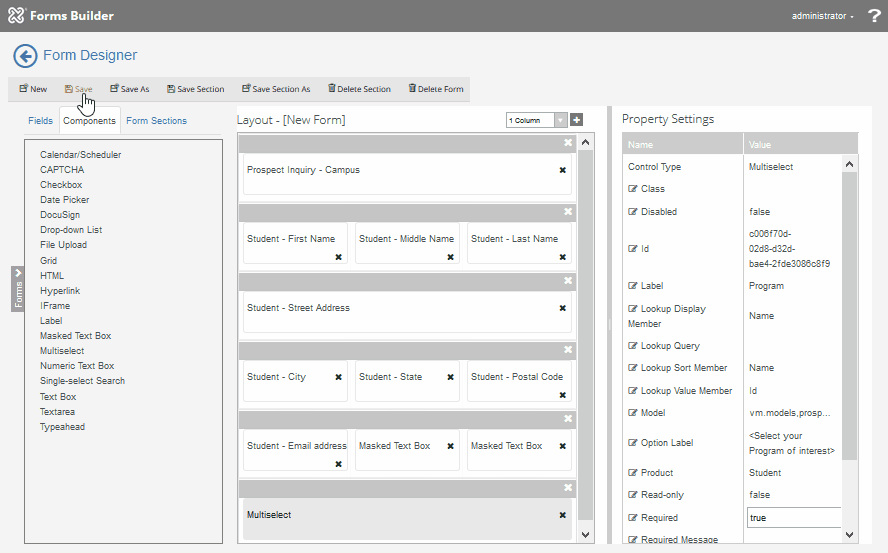
From the Components tab, drag Multiselect into the new panel. Specify the following properties:
-
Label: Program
-
Lookup Display Member: Name
-
Lookup Query: <see Note>
Note: Program is a multiselect field in the Anthology Student user interface. The Multiselect component needs a Lookup Query to retrieve the values for the multiselect field from the database.
To create a Lookup Query, you can either:
-
Copy the query from the Program ID field under ProspectInquiry > Student and paste it in the Lookup Query property for the Multiselect component (Programs?$select=Code,Name,Id&$filter=IsActive eq true).
— OR —
-
Query the data in the Web Client for Anthology Student as shown in the next section.
-
-
Lookup Sort Member: Name
-
Lookup Value Member: Id
-
Model: vm.models.prospectInquiryEntity.Student.ProgramsList
Note: The Multiselect component needs to be bound to the programs list in the CampusNexus entity model to retrieve values from the database.
-
Option Label: <Select your Program of interest>
-
Required: true
-
![]() (Click the Show button to view the preceding steps in a looping animated gif.)
(Click the Show button to view the preceding steps in a looping animated gif.)
-
Click Save to save what you have done so far on your form. Specify the following properties:
-
Form Name: Campus University - Request for Information
-
Title: Campus University - Request for Information
Note: The title is optional. When a title is specified, it is displayed on the rendered form.
-
![]() (Click the Show button to view the preceding steps in a looping animated gif.)
(Click the Show button to view the preceding steps in a looping animated gif.)
Create a Query in the Web Client
-
Open the Web Client for Anthology Student in another browser.
-
Sign in with your user name and password.
-
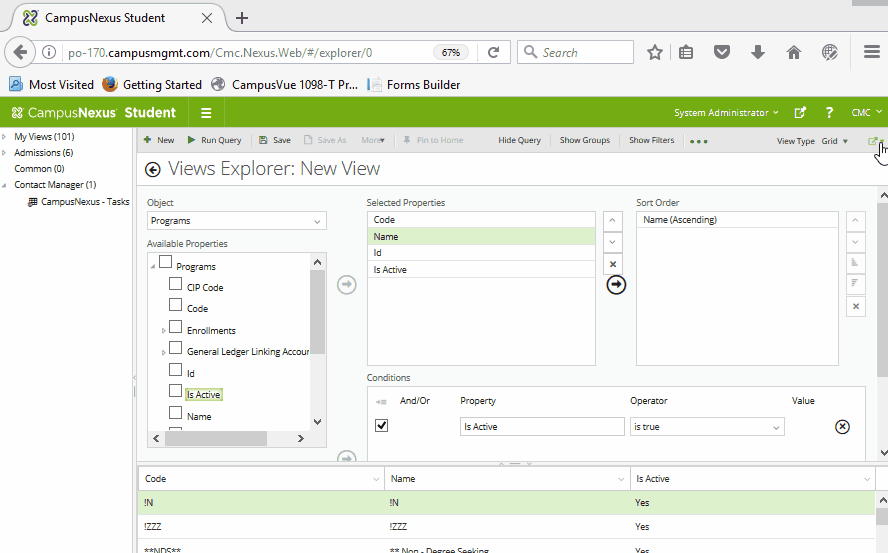
Click the Views tile.
-
Click
 to create a new view.
 -
In the Object drop-down list, under Academics, select Programs.
-
The Selected Properties pane lists the default query properties. For this query, we only want the Code, Id, and Name.
-
Select CIP Code and click
 to delete the property.
 -
Select Is Active and click
to delete the property.
-
-
Select Id and click
 to move Id below Name.
 -
Select Name and click
 to move Name to the Sort Order pane. By default, the sort order is ascending, and this is what we want.
 -
Select Is Active in the Available Properties pane and click
to move the property to the Conditions pane. This will only filter active programs. -
Click Run Query. The records returned by your query are displayed.
![]() (Click the Show button to view the preceding steps in a looping animated gif.)
(Click the Show button to view the preceding steps in a looping animated gif.)

-
Click the drop-down list on the far right of the toolbar and select Query URL. The "Copy the URL to the clipboard" popup is displayed.
-
Press Ctrl + C to copy the URL and click OK.
-
Open a new tab in your browser, press Ctrl + V to paste the URL into the address bar, and press Enter. The browser returns the metadata of the query.
-
Select the end portion of the URL, which is the query. Select the string from "Programs..." forward and copy it to the clipboard (Ctrl + C).
![]() (Click the Show button to view the preceding steps in a looping animated gif.)
(Click the Show button to view the preceding steps in a looping animated gif.)
Add the Query to the Form
-
In Form Designer, return to the "Campus University - Request for Information" form.
-
Select the Multiselect (Program) field in the Layout pane.
-
Paste (Ctrl + V) your query into Lookup Query property. It should look exactly like this:
Programs?$select=Code,Name,Id&$filter=IsActive eq true
-
Save your form.
-
Click
 to return to the home page of Forms Builder.
![]() (Click the Show button to view the preceding steps in a looping animated gif.)
(Click the Show button to view the preceding steps in a looping animated gif.)
Create a Sequence
-
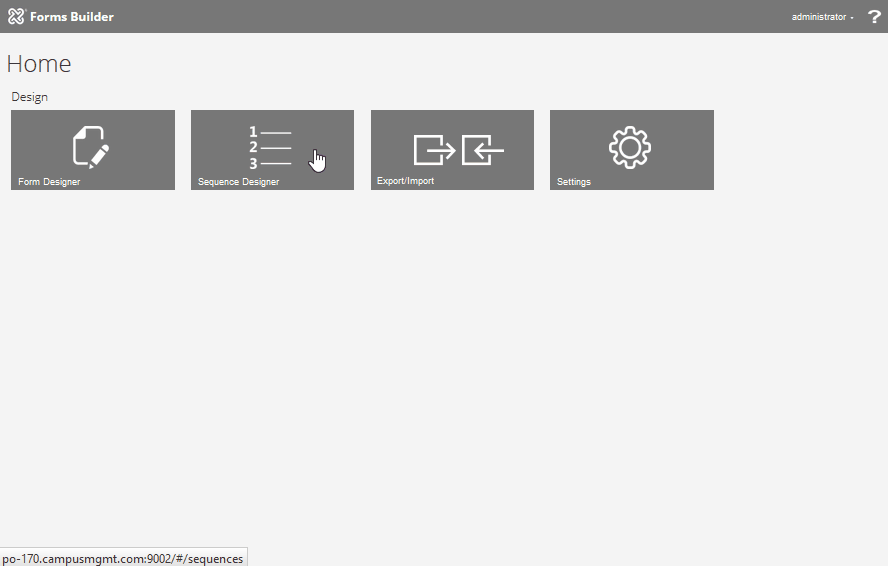
On the home page of Forms Builder, select the Sequence Designer tile.
-
Click New. A new panel is added to the Layout pane.
-
In the search bar of the Forms pane:
-
Type welcome and drag the Welcome form into the Layout pane.
Note: The Welcome form is an out-of-the-box form that can be modified and added to each sequence (see Welcome and Confirmation Forms). The prospective student clicks Next on this form and then proceeds through the sequence.
-
Type campus and drag the Campus University – Request for Information form below the Welcome form.
-
-
In the Properties pane:
-
In Authentication field, select the check box to set authentication to true.
-
In the Authentication Product field, select Student.
Note: This step is applicable only if your Forms Builder installation uses the databases of both CampusNexus CRM and Anthology Student.
-
-
Save the sequence. Specify the following properties:
-
Sequence Name: Campus University – Request for Information
-
Title: Campus University – Request for Information
-
![]() (Click the Show button to view the preceding steps in a looping animated gif.)
(Click the Show button to view the preceding steps in a looping animated gif.)
Edit the Workflow
-
Click the Sequence Designer tile on the Forms Builder home page.
-
Use the search box above the Sequences pane to find the Campus University – Request for Information sequence.
-
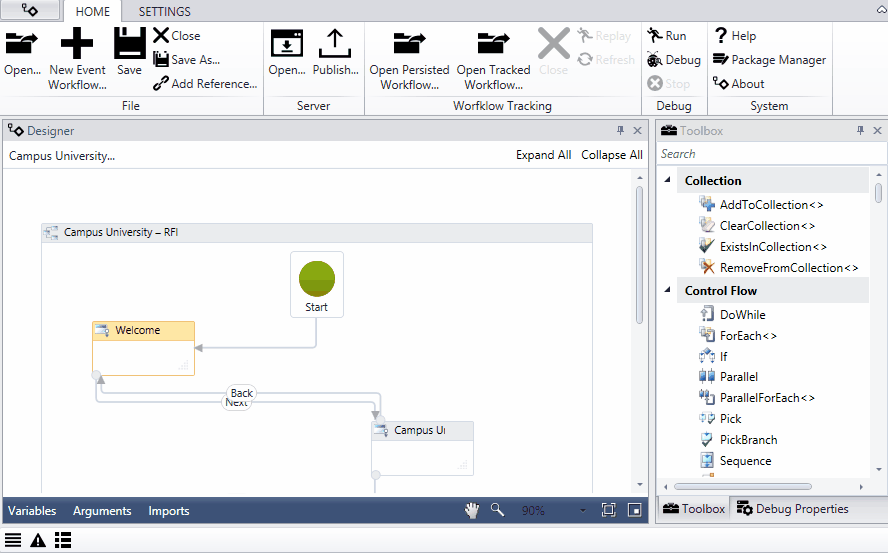
Launch Workflow Composer and open the workflow. See Open the Workflow for a Sequence.
-
Double-click the StateMachine label and rename it to Campus University – RFI.
-
Select the icon of the second state to give it the focus and press the right arrow key a few times to move the state to the right. This helps to organize the icons in the workflow to better navigate.
![]() (Click the Show button to view the preceding steps in a looping animated gif.)
(Click the Show button to view the preceding steps in a looping animated gif.)
-
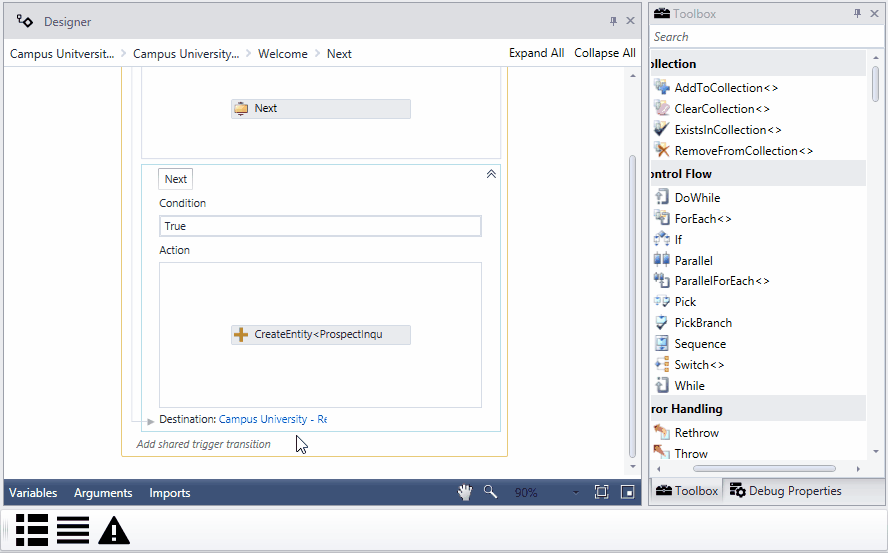
When a prospective student completes the RFI, we want to capture the data from the form and update the Anthology Student database. Since our form is built with fields from the Prospect Inquiry entity, the first step is to create a Prospect Inquiry entity record. We will create the entity when the student selects Next on the Welcome form.
Double-click the icon on the Welcome state (first state in the workflow) and select the Next link at the bottom of the transition. Specify the following properties:
-
Enter true in the Condition field of the Next transition.
Note: When the Condition evaluates to true (i.e., the student clicks Next), the Action of the transition is executed.
-
Drag the CreateEntity activity from the Toolbox into the Action section below the Condition field. The "Select Types" dialog for the CreateEntity activity is displayed.
-
Click the drop-down list in the Select Type window and select Browse for Types. The "Browse and Select a .Net Type" window is displayed.
-
In the Type Name field, paste ProspectInquiryEntity (or navigate to Cmc.Nexus.Admissions.Contracts > Cmc.Nexus.Admissions.Entities > ProspectInquiryEntity) and click OK.
-
Click OK in the "Select Types" dialog. The CreateEntity activity is added to the Action section of the Next transition.
-
Select the CreateEntity activity to give it the focus. Open the Properties pane and in the Result field, specify prospectInquiryEntity.
-
![]() (Click the Show button to view the preceding steps in a looping animated gif.)
(Click the Show button to view the preceding steps in a looping animated gif.)
-
When the prospective student selects Next on the Welcome form, the next form is the "Campus University – Request for Information" form. When this form is completed and submitted, the workflow updates data in Anthology Student and automates other tasks, such as creating a Portal account and sending emails.
-
Select the Destination link for the Campus University – Request for Information state.
-
Select the Next link at the bottom of state.
-
Change the label of the WaitForFormBookmark activity in the Trigger section of the transition to Start your Journey! The Display Name of the WaitForFormBookmark activity will be the label of the button on the form.
-
Set the Condition to True.
-
-
In the Action section below the Condition field, we want to accomplish the following:
- Update values for the prospect and save the values to Anthology Student.
- Create a Portal account and send an email with the credentials to the prospective student.
- Send an email to the prospective student detailing the next steps in the application process.
The workflow activities for these tasks will be placed in a Sequence activity.
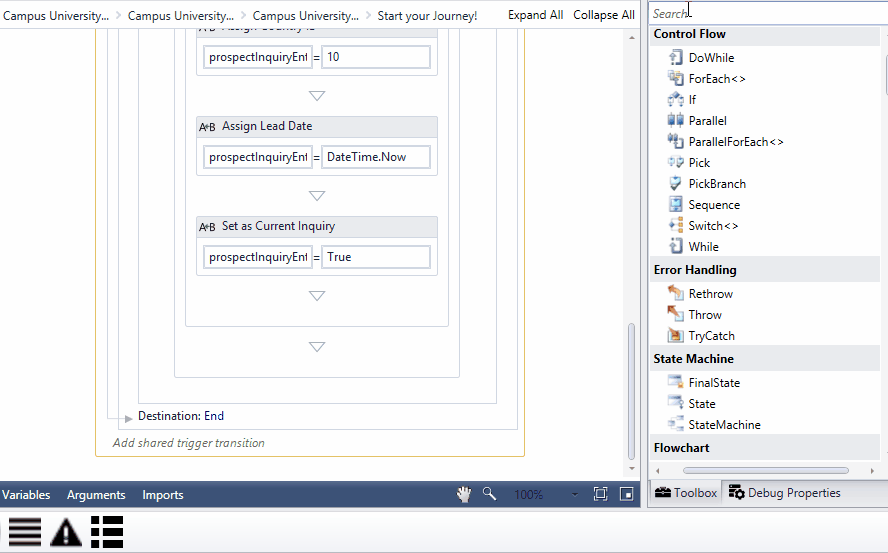
Drag a Sequence activity from the Toolbox into the Action section. Specify the Display Name: Assign Values
-
Drag 7 Assign activities into the "Assign Values" sequence.
 (Click the Show button to view the preceding steps in a looping animated gif.)
Specify the following properties: (each row in the table below represents an Assign activity)
Note: In this example, we hard-coded the assignments to simplify the workflow definition. In a live environment, you would use variables and the LookupReferenceItem activity.
These assignments provide values for required fields in prospect inquiry records. Query your Anthology Student database to obtain appropriate values for your environment. See Anthology Student entities reference Prospect Inquiry and Student.
Assign Display Name "To" Field Value 1 Assign School Status prospectInquiryEntity.Student.SchoolStatusId 88 2 Assign Lead Type prospectInquiryEntity.LeadTypeId 11 3 Assign Lead Source prospectInquiryEntity.LeadSourceId 711 4 Assign Admin Rep prospectInquiryEntity.AssignedAdmissionsRepId 28 5 Assign Country ID prospectInquiryEntity.Student.CountryId 10 6 Assign Lead Date prospectInquiryEntity.LeadDate DateTime.Now 7 Set as Current Inquiry prospectInquiryEntity.IsCurrentInquiry True
-
Drag a LogLine activity below the "Assign Values" sequence. This activity writes the assigned prospect inquiry values to the log. Specify the following properties:
-
Display Name: Log Prospect Inquiry Values
-
Text: Newtonsoft.Json.JsonConvert.SerializeObject(prospectInquiryEntity, Newtonsoft.Json.Formatting.Indented)
-
Level: Information
You may need to import a reference to the Newtonsoft.Json if the LogLine activity shows an error after completing the steps above.
-
![]() (Click the Show button to view the preceding steps in a looping animated gif.)
(Click the Show button to view the preceding steps in a looping animated gif.)
-
Drag the SaveEntity activity below the LogLine activity.
In the dialog box, select Browse for Types, select Cmc.Nexus.Admissions.Entities.ProspectInquiryEntity, and click OK.
In the Properties pane for the SaveEntity activity, Specify the following properties:
-
Entity: prospectInquiryEntity
-
ValidationMessage: formInstance.ValidationMessages
-
-
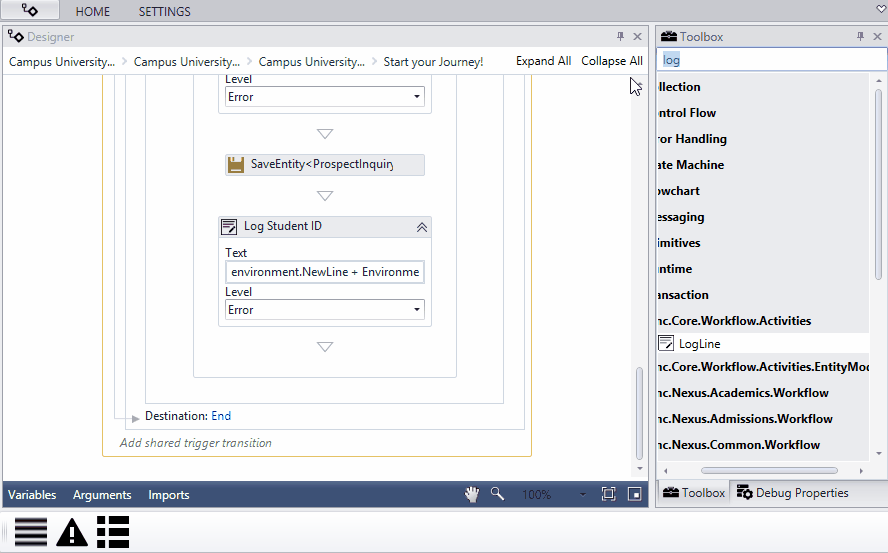
Drag a LogLine activity below the SaveEntity activity. This LogLine activity writes the student ID values to the log. Specify the following properties:
-
Display Name: Log Student ID
-
Text: environment.NewLine + Environment.NewLine + "The student ID is: " + prospectInquiryEntity.StudentId.ToString + Environment.NewLine + Environment.NewLine
-
Level: Information
-
![]() (Click the Show button to view the preceding steps in a looping animated gif.)
(Click the Show button to view the preceding steps in a looping animated gif.)

-
The next section of the workflow creates a Portal account for the prospective student. The workflow activities used to create the Portal account require several variables.
Select the Variables tab below the Designer pane and create variables. Specify the following properties:
Name Variable type Scope Default UserID String Campus University RFI Role String Campus University RFI “STUD” Culture String Campus University RFI “en-US” Key String Campus University RFI "JkL0sPc=" URL Int32 Campus University RFI 10 WebRoleID Int32 Campus University RFI 1 Password String Campus University RFI "DAA4496B6AC1B0C8FEEE6BE825854F05E78765F0"
![]() (Click the Show button to view the preceding steps in a looping animated gif.)
(Click the Show button to view the preceding steps in a looping animated gif.)

-
Drag a Sequence activity below the "Log Student ID" LogLine activity. Rename the sequence to Create Portal Account.
-
Drag the following activities into the "Create Portal Account" sequence.
Assign Activity
-
Display Name: Assign ID
-
To field: UserID
-
Value: prospectInquiryEntity.Student.FirstName + "." + prospectInquiryEntity.Student.LastName
ExecuteQuery Activity
-
Display Name: Create Account
-
Connection string name: “<dbConnections> ” (Enter the connection string displayed in your About Forms Builder window.)
-
Command: "exec sproc_School_Configuration_Admin_AddUser @LastName = '"& prospectInquiryEntity.Student.LastName & "', @FirstName = '" & prospectInquiryEntity.Student.FirstName &"', @eMail = '" & prospectInquiryEntity.Student.EmailAddress & "', @UserCode = '" & UserID & "', @Pwd = '" & Password & "', @Key = '" & Key & "', @DefaultCulture = '" & Culture & "', @wpURLID = " & URL & ", @CampusID = " & prospectInquiryEntity.CampusId & ", @C2kID = " & prospectInquiryEntity.StudentId & ", @Role = '" & Role & "', @wpWebRoleID = " & WebRoleID & ""
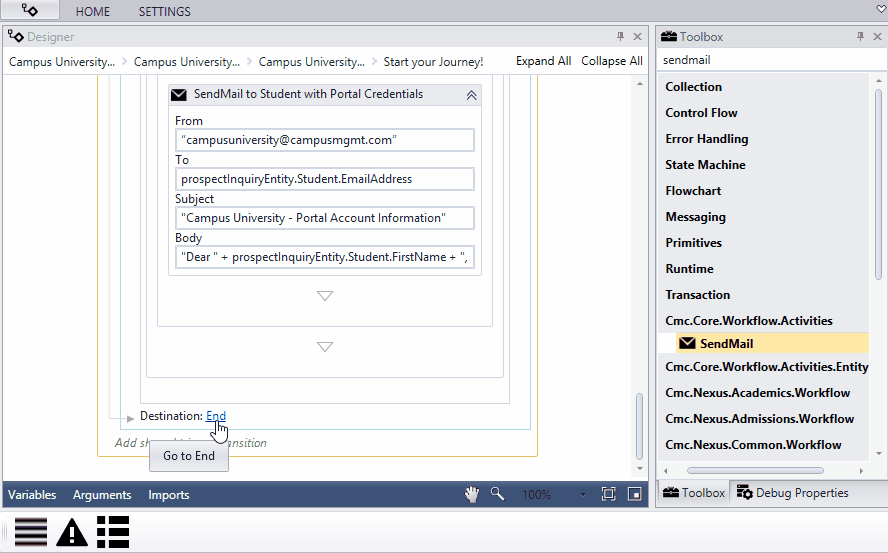
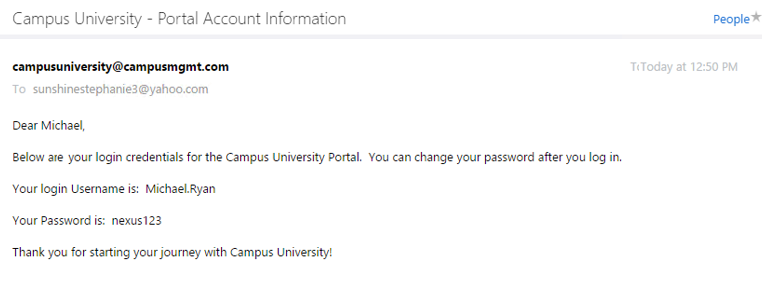
SendMail Activity
-
Display Name: SendMail to Student with Portal Credentials
-
From: “<campusuniversity@campusmgmt.com>” (Enter the email address of your institution.)
-
To: prospectInquiryEntity.Student.EmailAddress
-
Subject: "Campus University - Portal Account Information"
-
Body: "Dear " + prospectInquiryEntity.Student.FirstName + ", " + Environment.NewLine + Environment.NewLine + "Below are your login credentials for the Campus University Portal. You can change your password after you log in." + Environment.NewLine + Environment.NewLine + "Your login Username is: " + UserID + Environment.NewLine + Environment.NewLine + "Your Password is: nexus123" + Environment.NewLine + Environment.NewLine + "Thank you for starting your journey with Campus University!"
-
![]() (Click the Show button to view the preceding steps in a looping animated gif.)
(Click the Show button to view the preceding steps in a looping animated gif.)
-
Select the End link at the bottom of the transition to complete the triggers to occur when the form is submitted.
-
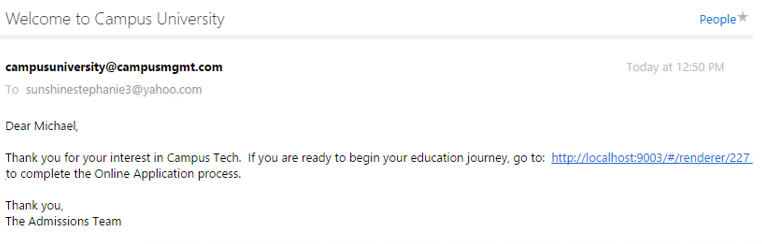
Drag the SendMail activity into the Entry section of the End state. Specify the following properties:
-
Display Name: SendMail with link to Online Application
-
From: “<campusuniversity@campusmgmt.com>” (Enter the email address of your institution.)
-
To: prospectInquiryEntity.Student.EmailAddress
-
Subject: "Welcome to Campus University"
-
Body: "Dear " + prospectInquiryEntity.Student.FirstName + "," +Environment.NewLine + Environment.NewLine + "Thank you for your interest in Campus University. If you are ready to begin your education journey, go to: http://localhost:<port>/#/renderer/227 to complete the Online Application process." + Environment.NewLine + Environment.NewLine + "Thank you, " + Environment.NewLine + "The Admissions Team"
-
-
Confirm there are no errors in the Error panel.
-
Click Publish and select Enable This Workflow Version? Click OK to confirm.
![]() (Click the Show button to view the preceding steps in a looping animated gif.)
(Click the Show button to view the preceding steps in a looping animated gif.)
Submit the RFI Form
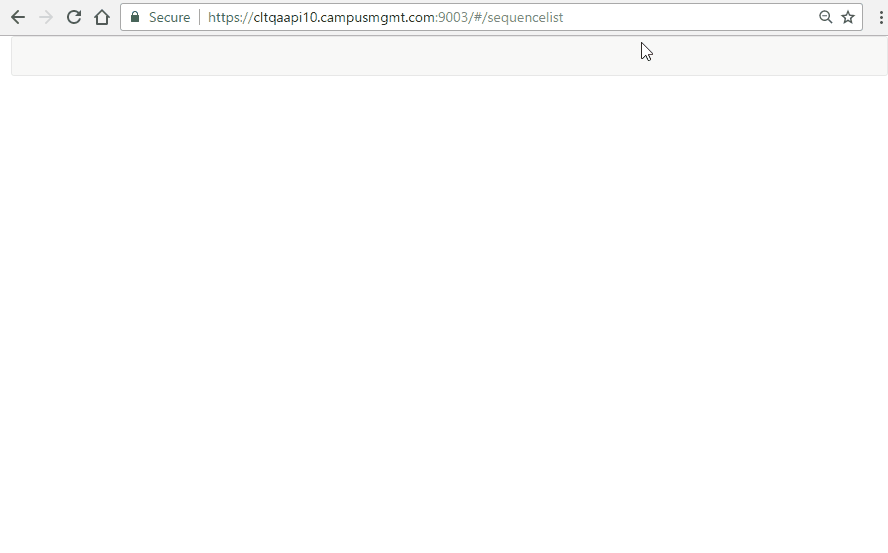
-
Open a different browser and point to the URL for the Sequence List.
(
http://<server>:<port>/#/sequencelistorhttps://<server>:<port>/#/sequencelist) -
Use the search box above the Sequence Name column to find the Campus University - Request for Information sequence.
-
Scroll to the right and click
 to view the sequence.
 -
Click Next on the Welcome Screen.
-
Complete the RFI form using your student data.
Note: For the student information, you might want to use data obtained from a random name generator.
Select these values for the following fields:
-
Campus: <Select a Campus>
-
Email: <A valid email for you>
-
Phone Number/Mobile Number: <Enter the same number for both
-
Program: <Select a program>
-
-
Select Start Your Journey!
-
Confirm that you received a Confirmation Message.
![]() (Click the Show button to view the preceding steps in a looping animated gif.)
(Click the Show button to view the preceding steps in a looping animated gif.)
Validate the Data in the Web Client
-
Open the Web Client for Anthology Student in another browser.
-
Sign in using your user name and password.
-
Select Students from the Home Page.
-
In the Search bar, search for your student’s last name.
-
Click on the Name link for your student to access the student’s information.
-
Validate that you received the following emails.
Check the Renderer Log
-
Navigate to: \\<server>\c$\logs and open the FormsBuilderRenderer file that has today's date.
-
Navigate to the bottom of the file (Ctrl + End) and then scroll up until you see the log lines from your workflow.