The topic "SignNow Workflow Sample - Multiple Signers" is not available in Version 3.5.
The topic "SignNow Workflow Sample - Multiple Signers" is not available in Version 3.6.
SignNow Workflow Sample - Multiple Signers
The following procedure details a sample workflow and forms for a sequence that contains multiple signers.
Prerequisites
-
The SignNow properties are configured in Forms Builder. See SignNow Settings.
-
A form sequence is created. In our example, the sequence includes the following forms:
-
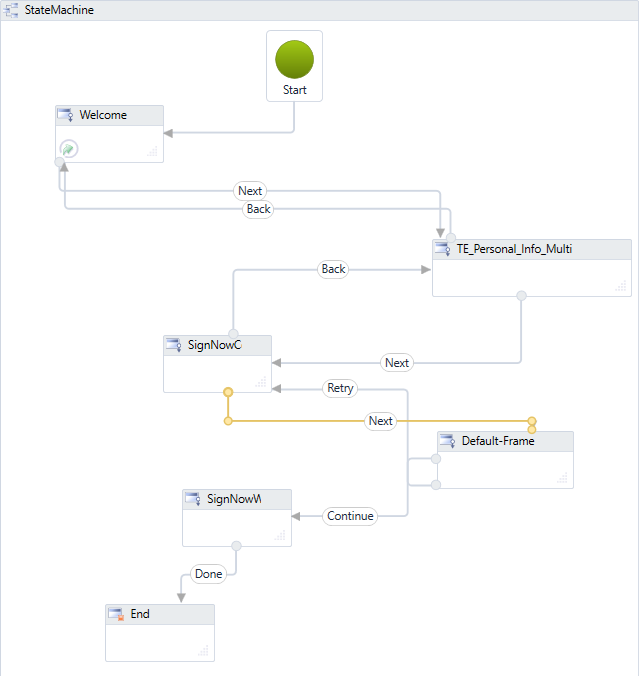
Welcome
-
TE_Personal_Info_Multi — This is an admissions application form that collects the personal data of a student and contains four SignNow components (signature and date fields for two signers).
The signing process for the primary signer is the same as described in SignNow Workflow Sample - Single Signer. The signing process for the primary signer is an embedded process within the form window. For the secondary signer, SignNow sends an email along with the document to be signed to the secondary signer. The signing process for primary and secondary signer takes place within the same SignNow request. SignNow returns events when each signer signs the document and when the document is complete. The workflow responds to these events.
-
SignNowCoSigner — This form informs the student that a co-signer is needed and provides three text boxes for the co-signer's first name, last name, and email address.
-
Default-Frame — This form contains an IFrame component.

We recommend that you copy the original Default-Frame form, edit the copy, and use it in your sequences. Save a backup copy of your form. In your copy of the form, edit the Name property as shown below (case sensitive). Keep the URL property as {{vm.models.frameUrl}}.
Name = signNowFrame
-
Default-DocuSignWait — This form is provided with the Forms Builder installation. For this example, we have copied and renamed it to form to SignNowWait. It contains two HTML components.
The first HTML component displays the following text. Edit the text in your copy of the form.
"Current user may close this browser tab. This page will auto submit when all the signatures are collected from DocuSign."
The second HTML component contains JavaScript code that is not applicable to SignNow. Remove that HTML component in your SignNowWait form.
The Default-DocuSignWait form will be overwritten when Forms Builder is upgraded. Copy the original form, rename it to SignNowWait, edit the copy, and use it in your sequences. Save a backup copy of your form. This logic can be repeated as needed for additional signers.
-
To optimize the display of your e-signature forms on mobile devices, you may want to add the CSS described in this Note.
Test the Multiple Signer Feature
To test the multiple signature feature with SignNow, the test environment needs to meet specific requirements. SignNow will try to call APIs on Renderer when secondary signers complete their signing process via email. This feature is referred to as Webhook.
-
If you are testing with a SignNow account in test mode:
-
Renderer must be hosted on port 80 or 443.
-
Port 80 or 443 must be open on the firewall depending on which port Renderer is using for SignNow to communicate. You can request an exception from your IT team for port 80 or 443 for an IP address range.
-
-
If you are testing with a live SignNow account:
-
Renderer must be hosted on port 443 (https).
-
If hosting Renderer on port 443 is not possible, a SignNow representative for your account will have to make an exception.
To confirm that multi-signature forms are completing the workflow process, please confirm that Webhook responses are received and displayed in the log. For more information, see Webhook Responses for Multiple Signer Sequences.
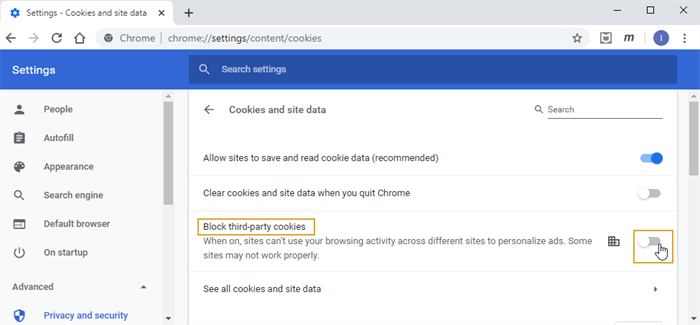
Chrome Browser Settings for Multiple Signers
The multiple signer feature for SignNow requires a specific setting in Google Chrome. If you experience issues with multiple signer forms, ensure that third-party cookies are allowed.
-
In Chrome, select Settings.
-
Click Advanced at the bottom of the page.
-
Expand Site Settings.
-
Expand Cookies and site data.
-
Disable Block third-party cookies.
Create the Workflow
-
Launch Workflow Composer and open the workflow. See Open the Workflow for a Sequence.
-
In Workflow Composer, drag the state icons and transition lines to so that you can easily locate each item in the StateMachine workflow.
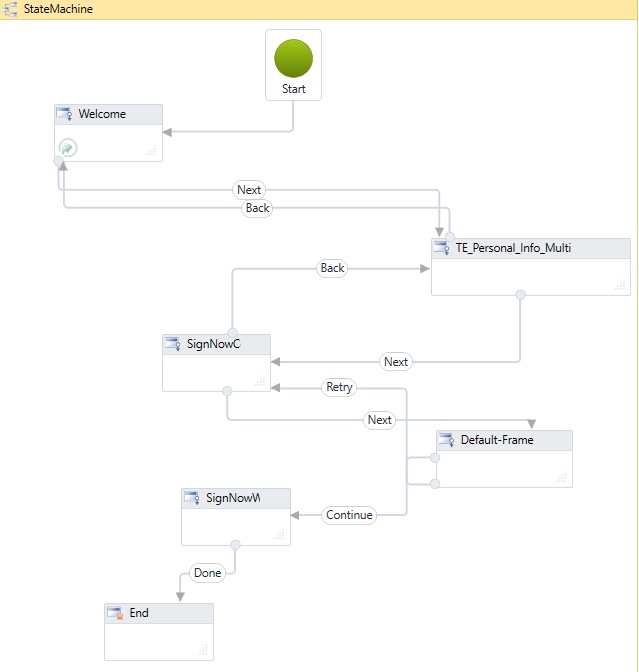
The workflow requires the following arguments and variables. You can create these arguments and variables before working on the activities, or you can add them when they are needed for a specific activity (as described below).
|
|
Keep in mind that arguments are passed in JSON format and that JSON elements are case sensitive. Be sure to match the casing of argument names in Workflow Composer and Form Designer. |
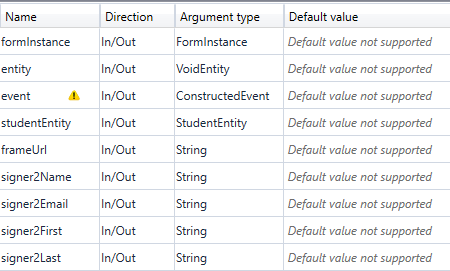
|
|
|

LogLine Activities
While testing and troubleshooting the workflow, we recommend adding LogLine activities at critical stages within the workflow. The following expression will provide logging for specific objects (replace <object> with the object name):
Newtonsoft.Json.JsonConvert.SerializeObject(<object>, Newtonsoft.Json.Formatting.Indented)
We recommend setting the Level value to Information for any LogLine or LogObject activities. See Best Practices for Logging and Logging in Azure.
Note: If your sequence is non-authenticated (Anonymous=true), the LookupUser and GetEntity activities are not applicable, but a CreateEntity activity may be needed instead. Be sure that any anonymous sequence includes the user's email address. It is required as the SignNow recipient address.
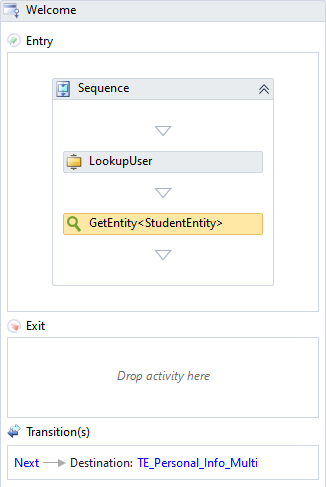
Use the Welcome form to retrieve the Student Id and Student Entity.
-
Double-click the icon of the Welcome state.
-
Create a variable named studentid of Type Int32.
-
Drop a LookupUser activity into the Entry area of the Welcome state.
- In the UserId property, specify the studentid variable.
- In the UserName property, specify formInstance.UserName.
-
Drop a GetEntity activity below the LookupUser activity.
- In the EntityId property, specify the studentid variable.
- In the Result property, specify studentEntity.
-
Save the workflow locally and continue with the next set of steps.
Since the workflow can be busy for a long time, we recommend that you persist the workflow instance before creating the PDF.
-
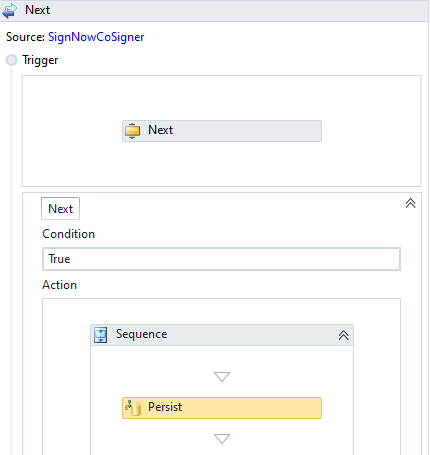
Double-click the Next transition between the SignNowCoSigner and Default-Frame states.

-
Set the Condition to True.
-
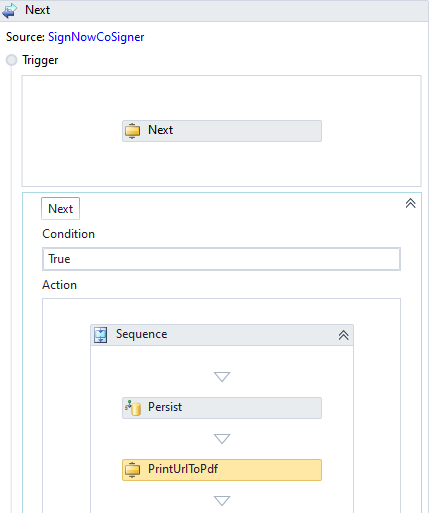
Drag a Persist activity into the Trigger area below the Next activity. The Persist activity does not require any properties to be specified.
Workflow Composer automatically wraps the Next and Persist activities in a Sequence.
-
Save the workflow locally and continue with the next set of steps.
-
Create a variable named URL. Set the Variable type to String. Set the Scope to StateMachine. This variable will be assigned to the PDF created from the form.
-
Create a variable with a name like Pdf. Set the Scope to StateMachine. This variable will hold the document image created from the form.
Note: Make sure you use the same variable name when you reference this variable later in the workflow. (This applies to any other variable.)
-
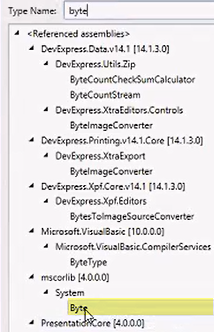
In the Variable type field, select Array of [T] and select Browse for Type.
-
In the "Browse and Select a .Net Type" window, specify byte, select the System variable Byte, and click OK.
-
-
Drop a PrintUrlToPdf activity below the Persist activity.
Specify the properties for the activity as follows:
-
PdfDocument = Pdf (This is the name of the variable created above.)
-
Url = URL (This is the name of the variable created above.)
-
Validation Messages = formInstance.ValidationMessages
-
-
Save the workflow locally and continue with the next set of steps.
In the following steps we will continue to add activities to the Next transition between the SignNowCoSigner and Default-Frame states.
-
Create a variable named SignNowConfig. Set the Scope to StateMachine.
In the Variable type field, select Browse for Type. In the "Browse and Select a .Net Type" window, scroll down to Cmc.Nexus.FormsBuilder.Contracts > Cmc.Nexus.FormsBuilder.Entities and select SignNowConfig.
-
Drop a GetSignNowConfig activity below the PrintUrlToPdf activity.
Specify the properties for the activity as follows:
- SignNowConfig = SignNowConfig
- Validation Messages = formInstance.ValidationMessages
The GetSignNowConfig activity retrieves your user credentials from the SignNow settings in Forms Builder. These values enable the workflow to log in to SignNow.
-
Create the following variables:
Variable Name Type Scope Default SignNowRecipient Cmc.Nexus.FormsBuilder.Entities.SignNowRecipient StateMachine new SignNowRecipient SignNowRecipient2 Cmc.Nexus.FormsBuilder.Entities.SignNowRecipient StateMachine new SignNowRecipient SignNowDocument Cmc.Nexus.FormsBuilder.Entities.SignNowDocument StateMachine new SignNowDocument SignNowRequest Cmc.Nexus.FormsBuilder.Entities.SignNowRequest StateMachine N/A -
Below the GetSignNowConfig activity, drop an Assign activity for each row in the following table and type the indicated values:
"To" Field Value Notes SignNowConfig.EmailSubject "CMC SignNow Test at " + DateTime.Now.ToString() This is the email that the end user will receive after the signing process is done. SignNowDocument.DocumentId "1" The SignerId should match the Signer property in the SignNow component on the form. Allowed values are "1" to "5". SignNowDocument.Name "NewMultiSignNow.pdf" Name of the signed document. SignNowDocument.Content Pdf Name of the variable that holds the document image (see Create a PDF of the Form). In our example the name of the variable is Pdf. SignNowRecipient.FirstName studentEntity.FirstName First name of the user who submitted the signed document. SignNowRecipient.LastName
studentEntity.LastName
Last name of the user who submitted the signed document. SignNowRecipient.Email SignNowConfig.SignerAccountEmail Email address of the person who will receive the signed SignNow document. SignNowRecipient2.FirstName signer2First First name of the co-signer who submitted the signed document. This could be a parent name from the StudentRelationshipAddressEntity. SignNowRecipient2.LastName signer2Last Last name of the co-signer who submitted the signed document. This could be a parent name from the StudentRelationshipAddressEntity. SignNowRecipient2.Email signer2Email Email address of the co-signer who will receive the signed SignNow document. This could be the email address retrieved from the StudentRelationshipAddressEntity. SignNowRecipient2.SignerId "2" The SignerId should match the Signer property in the SignNow component on the form. Allowed values are "1" to "5". -
Save the workflow locally and continue with the next set of steps.
In the following steps we will continue to add activities to the Next transition between the SignNowCoSigner and Default-Frame states.
-
Drop the CreateSignNowRequest activity below the previous activity.
Specify the properties using the names of the variables created above as follows:
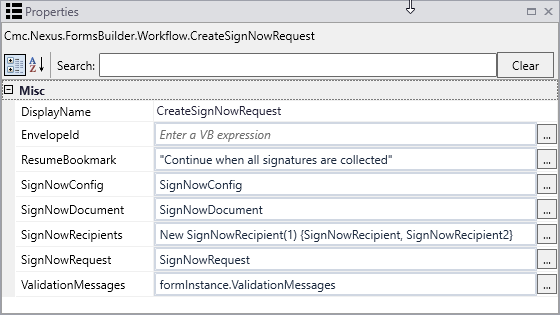
Notes:
-
The expression for SignNowRecipients passes multiple items (the primary and secondary recipient) within an array.
-
The ResumeBookmark value will be passed to SignNow as a custom field. When the signature request has been completed, SignNow will return this flag and any process that has to happen after the bookmark can resume automatically without any user intervention.
-
The out argument SignNowRequest returns the URL of the signed SignNow document.
-
-
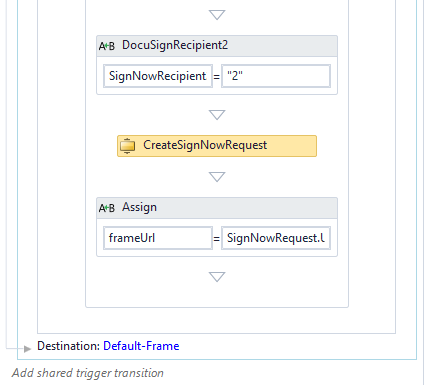
Drop an Assign activity below the CreateSignNowRequest activity.
-
In the To field, specify frameUrl. (This is the argument associated with the IFrame form.)
Be sure to use the exact casing shown here. -
In the Value field, specify SignNowRequest.Url.
-
-
Save the workflow locally and continue with the next set of steps.
The IFrame form (Default-Frame) will receive the SignNow document with the first signature, but the signing process is not yet complete. We want the workflow to continue with the SignNowWait form upon receipt of the first signature. The workflow will pause on the SignNowWait form until the second signature is received. If user closes the form or logs out after submitting the first signature, upon return to the form, the workflow will display the SignNowWait form.
-
Double-click the transition from the Default-Frame form to the SignNowWait form.
-
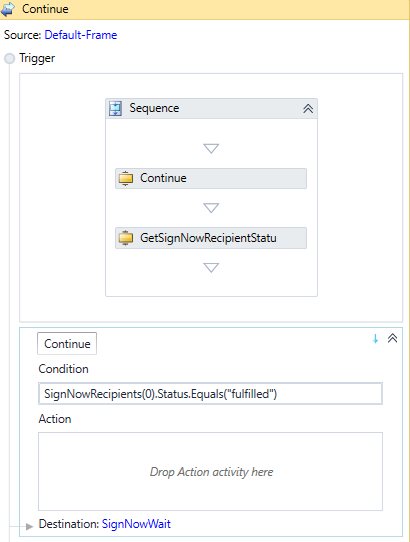
In the Trigger area, name the WaitForFormBookmark as Continue.
-
Select the property Transition Type = MoveForward on the WaitForFormBookmark activity.
-
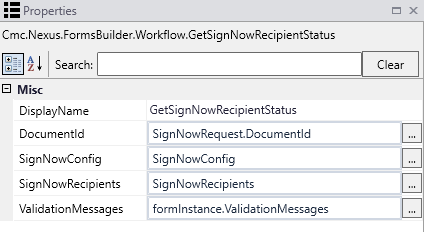
Drop a GetSignNowRecipientStatus activity below the Continue WaitForFormBookmark.
Specify the properties using the names of the variables created above as follows:
-
Specify the Condition as SignNowRecipients(0).Status.Equals("fulfilled").
-
Select the Default-Frame state and drag a line from the Default-Frame state to the SignNowCoSigner state to create a new transition (T1).
-
Change the T1 label to Retry and add the following condition:
Not SignNowRecipients(0).Status.Equals("fulfilled")
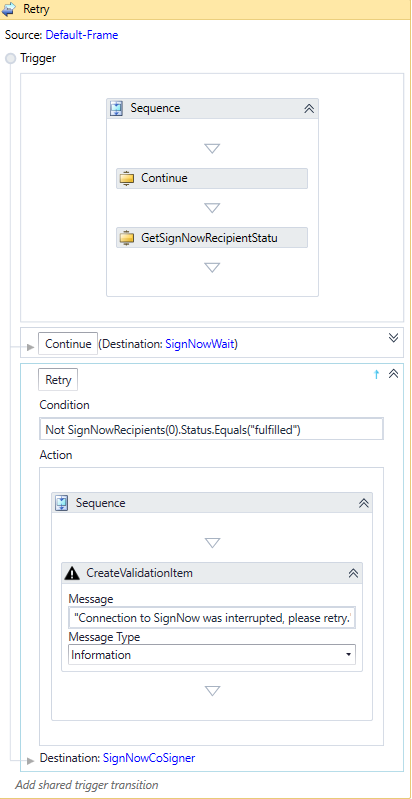
-
Drag a CreateValidationItem activity into the Action area of the Retry transition and specify the following properties:
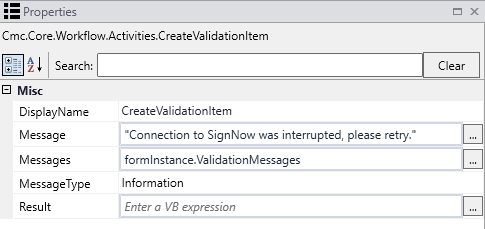
-
Save the workflow locally and continue with the next set of steps.
In the following steps, we will create activities in the Done transition before the End state. At this point in the workflow, the second signature was received and the SignNow document is complete.
-
Double-click the Done transition before the End state and rename the WaitForFormBookmark activity as Continue when all signatures are collected. SignNow returns the string "Continue when all signatures are collected" in the custom field named "Bookmark".
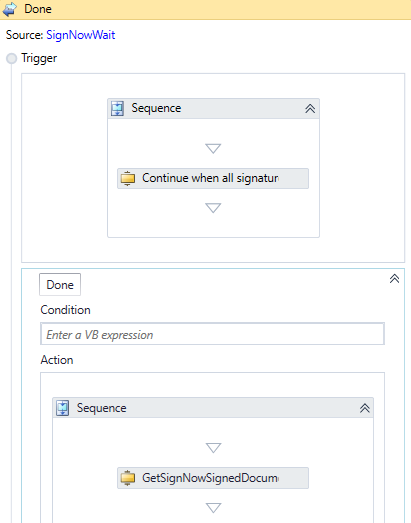
-
Create a variable named SignNowSignedDocument. In the Variable type field, select SignNowDocument. Set the Scope to StateMachine.
-
Drop a GetSignNowSignedDocument activity into the Action area.
Specify the properties for the activity as follows:
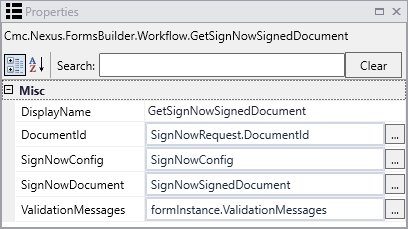
-
Save the workflow locally and continue with the next set of steps.
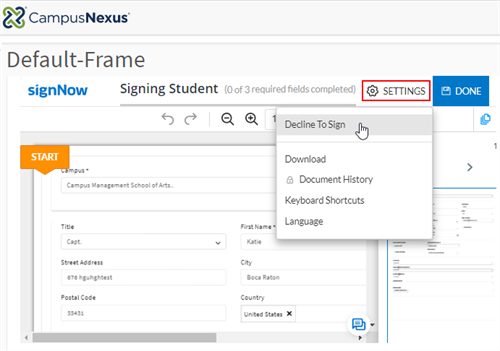
Note:
SignNow provides signers the Decline To Sign option.
If the decline option is selected by the primary, secondary, or any additional signer:
The signer will see a popup stating "You've declined to sign <PDF name>. <SignNow account email address> has been notified of your decision. You can always sign the document later if you change your mind."
SignNow will not return control of the sequence to Forms Builder and the workflow will not continue. The workflow will remain as a persisted instance. You will need to terminate persisted workflows periodically using either Sequence Designer (see Delete Persisted Workflow Instances) or Workflow Composer (see Persisted Workflows).
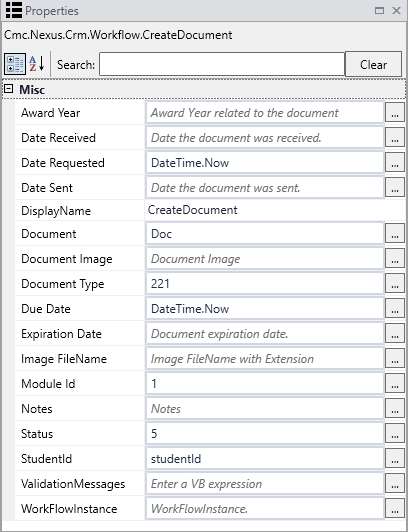
To convert a SignNow document to a DocumentEntity that can be attached to a record in Anthology Student, add CreateDocument and SaveDocument activities to the workflow. These activities will be placed below the GetSignNowSignedDocument activity.
-
Create a variable named Doc. Set the Scope to StateMachine.
In the Variable type field, select Browse for Type. In the "Browse and Select a .Net Type" window, scroll down to Cmc.Nexus.Crm.Contracts > Cmc.Nexus.Crm.Entities and select DocumentEntity.
-
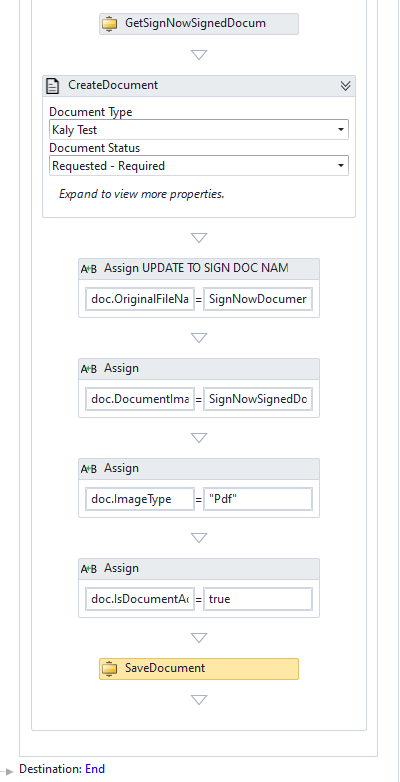
Drop a CreateDocument activity below the GetSignNowSignedDocument activity.
Specify the properties as shown below activity and use the drop-down field in the activity to select appropriate values:
- Module = Select a Module from the drop-down list, e.g., Admissions.
- Document Type = Select a Type (Template) from the drop-down list.
- Document Status = Select a Type from the drop-down list.
- Student = Specify a Student Id or use a variable.
- Due Date = Specify a date or use a variable, e.g., DateTime.Now
- Document (OutArgument) = Doc (This is the variable created above for the DocumentEntity.)
- Validation Messages = formInstance.ValidationMessages
-
Below the CreateDocument activity, drop an Assign activity for each row in the following table and type the indicated values:
"To" Field Value doc.OriginalFileName SignNowDocument.Name doc.DocumentImage SignNowSignedDocument.Content doc.ImageType "Pdf" doc.IsDocumentAddedManually true -
Drop a SaveDocument activity below the last Assign activity.
Specify the properties for the SaveDocument activity as follows:
- Document (InOutArgument) = Doc (This is the variable created above for the DocumentEntity.)
- Validation Messages = formInstance.ValidationMessages
-
Save the workflow locally and continue with the next set of steps.
-
Click Publish. The New Workflow Definition Version window is displayed.
-
If you want the workflow to be run as soon as the event occurs on the entity, select Enable This Workflow Version?, otherwise leave the check box cleared.
-
Click Save, then Cancel to close the publisher window.
-
In the Sequence List, select and complete the form that contains the SignNow fields.
-
Verify that the signed SignNow document is available at the return URL.
Note: While testing your workflow, make sure that you terminate the previous instance of the workflow before running an updated version of the same workflow. In Workflow Composer, click Open Persisted Workflow, select your workflow instance, and click Terminate.
Persisted workflow instances can be also deleted from the Sequence Designer workspace. For more information, see Delete Persisted Workflow Instances.