The topic "SignNow Settings" is not available in Version 3.5.
The topic "SignNow Settings" is not available in Version 3.6.
SignNow Settings
|
|
Important: Before you can use SignNow with Forms Builder, you must:
For more information, see https://www.signnow.com/. |
To enable SignNow signatures on Forms Builder forms, you need to configure your SignNow credentials and API key in Forms Builder Settings as described below.
Note: The API key is only usable for the main account (sender account). The API plan currently comes with 1 seat for the sender account and signer accounts do not need a license.
Set Up Forms Builder for SignNow
You can create a sandbox account to get your documents signed via the SignNow API for test purposes. When you are ready for production, contact your SignNow account manager and update the Forms Builder Settings with the appropriate information.
-
To create a sandbox account, go to https://www.signnow.com/api, enter your email address, and click Get Started.
-
Open the SignNow account activation message and click Activate.
-
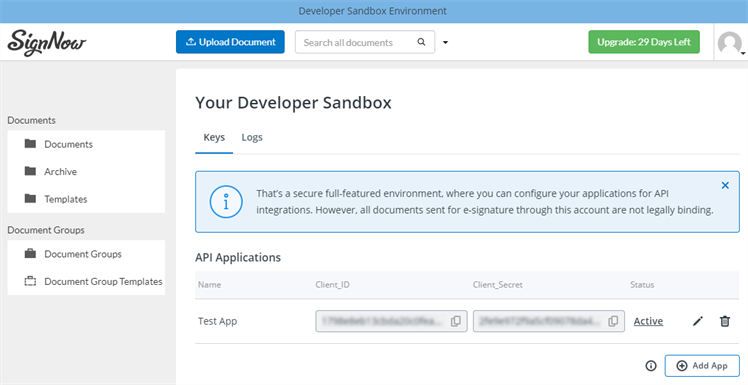
Create a password and click Activate Account. Your developer sandbox page will display your Client ID and Client Secret.

-
On the Forms Builder home page, click the Settings tile and select SignNow. The Properties pane will be populated with the SignNow properties.
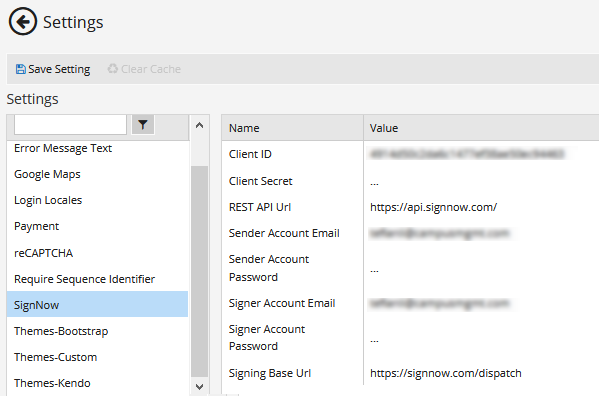
Note: The settings require two URLs. Specify the correct Urls values depending on whether you are using SignNow in a test environment or in a production environment. The image above shows the Urls used in production.
Url Testing Production (example) REST API Url https://api-eval.signnow.com/ https://api.signnow.com/ Signing Base Url https://eval.signnow.com/dispatch https://signnow.com/dispatch Contact your SignNow account manager or support@signnow.com to obtain the correct values for your production environment.
-
Complete the following fields in the Settings pane:
SignNow Properties Name Value Client ID Copy and paste the Client Id and Client Secret from the Developer Sandbox page.
Contact your SignNow account manager or support@signnow.com to obtain the correct values for your production environment.
These values are needed during the token exchange between Forms Builder and the SignNow API. The Client Secret is encrypted in the Forms Builder database.
Client Secret REST API Url For test purposes use: https://api-eval.signnow.com/
Contact your SignNow account manager or support@signnow.com to obtain the correct values for your production environment.
Sender Account Specify email address and password for the sender and signer account. Use the same email address both accounts. Signer Account Signing Base Url For test purposes use: https://eval.signnow.com/dispatch Contact your SignNow account manager or support@signnow.com to obtain the correct values for your production environment.
Note: The SignNow testing Url and production Url do not share data and require separate keys.
|
|
Whenever you edit a field in a Settings panel with hidden fields (i.e., sensitive data that are removed from the client-side view like passwords, keys, and secrets), you must re-enter the hidden values, otherwise they will get cleared upon update and resave of all the Settings. |
-
Save the Settings.
-
Once the SignNow configuration is complete, reset IIS or wait an hour for the changes to take effect.
Troubleshoot SignNow Settings
Error: Invalid Client
If your Forms Builder logs contain an error similar to the example below, correct the host URLs configured in the SignNow Settings.
2021-09-01 21:00:05.8169 ERROR - Cmc.Nexus.FormsBuilder.Services.SignNowService: Error getting access token: {"error":"invalid_client"}
2021-09-01 21:00:05.8169 ERROR - Cmc.Nexus.FormsBuilder.Services.SignNowService: Cmc.Nexus.FormsBuilder.Helpers.FormsBuilderException: Error getting access token: {"error":"invalid_client"}
Error: Access Denied
If your Forms Builder logs contain an error similar to the example below, change the signnow.apiuser, sender, and signer accounts in the SignNow Settings so that they use the same credentials and email addresses.
2021-09-01 22:00:05.2169 ERROR - Cmc.Nexus.FormsBuilder.Services.SignNowService: Error getting access token: {"errors":[{"code":11005001,"message":"Access denied."}]}
2021-09-01 22:00:05.3169 ERROR - Cmc.Nexus.FormsBuilder.Services.SignNowService: Cmc.Nexus.FormsBuilder.Helpers.FormsBuilderException: Error getting access token: {"errors":[{"code":11005001,"message":"Access denied."}]}
    at Cmc.Nexus.FormsBuilder.Services.SignNowService.GetAccessToken(String userEmail, String userPassword, String documentId) in C:\Agt1\_work\I\s\Cmc.Nexus.FormsBuilder\Services\SignNowService.cs:line 350
    at Cmc.Nexus.FormsBuilder.Services.SignNowService.CreateSignNowRequest(CreateSignNowRequest request) in C:\Agt1\_work\I\s\Cmc.Nexus.FormsBuilder\Services\SignNowService.cs:line 109
2021-09-01 22:00:05.4169 ERROR - Cmc.Nexus.FormsBuilder.Workflow.CreateSignNowRequest: CreateSignNowRequest had errors for WorkflowInstanceId: 1bae1731-bc64-8885-c2617081f663. Validation message: Error getting access token
|
|
Important: Before you can use SignNow with Forms Builder, you must:
For more information, see https://www.signnow.com/. |
To enable SignNow signatures on Forms Builder forms, you need to configure your SignNow credentials and API key in Forms Builder Settings as described below.
Set Up Forms Builder for SignNow
You can create a sandbox account to get your documents signed via the SignNow API for test purposes. When you are ready for production, contact your SignNow account manager and update the Forms Builder Settings with the appropriate information.
-
To create a sandbox account, go to https://www.signnow.com/api, enter your email address, and click Get Started.
-
Open the SignNow account activation message and click Activate.
-
Create a password and click Activate Account. Your developer sandbox page will display your Client ID and Client Secret.
-
On the Forms Builder home page, click the Settings tile and select SignNow. The Properties pane will be populated with the SignNow properties.
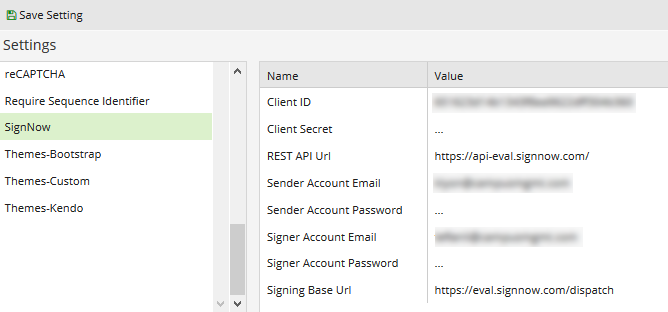
Note: The settings require two URLs. Specify the correct Urls values depending on whether you are using SignNow in a test environment or in a production environment. The image above shows the Urls used in production.
Url Testing Production (example) REST API Url https://api-eval.signnow.com/ https://api.signnow.com/ Signing Base Url https://eval.signnow.com/dispatch https://signnow.com/dispatch Contact your SignNow account manager or support@signnow.com to obtain the correct values for your production environment.
-
Complete the following fields in the Settings pane:
SignNow Properties Name Value Client ID Copy and paste the Client Id and Client Secret from the Developer Sandbox page. Contact your SignNow account manager or support@signnow.com to obtain the correct values for your production environment.
These values are needed during the token exchange between Forms Builder and the SignNow API. The Client Secret is encrypted in the Forms Builder database.
Client Secret REST API Url For test purposes use: https://api-eval.signnow.com/ Contact your SignNow account manager or support@signnow.com to obtain the correct values for your production environment.
Sender Account Specify Email address and Password for the sender's account. Signer Account Specify Email address and Password for the signer's account. Signing Base Url For test purposes use: https://eval.signnow.com/dispatch Contact your SignNow account manager or support@signnow.com to obtain the correct values for your production environment.
Note: The SignNow testing Url and production Url do not share data and require separate keys.
|
|
Whenever you edit a field in a Settings panel with hidden fields (i.e., sensitive data that are removed from the client-side view like passwords, keys, and secrets), you must re-enter the hidden values, otherwise they will get cleared upon update and resave of all the Settings. |
-
Save the Settings.
-
Once the SignNow configuration is complete, reset IIS or wait an hour for the changes to take effect.
|
|
Important: Before you can use SignNow with Forms Builder, you must:
For more information, see https://www.signnow.com/. |
To enable SignNow signatures on Forms Builder forms, you need to configure your SignNow credentials and API key in Forms Builder Settings as described below.
Set Up Forms Builder for SignNow
You can create a sandbox account to get your documents signed via the SignNow API for test purposes. When you are ready for production, contact your SignNow account manager and update the Forms Builder Settings with the appropriate information.
-
To create a sandbox account, go to https://www.signnow.com/api, enter your email address, and click Get Started.
-
Open the SignNow account activation message and click Activate.
-
Create a password and click Activate Account. Your developer sandbox page will display your Client ID and Client Secret.
-
On the Forms Builder home page, click the Settings tile and select SignNow. The Properties pane will be populated with the SignNow properties.
Note: The settings require two URLs. Specify the correct Urls values depending on whether you are using SignNow in a test environment or in a production environment. The image above shows the Urls used in production.
Url Testing Production (example) REST API Url https://api-eval.signnow.com/ https://api.signnow.com/ Signing Base Url https://eval.signnow.com/dispatch https://signnow.com/dispatch Contact your SignNow account manager or support@signnow.com to obtain the correct values for your production environment.
-
Complete the following fields in the Settings pane:
SignNow Properties Name Value Client ID Copy and paste the Client Id and Client Secret from the Developer Sandbox page. Contact your SignNow account manager or support@signnow.com to obtain the correct values for your production environment.
These values are needed during the token exchange between Forms Builder and the SignNow API. The Client Secret is encrypted in the Forms Builder database.
Client Secret REST API Url For test purposes use: https://api-eval.signnow.com/ Contact your SignNow account manager or support@signnow.com to obtain the correct values for your production environment.
Sender Account Specify Email address and Password for the sender's account. Signer Account Specify Email address and Password for the signer's account. Signing Base Url For test purposes use: https://eval.signnow.com/dispatch Contact your SignNow account manager or support@signnow.com to obtain the correct values for your production environment.
Note: The SignNow testing Url and production Url do not share data and require separate keys.
|
|
Whenever you edit a field in a Settings panel with hidden fields (i.e., sensitive data that are removed from the client-side view like passwords, keys, and secrets), you must re-enter the hidden values, otherwise they will get cleared upon update and resave of all the Settings. |
-
Save the Settings.
-
Once the SignNow configuration is complete, reset IIS or wait an hour for the changes to take effect.