Adding Targets to a Campaign
Permissions Required
Manage Campaigns - To create, edit, copy, and delete Campaigns.
You can add Targets to a Campaign using Filters or Mailing Lists. Targets which are added to a Campaign go through the various steps defined in the Campaign Workflow, always beginning from the Start Node. You can add Targets to a New Campaign only after saving it.
You can use Filters to add Targets to an active Campaign. These Targets are added to the Campaign Workflow immediately. When you add a Mailing List to an active Campaign, Targets are added when the Mailing List runs. Mailing Lists can be scheduled to run on a particular day and time, or at fixed intervals.
Adding Targets Using Filters
You can add Targets to a Campaign by defining Filter conditions to locate the Targets to be added.
To Add Targets Using Filters
1. Open the required Campaign.
2. From the Campaign menu, select Add Targets.
- OR -
Click  . The Add Targets dialog box is displayed.
3. From the Filters tab, select a saved Filter.
- OR -
Create a Filter by specifying conditions in the Define Conditions area.
4. Click Add to Campaign.
5. Click OK. The Targets are added to the Campaign.
|
Note When you use Filters, Targets are added to a Campaign when the Add Targets Job starts running in the background. |
Adding Targets Using Mailing Lists
You can add Targets to a Campaign by selecting a Mailing List that has been previously defined. The same Mailing List can be added to multiple Campaigns. Before adding a Mailing List to a Campaign you must:
• Identify base Object items.
• Create a Mailing List based on the identified base Object items.
• Create Mailers.
• Insert the required Mailer in the Campaign Workflow.
Before you add a Mailing List to a Campaign, Talisma enables you to sort the Mailing List, based on Properties of the base Object. You can also specify the number of Targets to be added to the Campaign from the sorted Mailing List.
|
Example As the Marketing Manager of WorldWaves, you are assigned the task of running a Newsletter Campaign to announce a sales promotion offer. You have dispatched Mailers to Targets in Denver, Chicago, and San Francisco. The Research & Development Team Manager informs you that New York has tremendous sales potential. So you decide to send the Newsletter to your Contacts in New York also. You can add the Mailing List containing your New York Contacts to the Campaign. |
To Add a Mailing List to a Campaign
1. In the Add Targets dialog box, click the Mailing List tab.
2. From the Add Targets to Campaign from list, select the Mailing List you want to add to the Campaign.
3. Schedule the Mailing List if you want it to be added at a later time. You can schedule a Mailing List:
◦ To be added at a particular time.
◦ To recur at specific intervals.
4. Click  in the Scheduled For column. The Schedule Mailing List dialog box is displayed.
5. For the On option, select the date and time when the mailing list must be added to the campaign. When the specified time occurs, targets are added to the campaign if they fulfill the criteria of the mailing list.
- OR -
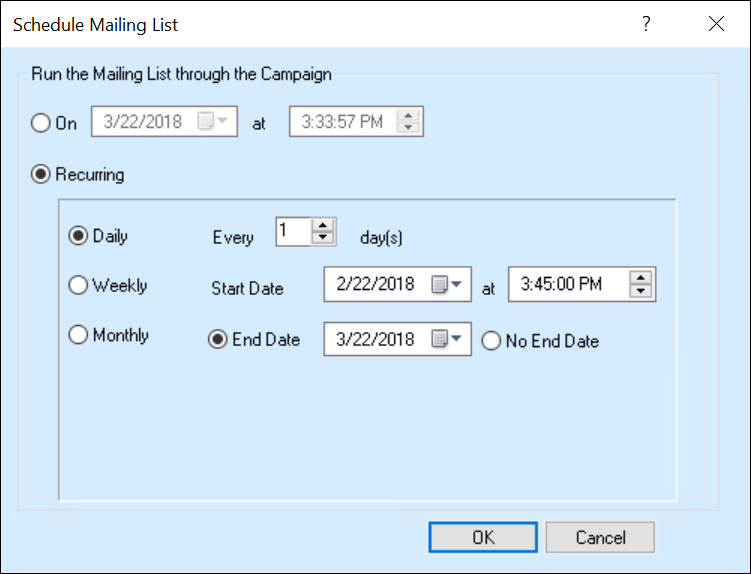
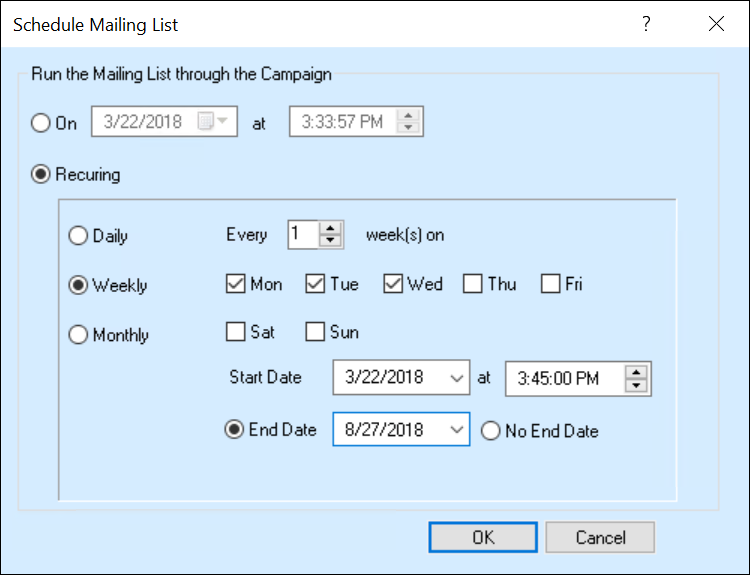
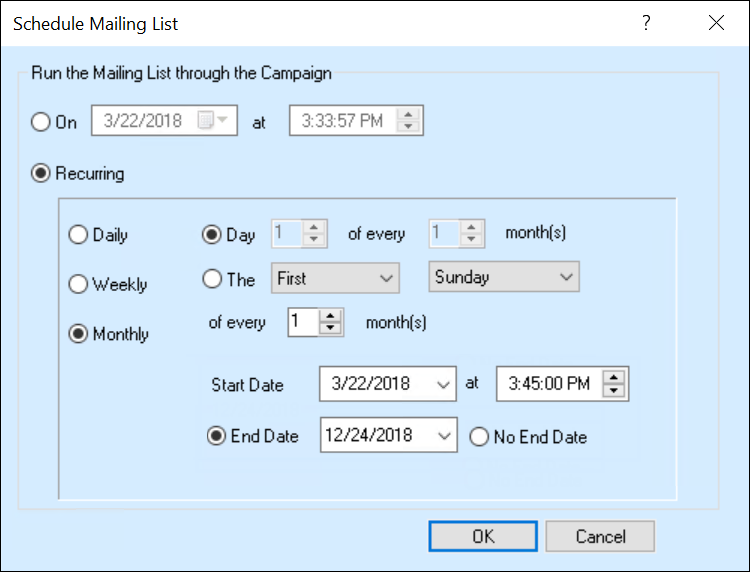
Select Recurring and then choose from one of the following options:
◦ Daily:![]()
◦ Weekly![]()
◦ Monthly![]()
For each option, select the fields that enable you to configure the scheduled mailing list.
Note
◦ In the Start date field, select a date from which targets can be added to the scheduled mailing list. The selected date must be on or after the current date.
◦ In the End date field, select a date after which targets will no longer be added to the scheduled mailing list. The selected date must be on or after the Start date.
OR
Select the No end date option. Targets will continue to be added to the mailing list indefinitely.
If you select an end date, targets will not be added to the dynamic mailing list after the end date lapses even if they fulfill the specified filter criteria. However, if you select the No end date option, targets will continue to be added to the mailing list if they fulfill the specified filter criteria.
The added targets will be processed at the campaign step when the campaign is activated.
Example
The Basic Finance Refresher non-paid event will be conducted on April 10th. The campaign to enroll for the event is open to first semester MBA students from March 1st to March 31st. Only those students who confirm their attendance on or before March 31st qualify to attend the event on April 10th. Students who confirm their attendance after March 31st will not be able to attend the event.
6. Click OK. The Schedule Mailing List dialog box is closed.
7. Click OK. The Add Targets dialog box is closed, and the mailing list is added to the campaign, and targets from the list will be added at the scheduled time.
|
Note • Use the Filters tab to add Targets to an active Campaign. These Targets are added to the Campaign Workflow immediately. • Mailing Lists can be scheduled to run on a particular day and time, or at fixed intervals. • Ensure that you activate the Campaign. Even if the Mailing List is scheduled, the Mailers will not be dispatched unless the Campaign is activated. Set a Reminder to remind yourself. • The Campaign must be active for the Mailing List to run at the scheduled time. • Both Static and Dynamic Mailing Lists are displayed in this tab. • The same Mailing List can be added to multiple Campaigns. |