Configuring Settings
Click the Settings icon ( ) to view the following menu options:
• Outbox
Administrator
The Administrator icon is displayed to users with the System Administration or Business Administration permissions in Business Administrator.
For more information about the Administrator page, see The Administrator Page.
Automatically Refreshing a Workspace
Permission Required - Set User Options
The Auto Refresh Interval option enables table view panes to be automatically refreshed at configured intervals.
1. Click Auto Refresh Interval. ![]()
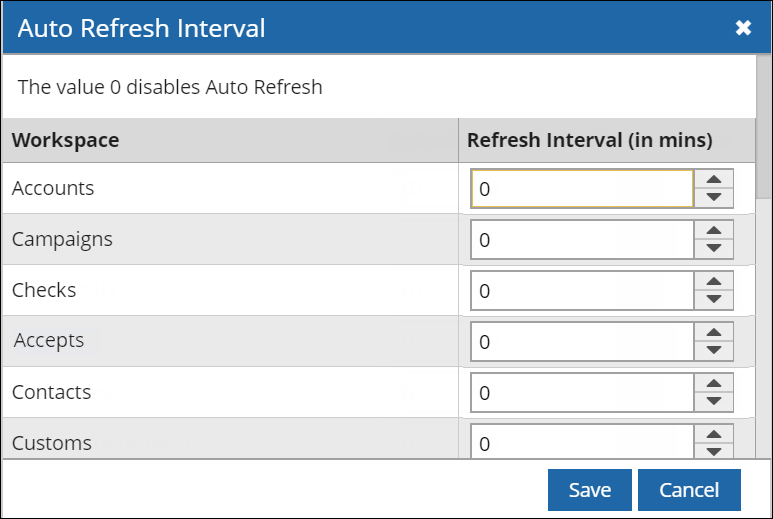
The dialog lists workspaces that are shared with you.
2. By default, the value 0 is displayed for each workspace.
3. Type a value and then click Save. The auto refresh interval is set. Workspaces will be refreshed based on the following scenarios:
| Scenario | Description | ||
|---|---|---|---|
|
In a single pane workspace that includes a table view, the user views a record in the item view. |
• After the Automatic Refresh Interval (ARI) has lapsed, the workspace will refresh when the user views the table view. OR While viewing the table view, if the ARI has not yet lapsed, the table view will be refreshed when the interval lapses. |
||
|
The following table views are configured in a two-pane workspace: • Pane 1 - Contact table view • Pane 2 - Event table view • Scenario 1 - The user views a record by clicking its link in either table view. • Scenario 2 - The user is navigating through records in either table view. |
• Scenario 1 - If the ARI lapses while viewing the record, the table view of the opened record will be refreshed when the user returns to the workspace. • Scenario 2 - The focused table view will be refreshed when the ARI lapses.
|
||
|
The following table views are configured in a two-pane workspace in which the interaction table view is dependent on the contact table view: • Pane 1 ◦ Contact table view ◦ Lead table view • Pane 2 - Interaction table view Scenarios • Scenario 1 - The user views an interaction record. • Scenario 2 - The user clicks an interaction in the dependent interaction table view, and then views the Lead table view. • Scenario 3 - The user navigates from the contact table view to the lead table view and then clicks a record in the interaction table view. |
When the ARI lapses: • Scenario 1 - The contact table view will be refreshed • Scenario 2 - The Lead table view will be refreshed. • Scenario 3 - The Interaction table view will be refreshed. |
||
Note
• When the workspace is refreshed:
◦ Records in which check boxes were selected on page 1 of the table view will remain selected.
◦ Records selected on other pages will be cleared and page 1 of the table view will be displayed.
• Records in a workspace pane that is maximized will be refreshed when the ARI lapses. Additionally, if the pane comprises multiple table view tabs, only the active tab will be refreshed when the ARI lapses.
• If the Set User Options permission is withdrawn, ARI values:
◦ Cannot be set in any new workspaces shared with you unless the permission is granted.
◦ That were set or changed earlier for existing workspaces will be displayed in read-only format. However, such workspaces will continue to be refreshed based on the set interval.
• You can also refresh a workspace pane or tab by clicking  .
.
• Records in the Outbox window are auto-refreshed based on the value of the AutoRefresh Table View every option in Desktop Client.
Available for Chat
This option enables you to be listed as available to accept chat requests.
The Available for Chat (Teams) dialog box lists all teams with which you are associated. Select the teams in which you want to mark yourself as available for chat.
For example, you are associated with teams A, B and C, but prefer to be available for chat requests that are associated only with teams A and C, then select teams A and C in this dialog box.
Click Select All or Clear All based on whether you want to select or clear all teams.
Broadcast Information
Permission Required - Can Broadcast Messages
This option is used to broadcast any information that is internal to your organization.
You can type a message and choose to broadcast it to a varied audience by selecting any of the following options:
| Select | To... |
|---|---|
| All Users | Broadcast your message to all users in the organization. |
| Users in Teams | Broadcast your message to all users in the selected Teams. |
| Following Users | Broadcast your message only to the selected users. |
Type your message in the message area and click Send.
Working with Filters
For complete information about working with filters, see Working With Filters.
Viewing Your Calendar Link
CampusNexus CRM enables you to view the link to your calendar. Such calendars are typically referred to as user calendars. Copying this link and integrating it with your third party calendar application enables you to view all your calendar events.
1. Click and select Link to My Calendar.
The Link to My Calendar dialog box is displayed.
2. Copy the link and use it in your calendar application to integrate your calendar events.
Working in the Outbox
For complete information about working in the Outbox, see Working With the Outbox.
Signature
Permissions required: Set User Options
The Signature option enables you to add a signature into a message.
The option enables you to select a team and choose a language in which your signature must be displayed.
1. Click Signature.![]()

2. From the Team list, select the team for which you want to use the signature.
3. From the Language list, select the language of the signature.
4. Type the text of the signature in the text box.
5. You can choose to insert the signature in all messages by selecting Add Signature by default to all Messages.
6. Click OK.
Your signature is set with the above specifications.
Note
• Signatures created in Web Client can be edited and used in Desktop Client, and vice versa.
• If you do not select Add Signature by default to all messages, you can insert your signature by clicking Signature from the Insert menu in the Reply, Reply All, Forward, or Consult windows. For information about inserting a signature, see Inserting a Signature in a Message.