Step 6 - Creating Reference Mappings
Object items belong to a User and Team. Hence, while importing data into Talisma, you must specify the values for the User and Team Properties of the Object items.
You can select the User and Team to which the Object item must belong, or use the default values of the TalismaAdmin User, and the Home Team.
When the base Object is Interaction or Interaction Events, you can specify the Medium through which the Interaction is created.
If you are creating Shared Object items, you can specify whether the Object items created must be shared with all Teams.
Click here to view a detailed example of how you would create Reference Mappings for User values.
Transferring Data Before Creating Reference Mappings
You need to transfer data to the interface tables before you can map values in the interface table columns to the Talisma entities of User, Team, and Interaction Medium.
To do so, perform the following steps:
1. Complete the creation of the Import Configuration and run the Import Configuration. When an Import Configuration is run for the first time after it is created, data is transferred to the interface tables, and Talisma tables.
2. Modify the Import Configuration, and map User and Team values to the values available in the interface table columns, in the Reference Mappings page.
3. Run the Import Configuration in the Update Existing Data or Import and Update mode.
It is recommended that you use the method described above when the number of distinct values to be added is large. You can also add interface table values manually. However, the manual method is recommended only when the number of distinct values to be added is small.
Perform the following steps to add the interface table values manually:
1. Right-click in the Interface Table Values area and select Add Item.
A new row is displayed.
2. Click the new row, and type the interface table value.
3. Press Enter. The new value is added to the Interface Table Values area.
To Create Reference Mappings
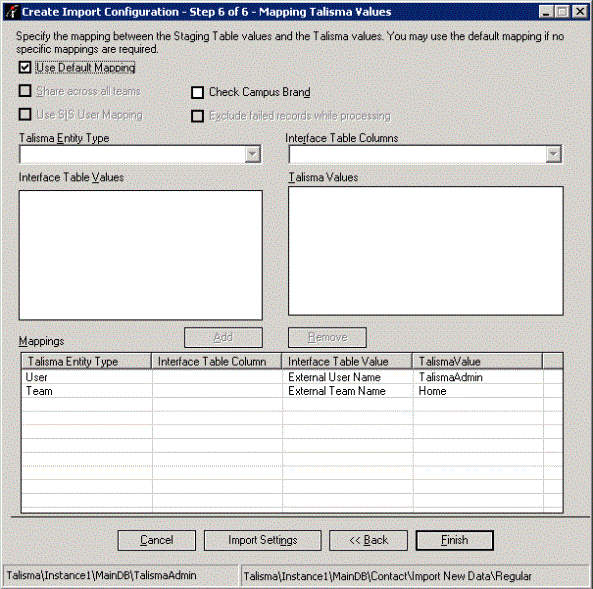
1. When you click Next on page 5 of 6, the Create Import Configuration – page 6 of 6 - Mapping Talisma Values page is displayed.

The Create Import Configuration - Step 6 of 6 Page
In this page, you can specify the values to be used for the User and Team Properties for the specified columns of the imported data. You can also use the default values by selecting the Use Default Mapping option. The default value for User is TalismaAdmin, and for Team is Home.
To Specify a Value for Talisma User
a. Select User from the Talisma Entity Type list. The Users available in Talisma are listed in the TalismaValues area.
b. From the Interface Table Columns list, select a column whose values must be mapped to the Talisma Entity that you selected. The values available in the interface table column are updated in the Interface Table Values area.
c. From the Interface Table Values area, select a value.
d. From the Talisma Values list, select a User, and click Add. A row containing the information you specified is added to the Mappings area.
|
Note The display of Talisma Users in the Talisma Values area indicates if the Lead distribution status Property of User(s) is Active or Suspended. This enables you to assign Leads to User(s) whose Lead distribution status Property is Active. However, Leads can also be assigned to a User whose Lead distribution status is Suspended. |
To Specify a Value for Team
a. Select Team from the Talisma Entity Type list. The Teams available in Talisma are listed in the Talisma Values area.
b. In the Interface Table Columns field, select a column that must be mapped to the Talisma Entity that you selected. The values available in the interface table column are updated in the Interface Table Values area.
c. From the Interface Table Values area, select a value.
d. From the Talisma Values list, select a Team, and click Add. A row containing the information you specified is added to the Mappings area.
2. If you are importing data for Interactions, or Interaction Events, specify mappings for the Medium through which the Interaction is created.
a. Select Received as Medium from the Talisma Entity Type list. The Media available in Talisma are listed in the Talisma Values area.
b. In the Interface Table Columns field, select a column that must be mapped to the Talisma Entity that you selected. The values available in the interface table column are updated in the Interface Table Values area.
c. From the Interface Table Values area, select a value.
d. From the Talisma Values list, select a Medium, and click Add. A row containing the information you specified is added to the Mappings area.
3. If you are importing data for Shared Objects, the Share across all Teams option is displayed. Select this option if you want the Object items to be shared to all Teams.
|
Note • For the Lead Object, ensure that: ◦ For the User Property in the Talisma Entity Type column, the value None is specified in the TalismaValue column. ◦ For the Team Property in the Talisma Entity Type column, an appropriate value is specified in the TalismaValue column. • If Team-based security is enabled for the Contact Object, the Share across all Teams option is displayed for the Contact Object. For more information about Team-based security for the Contact Object, contact Talisma Product Support. |
4. When the Use SIS User Mapping option is selected for an Import operation, the Talisma User who is mapped to the SIS User in Talisma Business Administrator will be set as the Owner of the Object item. Regardless of whether the Use SIS User Mapping option is selected, the Owner of the Object item will be set to Talismaadmin if the value in the source Microsoft Excel file is blank or invalid.
Behavior of the Use SIS User Mapping option
Database equivalent values of SIS Users or names of Talisma Users are specified in a column in the source Microsoft Excel file.
◦ When the Use SIS User Mapping option is selected:
◦ For SIS Users whose database equivalent values are specified, the Talisma User who is mapped to the SIS User is set as the Owner of the Object item.
◦ For Talisma CRM Users whose name is specified, Talismaadmin is set as the Owner of the Object item.
◦ When the Use SIS User Mapping option is cleared:
◦ For SIS Users whose database equivalent values are specified, Talismaadmin is set as the Owner of the Object item.
◦ For Talisma CRM Users whose name is specified, the Object item is created with the Talisma CRM User as the Owner.
|
Note The Use SIS User Mapping option is available for selection if Talisma Higher Education Foundation is installed, and if a column in the source Microsoft Excel file is mapped to the Owner Property of the Object item that is created. |
5. If you are creating an Import Configuration for the Contact Object, the Check Campus Brand option is displayed. When you select this option, the Campus’s Brand of a Contact is implicitly added to the list of Properties in the duplicate check criteria.
The Check Campus Brand option is available for the following Import modes:
◦ Import New Data
◦ Update Existing Data
◦ Import and Update Data
|
Example In the Duplicate Check Groups list of the Contact Duplicate Configuration page, the duplicate check criteria is specified as follows: • E-mail, Name, Program • E-mail, Name • CustDate, CustNum, CustUser When the Check Campus Brand option is selected, Campus’s Brand is implicitly added to the list of duplicate check criteria. Therefore the duplicate check criteria will be as follows: • E-mail, Name, Program, Campus’s Brand • E-mail, Name, Campus’s Brand • CustDate, CustNum, CustUser, Campus’s Brand |
|
Note • The Check Campus Brand option is displayed if: ◦ The base Object is Contact. ◦ The base Object, if not a Contact Object, has a Relationship with the Contact Object, and the Contact Properties are mapped in the Duplicate Check criteria. • The Campus’s Brand is not displayed in the Duplicate Check Groups list of the Contact Duplicate Configuration page. It is implicitly added to the list of Properties in the duplicate check criteria. |
6. When the Exclude failed records while processing option is selected, any failed records available in the interface table are not processed when the Import Configuration is run. By default, this option is cleared.
Selecting this option improves the performance of an Import operation. This option is available only for the Lead Object. For other Objects, this option is disabled.
Scenarios for the Exclude failed records while processing option:
◦ When the Exclude failed records while processing option is cleared, failed records that were retained in the interface table are processed along with new records.
◦ When the Exclude failed records while processing option is selected:
a. In the interface table, the value of the lImpstatus column of the failed records is set to 1000.
b. The failed records for which the value of the lImpstatus column is set to 1000 are excluded while processing.
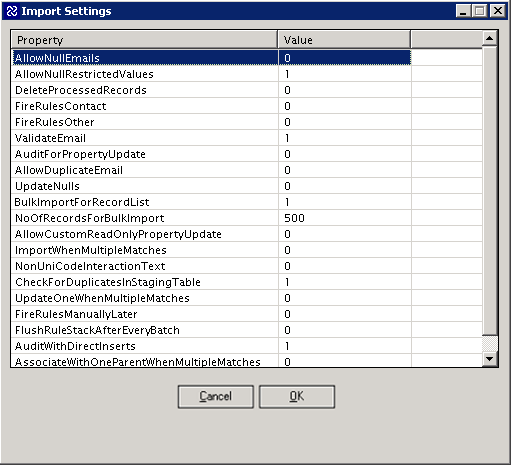
7. Click Import Settings. The Import Settings window is displayed.

The Import Settings Dialog Box
It lists properties of the Global Config Utility that are specific to or "local" to the Data Management Utility. To modify the behavior of the import configuration, values for these properties must be set in the Data Management Utility even though these properties are displayed in the Global Config Utility. To do so:
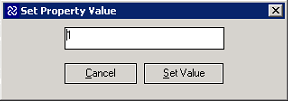
a. Double click a property. The Set Property Value dialog box is displayed.

b. Type a valid value for the property. For information about the valid values of each property, see Configuring Settings for the Import Configuration.
c. Click Set Value.
Note
• If you specify special characters for the property value, the Import configuration may not work as expected.
• By default, property values in the Import Settings dialog box are inherited from the Global Config Utility. Changing the value of the property in the Set Property Value dialog box enables you to modify settings of the import configuration locally. Further, if you modify the Import Configuration later, clicking the Import Settings button enables you to view property values that apply to the Import Configuration.
|
Example The value of the AuditForPropertyUpdate property in the Global Config Utility is set to 0. You update its value to 1 in the Set Property Value dialog box and then create and run an Import Configuration. Later, the value of AuditForPropertyUpdate is changed to 0 in the Global Config Utility. In this scenario, the following behavior occurs: • When you view the Import Settings dialog box in the Modify Import Configuration wizard, the value of the property is 1. This occurs because you changed the value of the property before creating and running the Import Configuration. • When you create a new Import Configuration, the default value of the Property is 0 in the Import Settings window. This occurs because the value of the property was updated in the Global Config Utility. |
8. Click Finish.
The Job Creation dialog box is displayed, indicating the stored procedures and SQL Server Jobs are created for the Import Configuration. You can choose to run the Import Configuration or exit the wizard.
|
Note • Import packages that are created are suffixed with the name of Talisma Main Database. Similarly, in the Jobs node in SQL Server Management Studio, the name of Talisma Main Database is suffixed to the DTS, Master, and Talisma jobs that are created for each Import package. • If you try to create an Import Configuration when the version of Microsoft SQL Server on the Server Components computer is not identical to the version of Microsoft SQL Server Client Tools on the Client Components computer, a message is displayed that the creation operation will abort. You must see the Import log for more information. |