DocuSign
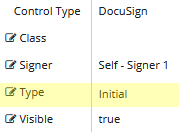
You can use the DocuSign component to integrate DocuSign fields into a form. Forms Builder supports a several types of DocuSign fields, e.g., Approve, Decline, Sign, Initial, and others. The fields are selected in the Type property of the Control Property Settings.
Before using the DocuSign component, you must set up and account with DocuSign and configure the DocuSign Settings in Forms Builder.
Properties
Control Property Settings
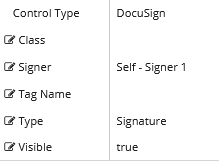
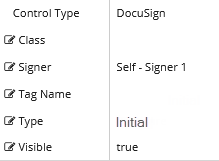
Rendered Components (Type=Signature and Type=Initial)
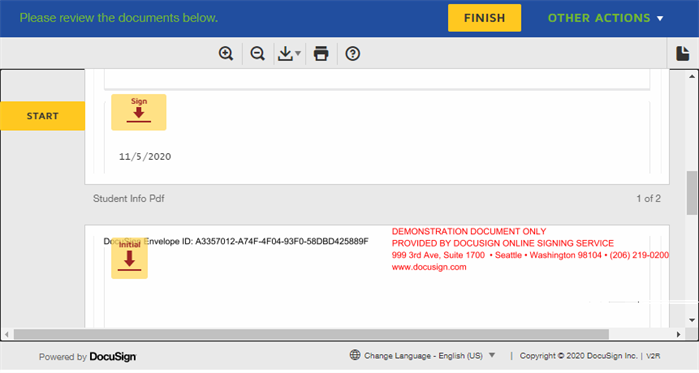
-
Class is an optional CSS class (or space separated classes) added to the top level of the control. CSS specific to the control can be applied. The class must be defined in a Renderer CSS file. For more information, see Custom Styles.
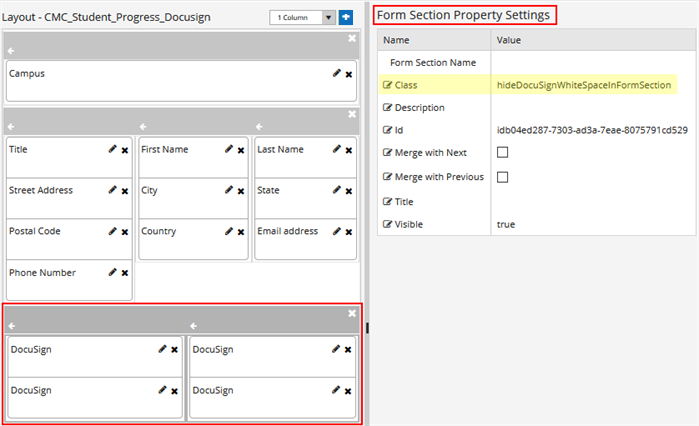
When you design a form with hidden fields or Form Sections, you may need to hide the empty space for e-sign components to ensure that the form is rendered as intended. To hide the space for e-sign components:
-
Place the e-sign components in their own Form Section (usually at the bottom of a form).
-
In the Form Section Property Settings, specify the Class name hideDocuSignWhiteSpaceInFormSection.
-
Save the form. Forms Builder will not render the Form Section on the screen but will allow it to render when it is printed to a PDF.
-
-
Signer provides the following options:
- Self - Signer 1
- Signer 2
- Signer 3
- Signer 4
- Signer 5
-
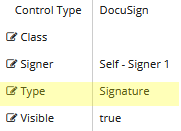
Type provides the following DocuSign fields:
Field Description Required/ Optional User Input Approve Allows the recipient to approve documents without placing a signature or initials on the document. Required Yes Attachment Allows the recipient to attach supporting documents to an envelope. Required Yes Checkbox Allows the recipient to select a yes/no (on/off) option. Optional Yes Company Allows the recipient to specify the company name. Required Yes Date Allows the recipient to enter a date. Required Yes Date Signed Allows the recipient to specify the date the document was signed. Required Yes Decline Allows the recipient the option of declining an envelope. Optional Yes Email Allows the recipient to enter an email address. Required Yes Email Address Allows the recipient to specify an email address. Required Yes Envelope Id Displays (read-only) the envelope ID. The Envelope object is the overall container for a transaction. The envelope contains the documents for the eSignature transaction. It also contains information about the recipients and timestamps that indicate delivery progress. Required No Full Name Allows the recipient to specify his/her full name. Required Yes Initial Allows the recipient to initial the document. Required Yes Number Allows the recipient to enter numbers and decimal (.) points. Required Yes Signature Allows the recipient to sign a document. May be optional. Required Yes Ssn Allows the recipient to enter a Social Security Number. Required Yes Text Allows the recipient to enter any type of text. Required Yes -
Tag Name applies to the following fields in the Type control for a specific signer:
- Checkbox
- Date
- Numbers
- Ssn
- Text
When any of the above fields is inserted multiple times in a form, typing a Tag Name for each field prevents the recipient’s typed value from being replicated to remaining fields of the same type.
Alternatively, if tag names are same or blank in a document or envelope with fields of an identical type, data population scope will be turned on and field data will be linked. The recipient's typed value in a field will be replicated to all fields of the same type. For more information about this feature, see Using Data Population Scope.
Across all the forms in a sequence, to enable a unique value to be typed in each field of a specific type, assign a unique Tag Name to the field.
Example to turn off data population scope
Type a unique value for each Tag Name to delink fields of the same type from each other. In the form, the recipient's typed value will then be unique, i.e., the values will not be copied to all fields of the same type.
A form with text fields is inserted twice as follows:
-
With the value First Name in the Tag Name field.
-
With the value Last Name in the Tag Name field.
A value typed in the first field will not be replicated to the second field, and vice versa.
Example to turn on data population scope
Type identical tag names or leave the Tag Name blank. This will link all such fields in the form, and the recipient's typed value in any field will be copied to all fields of the same type.
Note
-
Values typed in the Tag Name apply only to the 6 fields listed above. Tag Name values typed for other fields will not affect the behavior of the field.
-
In an upgrade scenario to version 4.1, the Tag Name will be blank. Type a value to enable the behavior described above.
-
Visible makes the control visible or hidden.
-
Can be bound to a workflow argument or another control's value. This property is dynamic.
-
A property array string index requires single quotes, e.g., vm.models.xxx.CustomProperties['yyyyy'].
-
An expression can be used that evaluates to true or false, e.g., vm.models.myvalue==7 (>,<, !=, ==, >=, <=). If comparing to a string, it must be in single quotes.
-
(true and false must be all lowercase)
-
Working with the DocuSign Component
You are designing a form in which you want the person completing the form to sign and date the form electronically.
-
Drag two DocuSign components into the Layout pane of your form in Form Designer.
-
On the first DocuSign component, set the Signer to Self - Signer 1 and set the Type to Signature.
-
On the second DocuSign component, set the Signer to Self - Signer 1 and set the Type to Date Signed.
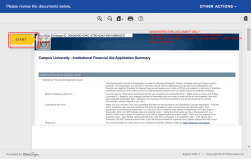
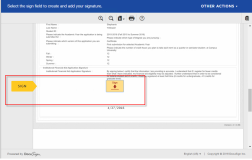
When Anthology Student fields are inserted into a form, the student is automatically directed to the section that needs an e-signature.
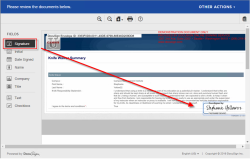
If the fields are not inserted into a form but e-signature is enabled, the student is directed to electronically sign the document and can drag out the signature anywhere on the document.
In Forms Builder 3.6 and later, the DocuSign component allows for a DocuSign sequence to be embedded in an IFrame. Previously, users received a "Waiting for data" message after successfully completing an embedded DocuSign sequence. Now, users will be redirected to the parent sequence with a "DocuSign complete" form and/or confirmation form.
The DocuSign component provides an automatic transition (auto-redirect) from the Default-Frame form to the confirmation form after a successful DocuSign session. The auto-redirect obsoletes the "DocuSign Confirmation Message Text" setting.
The auto-redirect depends on a forward direction in the WaitForFormBookmark activity in the transition after the DocuSign redirect state (typically Default-Frame), in particular if DisplayName has been modified.
-
If there is only a single button and DisplayName has been customized but Transition Type was left as "Default", the auto-redirect moves forward to next form state.
-
If there are two buttons and DisplayName(s) have been customized but Transition Type was left as "Default", the auto-redirect will assume the rightmost button (alphabetically last) is the transition for next state.
Best Practice is always to specify Display Order and Transition Type (“MoveForward” or “MoveBack”) when button Display Name(s) have been customized so behavior is known. The Transition Type of “Default” was kept for compatibility for forms built prior to Transition Type being available on WaitForFormBookmark with default Display Names "Next" and "Back”.
Localization of DocuSign Sequences
To localize sequences with DocuSign components, follow the procedure described here: Steps to Localize Sequences. There are no additional steps to be completed for DocuSign sequences. DocuSign does not provide a method for Forms Builder to pass in a locale.
The DocuSign portion of the sequences (Start, Sign here, Finish, and Completed email) displays drop-down control with a limited list of locales that are supported by DocuSign. In single signer sequences, the language selection control is in the IFrame of the sequence. In multiple signer sequences, the language control is on the DocuSign site.

The language selection for the DocuSign portion of the sequences is cached in the user's browser. In multiple signer sequences, the primary signer and other signers need to set the languages themselves. For example, one secondary signer may select French, while another secondary signer may select Italian. However, the PDF translation within the form itself is based on primary signer’s locale selection on the form prior to the redirection to the DocuSign site for the secondary signers.
Allow Sequential Signing
Forms Builder 3.6 and later supports RoutingOrder as an optional property on the DocuSignRecipient entity. If your DocuSign form sequences use this property, ensure that you have permissions to create a routing order.
-
Log in to your account at https://admin.docusign.com.
-
Go to DocuSign Admin. and navigate to Permission Sets > Action: Edit > User Permissions.
-
Select Allow sequential signing.
-
Save your changes.
If the RoutingOrder is not explicitly specified in the workflow, the RoutingOrder will be initialized with SignerId in the activity (Signer 1 gets 1, Signer 2 gets 2, etc.). When the first recipient has a routing order of 1 and the second recipient has a routing order of 2, the second recipient will not receive the request until the first signer has finished signing.
If the third and fourth recipients have a routing order of 3, they will simultaneously receive a copy of the completed envelope once the second signer completes their actions.
For more information, see Get the DocuSign Configuration and Pass the Recipient Information in DocuSign Workflow Sample - Multiple Signers.
You can use the DocuSign component to integrate DocuSign fields into a form. Forms Builder supports a several types of DocuSign fields, e.g., Approve, Decline, Sign, Initial, and others. The fields are selected in the Type property of the Control Property Settings.
Before using the DocuSign component, you must set up and account with DocuSign and configure the DocuSign Settings in Forms Builder.
Properties
Control Property Settings
Rendered Components (Type=Signature and Type=Initial)

-
Class is an optional CSS class (or space separated classes) added to the top level of the control. CSS specific to the control can be applied. The class must be defined in a Renderer CSS file. For more information, see Custom Styles.
When you design a form with hidden fields or Form Sections, you may need to hide the empty space for e-sign components to ensure that the form is rendered as intended. To hide the space for e-sign components:
-
Place the e-sign components in their own Form Section (usually at the bottom of a form).
-
In the Form Section Property Settings, specify the Class name hideDocuSignWhiteSpaceInFormSection.
-
Save the form. Forms Builder will not render the Form Section on the screen but will allow it to render when it is printed to a PDF.

-
-
Signer provides the following options:
- Self - Signer 1
- Signer 2
- Signer 3
- Signer 4
- Signer 5
-
Type provides the following DocuSign fields:
Field Description Required/ Optional User Input Approve Allows the recipient to approve documents without placing a signature or initials on the document. Required Yes Attachment Allows the recipient to attach supporting documents to an envelope. Required Yes Checkbox Allows the recipient to select a yes/no (on/off) option. Optional Yes Company Allows the recipient to specify the company name. Required Yes Date Allows the recipient to enter a date. Required Yes Date Signed Allows the recipient to specify the date the document was signed. Required Yes Decline Allows the recipient the option of declining an envelope. Optional Yes Email Allows the recipient to enter an email address. Required Yes Email Address Allows the recipient to specify an email address. Required Yes Envelope Id Displays (read-only) the envelope ID. The Envelope object is the overall container for a transaction. The envelope contains the documents for the eSignature transaction. It also contains information about the recipients and timestamps that indicate delivery progress. Required No Full Name Allows the recipient to specify his/her full name. Required Yes Initial Allows the recipient to initial the document. Required Yes Number Allows the recipient to enter numbers and decimal (.) points. Required Yes Signature Allows the recipient to sign a document. May be optional. Required Yes Ssn Allows the recipient to enter a Social Security Number. Required Yes Text Allows the recipient to enter any type of text. Required Yes
-
Visible makes the control visible or hidden.
-
Can be bound to a workflow argument or another control's value. This property is dynamic.
-
A property array string index requires single quotes, e.g., vm.models.xxx.CustomProperties['yyyyy'].
-
An expression can be used that evaluates to true or false, e.g., vm.models.myvalue==7 (>,<, !=, ==, >=, <=). If comparing to a string, it must be in single quotes.
-
(true and false must be all lowercase)
-
Working with the DocuSign Component
You are designing a form in which you want the person completing the form to sign and date the form electronically.
-
Drag two DocuSign components into the Layout pane of your form in Form Designer.
-
On the first DocuSign component, set the Signer to Self - Signer 1 and set the Type to Signature.
-
On the second DocuSign component, set the Signer to Self - Signer 1 and set the Type to Date Signed.
When Anthology Student fields are inserted into a form, the student is automatically directed to the section that needs an e-signature.
If the fields are not inserted into a form but e-signature is enabled, the student is directed to electronically sign the document and can drag out the signature anywhere on the document.
In Forms Builder 3.6 and later, the DocuSign component allows for a DocuSign sequence to be embedded in an IFrame. Previously, users received a "Waiting for data" message after successfully completing an embedded DocuSign sequence. Now, users will be redirected to the parent sequence with a "DocuSign complete" form and/or confirmation form.
The DocuSign component provides an automatic transition (auto-redirect) from the Default-Frame form to the confirmation form after a successful DocuSign session. The auto-redirect obsoletes the "DocuSign Confirmation Message Text" setting.
The auto-redirect depends on a forward direction in the WaitForFormBookmark activity in the transition after the DocuSign redirect state (typically Default-Frame), in particular if DisplayName has been modified.
-
If there is only a single button and DisplayName has been customized but Transition Type was left as "Default", the auto-redirect moves forward to next form state.
-
If there are two buttons and DisplayName(s) have been customized but Transition Type was left as "Default", the auto-redirect will assume the rightmost button (alphabetically last) is the transition for next state.
Best Practice is always to specify Display Order and Transition Type (“MoveForward” or “MoveBack”) when button Display Name(s) have been customized so behavior is known. The Transition Type of “Default” was kept for compatibility for forms built prior to Transition Type being available on WaitForFormBookmark with default Display Names "Next" and "Back”.
Localization of DocuSign Sequences
To localize sequences with DocuSign components, follow the procedure described here: Steps to Localize Sequences. There are no additional steps to be completed for DocuSign sequences. DocuSign does not provide a method for Forms Builder to pass in a locale.
The DocuSign portion of the sequences (Start, Sign here, Finish, and Completed email) displays drop-down control with a limited list of locales that are supported by DocuSign. In single signer sequences, the language selection control is in the IFrame of the sequence. In multiple signer sequences, the language control is on the DocuSign site.

The language selection for the DocuSign portion of the sequences is cached in the user's browser. In multiple signer sequences, the primary signer and other signers need to set the languages themselves. For example, one secondary signer may select French, while another secondary signer may select Italian. However, the PDF translation within the form itself is based on primary signer’s locale selection on the form prior to the redirection to the DocuSign site for the secondary signers.
Forms Builder 3.6 and later supports RoutingOrder as an optional property on the DocuSignRecipient entity. If your DocuSign form sequences use this property, ensure that you have permissions to create a routing order.
-
Log in to your account at https://admin.docusign.com.
-
Go to DocuSign Admin. and navigate to Permission Sets > Action: Edit > User Permissions.
-
Select Allow sequential signing.
-
Save your changes.
If the RoutingOrder is not explicitly specified in the workflow, the RoutingOrder will be initialized with SignerId in the activity (Signer 1 gets 1, Signer 2 gets 2, etc.). When the first recipient has a routing order of 1 and the second recipient has a routing order of 2, the second recipient will not receive the request until the first signer has finished signing.
If the third and fourth recipients have a routing order of 3, they will simultaneously receive a copy of the completed envelope once the second signer completes their actions.
For more information, see Get the DocuSign Configuration and Pass the Recipient Information in DocuSign Workflow Sample - Multiple Signers.
