Custom Content
The Custom Content tile on the Home page enables users to upload files to the CustomContent table in the database. These files can then be used to customize forms. In previous releases, on premises customers could also use the file system reference method, and for Azure customers the database method was the only way of customizing forms.
As the file system reference method is no longer available from version 4.1, on premises and Azure customers must only use the database method as it simplifies Forms Builder upgrades.
Custom files can include 5 different types of content: images, videos, CSS styles, JavaScript, and logos.
-
Currently, the following extensions are allowed: .jpg, .jpeg, .bmp, .svg, .gif, .ico, .png, and .apng.
Please check https://en.wikipedia.org/wiki/Comparison_of_web_browsers for details on support in various browsers. -
Only mp4 is supported.
-
This section describes how to apply a CSS file to forms in a sequence, to a sequence, or globally across all sequences.
In addition, to understand how CSS files can be configured in form sequences to be displayed at different URLs with different branding using a single instance of Forms Builder, see Multiple Renderer URLs.
-
Note: Since .js files are active scripts, you must ensure that security guidelines are followed.
Several libraries that are part of Renderer that can be utilized, including JQuery, w3 (from w3schools.com), Lodash, he, jsep, kendo, clipboard that will work outside of the Anthology Inc. Angular application. -
Navigation Bar Logos and Sequence Logos (not to be confused with header or footer content for a form)
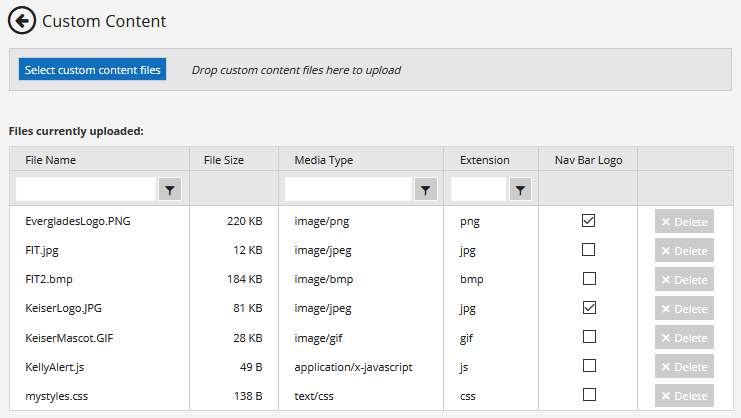
To upload custom content, click Select custom content files and select the files (or drag the files into the selection area). The files will be uploaded to the database used by Forms Builder and added to the grid showing the currently uploaded files.
To remove a custom content file, select it in the grid, click Delete, and click OK on the confirmation message. The file is deleted. If the file is in use, it will not be deleted, and a validation message is displayed in Form Designer.
If you edited a previously uploaded file and want to upload the new version of the same file, the previous version will be overwritten, i.e., you don't need to delete the previous version.
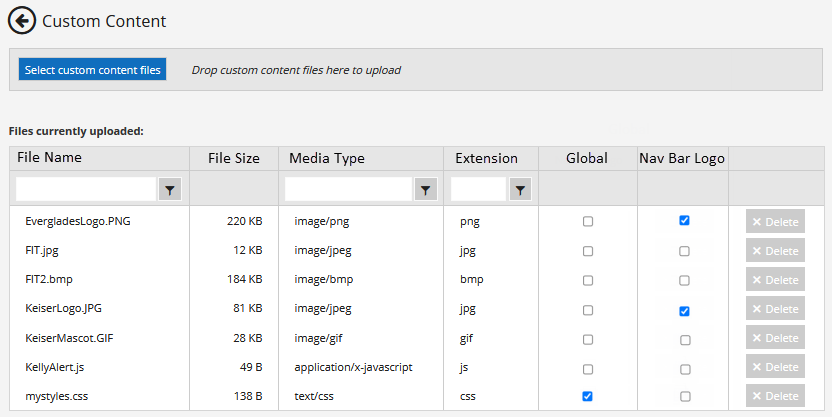
Image Files
While image files can be directly embedded in HTML by going to https://codebeautify.org/image-to-base64-converter and creating the data to embed, the Custom Content feature does the work for you. Anywhere you need an image, simply upload an image file and add an HTML component to the page. Currently, the following extensions are allowed: .jpg, .jpeg, .bmp, .svg, .gif, .ico, .png, and .apng.
Use the following HTML to refer to the uploaded file:
<cmc-custom-content-image src=”myImage.png” model=”myModel” />
This will place the image on the page at the location of the component. If you ever need to change the image, simply upload a new file with the same name. You could also add style information for the image using CSS.
Model is an optional attribute. If it is specified and an argument in a workflow is assigned a value, it will be used to retrieve the image uploaded by name. If not, the src value is used. This allows you to programmatically decide which image to display.
Note: In the model value, specify either the argument name only (e.g., "myModel") or the argument name with the "vm.models." prefix (e.g., "vm.models.myModel").
The src value acts as the default if model has not been set or modified in workflow, otherwise it is ignored.
Example
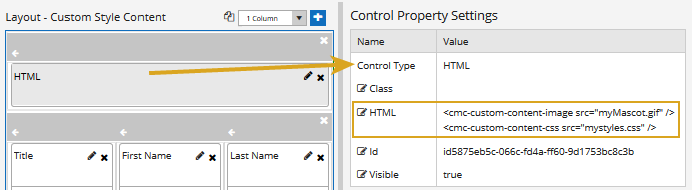
Note: You can combine multiple directives in one HTML component as shown in the example with "cmc-custom-content-image" and "cmc-custom-content-css".
Video Files
This directive has attribute "src1" and optional attributes "src2" and "src3", which refer to files in the CustomContent database table. It gets the FileData and replaces this element with an embedded video element that utilizes base 64 strings.
Use the following HTML to refer to the uploaded file:
<cmc-custom-content-video src1="myVideo.mp4" />
Optional attributes are: model="" src2="", src3="", controls, autoplay, width="", and height="".
-
model allows a workflow argument to set the video for src1 and overrides src1 if set.
-
src2 and src3 are optional videos to play if src1 will not play, but usually are not necessary if mp4 is the first video.
-
autoplay starts the video automatically.
-
controls will display controls to stop, start, pause the video. None by default.
-
width and height should be set in pixels unless the default size is correct. Usually, only one of width or height is set, not both, otherwise the video might stretch or squash.
Only mp4 is supported by HTML5 in all browsers. All other formats should be converted to mp4 to use this directive.
For other types of videos, other techniques such as embed and object are needed and the video must be a physical file (which defeats the purpose of this directive). It can be hosted on a specialized server or YouTube but may be subject to restrictions for commercial use of the site (such as payment for ad free content).
CSS Files (Style Sheets)
Upload your style sheet. It does not have to be embedded in <style></style> tags, but it can be.
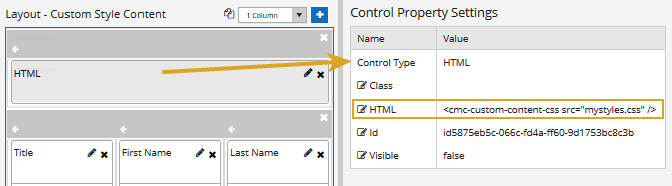
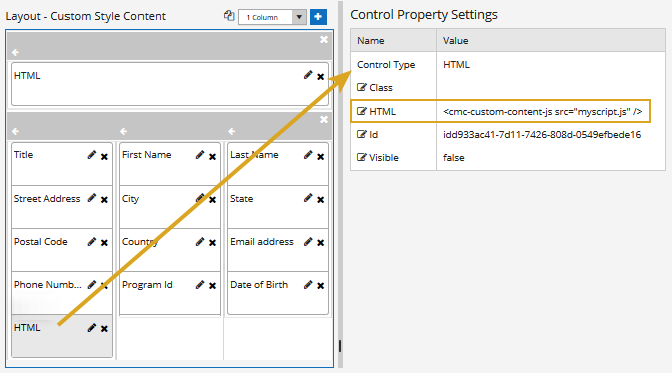
Use the following directive in your HTML component. The HTML component can be made Visible=false since it does not need to be seen on the page.
<cmc-custom-content-css src=”myCss.css” />
Example
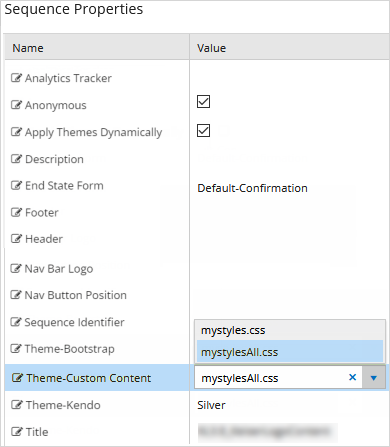
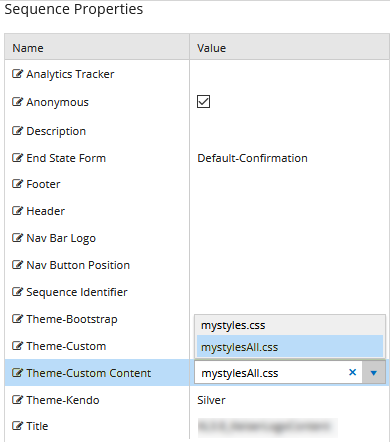
In Forms Builder 3.8 and later, you can upload custom css files to the database and then select a custom css file in the Theme-Custom Content drop-down list in the Sequence Properties. The selected css file will be applied to the entire sequence.
If the css file for a sequence contains references to images, the images need to be uploaded to the database and you must replace the file paths for the images using the getCustomContentDataAsFile?src= attribute so that the images are retrieved from the database instead of the file system.
The custom css file may also contain a .navbar brand class but must include the !important tag. However, the preferred method for the navigation bar logo is the Nav Bar Logo property in the Sequence Properties pane. See Navigation Bar Logos.
If your css previously referenced an image in a file path...
.navbar-brand {
background: url('images/YourLogo.png') center / contain no-repeat !important;
padding: 0;
width: 200px;
margin-left: 5px;
}
... replace the path in the css with getCustomContentDataAsFile?src=
.navbar-brand {
background: url(getCustomContentDataAsFile?src=Yourlogo.png) center / contain no-repeat !important;
padding: 0;
width: 200px;
margin-left: 5px;
}
The YourLogo.png image file is included as an example in the above code snippet.
On upgrading to version 4.1 or later, the following changes must be done to retain CSS files and images that were referenced in the CustomerIncludes.html file in previous versions:
-
Merge all the CSS files that were referenced in the CustomerIncludes.html file into a single CSS file.
-
Open the new CSS file and change references to all images as indicated below. If the CSS contains a
.navbar brandclass but must include the!importanttag:If the css previously referenced an image in a file path...
.navbar-brand {
background: url('images/YourLogo.png') center / contain no-repeat !important;
padding: 0;
width: 200px;
margin-left: 5px;
}
... replace the path with getCustomContentDataAsFile?src=
.navbar-brand {
background: url(getCustomContentDataAsFile?src=Yourlogo.png) center / contain no-repeat !important;
padding: 0;
width: 200px;
margin-left: 5px;
}
The YourLogo.png image file is included as an example in the above code snippets.
-
Click the Custom Content tile on the home page to upload the CSS file to the CustomContent table in the database. In the Custom Content tile, select the check box in the Global column. The uploaded CSS file will apply globally to all sequences.
Only a single CSS file can be selected in the Global column. To change the CSS that will apply globally, deselect the check box of the current file and then select the check box of another CSS file.
-
Upload images that were referenced in previous CSS files to the CustomContent table in the database.
-
Save all your changes.
Note: A CSS applied to a form in a sequence will override the CSS applied to the sequence. Similarly, CSS styles applied to a sequence will override a globally applied CSS.
JavaScript
Upload your JavaScript file. The script does not have to be embedded in <script></script> tags, but it can be.
Use the following directive in your HTML component. The HTML component can be made Visible=false since it does not need to be seen on the page.
<cmc-custom-content-js src=”myJavascript.js” />
Example
Navigation Bar Logos
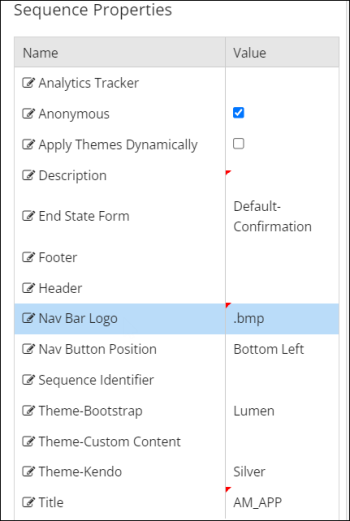
By default, the navigation bar of Forms Builder sequences displays the Anthology logo. In Forms Builder 3.7 and later, you can replace the default logo with a specific logo for your institution using the following steps:
-
Upload your logo image file (.png, .bmp, etc.) into the Custom Content workspace.
-
In the Nav Bar Logo column, select the check box to indicate that the uploaded logo image can be selected in Sequence Designer and placed in the navigation bar on rendered form sequences.
The
FormsBuilder.CustomContenttable will show a value of1in theIsLogocolumn.Note: When you try to delete a Nav Bar Logo image and the file is in use, it will not be deleted, and a validation message is displayed in Form Designer.
-
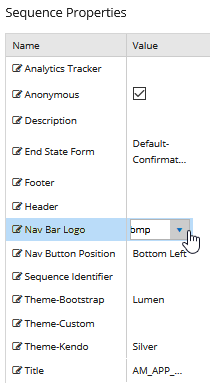
In Sequence Designer, open your sequence and select your logo image from the Nav Bar Logo drop-down list in the Sequence Properties.
The
FormsBuilder.Sequencetable will show the name of the selected image in theNavBarLogocolumn. -
Save your sequence and review it in Forms Renderer.
Notes
When you are designing new sequences, we recommend using the Navigation Bar Logos method described above instead of using the Sequence Logos method described below. The Nav Bar Logo method will display the selected custom logo without loading the default logo while rendering the form.
If you accidentally used both methods in the same sequence, the Sequence Logo method will take precedence to ensure backward compatibility. However, a known issue of the Sequence Logo method is that the default logo will briefly appear on the navigation bar before it is replaced with the custom logo. If possible, update your sequences using only the Nav Bar Logo method.
If you created multiple sequences using different logo methods and you are reviewing these sequences within the same browser session, you will notice rendering issues when going from sequences with the Nav Bar Logo method back to the Sequence Logo method. The rendering issues will not occur in new/refreshed browser sessions for each sequence.
Sequence Logos
Note: The method described below does not prevent the default logo from appearing briefly on the rendered form before it is replaced with a custom logo. If you want to avoid this, use the Navigation Bar Logos method.
This feature has flexibility in that the image can be set programmatically in a workflow. Simply create your logic in the workflow (for instance by campus name) that defines which upload file to use by name and assign that to a named string argument (the model value).
Use the following directive in your HTML component. The HTML component can be made Visible=false since it does not need to be seen on the page.
<cmc-custom-content-logo src=”campusA_Logo.png” model=”campusSelection” />
The src value acts as the default if the model has not been set or modified in the workflow, otherwise it is ignored.
In the model value, specify either the argument name only (e.g., "myModel") or the argument name with the "vm.models." prefix (e.g., "vm.models.myModel").
Example
![]()
The Custom Content tile on the Home page of Form Designer enables users to upload files used to customize forms to the CustomContent table in the database. This feature is intended for users who do not have access to their website file system or who simply want to use this feature to store custom files in the database.
For Azure customers, this is the only method of customizing forms. Customers who install Forms Builder on premises can still use the file system reference methods. However, we recommend using the database method since it simplifies Forms Builder upgrades.
Note: When Forms Builder is upgraded in an Anthology Cloud 2.0 environment, any custom files that had been deployed to the file system will not be retained. This affects references in the Custom/CustomerIncludes.html file and other custom files, including custom themes. To ensure that customizations will be retained during upgrades, upload your custom files to the CustomContent table and reference the files as described below.
|
|
After December 2021 custom files in local file systems and Custom Themes will no longer be supported. We recommend that you prepare for this change at your earliest convenience. For more details, see Remove Local Custom Content. |
Custom files can include 5 different types of content: images, videos, CSS styles, JavaScript, and logos.
-
Currently, the following extensions are allowed: .jpg, .jpeg, .bmp, .svg, .gif, .ico, .png, and .apng.
Please check https://en.wikipedia.org/wiki/Comparison_of_web_browsers for details on support in various browsers. -
Only mp4 is supported.
-
Note: Since .js files are active scripts, you must ensure that security guidelines are followed.
Several libraries that are part of Renderer that can be utilized, including JQuery, w3 (from w3schools.com), Lodash, he, jsep, kendo, clipboard that will work outside of the Anthology Inc. Angular application. -
Navigation Bar Logos and Sequence Logos (not to be confused with header or footer content for a form)
To upload custom content, click Select custom content files and select the files (or drag the files into the selection area). The files will be uploaded to the database used by Forms Builder and added to the grid showing the currently uploaded files.
To remove a custom content file, select it in the grid, click Delete, and click OK on the confirmation message. The file is deleted. If the file is in use, it will not be deleted, and a validation message is displayed in Form Designer.
If you edited a previously uploaded file and want to upload the new version of the same file, the previous version will be overwritten, i.e., you don't need to delete the previous version.
While image files can be directly embedded in HTML by going to https://codebeautify.org/image-to-base64-converter and creating the data to embed, the Custom Content feature does the work for you. Anywhere you need an image, simply upload an image file and add an HTML component to the page. Currently, the following extensions are allowed: .jpg, .jpeg, .bmp, .svg, .gif, .ico, .png, and .apng.
Use the following HTML to refer to the uploaded file:
<cmc-custom-content-image src=”myImage.png” model=”myModel” />
This will place the image on the page at the location of the component. If you ever need to change the image, simply upload a new file with the same name. You could also add style information for the image using CSS.
Model is an optional attribute. If it is specified and an argument in a workflow is assigned a value, it will be used to retrieve the image uploaded by name. If not, the src value is used. This allows you to programmatically decide which image to display.
Note: In the model value, specify either the argument name only (e.g., "myModel") or the argument name with the "vm.models." prefix (e.g., "vm.models.myModel").
The src value acts as the default if model has not been set or modified in workflow, otherwise it is ignored.
Example
Note: You can combine multiple directives in one HTML component as shown in the example with "cmc-custom-content-image" and "cmc-custom-content-css".
This directive has attribute "src1" and optional attributes "src2" and "src3", which refer to files in the CustomContent database table. It gets the FileData and replaces this element with an embedded video element that utilizes base 64 strings.
Use the following HTML to refer to the uploaded file:
<cmc-custom-content-video src1="myVideo.mp4" />
Optional attributes are: model="" src2="", src3="", controls, autoplay, width="", and height="".
-
model allows a workflow argument to set the video for src1 and overrides src1 if set.
-
src2 and src3 are optional videos to play if src1 will not play, but usually are not necessary if mp4 is the first video.
-
autoplay starts the video automatically.
-
controls will display controls to stop, start, pause the video. None by default.
-
width and height should be set in pixels unless the default size is correct. Usually, only one of width or height is set, not both, otherwise the video might stretch or squash.
Only mp4 is supported by HTML5 in all browsers. All other formats should be converted to mp4 to use this directive.
For other types of videos, other techniques such as embed and object are needed and the video must be a physical file (which defeats the purpose of this directive). It can be hosted on a specialized server or YouTube but may be subject to restrictions for commercial use of the site (such as payment for ad free content).
Upload your style sheet. It does not have to be embedded in <style></style> tags, but it can be.
Use the following directive in your HTML component. The HTML component can be made Visible=false since it does not need to be seen on the page.
<cmc-custom-content-css src=”myCss.css” />
Example
Theme-Custom Content & getCustomContentDataAsFile
In Forms Builder 3.8 and later, you can upload custom css files to the database and then select a custom css file in the Theme-Custom Content drop-down list in the Sequence Properties. The selected css file will be applied to the entire sequence.
Note: You cannot save a sequence with selections for both Theme-Custom Content and Theme-Custom.
If the css file for a sequence contains references to images, the images need to be uploaded to the database and you must replace the file paths for the images using the getCustomContentDataAsFile?src= attribute so that the images are retrieved from the database instead of the file system.
The custom css file may also contain a .navbar brand class but must include the !important tag. However, the preferred method for the navigation bar logo is the Nav Bar Logo property in the Sequence Properties pane. See Navigation Bar Logos.
If your css previously referenced an image in a file path...
.navbar-brand {
background: url('images/YourLogo.png') center / contain no-repeat !important;
padding: 0;
width: 200px;
margin-left: 5px;
}
... replace the path in the css with getCustomContentDataAsFile?src=
.navbar-brand {
background: url(getCustomContentDataAsFile?src=Yourlogo.png) center / contain no-repeat !important;
padding: 0;
width: 200px;
margin-left: 5px;
}
Upload your JavaScript file. The script does not have to be embedded in <script></script> tags, but it can be.
Use the following directive in your HTML component. The HTML component can be made Visible=false since it does not need to be seen on the page.
<cmc-custom-content-js src=”myJavascript.js” />
Example
By default, the navigation bar of Forms Builder sequences displays the Anthology logo. In Forms Builder 3.7 and later, you can replace the default logo with a specific logo for your institution using the following steps:
-
Upload your logo image file (.png, .bmp, etc.) into the Custom Content workspace.
-
In the Nav Bar Logo column, select the check box to indicate that the uploaded logo image can be selected in Sequence Designer and placed in the navigation bar on rendered form sequences.
The
FormsBuilder.CustomContenttable will show a value of1in theIsLogocolumn.Note: When you try to delete a Nav Bar Logo image and the file is in use, it will not be deleted, and a validation message is displayed in Form Designer.
-
In Sequence Designer, open your sequence and select your logo image from the Nav Bar Logo drop-down list in the Sequence Properties.
The
FormsBuilder.Sequencetable will show the name of the selected image in theNavBarLogocolumn. -
Save your sequence and review it in Forms Renderer.
Notes
When you are designing new sequences, we recommend using the Navigation Bar Logos method described above instead of using the Sequence Logos method described below. The Nav Bar Logo method will display the selected custom logo without loading the default logo while rendering the form.
If you accidentally used both methods in same sequence, the Sequence Logo method will take precedence to ensure backward compatibility. However, a known issue of the Sequence Logo method is that the default logo will briefly appear on the navigation bar before it is replaced with the custom logo. If possible, update your sequences using only the Nav Bar Logo method.
If you created multiple sequences using different logo methods and you are reviewing these sequences within the same browser session, you will notice rendering issues when going from sequences with the Nav Bar Logo method back to the Sequence Logo method. The rendering issues will not occur in new/refreshed browser sessions for each sequence.
Note: The method described below does not prevent the default logo from appearing briefly on the rendered form before it is replaced with a custom logo. If you want to avoid this, use the Navigation Bar Logos method.
This feature has flexibility in that the image can be set programmatically in a workflow. Simply create your logic in the workflow (for instance by campus name) that defines which upload file to use by name and assign that to a named string argument (the model value).
Use the following directive in your HTML component. The HTML component can be made Visible=false since it does not need to be seen on the page.
<cmc-custom-content-logo src=”campusA_Logo.png” model=”campusSelection” />
The src value acts as the default if the model has not been set or modified in the workflow, otherwise it is ignored.
In the model value, specify either the argument name only (e.g., "myModel") or the argument name with the "vm.models." prefix (e.g., "vm.models.myModel").
Example
![]()