About Forms Builder
The next generation of Forms Builder uses OData (Open Data Protocol) to access and expose data from various data sources such as the Anthology Student database, the CampusNexus CRM database, or both. Forms Builder has access to the entire data model for these applications. The adapters built for Forms Builder 2.x to expose data properties and implement business logic rules are no longer applicable and do not exist in Forms Builder 3.x or later.
Forms Builder 3.x and later provides greater flexibility to the user and enables integration with Workflow (“Form Flow”). Each new sequence that is created and saved automatically saves a corresponding workflow definition that can be further customized or edited in Workflow Composer.
|
|
Important OData calls must be made from within Forms Builder or Workflow. |
The following components are used with Forms Builder 3.x and later:
- Web client for CampusNexus CRM and/or web client for Anthology Student
- Workflow Composer
- CMCFormsBuilderDesigner_V3
- CMCFormsRenderer_V3
Designer is installed on port 9002 by default. When you access your Forms Builder URL with this port number, the Home page is displayed.
Renderer is installed on port 9003 by default. When you access your Forms Builder URL with this port number at http://<server>.<domain>:9003/#/Sequencelist, the Sequence List is displayed.
The URLs and port numbers are customizable during installation.
Database Providers and Authentication
CampusNexus CRM, Anthology Student, or both products can be database providers for Forms Builder. The web.config files of Form Designer and Renderer contain "enabled" attributes for the products. Depending on the options selected in Installation Manager, the "enabled" attributes are set to "true" for each product.
Authentication of Forms Builder users is based on the security tokens issued by the Student STS for Anthology Student and the Contact STS for CampusNexus CRM. The <trustedIssuers> section of the web.config file for Forms Builder Renderer has empty thumbprints for the Student STS and/or Contact STS.
-
When Anthology Student is enabled during installation, the Student STS thumbprint is populated.
-
When CampusNexus CRM is enabled, the Contact STS thumbprint is populated.
-
When both products are enabled, both thumbprints are populated. Single sign-on allows Forms Builder users to access both databases.
The user can select the database service provider in Form Designer (see Select Provider).
Workspaces
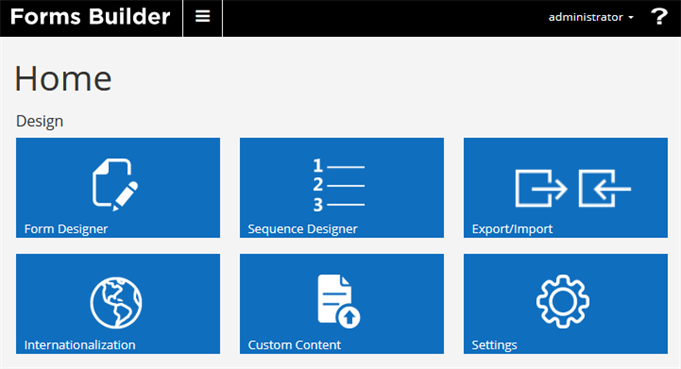
After logging in to the Forms Builder application, the Home page is displayed.
Use the Forms Builder header elements as follows:
-
Click the product name to return to the Forms Builder home page from any other page.
-
Click the hamburger button to access a menu of the navigation options (tiles) from any other page.
-
Click the drop-down arrow next to the name of the logged in user to Sign Out or to view the About Forms Builder window.
-
The About Forms Builder window contains the following information:
- Forms Builder Version
- Connections for database access
- Web Client URLs for Anthology Student, CampusNexus CRM, and Occupation Insight (as applicable)
- Install Date
- Link for the Service Desk at Anthology Inc.
-
Click the question mark icon to access this help system.
The tiles on the Forms Builder home page link to the following workspaces:
- Form Designer
- Sequence Designer
- Export/Import
- Internationalization
- Custom Content
- Settings
Form Designer
The process of building forms starts with Form Designer. You access the URL and port assigned to CMCFormsBuilderDesigner_V3 and select the Form Designer tile on the home page. The first time you open Form Designer, the metadata service of the installed web client (Anthology Student and/or CampusNexus CRM) is invoked and the entities of the CampusNexus data model are loaded into Forms Builder.
The building blocks in Form Designer include:
- Forms (flyout menu)
- Tabs for Fields, Components, and Form Sections
- Layout pane
- Property Settings pane
You can build forms using any of the available CampusNexus entities. You select an entity, select an associated field, and drag the field into the form layout pane. For more information, see Fields.
You can add custom controls to any form. The custom controls are on the Components tab and include check boxes, hyperlinks, text boxes, and so on.
You arrange fields and/or components in the Layout pane based on your selected column layout for the form. You use the Control Property Settings pane to assign properties to the items in the Layout pane. Properties include options such as label, tooltip, class, and so on. The values for properties can be data types such as Boolean, strings, numeric, arrays, and expressions.
The Model property is especially powerful and flexible. Any field or component can be bound using the Model property. A bound control is a control whose source of data can be any value assigned to a workflow argument. The designer of the workflow determines the source of the value. It could be a constant or a calculated value from the workflow. It also can be a value from another control or from external JavaScript code using the global variable vmModelsRef. The Model property is an Angular JS container that allows you to pass data to a workflow regardless of whether the control is a based on a CampusNexus entity/field or custom component. You can use the Model property to create arguments to hold bidirectional data. Data can be passed both to and from a workflow, to and from another control, or to and from external JavaScript.
Sequence Designer
Once you have created and saved individual forms, you combine the forms into a sequence using Sequence Designer. You specify properties for sequences such as authentication, title, name, theme, end state form, and URL.
For every sequence Forms Builder automatically creates a workflow definition based on the initial layout of the sequence. The name of the workflow definition matches the sequence name. Forms Builder passes data to the workflow through arguments in the Model property of fields and components. Using Workflow Composer, you can customize the workflow definition and insert workflow activities that manipulate the data. When an activity starts executing, the values of all its arguments are evaluated. Workflow Composer enables you to apply customized logic to forms, write data to the database, and trigger specific events. For more information, see Open the Workflow for a Sequence and State Machine Workflows.
End users, for example students or leads, access the published forms and submit data that can then be stored in a database because of the modified workflow definition including applicable activities for saving/updating data.
The markup for the sequences is saved in the Anthology Student or CampusNexus CRM database. Unlike Forms Builder 2.x, Forms Builder 3.x and later does not require its own database. For more information, see Set Up the Database Environment.
Sequences can be anonymous or non-anonymous. Non-anonymous sequences require users to provide credentials and be authenticated (see Renderer Authentication).
Export/Import
The Export/Import workspace enables you to export and import sequences and workflows from one environment and to another. For more information, see Export/Import.
Internationalization
The Internationalization workspace enables you to generate .pot files and import .po files. The .pot files contain translatable text that is extracted from sequences. The .po files contain translations for specific languages. For more information, see Internationalization.
Custom Content
The Custom Content tile on the Home page enables users to upload files to the CustomContent table in the database. These files can then be used to customize forms. In previous releases, on premises customers could also use the file system reference method, and for Azure customers the database method was the only way of customizing forms.
As the file system reference method is no longer available from version 4.1, on premises and Azure customers must only use the database method as it simplifies Forms Builder upgrades.
For more information, see Custom Content.
Settings
The Settings workspace is used to configure attributes and resources for features such as themes, e-signature providers, reCAPTCHA, Credit Card Payment, and custom error messages. For more information, see Settings.