Campuses
To access the Campuses section, go to Administrators > Campus Administration > Campuses.
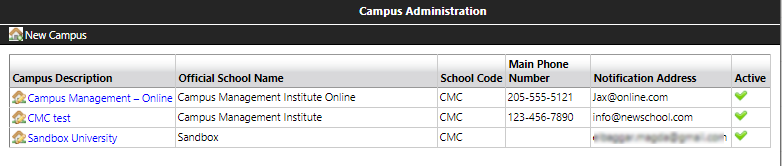
The list of active and inactive campuses created during implementation will be visible on the Campus Administration page.
For additional details on a campus, select the Campus Description link. This will enable you to view, edit, and delete information.
Required Permissions:
-
System: Has the Administrator Home Screen
-
System: Add, edit, and delete campuses
Edit Campus Details
-
Select the campus name link in the Campus Description column of the Campus Administration page.
The modal will display four tabs:
- General
- Contact
- Alt Contact
- Useful Links
-
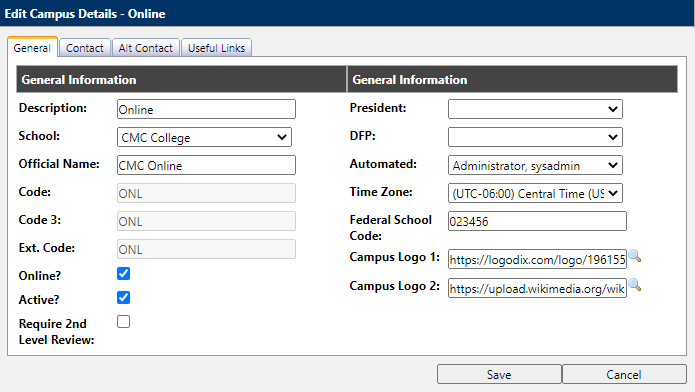
Select the General tab, make any necessary changes, and select Save.
General Information
-
Description – Campus description that will be used within the Staff Portal
-
School – Select the School (brand) from drop-down list
-
Official Name – Official Name of the campus that will be presented on Student Portal
-
Code – Campus code assigned by Anthology, not open for edits
-
Code 3 – Three letter code assigned by Anthology, not open for edits
-
Ext. Code – Campus Code assigned in the Student Information System (SIS)
-
Online? – Check box to indicate Online campus
-
Active? – Check box to indicate campus is Active
-
Require 2nd Level Review - Select or clear the check box to indicate Yes/No. When enabled, the second-level/supervisor approval requires each file marked complete by a staff user to be approved by a second-level user.
-
President – Campus President (may be used as a data stamp on documents)
-
DFP – Director of Financial Planning
-
Automated – Select the user email address that should be used as the default email address when sending automated emails
-
Time Zone – Select the campus’ time zone from the drop-down list
-
Federal School Code - Specify the Federal School Code for your institution. The field is required and has the following validation message: "Federal School Code must start with one of these values: 0 (zero), B, E, or G. Valid range is X00000 to X99999."
-
Specify a valid URL for the location of a logo image to be used in templates and merge fields (i.e., STL document stamps) across the system.
Campus Logo 1 and 2 are used in the following fields: BudgetEnrollmentCampusLogo1/2, CampusLogo1/2, CFPCampusLogo1/2, EmailTemplate1/2, EnrollmentCampusLogo1/2, StaffCampusLogo1/2, StudentCampusLogo1/2.
Select the preview icon (
 ) to view the logo image. Select Save to save the selected logo.
-
-
Select the Contact tab, review the following information, make any necessary changes, and select the Save button.
Contact Information
-
Main Phone – The main phone number of the campus
-
Phone 2 – Optional second phone number for the campus
-
Phone 3 - Optional third phone number for the campus
-
Fax – Fax number for the campus
-
Email – General email address for the campus
-
URL – Campus website URL
-
SV Portal URL – The website for the Student Portal, not open for edits
-
Notif. Email – Email address where student emails will be sent
-
Help Email – Email address where student help emails will be sent
-
Address Line 1 – Campus Street Address
-
Address Line 2 – Optional second line of campus street address
-
City – Campus’ city
-
State – Campus’ state
-
Zip Code – Campus’ zip code

Contact Information is used in the “Contact Us” section in the Student Portal, unless changes are made in Student Portal Templates Configuration.
-
-
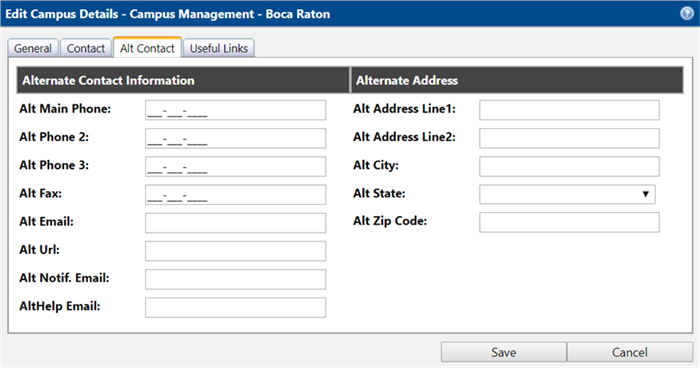
Select the Alt Contact tab, review the following information, make any necessary changes, and select the Save button.
Alternate Contact Information
-
Alt Main Phone – An optional alternative main phone number of the campus
-
Alt Phone 2 – Optional alternative second phone number for the campus
-
Alt Phone 3 - Optional alternative third phone number for the campus
-
Alt Fax – Optional alternative fax number for the campus
-
Alt Email – Optional alternative General email address for the campus
-
Alt URL – Optional alternative Campus website URL
-
Alt Notif. Email – Optional alternative Email address for students to email
-
Alt Help Email – Optional alternative Email address for student help
-
Alt Address Line 1 – Optional alternative Campus Street Address
-
Alt Address Line 2 – Optional alternative second line of campus street address
-
Alt City – Optional alternative Campus’ city
-
Alt State – Optional alternative Campus’ state
-
Alt Zip Code – Optional alternative Campus’ zip code
-
-
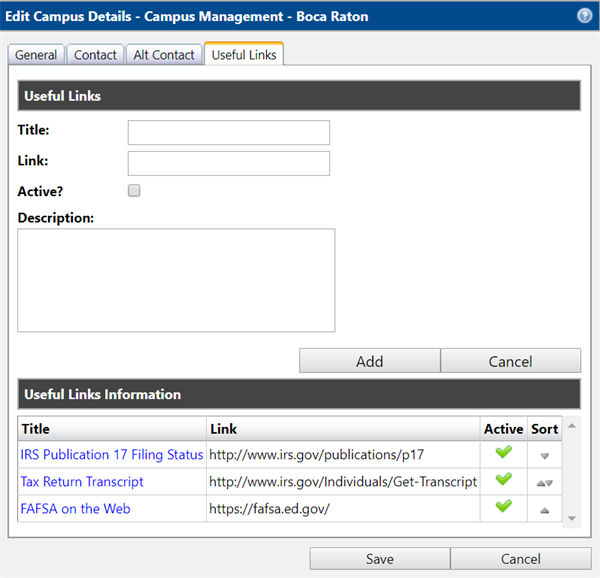
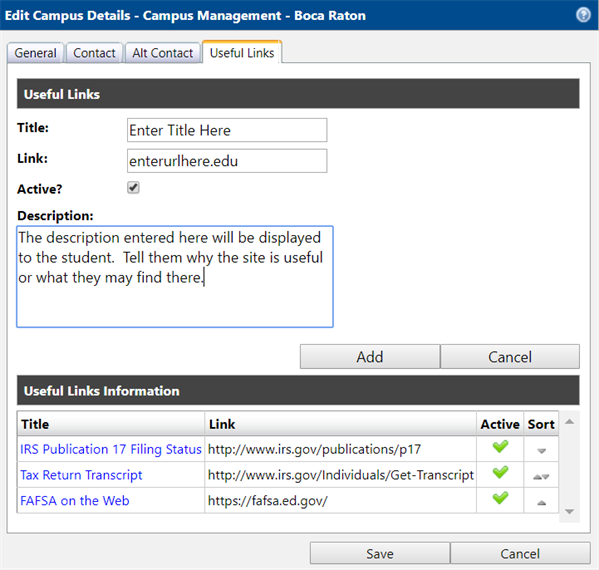
Select the Useful Links tab, make any necessary changes, and select Save. As part of the out of the box application, you will see the following:
Add Useful Links
-
Enter the Title of the link as you would like it to appear in the Student Portal.
-
Enter the URL Link including http(s).
-
The Active? check box activates the link.
-
Enter the Description that you would like to display to the student.
-
Select Add.
The link will be added to the list under Useful Links Information.
-
Use the arrows in the Sort column to reorder the links to your preference.
-
Select Save.
-
New Campus
Institutions can add a new campus in the Student Verification Portal. On the Campus Administration page, select the New Campus button.

The New Campus Details form is displayed. It has the same tabs and fields as the Edit form described above.
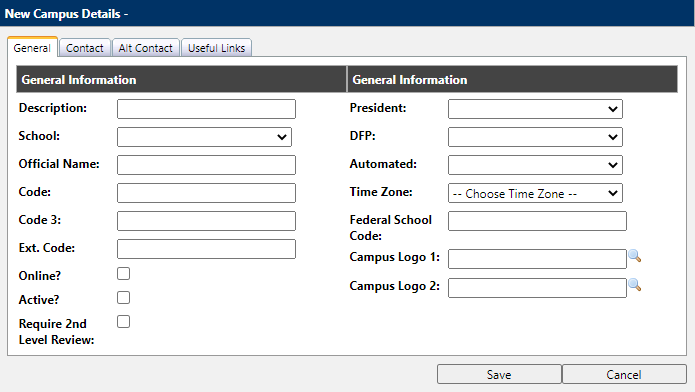
Here is additional guidance on some of the fields:
Required Fields
-
Description: Must be unique, per school
-
School
-
Official School Name: Must be unique, per school
-
Time Zone
New Fields
-
Code is a 2 or 3-letter abbreviation code. The field is disabled for edits and must be unique, per school.
-
Code3 is a 3-letter abbreviation code for the Campus Name. This is the External Campus Code and shares the same value as the Code.
Example: Code: LA; Code3: LAM; ExternalCampusCode: LA.
-
URL is the field under the Contact tab in the Campus Details modal. This field is for the school’s website.
-
SV Portal URL is the URL for the Student Portal.
-
Automated indicates an email sent from the system where the sender is unknown. The user selected in this field will be the default in the From row when the sender is unknown.
-
Campus Logo 1 / Campus Logo 2
Specify a valid URL for the location of a logo image to be used in templates and merge fields (i.e., STL document stamps) across the system.
Campus Logo 1 and 2 are used in the following fields: BudgetEnrollmentCampusLogo1/2, CampusLogo1/2, CFPCampusLogo1/2, EmailTemplate1/2, EnrollmentCampusLogo1/2, StaffCampusLogo1/2, StudentCampusLogo1/2.
Select the preview icon (
) to view the logo image. Select Save to save the selected logo.
When a New Campus is added, these additional configurations need to be updated or evaluated:
-
Configure the Campus Group. (Mandatory)
-
Configure the Campus Location. (Mandatory)
-
Assign the newly created campus to Email Template types. (Mandatory)
-
Define campus-specific configurations. Some of them can be defined on the Application Configuration page. If not set, they will inherit settings from the school or site-level configurations. (Optional)
-
Define the Student Verification Template layout for the new campus. If not defined, it will inherit settings from the site-level configuration. (Optional)
-
Create campus-specific Form documents. (Optional)
-
Create Auto Assignment Rules for the new campus. (Optional)
-
Create Document Rules specific for the new campus. (Optional)