Encryption
Anthology Inc. implemented a process to secure sending and receiving of files to and from File Transfer Protocol (FTP) and Azure Cloud Storage. This process uses the OpenPGP encryption standard with public key cryptography. The public/private key flow is used when transmitting files with data that could include personal identifiable information (PII) or secondary personal identifiable information (SPII).
The encryption process applies to the following products:
-
Student Verification (SV) Staff Portal
-
Financial Aid Solutions (FAS) Staff Portal
-
Mailbox Manager (MM)
A high-level overview of the public/private key process is outlined below.
-
The recipient (client) of the file(s) generates a public key and a private key.
-
The public key is used for encryption.
-
The private key is used for decryption.
-
-
The recipient gives the public key to the sender (Anthology Inc.).
-
The sender uses the public key to encrypt the file.
-
The sender sends the encrypted file to the recipient.
-
The recipient decrypts the file with his/her private key.
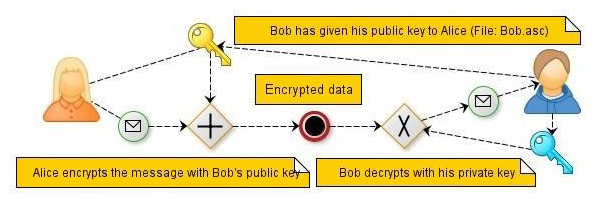
Example: Bob (recipient) uses software to generate a public and private key. Bob then uploads his public key, so Alice (sender) can encrypt files that she sends to Bob’s FTP location.
Setup
The first step in the setup process is generation and management of new public and private keys. It is very important that once the keys have been generated that they are safeguarded, and a standard operating procedure is developed. The ownership and management of the public and private key generation is the sole responsibility of the client. Anthology Inc. will not be able to retrieve or access public keys unless given to us by the client. Your private key will remain internal and should not be shared outside of your organization nor with Anthology Inc. (outside of the normal upload process).
Important: Client management of the public and private key is crucial. Ensure your private key is safeguarded. Files will be encrypted from Anthology Inc. using the public key associated with the private key. The private key will be stored on the hard drive of the computer in which the keys were generated. If this computer becomes damaged or lost, the process of decrypting files will be lost, and Anthology Inc. will not be able to generate encrypted files again. Please export your private key and store it on an external drive and then re-import it on a new computer.
Download PGP Software
Multiple free tools are available to generate and manage public and private keys. For purposes of this guide, we are using the Kleopatra 3.1.11 -gpg4win-3.1.12 software (Windows).
Download one of the PGP software tools listed above or your preferred software aligning with the PGP. Be sure to select the .ASC extension as one of your selections when downloading the new tool.
After installing your new software, complete the following steps to generate and manage public and private key(s):
-
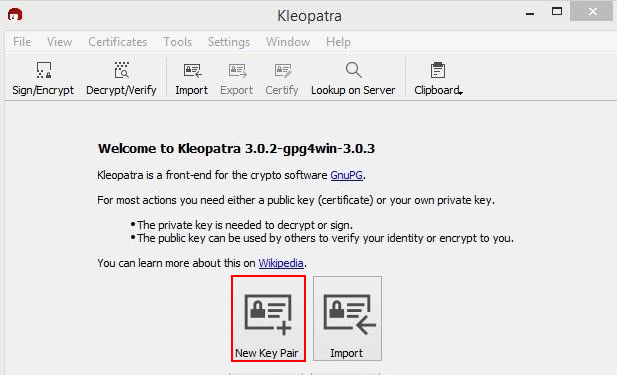
Open Kleopatra.
-
Select New Key Pair. The New Key Pair Wizard will generate a public and private key upon saving.
The Key Pair Creation Wizard will require the following:
- Name
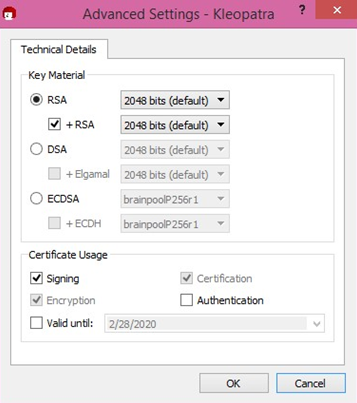
- Key Material
- RSA (2048 bits default)
- Certification Usage
- Signing
- Certification
- Encryption
- Valid Until (if checked, an expiration date will be required and set for your public and private key)
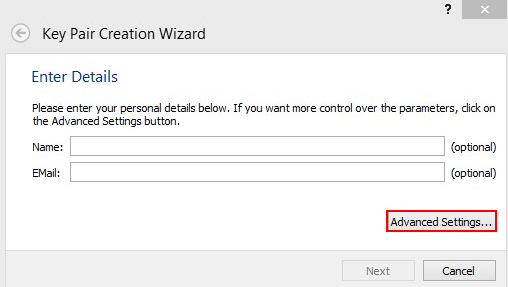
Select Advanced Setting to review additional parameters.
Important: If an expiration date is set for your public key and Anthology Inc. is not made aware prior to the expiration, files sent during this time period will be lost and cannot be re-generated. It is important to ensure Anthology Inc. has the most recent public key on file.
-
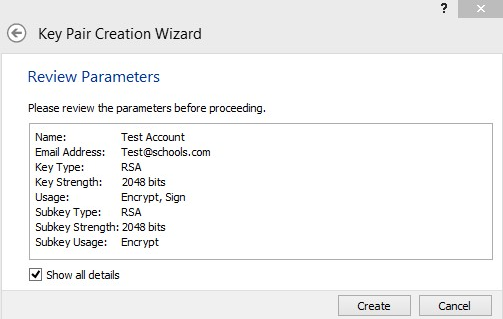
Select OK. The Review Parameters window appears. Be sure to select the Show all details check box. After review, select the Create button to proceed.
-
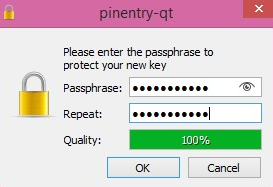
In the Creating Key Pair... window, to enter a Passphrase to protect your new key.
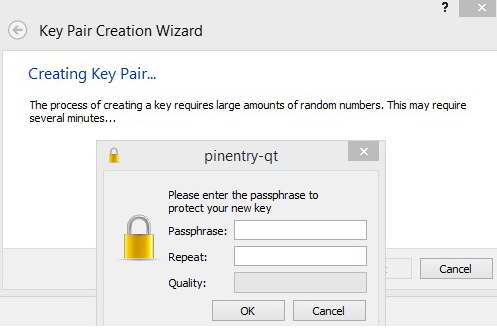
The quality of the passphrase will be monitored, and you will be prompted to re-enter should it not meet the strong requirements standard.
-
Select OK.
-
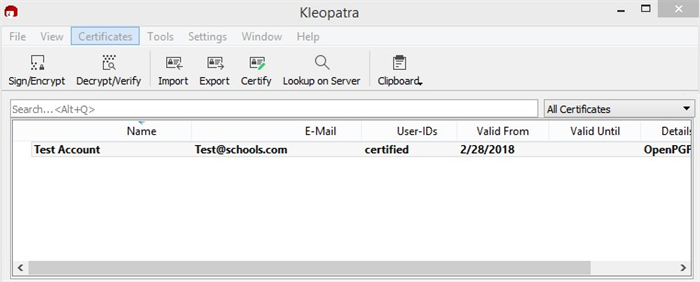
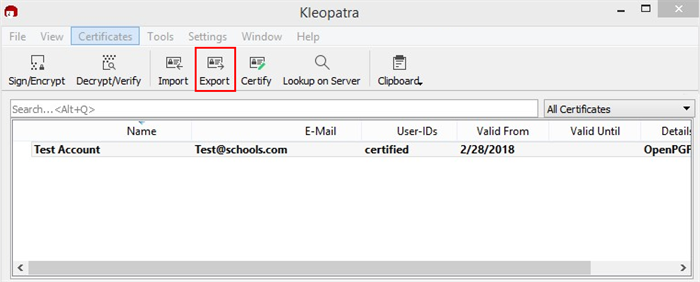
The main Kleopatra page appears after successfully generation of the key pair.
-
Select the Export option located in the menu header.
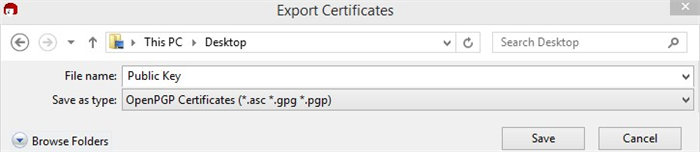
-
In the Export Certificates dialog, update the File Name (if needed) and Save the public key to preferred location.
-
The Certificate Import Result window displays the processed, imported, and unchanged statuses. (This will also appear if the saved file is selected.)
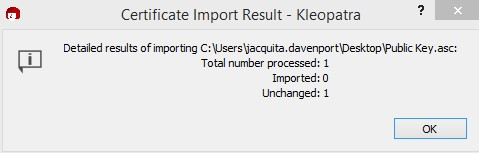
-
Select OK. Proceed to the next step. See Store the Public Key.
Store the Public Key
The second step in the setup process is to store the newly created public key (or if the public key changes over time).
The setup process for the key pair is different for Mailbox Manager and the Student Verification (SV) and Financial Aid Solutions (FAS) Staff Portal.
SV and FAS Staff Portal
Required Permissions:
- Can Upload Public Keys
Anthology Inc. will only activate one public key at a time and will capture activity history on changes made (i.e., new uploads, inactivation of key, successful uploads, and failed uploads).
To upload a public key in the Staff Portal:
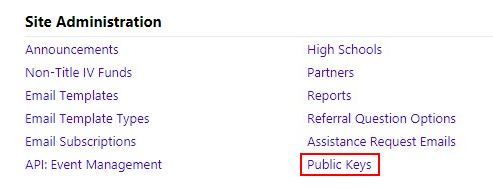
-
As a user with the required permissions, under Site Administration on the Administrator Tasks menu, select Public Keys.
-
On the Public Key page, select the Browse button to locate your public key file. Once successfully located, select Upload.
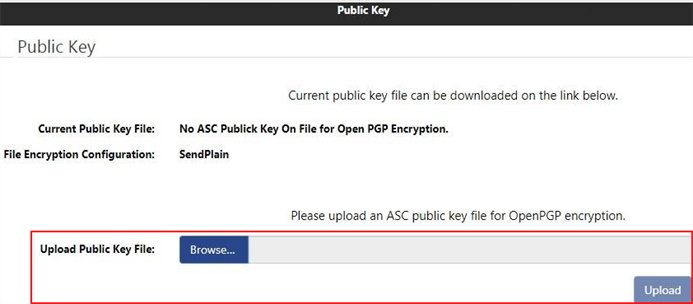
Important:
-
Upload an ASC public key file for OpenPGP encryption.
-
Ensure successful upload before navigating away from the screen. The new file should appear in the Current Public Key file field.
-
The Activity History will be displayed below the Upload screen once the first upload occurs.
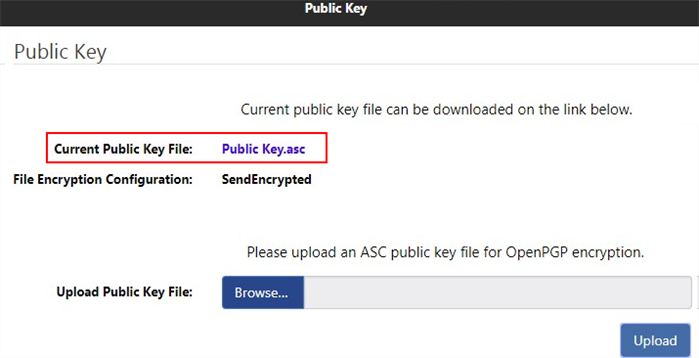
-
-
Upon successful upload, the Current Public Key File field shows the new public key.
Mailbox Manager Encryption
Mailbox Manager is designed to allow the management of a client’s SAIG message classes which includes the process of uploading and downloading messages to and from the SAIG gateway portal.
Required Permissions:
- Can Manage Encryption Keys
- Can Manage Application Configuration
Anthology Inc. will only activate one public key at a time and will capture activity history on changes made (i.e., new uploads, inactivation of key, successful uploads, and failed uploads).
The public/private key configuration supports file import, file export, and message download.
To manage the encryption key pairs in Mailbox Manager:
-
As a user with the required permissions, log in to Mailbox Manager at https://mailboxcmc.educationpartners.com/
-
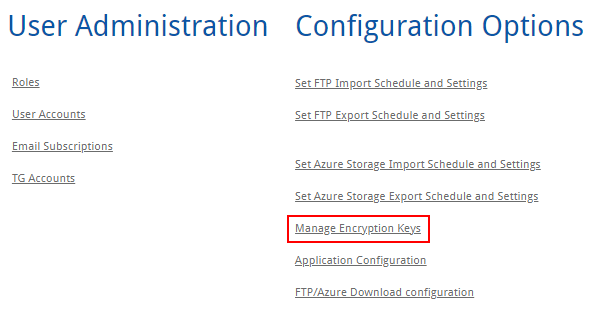
Select the Settings tab.
-
Select Manage Encryption Keys.
-
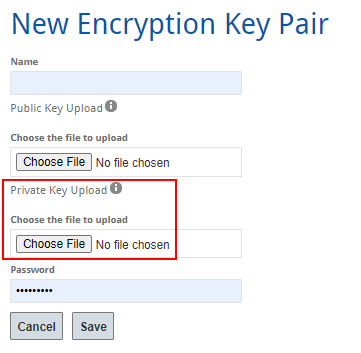
Select the New Encryption Key Pair button.
-
Enter the Name for the new key pair.
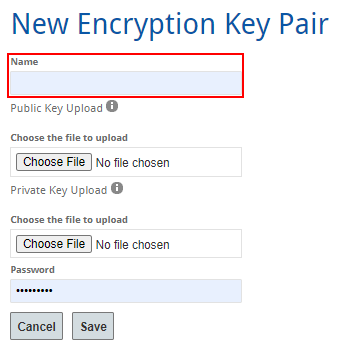
-
Upload the Public Key. The public key is used for encryption.
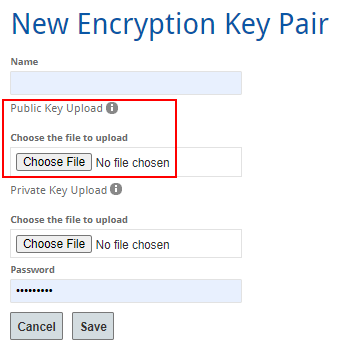
-
Upload the Private Key. The private key is used for decryption.
-
(Optional) Enter the Password if a password is associated with the key pair.
-
Select Save.
A summary of the available key pairs is visible on the main Encryption Key Pairs page. The summary includes the following.
| Column Name | Description |
|---|---|
| Name | Key Pair Name |
| Is Active |
A green check mark indicates the key pair is Active. A red x indicates the key pair is Inactive. |
| Created By | The username associated with the creation of the key pair |
| Created Date | The date the key pair was created. |
| Last Modified By | The username associated with the last modified action |
| Last Modified Date | The date the key pair was last modified. |
| Actions |
The pencil icon is to edit the key pair. The lock icon is to download the key pair |
Important: The Application Configuration page activates file activity for Mailbox Manager only.
Message Class Download Update
Mailbox Manager will download message class files by default in plain text file (no encryption). The encryption process will be activated after the completion of the initial setup and selection of Send Plain and Encrypted or Send Encrypted.
To encrypt downloaded messages:
-
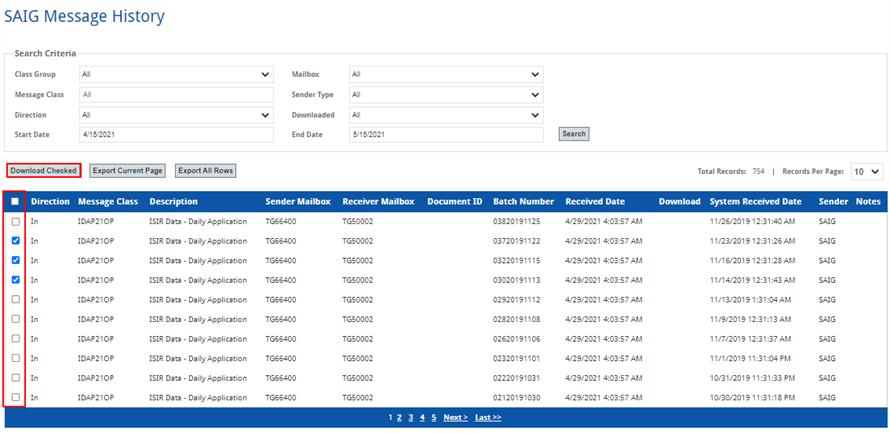
In Mailbox Manager, select the Messages tab.
-
Select the check box(es) for message class file(s) to download and then select Download Checked.
-
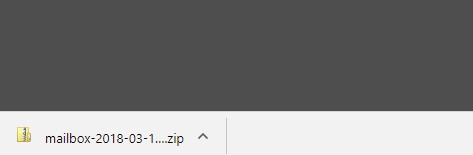
The browser displays the downloaded zip file. Save it in a preferred location.
-
The newly downloaded folder contains two files when set to Send Plain and Encrypted.
-
A compressed (zipped) folder which requires the default Mailbox Manager password
-
An encrypted (OpenPGP Binary) file using the public key

Important:
The file
mailbox-2018-03-13-15-21-13.64845is the plain text file and requires the normal password and extraction to open the file.The file
mailbox-2018-03-13- 1521-13.64845.ziphighlighted in the image above is encrypted with the uploaded public key. -
-
Open the software that was used to generate the public and private key pair. Select the Decrypt/Verify option.

-
Browse for the encrypted file in the Mailbox Manager zipped folder.
Note: The easiest way to locate the encrypted file is to save it to your Desktop or Extract All out of the folder.

-
The Decrypt/Verify Files – Kleopatra dialog prompts for the Passphrase associated with the public/private key pair.
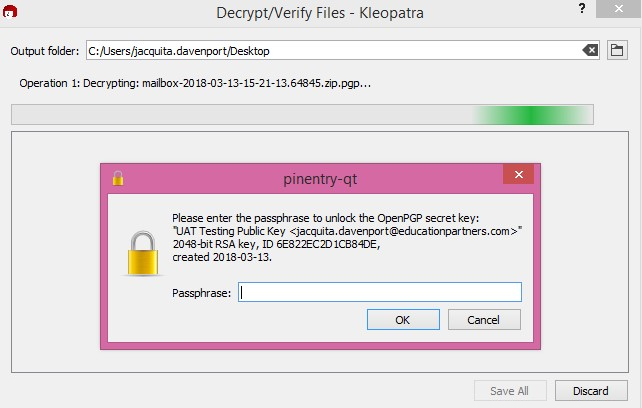
-
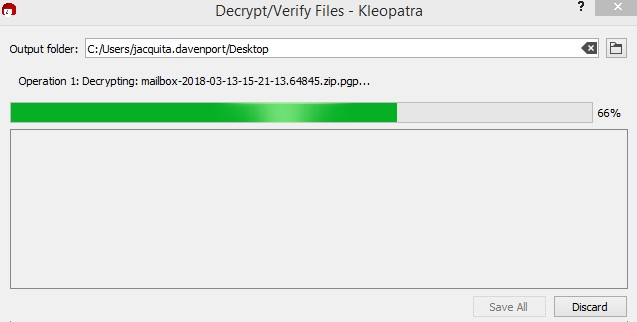
The decryption process begins after successfully entry of the passphrase.
-
A confirmation appears once the decryption process is complete.
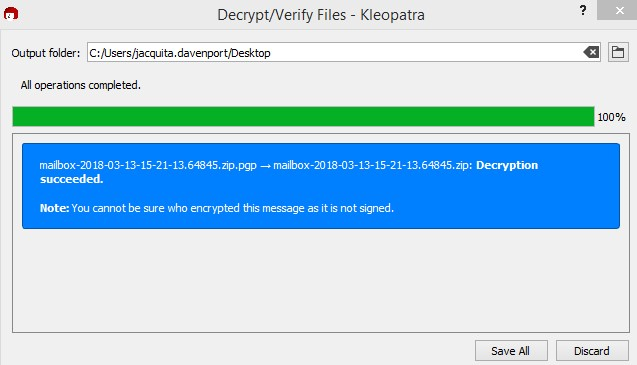
-
The decrypted file will appear in the saved location.

-
The message class file is available for processing as needed.

File Transfer Export and Import Schedule and Settings
The file transfer process supports encryption for incoming and/or outgoing message classes to and from the Department of Education.
As default message class files will be sent (imported) as plain text, when encryption is enabled, the system will encrypt the files and prepare for submission to the configured FTP or Azure Cloud Storage location.
The system will accept a file encrypted by the institution and decrypt it with the appropriate key pair. When encryption is enabled, the system will decrypt the file and prepare for submission to Department of Education system.
The configuration to Send Plain and Encrypted will display two files both with the same file name and time stamp. The encrypted file will be tagged OpenPGP Binary file and will require a manual decryption or automated decryption to process the file into your internal system.
The configuration for the FTP or Azure Storage Export and Import Schedule is in the Settings menu on Mailbox Manager.
Note: See Configuration Options for additional information on setup for the FTP and Azure Storage process.
Change Configuration Settings
The third step in the process is to change the configuration settings associated with the file transfer process. This step begins the adoption phase as it allows the customer to set the format in which file(s) are transferred to FTP or email.
The available configuration settings (File Encryption Option) are as follows:
-
Send Plain (default value, current setting, sends only plain text files)
-
Send Plain and Encrypted (send plain text file and encrypted file)
-
This allows testing of the new encryption process, while still receiving the normal plain text file.
-
-
Send Encrypted (send only encrypted file)
To change the configuration settings:
-
In Mailbox Manager, select the Settings tab and select Application Configuration.
-
Select appropriate values from the drop-down fields and specify the password for user download file encryption if needed.
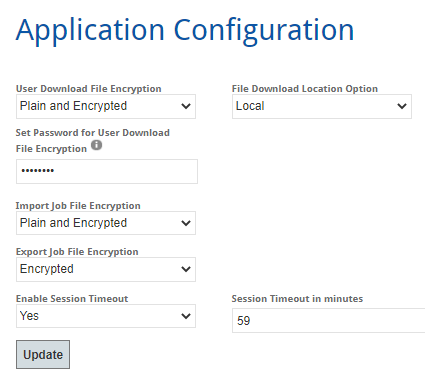
Important: The default setting for file import, file export, and message download is to send plain text.
See below for an explanation of the available categories and options.
Category Explanation User Download File A message class file downloaded from the Message Class History table in the Mailbox Manager Import Job File A message class file transfer via FTP or Azure Storage Export Job File A message class file transfer via FTP or Azure Storage Available Options Description Send Plain The file is in a password protected folder and requires WINZIP or 7ZIP to extract Send Plain and Encrypted The system generates two files. One file is in a password protected folder and requires WINZIP or 7ZIP to extract. The second file is encrypted with the appropriate key and requires decryption Send Encrypted The file is encrypted with the appropriate key and requires decryption Note: See Application Configuration for additional information.