Power BI Reports Integration
Portal
For example, institutions who use Anthology Inc.'s Analytics product maintain their own Power BI Pro accounts to manage and disseminate reports for the institution. This enhancement enables the institutions to incorporate their Power BI reports into the Student Portal in addition to any Occupation Insight reports.
To integrate Power BI reports, you need to take the following steps:
- Configure a Power BI user account in the Portal Admin Console
- Configure the Power BI reports in the Portal Configuration tool
Configure a Power BI User Account
-
Using Internet Explorer, log in to the Portal Admin Console.
-
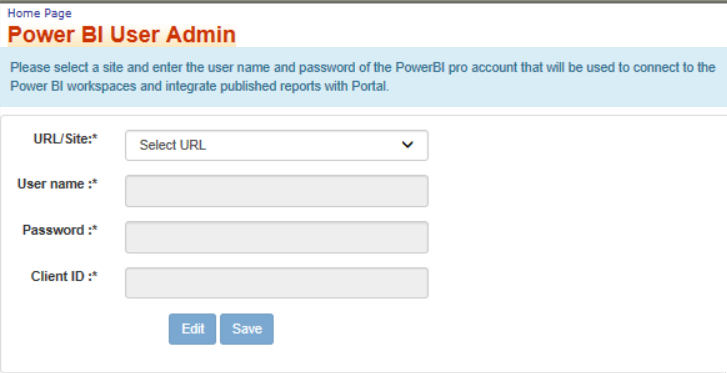
Click the Power BI User link in the Administration section. The Power BI Admin page is displayed. Entries in all fields are required.

-
Select the URL/Site for your portal.
-
Specify the User name (max. 50 characters). The username is expected to be in valid email address format.
-
Specify the Password (max. 50 characters).
-
Specify the Client ID. The Client ID is expected to be a valid GUID.
-
Click Save. The credentials are encrypted and saved in the wpURL table.
After a Power BI user account has been configured, all Power BI workspaces that the user account has access to will be available for selection when adding a Power BI page to the Student Portal (see Configure Power BI Reports).
Institutions should provision a Power BI user account that has appropriate access to workspaces that contain reports/dashboards that should be made available to students and/or faculty users of the Portal.
Configure Power BI Reports
-
Using Internet Explorer, log in to the Portal Configuration tool and access your campus.
-
Navigate to Menu Groups.
-
Right-click the Menu Group to which you want to add Power BI reports and select New Menu Item.
-
In the Add Menu Item form, specify the Menu Item Name, e.g., PowerBI DB Report.
-
In the Menu Item Name drop-down list, select Power BI Visualizations and click Add Menu Item.
-
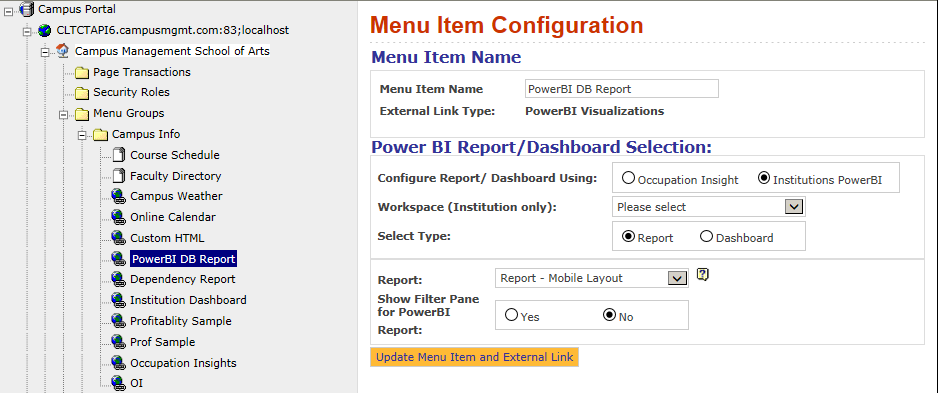
In the left pane, click the item that was just created. The Menu Item Configuration page is displayed. The External Link Type is Power BI Visualizations.

-
In the Power BI/Dashboard Selection area, under "Configure Report/Dashboard Using", select Institution's Power BI.
-
In the "Workspace (Institution only)" drop-down list, select your institution's Workspace.
-
In the "Select Type" options, select Report or Dashboard.
-
If you chose Report, specify a Report ID for the Power BI report to be displayed for this link and select Yes or No in the Show Filter Pane for Power BI Report field.
- If you chose Dashboard, select a dashboard name in the Dashboard drop-down list.
-
-
Click Update Menu Item and External Link to save the menu item settings.
-
Navigate to Security Roles and select the role that is supposed to have access to the Power BI page (Staff, Student, Applicant, Employer).
-
In the Menu Transactions and Quick Links Manager section, locate the Power BI page, select the check boxes in the Add Menu and Quick Link columns (as applicable), and click the Update Transaction Security button.
-
On the Portal server, open the Command Prompt, type iisreset and run the command.
-
Log in to Portal with the appropriate role (Staff, Student, Applicant, or Employer) and click the My Home Page link to refresh the pages.
Note: If you are using the Chrome browser, make sure that third party cookies are allowed. This setting is required to access Power BI reports.
-
Select the menu item for the Power BI page and verify that the content is displayed as expected.
The image below shows an example of a Power BI report.
Mobile Version of Power BI/Occupation Insight Reports
When an Power BI or Occupation Insight report is configured for display in the Student Portal or Faculty Portal, the Portal will detect whether or not the user is logged in via a mobile device.
- If mobile layout exists for report, the mobile layout will be rendered.
- If mobile layout does not exist for report, the regular (desktop) layout will be rendered.
When the Portal is launched in a desktop, the report will be rendered in desktop layout regardless of whether or not a mobile layout exists for the report.
