Occupation Insight Pages
As a Portal administrator, you can create Occupation Insight pages in Portal. Occupation Insight content is derived from Power BI reports and dashboards about market data around specific career fields that are relevant to the students at your institution. The Occupation Insight pages will be integrated into the Portal and will be displayed in the main window to the right side of the menu. Users don't need to navigate through external links to access these pages.
To access Occupation Insight reports, a set up needs to be provided under Site Settings in Admin Console which will be read by Portal Configuration tool.
-
Navigate to Admin Console > Site Settings.
-
Select the value shown in the drop down for the fields Site, Descrepencies, Category and Filter and click Submit.
-
The below values get populated:
-
powerBIReportsBase : Base location from where OI Reports will be accessed
-
powerBIReportsApiKey :Unique API key that is generated only after successful OI license generation
When these values are set, Occupation Insight reports can be integrated with Portal.
Note: The powerBIReportsBase and powerBIReportsApiKey values are populated only when customer has license for Occupation Insight, else the API key value remains blank.
-
Occupation Insight pages can be added to new or existing menu groups. The pages need to be associated with the user's menu by enabling the menu transactions for given user roles.
-
Using Internet Explorer, log in to the Portal Configuration tool and access your campus.
-
Navigate to Menu Groups.
-
Right-click the Menu Group to which you want to add Occupation Insight page and select New Menu Item.
-
In the Add Menu Item form, specify the Menu Item Name.
- In the Menu Item Name drop-down list, select Power BI Visualizations and click Add Menu Item.
-
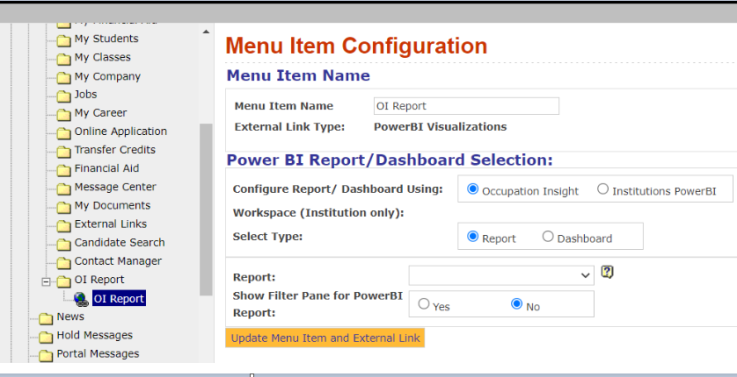
In the left pane, click the item that was just created. The Menu Item Configuration page is displayed. The External Link Type is Power BI Visualizations.

-
In the Power BI/Dashboard Selection area, under "Configure Report/Dashboard Using", select Occupation Insight.
-
In the "Workspace (Institution only)" drop-down list, select your institution's Workspace.
-
In the "Select Type" options, select Report or Dashboard.
-
If you chose Report, select a report name in the Report drop-down list and select Yes or No in the Show Filter Pane for Power BI Report field.
- If you chose Dashboard, select a dashboard name in the Dashboard drop-down list.
-
-
Click Update Menu Item and External Link to save the menu item settings.
-
Navigate to Security Roles and select the role that is supposed to have access to the Occupation Insight page (Staff, Student, Applicant, Employer).
-
In the Menu Transactions and Quick Links Manager section, locate the Occupation Insight page, select the check boxes in the Add Menu and Quick Link columns (as applicable), and click the Update Transaction Security button.
-
On the Portal server, open the Command Prompt, type iisreset and run the command.
-
Log in to Portal with the appropriate role (Staff, Student, Applicant, or Employer) and click the My Home Page link to refresh the pages.
-
Select the menu item for the Occupation Insight page and verify that the content is displayed as expected.
The image below shows an example of an Occupation Insight report.
Mobile Version of Power BI/Occupation Insight Reports
When an Power BI or Occupation Insight report is configured for display in the Student Portal or Faculty Portal, the Portal will detect whether or not the user is logged in via a mobile device.
- If mobile layout exists for report, the mobile layout will be rendered.
- If mobile layout does not exist for report, the regular (desktop) layout will be rendered.
When the Portal is launched in a desktop, the report will be rendered in desktop layout regardless of whether or not a mobile layout exists for the report.

