This screen enables you to select the actions to be taken by Installation Manager (e.g., install, uninstall) and to specify the machine name of the client for the Regulatory 1098-T Processing Utility.
Set Up the 1098-T Client
-
In the Installation menu, click 1098T. The Regulatory 1098T settings screen is displayed.

-
Click Add to add a line to the Settings screen.
-
Select an appropriate Action. The following Action values are available:
-
None – Performs no action.
-
Install – Performs a fresh installation or upgrade of a component. You can install or upgrade multiple components at the same time.
-
Uninstall – Removes all subcomponents on that machine and uninstalls the component from Programs and Features.
Optional: Click Select All to set the Action field to Install for all components listed on this screen. Click Unselect All to set the Action field to None.
-
-
Enter the Machine Name for the component to be installed. This is the machine where the client for the 1098-T Processing Utility will be installed.
-
In the Database field, select a database for Anthology Student. The drop-down contains a list of databases configured in the Database settings screen.
-
Specify the Destination Directory if you want to override the default directory set on the Global Settings screen. Installation Manager searches the machine for an existing \C2000 share folder. It automatically uses the \C2000 share folder as the Destination path to install to, if found. Otherwise, it uses the Destination Path from the Global Settings.
-
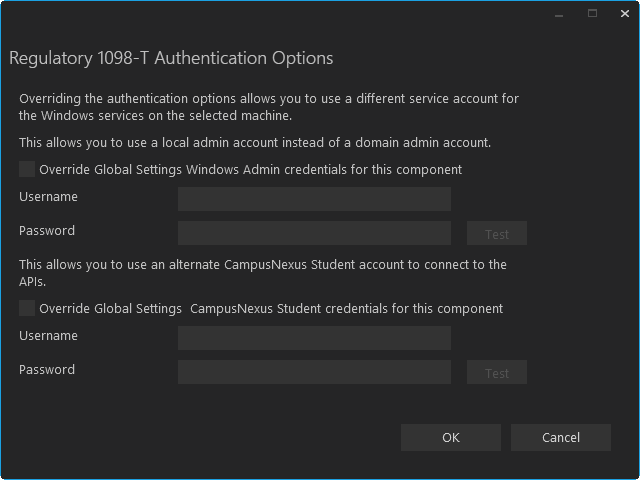
Click
 in the Auth column if you want to override the authentication options from Global Settings to use a different account for the Windows services and alternate Anthology Student credentials on the selected machine. The Service Authentication Options form is displayed.
 -
Click
 to copy a line. Edit the copied line as needed.
 -
Click
 to delete a selected line.
 -
Click Test to ensure the setup for the corresponding line is correct. If a test on a particular line fails, check all associated fields and click Test again.
-
If all tests pass, click
 .
.