WorldWaves University offers a number of courses in various disciplines. A prospect who is interested in a course is created as a Lead in Talisma. Details of the new Lead are captured using one of the following channels:
• The prospect sends an SMS to the University for more information.
• The prospect communicates with an admissions officer at WorldWaves University over the phone.
• The prospect visits the WorldWaves University web site and submits an online form.
Samantha, the marketing executive at WorldWaves University, needs to configure an SMS Campaign which must be automatically sent daily every 30 minutes to new Leads that satisfy the following conditions:
• The Send SMS Property is Yes
• The Double Opt-In(SMS) Property is blank
Further, if the Campaign is already sent to a Target, it must not be sent to the same Target again.
The SMS message must provide information to the Targets so that they can respond with Y to Opt-In and with N to Opt-Out from the SMS services of the University. Additionally, an automatic response must be sent to all Targets who respond to the Campaign.
|
Note WorldWaves University has obtained the following information from the SMS Service Provider: • Keyword - WORLDWAVES • Shared Short Code - 5686 For information on Keyword and Short Code, your administrator must see Installation Manager Help. |
To meet Samantha’s requirement to configure the Double Opt-In functionality, the following steps must be performed:
1. Configure Keywords for Opt-In and Opt-Out
3. Create a Dynamic Mailing List for the SMS Campaign
4. Configure a Campaign to Send Initial SMS Messages to New Leads
|
Note • To configure a Contact-based Campaign to send SMS messages, perform steps 3 and 4 with Contact as the Base Object. • When Dynamic Mailing Lists are configured for Lead and Contact-based Campaigns, after the Campaigns are processed, two SMS messages are sent to the same mobile number if the Contact and Lead share the same mobile number. Hence, it is recommended to configure only one Campaign which must be based on the Contact or Lead Object. |
Configure Keywords for Opt-In and Opt-Out
The database administrator of WorldWaves configures Y as the Opt-In and N as the Opt-Out keywords in the Talisma Main Database server. For more information, your administrator must see Installation Manager Help.
Configure SMS Templates
A Talisma Client User must configure the following SMS Templates:
• Welcome Message
• Opt-In Message
• Opt-Out Message
Creating the Welcome Message SMS Template
This SMS Template will be used in the Talisma Campaign to send the initial SMS Message to Targets. To create the Welcome Message SMS Template, perform the following steps in Talisma Client:
1. From the Edit menu in the Home Workspace, select Mailer/SMS Template.
The Mailer/SMS Template Manager is displayed.
2. Click New.
The New Mailer/SMS Template dialog box is displayed.
3. Select Create SMS Template and select Lead from the Base Object field.
|
Note If you are configuring a Contact-based Campaign, select Contact from the Base Object field. |
The New Mailer Template window is displayed.
4. In the Title field, specify Welcome Message.
5. In the Message tab, type the following content:
To receive 2 SMS messages every week regarding events organized by WorldWaves University, send WORLDWAVES Y to 5686. To Opt-Out from receiving SMS messages in future, send WORLDWAVES N to 5686.
|
Note In the above message content, WORLDWAVES is the keyword and 5686 is the Shared Short Code provided by the Service Provider. |
6. From the File menu select Save.
- OR -
Click  .
.
The Welcome Message SMS Template is created.
Creating the Opt-In Message SMS Template
This SMS Template will be used as an automatic response that will be sent to a Target, when the Target responds with an Opt-In keyword. To create the Opt-In Message SMS Template, perform the following steps in Talisma Client:
1. From the Edit menu, select Mailer/SMS Template.
The Mailer/SMS Template Manager is displayed.
2. Click New.
The New Mailer/SMS Template dialog box is displayed.
3. Select the Create SMS Template option and select Contact from the Base Object field.
The New Mailer Template window is displayed.
4. In the Title field, specify Opt-In Message.
5. In the Message tab, type the following content:
You have been successfully subscribed for the SMS Service from WorldWaves University. To unsubscribe from the SMS service from WorldWaves University in future, type WORLDWAVES N to 5686.
|
Note In the above message content, WORLDWAVES is the keyword and 5686 is the Shared Short Code provided by the Service Provider. |
6. From the File menu select Save.
- OR -
Click  .
.
7. In the SMS tab, set the values of the following fields as indicated:
a. Used for automatic response to Yes
b. SMS Keyword to WORLDWAVES
c. Automatic response type to Opt-in.
|
Note In the SMS Keyword field, select the keyword provided by the Service Provider for your organization. If your organization uses a unique long number or a unique short code for response SMS, leave the SMS Keyword field blank. |
8. From the File menu select Save.
- OR -
Click  .
.
The Opt-In Message SMS Template is created.
Creating the Opt-Out Message SMS Template
This SMS Template will be used as an automatic response that will be sent when the Target responds with an Opt-Out keyword. To create the Opt-Out Message SMS Template, perform the following steps in Talisma Client:
1. Repeat steps 1 - 3 of Creating the Opt-In Message SMS Template.
2. In the Title field, specify Opt-Out Message.
3. In the Message tab, type the following content:
You have been successfully unsubscribed from the SMS Service from WorldWaves University. To subscribe for the SMS service from WorldWaves University in future, send WORLDWAVES Y to 5686.
|
Note In the above message content, WORLDWAVES is the keyword and 5686 is the Shared Short Code provided by the Service Provider. |
4. From the File menu select Save.
- OR -
Click  .
.
5. In the SMS tab, set the values of the following fields as indicated:
a. Used for automatic response to Yes
b. SMS Keyword to WORLDWAVES
c. Automatic response type to Opt-out.
|
Note In the SMS Keyword field, select the keyword provided by the Service Provider for your organization. However, if your organization uses a unique long number or a unique short code for response SMS, leave the SMS Keyword field blank. |
6. From the File menu select Save.
- OR -
Click  .
.
The Opt-Out Message SMS Template is created.
Create a Dynamic Mailing List for the SMS Campaign
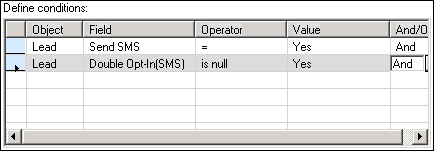
Samantha wants to send an initial SMS Message using Talisma Campaigns only to the new Leads created in Talisma that satisfy the following conditions:
• The Send SMS Property is Yes
• The Double Opt-In(SMS) Property is blank
This can be achieved by configuring a Dynamic Mailing List in Talisma and adding this Mailing List as Targets in a Campaign. To create a Dynamic Mailing List perform the following steps:
1. In any Workspace, from the Edit menu, select Mailing Lists.
The Mailing list Manager will be displayed.
2. Click New.
The New Mailing List dialog box is displayed.
3. Select Create dynamic Mailing List option.
4. From the Base Object list, select Lead.
5. Click OK.
The New Mailing List window is displayed.
6. Click the Filters tab.
7. Select the Advanced Filter option and define the Filter in the Define Conditions area as shown in the following graphic:

|
Note If you are configuring a Contact-based Dynamic Mailing List, instead of Lead, use Contact as the Object in the Filter. |
8. Type a name for the Filter in the Filter Name box and click Add.
9. Select the Properties tab.
10. In the Name field, specify a name for the Mailing List as SendSMStoLeads.
11. In the Teams field, select the Teams with which the Mailing List must be shared.
12. From the File menu, select Save.
- OR -
Click  .
.
The Dynamic Mailing List is created and displayed in the Mailing List Manager.
Configure a Campaign to Send Initial SMS Messages to New Leads
To configure a Campaign which will send SMS messages to new Leads, a Talisma Client User with Manage Campaigns Permission must perform the following steps:
2. Add Targets to the Campaign
1. In any Campaign-based Workspace, select New Campaign from the File menu.
- OR -
From the File menu, select New, Object, Campaign, General.
- OR -
Click  .
.
The Team and Base Object dialog box is displayed.
2. Select the Team to which the Campaign must be assigned.
3. From the Base Object list, select Lead.
4. Click OK.
The Campaign window is displayed.
5. Click the Properties tab.
6. In the Name field, type SendSMStoNewLeads.
7. Enter the relevant Properties.
8. Click the Workflow tab.
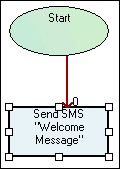
9. Perform the following steps to create a Workflow:
a. Click  to add an action node.
b. In the Select Type of action field, select Send SMS.
c. In the Select Object field, select Lead.
d. In the Select Property field, select Mobile.
e. In the Select SMS Template field, select the SMS template Welcome Message that was created in Creating the Welcome Message SMS Template.
f. In the From field options field, select SMS Code.
g. In the From field, select the name of the SMS Web Service.
h. In the SMS Dispatcher field, select the name of the SMS Dispatcher.
The Workflow appears as follows:

10. From the File menu, select Save.
- OR -
Click  .
.
The Campaign will be created.
To Add Targets to the Campaign
Samantha wants the Campaigns to be sent every day to all new Leads that are created in Talisma.
To achieve this, the dynamic Mailing List that was created in Create a Dynamic Mailing List for the SMS Campaign must be added as Targets to the SendSMStoNewLeads Campaign and configured to recur daily. To do so:
1. Open the SendSMStoNewLeads campaign.
2. From the Campaign menu, select Add Targets.
- OR -
Click  .
.
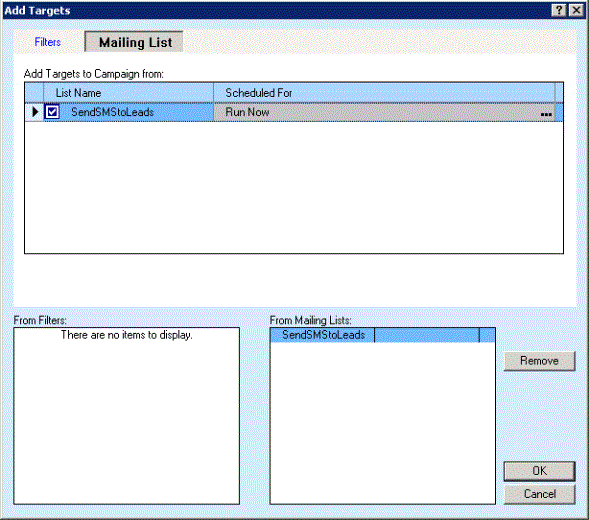
The Add Targets dialog box is displayed.
3. Click the Mailing List tab.
4. From the Add Targets to Campaign from list, select the SendSMStoLeads Mailing List.

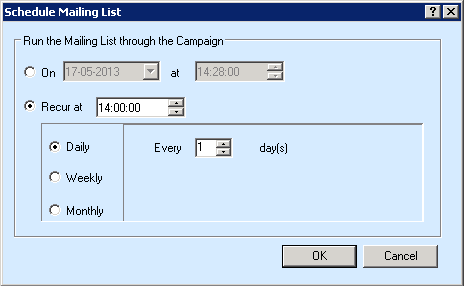
5. Click  in the Scheduled For column. The Schedule Mailing List dialog box will be displayed.

6. Select the Recur at field and specify the time when the Campaign must recur.
7. Click the Daily option.
8. Click OK. The Add Targets dialog box is displayed.
9. Click OK.
The Mailing List is added to the SendSMStoNewLeads Campaign, and Targets from the list will be added at the scheduled time.
|
Note If you need to schedule a Campaign to run at a regular interval daily, such as every 30 minutes, the database administrator must perform the following steps on the computer where Talisma Server is installed: 1. Open Microsoft SQL Server Management Studio. 2. Navigate to the Jobs node under the SQL Server Agent node. 3. Locate the Talisma-Campaign-ListSchedule Job that is suffixed with the Campaign ID and the Mailing List ID. For example, if the Campaign ID is 8 and the Mailing List ID is 2, the Job will be Talisma-Campaign-ListSchedule<DBGUID><(MainDBName)>Campaign#8List#2 4. Right-click and select Properties from the shortcut menu. The Job Properties- <Job name> dialog box is displayed. 5. In the Select a Page area, click Schedules and click the Edit button. The Job Schedules Properties - <Job name> dialog box is displayed. 6. In the Daily frequency area, click the Occurs every option and specify the frequency as 30 minutes in the appropriate fields. 7. Click through OK twice. Caution: If a Talisma Client User changes the schedule of the Campaign later, the changes to the Talisma-Campaign-ListSchedule Job associated with that Campaign will be lost and it must be reconfigured. |
1. Open the SendSMStoNewLeadscampaign.
2. From the Campaign menu, select Activate Campaign.
- OR -
Click  .
.
The Campaign is activated and will run at the scheduled time every day.
|
Example If you have configured the schedule of the Campaign to run every 30 minutes, the Campaign will automatically run every 30 minutes daily and send SMS messages to the new Leads. |
Update in Talisma based on the Response Received from Targets
When the SendSMStoNewLeads Campaign is processed, the Welcome SMS message is sent to the Targets which were configured in the Campaign. The Targets perform one of the following actions:
• Target Opts-In
• Target Opts-Out
• Target does not respond
Target Opts-In
To Opt-In, the Target sends the following message to 5686:
WORLDWAVES Y
WorldWaves University receives the SMS Message and triggers the following automatic response to the Target:
You have been successfully subscribed for the SMS Service from WorldWaves University. To unsubscribe from the SMS service from WorldWaves University in future, type WORLDWAVES N to 5686.
WorldWaves University will now send 2 SMS messages every day to the Target until the Target Opts-Out from the SMS service.
Target Opts-Out
To Opt-Out, the Target sends the following message to 5686:
WORLDWAVES N
WorldWaves University receives the SMS Message and triggers the following automatic response to the Target:
You have been successfully unsubscribed from the SMS Service from WorldWaves University. To subscribe for the SMS service from WorldWaves University in future, send WORLDWAVES Y to 5686.
WorldWaves University will not send SMS messages to the Target until the Target Opts-In again for the SMS service.
Target does not respond
If the Target does not send any response, no action is taken.
|
Note • Consider a scenario where the Opt-In or Opt-Out keywords configured in Talisma do not match the Opt-In and Opt-Out keywords given by the Service Provider. In this scenario, if the response SMS from a Lead or Contact contains the Opt-In or Opt-Out keyword that is configured, an Interaction is created in Talisma. Further, the Send SMS and Double Opt-In(SMS) Properties of the Lead or Contact will be updated appropriately. For more information on the Send SMS and Double Opt-In(SMS) Properties value, see Behavior of the Send SMS and Double Opt-In(SMS) Properties. • If a Lead or Contact sends an SMS response with a keyword such as HELP which is not configured in Talisma, an Interaction is created and the Send SMS and Double Opt-In(SMS) Properties of the Lead or Contact Objects will not be updated. Additionally, an automatic response can be sent to the Lead or Contact if an SMS Template is configured with the Automatic response type Property as Normal. For more information on the Automatic response type Property, see Template Tabs and Properties. • Consider a scenario where a Contact or Lead has Opted Out and has the Send SMS and Double Opt-In(SMS) Properties as No in Talisma. In this scenario, if a Talisma Client User tries to send an SMS message either using a Campaign or by changing the value of the Send SMS Property of the Contact or Lead to Yes, the SMS will be sent from Talisma, however it will fail to be delivered from the Service Provider to the Contact or Lead. This happens because the Service Provider such as Clickatell maintains the phone numbers of Contacts or Leads that have opted out from receiving SMS Messages as a Stop-list on their servers. If the Service Provider is Clickatell, the phone numbers of a Contact or Lead can be unblocked by sending a request to support@clickatell.com. It takes at least 24 hours for Clickatell to unblock the phone numbers. |