Configuring Global Options
To Specify Global Options
1. From the Navigation pane, select the <System> node (the node at the top of the left pane).
2. Click Options in the Results pane. The System Option page is displayed.
3. Click the Global Options link at the bottom of the page. The Global Options page is displayed.
4. Make the required settings and click Save.
Note
For tblGlobalInfo options that are configured to be displayed in Business Administrator, it is recommended that you do not modify their values in the tblglobalinfo table.
If you want to modify the value of the options, it is recommended that you use the settings in the Global Options page. When you modify the settings; events, actions, and errors that occur are logged in the Admin and Error logs in Business Administrator
• Enable creation of multiple Contacts with the same e-mail address
When this option is set to Yes, you can create multiple contacts with the same email address.
Important
For this setting to take precedence, ensure that a “duplicate check configuration” that is different from the “default duplicate check configuration” is active in the Data Management Utility (DMU).
Select Yes to create multiple contacts with the same email address.
- OR -
Retain the default value No to disable the creation of multiple contacts with the same email address.
Note
◦ When the Apply Brand button is clicked in the Data Management Utility, this option is automatically set to Yes and is disabled.
◦ The Enable creation of multiple Contacts with the same email address option corresponds to the AllowDuplicateContactEmail option in the tblglobalinfo table.
Web Forms are threaded using the Email Property of the Contact Object. If you set the value of the option to Yes, you must specify another unique property using which Web Forms can be threaded.
Run the following SQL statements on the computer where the Main server is installed, after replacing the value 21006 with the ID of the unique property to be used for web form threading.
Insert into tblGlobalInfo
tValueName,tValueData)values(N'ContactUniquePropertyID',21006)
Insert into tblGlobalInfo
tValueName,tValueData)values(N'IscontactInteractionInOneWebForm',1)
You can obtain the ID of the unique property from the tblColumnMain table.
Note
When the option is set to Yes:
• For an Interaction created from an incoming message, the Contact who was most recently created in CampusNexus CRM is set for the Interaction.
• When the user specifies contact details in the new Message window, the contact who was most recently created is automatically set for the message. The user can select a different contact from the Address Book.
• Masking Character in Interaction Messages
The character that you specify here, is used to mask text in interaction messages. The default value of this option is * (asterisk).
Note
◦ The following special characters are not supported to mask text in Interaction Messages:
Space, @, single quote (’), semi-colon (;), question mark (?), left parenthesis ((), equals (=), and right curly braces (}).
◦ The Masking Character in Interaction Messages option corresponds to the MaskedTextCharacter option in the tblGlobalInfo table.
• Use Advanced Duplicate Check Criteria
When this option is set to Yes, the following actions occur:
◦ The Advanced button is enabled in the Duplicate Check Criteria page in the Data Management Utility and in the Web Form Configuration page in Business Administrator. As a result, you can configure advanced duplicate check criteria for the lead and contact objects. These criteria are used for creating Contact and Lead items.
When this option is set to No, the following actions occur:
◦ The Advanced button is disabled in the Duplicate Check Criteria page in the Data Management Utility and in the Web Form Configuration page in Business Administrator.
By default, the value of this option is set to No.
For information about configuring Advanced Duplicate Check Criteria for the Contact Object in the Web Form Configuration page, see Configuring Advanced Duplicate Check Criteria.
Note
The Use Advanced Duplicate Check Criteria option corresponds to the EnableAdvancedDupCheckForLeadAndContacts option in the tblGlobalInfo table.
• Enable the enhanced name splitting logic
This option enables enhanced name splitting logic for the Contact and Lead items. It can have one of the following values:
◦ Yes: The name is split in such a way that the first word of the Name property becomes the first name, the last word becomes the last name, and the words between the first and last words become the middle name.
◦ No: The name is split in such a way that the first word of the Name property becomes the first name, the second word becomes the middle name, and rest of the words become the last name.
By default, the value of this option is No.
Note
The Enable the enhanced name splitting logic option corresponds to the EnableEnhancedNameSplit option in the tblGlobalInfo table.
The URL of the Calendar web component is stored in this parameter. When the user clicks on the Link to My Calendar, the value in this parameter is used to construct the link to the user's calendar. The user can copy the URL and view calendar details after integrating the URL with a calendar client. By default, the Calendar URL field is blank. In this scenario, the URL that is generated includes the following details:
◦ The internal server name specified for the Calendar web component when it is installed.
◦ The name of the virtual root where the calendar web component is installed.
For example, if the calendar web component is installed on the server named CRMWebServer1 under the virtual root Calendar, the Calendar URL is constructed as http://CRMWebServer1/Calendar.
It is recommended to provide the public facing URL pointing to the CampusNexus CRM Calendar web application in this field. This allows for the calendar to be accessible to devices such as phones and tablets when they are not connected to the institution’s network. For example. if the server on which the calendar web component is installed has the public name https://CRMWeb.school.edu and the virtual root name is Calendar, the value in the Calendar URL field is constructed as https://CRMWeb.school.edu/Calendar.
Note
The Calendar URL option corresponds to the CalendarServerUrl option in the tblGlobalInfo table.
• Allow to generate the case ID of a new Interaction
This option is not used. It corresponds to the PreGenerateCaseID option in the tblGlobalInfo table.
• No. of columns in the Object Item View of Talisma Web Client
By default, properties in the Object Item View in Web Client are displayed in three columns. You can change the default count of columns. To do so, set the value of this option. Ensure that you specify a value that is in the range 1 - 4.
Note
The No. of columns in the Object Item View of Talisma Web Client option corresponds to the WebClientItemViewNoOfCols option in the tblGlobalInfo table.
• Outgoing Alias For Calendar Events
From the list of displayed aliases, select an outgoing alias. Attendees of a calendar event receive emails from the selected alias.
Note
The Outgoing Alias For Calendar Events option corresponds to the CalendarAlias option in the tblGlobalInfo table.
• Maximum count of consecutive soft bounces allowed per email address
When a recipient does not receive an email or a campaign mailer, and the recipient's email server returns an undelivered message, the bounced status code for undelivered message is used to categorize the email address as hard or soft bounced. If the email remains undelivered with a soft bounce status code even after repeated attempts, the email is categorized as hard bounced when the count of soft bounces equals or exceeds the value that is set.
By default, the value of this option is 5. You can specify a different value. If you type a negative number or 0, the bounced email address is categorized as soft or hard bounced based on the bounced status code.
Note
The bounce status (hard or soft) of the email address is removed and the bounce counter is reset to 0 when:
◦ An email is received from the email address
◦ The Email Opened Tracker is configured and the recipient opens the email from a campaign or interaction
◦ When the campaign target clicks a URL and the On URL Click event is triggered
The Maximum count of consecutive soft bounces allowed per email address option corresponds to the EmailSoftBounceThreshold option in the tblGlobalInfo table.
• Create an item if the value of the Duplicate Check Property is Null
When you set the value of this option to Yes, a Contact or Lead is created in CampusNexus CRM if a value is not specified for a property that is configured in the Duplicate Check Configuration.
- OR -
When you set the value of this option to No, during Contact or Lead creation, if a value is not specified for a property which is configured in the Duplicate Check Configuration, the system performs a duplicate check on the rest of the properties for which the values are specified. If a matching Contact is found, a new record is not created.
For the Lead Object, if a matching Lead is found, the Lead is created and the value of its Duplicate Property is set to Yes.
Setting the value in this global option affects the behavior of creating a Contact or Lead from any of the following ways:
For the Contact Object
◦ User manually creates a Contact in Desktop Client
◦ Through Chat
◦ Through Rules
For the Lead Object
◦ User manually creates a Lead in Desktop Client
◦ Through Rules
◦ Through an iService request
Setting the value in this global option does not affect the behavior of creating a Contact or Lead from any of the following ways:
◦ Through an Import operation
◦ Through Campaigns
◦ Through Web Forms
◦ Through a New Message
◦ Through Auto Association
◦ Through the Mark Lead as Duplicate operation in Desktop Client
Note
The Create an item if the value of the Duplicate Check Property is Null option corresponds to the IncludeNullForDuplicateCheck option in the tblGlobalInfo table.
• Exclude time in date fields for bulk export, mailer templates and print templates
This option can have one of the following values
◦ No: The time value in date properties will be exported when an export configuration is run or when date properties are merged in mailer and print templates.
◦ Yes: The time value will not be considered when the export configuration runs or date properties are merged in a mailer or print template.
By default, the value of this option is No.
Note
◦ Time values are stored in date properties if the Include Time attribute is selected for the property. For information about the attribute, see About Property Types.
◦ The Exclude time in date fields for bulk export, mailer templates and print templates option corresponds to the ExcludeTimeBulkExpMailerAndPrintTemp option in the tblglobalInfo table.
◦ Include a value in the DateWithTimeFormat parameter that will be associated with a specific display format of date and time fields. By default, the value of the parameter is 100, which will display date and time values in the format Dec 30 2022 12:38AM. As this parameter is not displayed, its value must be updated directly in the tblglobalInfo table. For more information about date and time formats that can be set in the DateWithTimeFormat parameter and their associated display values, see Microsoft documentation.
Changing the value of the date/time formats is a 2-step process. The following steps are described with mailer templates as an example:
-
Change the value of DateWithTimeFormat.
AND/OR
Change the value of Exclude time in date fields for bulk export, mailer templates and print templates.
-
After making either or both the above changes, edit and save the previously used mailer template. This step is important and must not be skipped as changed date and time formats will reflect only after the mailer template is edited and saved.
If it’s required, restore the edited mailer template to its original text by editing and saving it again. For example, remove an inserted comma character that was included when it was edited. Revised date and time formats associated with changed settings of step 1 will be displayed when field values are merged in the mailer template.
While step 1 is required for changing displayed date formats in bulk export, canned responses, mailer templates and print templates, step 2 is mandatory only for canned responses, mailers and print templates that were previously used or created before this resolution.
• Web Client idle timeout (0 - 999 mins)
If Web Client is idle for a duration set in this field, i.e., the user does not perform any operations until the duration lapses, a message will display that the user will be logged off after a timer counts down from 60 seconds.
By default, the value of this option is 0 indicating that this functionality is disabled. To enable timeout behavior, set a positive non-decimal value.
Note
◦ The Web Client idle timeout (0 - 999 mins) option corresponds to the WebClientIdleTimeOut option in the tblGlobalInfo table.
◦ The behavior will be disabled in a Web tab. While the cursor is in the tab, the message will not display even if the duration lapses, and the user will not be logged off.
• Enable monitoring notifications in Desktop and Web Client
This option enables the display of application, database and service monitoring notifications in Desktop and Web Client. It can have one of the following values:
◦ No: Notifications will not be displayed
◦ Yes: Notifications will be displayed.
By default, the value of this option is No.
Note
This option corresponds to the SendNotificationForMonitoring parameter in the tblGlobalInfo table.
• Recover active phone sessions upon login to Desktop or Web Client
This option enables CRM users to recover phone sessions if they were disconnected in the previous login session on account of Internet or computer outages, a browser refresh, or any other reasons.
By default, the value of this option is Yes which indicates that active phone sessions from the previous login session will be automatically recovered in the current login session.
To disable this behavior, change the value of the option to No.
Note
This option corresponds to the RecoverActivePhoneSessionsUponLogin parameter in the tblGlobalInfo table.
• Enable Activity Creation for the Interaction Object
To configure Activity creation for the Interaction object:
Select Yes to automatically create Activity when a new Interaction is created.
- OR -
Select No to restrict Activity creation when a new Interaction is created
Note
The Enable Activity Creation for the Interaction Object option corresponds to the CreateActivityForInteraction option in the tblGlobalInfo table.
• View related Object items based on the set object item
When this option is selected, the related object item associated with the item that is set, is viewed.
Example
The User creates an Interaction after selecting a Lead in the Lead Table View. When this occurs, the Contact associated with the Lead is automatically set in the Contact Property of the New Interaction window. Further, details of the Enrollment that is associated with the Lead will be displayed in the Name field when the User selects Enrollment in the Link to list.
If you select Yes, Contact and Enrollment details are automatically set based on the selected Lead.
- OR -
If you select No, Contact details are not set in the Interaction window. Enrollment details are set if an Enrollment is associated with the Lead.
Note
The View related Object items based on the set Object item option corresponds to the PrefilledConditionsForNewInteraction option in the tblGlobalInfo table.
• Enable the automatic association of Enrollment with Lead
This option enables you to automatically associate a Lead in CampusNexus® CRM that is not deleted, disqualified, invalid, or duplicate, and which has values in specific properties that match the values in the corresponding properties of an Enrollment.
The Properties based on which the automatic association occurs are specific to a Campus in which the Lead and Enrollment are available. When the Lead is automatically associated with the Enrollment, the Link to Enrollment property of the Lead, and the Link to Lead property of the Enrollment are automatically updated.
Select Yes to enable automatic association of Leads with Enrollments.
- OR -
Select No to disable the automatic association of Leads with Enrollments.
Note
The Enable the automatic association of Enrollment with Lead option corresponds to the AutoAssociateEnrollmentWithLead option in the tblGlobalInfo table.
• Send Interaction related Activity details from CRM to the SIS
When a Rule to send details of Activities from CRM to the SIS is triggered, set the value of the option to Yes to send additional information about corresponding Interactions.
If you select Yes, in addition to information in the Properties tab, information about Comments, User responses using the Send and Send and Resolve options, and Messages of the corresponding Interaction are also sent to the SIS.
- OR -
If you select No, only information in the Properties tab of the corresponding Interaction is sent to the SIS. By default, the value of this option is No.
Note
The Send Interaction related Activity details from CRM to the SIS option corresponds to the SendDetailInformationForInteraction option in the tblGlobalInfo table.
• Polling interval for Chat notifications (in seconds)
This option enables you to specify the polling interval at which notifications applicable for Chat are pulled into CampusNexus CRM and displayed to the Chat users. The minimum value is set to 3 seconds.
Note
The Polling interval for Chat notifications (in seconds) option corresponds to the ChatPollingInterval option in the tblGlobalInfo table.
• Polling interval for other CRM notifications (in seconds)
This option enables you to specify the polling interval at which the applicable notifications are pulled into CampusNexus CRM and displayed to users. The minimum value is set to 30 seconds.
Note
The Polling interval for other Talisma Client notifications (in seconds) option corresponds to the NotificationPollingInterval option in the tblGlobalInfo table.
• Enable logging communication history in campaign actions
This option enables the logging of communication history for messages sent to targets at the following campaign steps: Create Label, Create Letter, Export Records, Send mailer and Send SMS.
When the value Yes is selected, the Log communication history check box will be enabled at the steps. To log communication history, Desktop Client users are required to select the check box and then activate the campaign. Communication history is logged in the Campaign Communications tab of the base object of the campaign and the associated contact object. The tab is displayed Desktop Client and Web Client.
By default, the value of the option is set to No.
The Enable logging communication history in campaign actions option corresponds to the EnableLoggingCommHistory option in the tblGlobalInfo table.
• Purge Campaign Communication data older than n days
Campaign communication records that were created before the specified count of days are automatically purged. The purge operation also applies to orphaned campaign communication records, regardless of whether they are older than the specified count of days.
By default, the value of this option is 0, indicating that campaign communication records will not be purged.
The Purge Campaign Communication data older than n days option corresponds to the PurgeCampaignCommunications option in the tblGlobalInfo table.
• Assign Lead(s) only to User(s) logged on to Talisma Client
This option enables the assignment of Leads based on weighted round robin logic only if the user is logged on to Talisma Client (Desktop Client or Web Client).
If you select Yes, Leads are assigned to the user based on weighted round robin logic only if the User is logged in.
- OR -
If you select No, Leads are assigned to the user based on weighted round robin logic regardless of whether the user is logged in.
By default, the value of this option is set to No.
Note
The Assign Lead(s) only to User(s) logged on to Talisma Client option corresponds to the AssignLeadsToLoggedInUsers option in the tblGlobalInfo table.
• Prompt Users to associate an Interaction with Lead or Enrollment
This option enables a user to be prompted to link the Interaction to a Lead or Enrollment when the Interaction is created manually.
If you select Yes, when a user logs an Interaction without linking it to a Lead or Enrollment, a prompt to link the Interaction with a Lead or Enrollment is displayed.
- OR -
If you select No, when a user logs an Interaction without linking it to a Lead or Enrollment, a prompt to link the Interaction with a Lead or Enrollment is not displayed. By default, the value of this option is No.
• Specifying the Count of the Maximum Number of Event Occurrences
MaxNumOfEventOccurrences
You can specify the maximum number of occurrences that can be created for a Master Event. You can specify a numeric value between 1 and 365 (both inclusive) in this field.
By default, the value of this option is 365.
• Enabling Team Based Security for Events
EnableTeamBasedSecurityForEvents
This option enables you to restrict a user to work only with those events that belong to team(s) to which the user has access. It can have the following value:
Yes: Only users who have access to a team will be able to view events that belong to the team. When the user runs a filter or report, only events that belong to the user’s team will be displayed. Further, using the functionality of the GoTo dialog box, the user will be able to view only those events that belong to teams to which the user has access.
The value of this option must not be changed.
• Enabling Team Based Security for Participants
EnableTeamBasedSecurityForParticipants
This option enables you to restrict a user to work only with those participants that belong to team(s) to which the user has access. It can have the following value:
Yes: Only users who have access to a team will be able to view participant items that belong to the team. When the user runs a filter or report, only participant items that belong to the user’s team will be displayed. Further, using the functionality of the GoTo dialog box, the user will be able to view only those participant items that belong to teams to which the user has access.
The value of this option must not be changed.
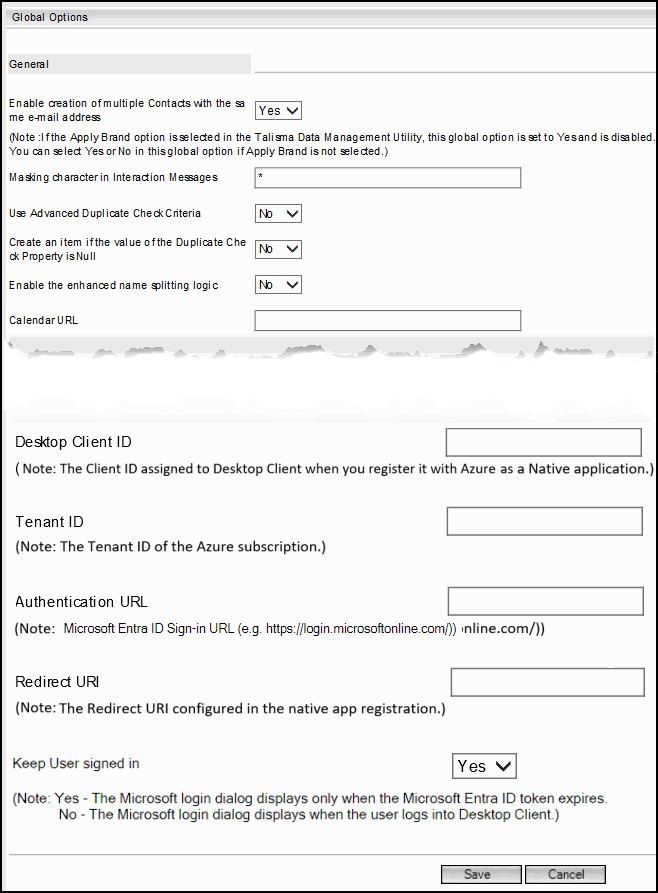
It's not required to set these options if Desktop Client is hosted in a Citrix SSO environment with Azure. If you use iServices, specify values in all options except Keep User signed in.
For Desktop Client, this value determines if Citrix SSO is enabled. It can have one of the following values:
◦ Yes – Set the value to Yes if Citrix SSO is enabled.
◦ No – This is the default value of the parameter.
This option corresponds to the CitrixSSO option in the tblglobalInfo table.
The Desktop Client ID that uniquely identifies your application. This value can be copied from the ME-ID portal when Desktop Client is registered with Azure. Update this value when your institution associates your implementation of Desktop Client with Azure.
The Desktop client ID is validated along with the token during authentication.
By default, this value is blank.
This option corresponds to the DesktopClientID option in the tblglobalinfo table.
A tenant is a dedicated instance of an ME-ID directory that your organization receives when it signs up with Azure.
By default, this value is blank. Update this value when your institution associates your implementation of Desktop Client with Azure.
This option corresponds to the TenantID option in the tblglobalinfo table.
This URL enables users to sign into Desktop Client when it's hosted in Azure. Using this URL, your application receives a token from ME-ID that your app can use to sign in the user.
By default, this value is blank. Update this URL when your institution associates your implementation of Desktop Client with Azure.
This option corresponds to the AuthenticationURL option in the tblglobalinfo table.
The Desktop Client user will be sent to the location specified in this field when authentication is successful. This value can be copied from the ME-ID portal when Desktop Client is registered with Azure. By default, this option is blank. Update this value when your institution associates your implementation of Desktop Client with Azure.
This option corresponds to the RedirectURI option in the tblglobalinfo table.
Defines the time interval within which a token is valid.
This option can have one of the following values:
◦ Yes – The Microsoft login dialog displays for trusted security Desktop Client users only during a first-time login, after which the dialog displays if user credentials are invalidated. The expiry time is set by the administrator in Azure and is based on the Access Token Lifetime policy.
◦ No – The Microsoft login dialog displays for trusted security Desktop Client users for every login attempt.
This option corresponds to the TokenLifetime option in the tblglobalInfo table.
The following options enable Power BI to be configured with Web Client. To view Power BI reports in Web Client, the View Power BI Reports (Web Client Only) permission must be enabled for the user.
The Client ID uniquely identifies your Power BI application. This value can be copied from the Azure portal when Power BI is registered with Azure. Update this value when your institution associates your implementation of Power BI with Azure.
The Client ID is validated along with the token during authentication.
By default, this value is blank.
This option corresponds to the PowerBIClientID option in the tblglobalInfo table.
Type the Power BI access token URL. On registering Power BI with Azure, the Tenant ID that is obtained must be passed in this URL. This token enables access to Power BI APIs.
This option corresponds to the PowerBIOAuthAccessTokenURL option in the tblglobalInfo table.
Type the Power BI authorization URL. It authorizes the user's Web Client login credentials to be used for signing on to Power BI.
This option corresponds to the PowerBIOAuthAuthorizeURL option in the tblglobalInfo table.
The Client secret assigned to Power BI when it is registered with Azure as a native app.
This option corresponds to the PowerBIClientSecret option in the tblglobalInfo table.
The following options enable the configuration of campaign dispatchers, and incoming and outgoing aliases to be based on the OAUTH 2.0 authentication type.
Prerequisites
Before choosing Office 365 or Gmail, ensure that the following settings are configured:
| In https://portal.azure.com (For Office 365) | In https://console.developers.google.com (For Gmail) |
|---|---|
|
From the application that's created, copy the following values and ensure that they are stored safely: • Application (client) ID • Directory (tenant) ID • Client Secret |
From the project that's created, copy the following values and ensure they are stored safely: • Client ID • Client Secret
|
|
Configure the field Redirect URI in the following format: https://<Business Administrator host computer details in FQDN format>/<Business Administrator virtual directory>/ModernAuthentication/AuthorizeToken.aspx. Note If the Business Administrator web server is changed and modern authentication settings are configured, ensure that changes are also made to values in the Redirect URI field. |
|
• Mail Server: Select one of the following mail servers:
◦ Office 365
◦ Gmail
• Mail Server Client ID: Type the client ID that uniquely identifies the selected mail server. This value must be copied from:
◦ The Azure Portal if Office 365 is the selected mail server.
◦ The Google page on which the OAuth client is created.
• Mail Server Client Secret: Type the client secret set for the selected mail server. Values must be copied from:
◦ The Azure Portal if Office 365 is the selected mail server.
◦ The Google page on which the OAuth client is created.
• (For Office 365 only) Mail Server Tenant ID: Copy this value from the application created in Portal.Azure.com.
• The following fields will be updated automatically based on the selected mail server and will be displayed in read-only format:
◦ Mail Server Authorize URL
◦ Mail Server Token URL
◦ Mail Server Scope
Note
• Values generated in https://portal.azure.com/ (first column) can be used as common input values in multiple fields as indicated in the following table.
| Values Generated From https://portal.azure.com
|
Copied To Fields in the Following Sections | ||
|---|---|---|---|
| Modern Authentication Options | Power BI Client Details | Microsoft Entra ID Configuration for Desktop Client and iServices | |
| Application (client) ID | Mail Server Client ID | Client ID | Desktop Client ID |
| Directory (tenant) ID | Mail Server Tenant ID | The Tenant ID must be passed in the field OAuth Access Token URL. | Tenant ID |
| Client Secret | Mail Server Client Secret | Client Secret | |
However, administrators can also create new applications in https://portal.azure.com and generate unique values for fields in each of the above sections.
• A notification will be displayed in Desktop Client or Web Client if login to the mail server fails while sending or receiving emails from an alias created with OAUTH 2.0 settings.