Step 2 - Specifying Source File Information
The contents of Step 2 of the Create Import Configuration wizard differs depending on the option you selected in the Select Data Transfer Type field in Step 1 of the Wizard.
• Use Existing SSIS Package: On this page, specify the SSIS package to be used to import data. You must also select the type of data to be created as a result of the import operation.
- OR -
Configure Data Transfer: On this page, specify details about the source file and its format. You must also select the type of data to be created as a result of the import operation.
Data Creation in Talisma
The type of data that can be created in Talisma depends on the base Object selected for the Import Configuration. For example, if you have selected Contact as the base Object, you can import Contact Properties. You can also import an Account-Contact Relationship.
Note that the number of steps in the Create Import Configuration wizard changes depending on the type of data you want to create in Talisma. If the type of data being created does not require mapping of Related Object Properties, the number of steps in the wizard is 6. If the type of data being created requires mapping of Related Object Properties, the number of steps in the wizard increases to 8, and the change is indicated in the title bar of the wizard. Further, if Relationship Properties of the base Object are being updated, the count of steps in the wizard increases to 9.
The following table lists the Talisma Objects, and the corresponding types of data that can be created as a result of the import.
|
Talisma Object |
Type of Data that can be Created in Talisma |
|
All Objects that can be created as a result of the Import. |
Regular Object Properties |
|
All Objects that can be created as a result of the Import. |
RecordList Properties |
|
Contact, Account, and Global custom Objects |
Categories |
|
All Objects that can be created as a result of the Import. |
Relationships |
|
Example The following examples illustrate the various combinations of Talisma Objects and data types that can be created during the data import operation: 1. Talisma Object: Contact, and Data Type: Regular You can map the external information to Contact Properties such as Name, E-mail, Phone, and Company. 2. Talisma Object: Contact, and Data Type: RecordList You can map the external information to the Contact Property, Language, which is a RecordList Property in Talisma. 3. Talisma Object: Contact, and Data Type: Account-Contact Association You can associate an Account with the Contact you have created as a result of the data import. |
To Use an Existing SSIS Package
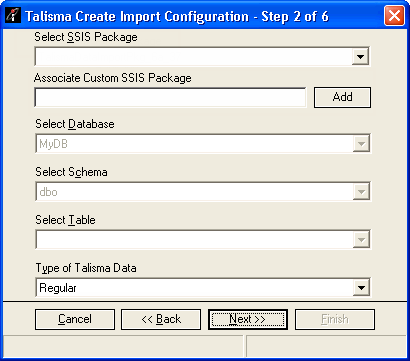
In Step 1, when you select Use Existing SSIS Package and click Next, the Talisma Create Import Configuration - Step 2 of 6 page is displayed.

Selecting an Existing SSIS Package
You can select an existing SSIS package that is created in the Talisma Data Management Utility or a custom SSIS package that is not created in the Talisma Data Management Utility.
Selecting an SSIS Package that is created in the Talisma Data Management Utility
1. From the Select SSIS Package list, select the SSIS package you want to use to import data.
2. In the Associate Custom SSIS Package list, click Add to add custom SSIS packages. The packages will then be available in the Select SSIS Package list
|
Note The Select SSIS Package list contains packages created in the Data Management Utility and those that are added using the Associate Custom SSIS Package field. |
3. From the Type of Talisma Data list, select the type of data you want to create as a result of the data import.
4. Click Next.
The Create Import Configuration – Step 3 of 6 page is displayed.
|
Note The number of columns in the source file must not exceed 255. If the number of columns exceeds 255, data may not be imported correctly. |
Selecting a custom SSIS Package that is not created in the Talisma Data Management Utility
1. Select the Custom SSIS Package check box.
2. From the Select SSIS Package list, select the SSIS package you want to use to import data.
3. Select values in the following fields:
Select Database - Lists the Talisma Main Database instance with which Talisma Client is connected and intermediate databases that are specified in the Package DB parameter of the Import Global Config utility. Other databases in the Select Database list are those that are specified when linked tabs or linked properties are created in Talisma Business Administrator for the same SQL server instance. To add other databases or linked servers to the Select Database list, contact Talisma Professional Services or Talisma Support.
Select Schema - Lists the schema of the database where the interface table exists. Select the schema.
Select Table - Lists the interface tables from the selected database and the selected schema. Select the table.
4. From the Type of Talisma Data list, select the type of data you want to create as a result of the data import.
5. Click Next. The Create Import Configuration – Step 3 of 6 page is displayed.
The following table describes the columns that must be available in the interface table:
|
Name of the Column |
Type |
Constraint |
|
lImpIdentity |
int |
• identity(1,1) • primary key |
|
lImpStatus |
int |
default 0 |
|
tTimestamp |
timestamp |
Not applicable |
|
lObjectID |
int |
Not applicable |
|
lParentObjectID |
int |
Not applicable |
|
Ensure that: • The name of the custom SSIS package does not contain spaces or special characters because packages with spaces or special characters will not be displayed in the Select SSIS Package list. • You do not define a column of type nvarchar(max) in the interface table because the maximum length supported for a column is 255 characters. |
To Configure Data Transfer
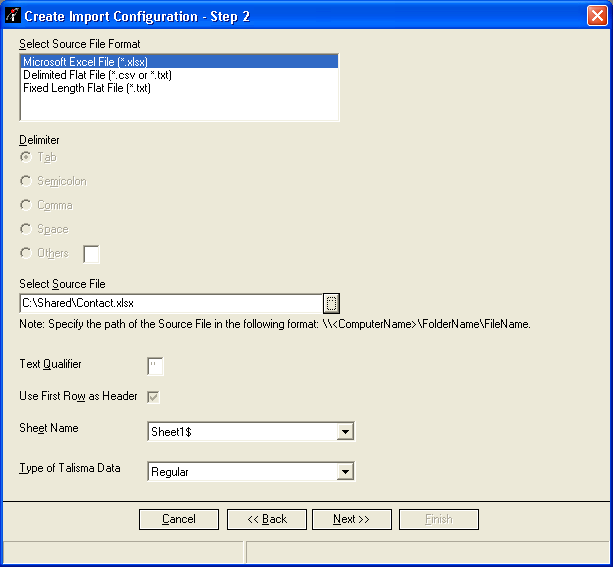
When you select Configure Data Transfer and click Next in Step 1, the Create Import Configuration – Step 2 page is displayed.

The Create Import Configuration - Step 2 Page
You can specify details of the source file from which you want to import data.
1. From the Select Source File Format list, select the format of the source file.
Microsoft Excel File (*.xlsx):
◦ By default, the Use First Row as Header option is selected. As a result, the first row of the source Excel file is considered as the header row. You cannot modify this selection.
◦ The names of the sheets in the Excel file are automatically listed in the Sheet Name list. Select the sheet that contains the data you want to import.
Delimited Flat File (*.csv or *.txt):
◦ In the Delimiter area, select the punctuation mark or character that separates data in the .csv, or .txt file. For example, if data in the .txt file that you have specified is separated by a backslash (\), select the Other option, and type \.
◦ Select the Use First Row as Header option, if you want to designate the first row of the source file as the header row. For example, if the first row of the .csv file contains Contact Name, E-mail Address, and Phone, these values will be taken as the row headings and will be used to create mappings between the external data source and Talisma Properties.
Fixed Length Flat File (*.txt)
◦ By default, the Row Header option is selected. As a result, the first row of the source text file will be taken as the header row. You can modify this selection.
2. In the Select Source File field, click 
If the folder containing the source file is on another computer, ensure that you have access to the folder.
3. The Sheet Name list includes the names of the sheets in the selected excel file. Select the sheet containing the data that you want to import.
4. From the Type of Talisma Data list, select the type of data you want to create as a result of the data import.
5. Click Next.
A message is displayed to indicate the successful creation of the SSIS package for the Import Configuration.
6. Click OK. The Create Import Configuration – Step 3 of 6 page is displayed.