Custom Configuration and Mapping Files
Connector ships with standard and custom versions of the configuration and mapping files. Under normal operating conditions, the administrator must not modify the files that are installed in the default installation location of the Connector Service Manager and Connector Queue Manager modules. If the administrator needs to modify the configuration and/or mapping files, the administrator must edit the custom versions of the configuration and mapping files.
For more information, see Service Manager and Queue Manager.
Using the MapTalismaSISUsers Utility
MapTalismaSISUsers, a custom utility, allows you to create CampusNexus CRM user accounts and map them to Anthology Student user records.
When the SyStaff data conversion script is run on the Anthology Student database or whenever a new user is added in Anthology Student, the SyStaff records are sent through the Connector. As a result, user records are created in the Talisma SIS user table.
The MapTalismaSISUsers utility will display all user records from the Talisma SIS user table that are not mapped to a CampusNexus CRM user account. To map Anthology Student users to CampusNexus CRM user accounts, perform the following steps:
-
Run MapTalismaSISUsers.exe.
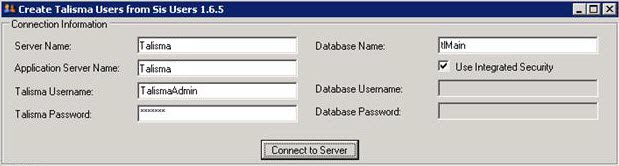
The Create Talisma Users from Sis Users window is displayed.
-
In the Connection Information area, perform the following steps:
-
Type the CampusNexus CRM username in the Talisma Username field.
-
Type the CampusNexus CRM password in the Talisma Password field.
-
Type the database name in the Database Name field.
-
Click the Connect to Server button.
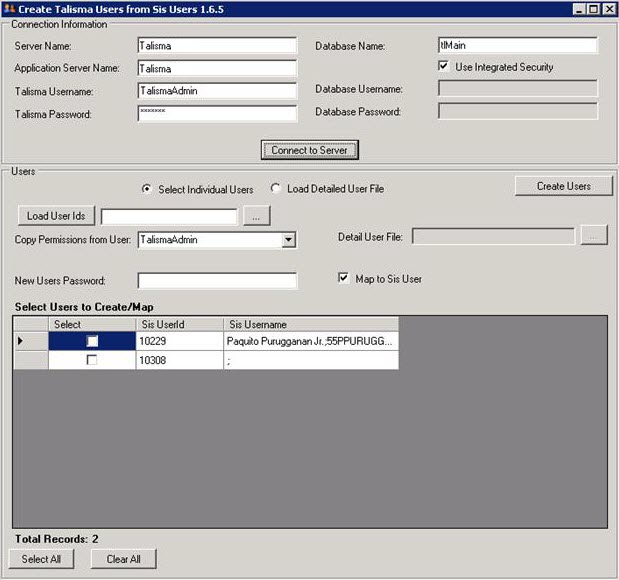
The Users area is displayed. All users who are not mapped to a CampusNexus CRM user account are displayed in the Select Users to Create/Map list.
-
-
In the Users area, perform one of the following methods to map Anthology Student users to CampusNexus CRM user accounts:
Method 1
-
Select the Select Individual Users option.
-
Select a user from the Copy Permissions from User drop-down list.
-
In the New Users Password field, type a password that will be assigned to all new user accounts.
-
Select the Map to Sis User check box.
-
Click the Select All button to select all users displayed in the Select Users to Create/Map list or you can select specific users from this list.
You can use the Clear All button to clear the selection.
-
Click the Create Users button.
The Anthology Student users are mapped to CampusNexus CRM user accounts.
Method 2
-
Select the Load Detailed User File option.
-
In the Detail User file field, locate the Microsoft Excel file that contains the list of users you want to map to CampusNexus CRM user accounts.
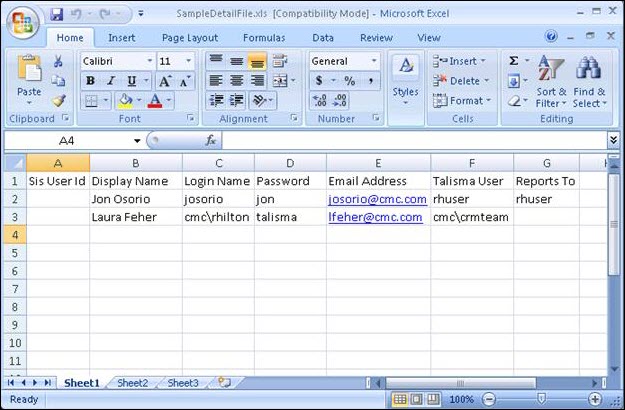
The Excel sheet must contain the following details:
-
Sis User Id: Anthology Student SyStaff ID.
-
Display Name: Display name of the user being mapped.
-
Login Name: Login name or active directory name (domain\username) for the user account.
Note: If an active directory name is used, ensure the following:
-
The Talisma User column contains an active directory name for the template account.
-
User mappings defined in the Map SIS User to Talisma User node of CampusNexus CRM Business Administrator are removed.
-
-
Password: Password of the CampusNexus CRM user.
-
Email Address: E-mail address of the CampusNexus CRM user.
-
Talisma User: The CampusNexus CRM user account that has to be used as a template.
-
Reports To: The CampusNexus CRM user to whom the newly mapped user will report to. This column is optional.
Note: Values of Display Name, Login Name, and Email Address must be unique.
-
-
Select the Map to Sis User check box.
-
Click Create Users.
The Anthology Student users are mapped to CampusNexus CRM user accounts.
The mapped users are displayed in SIS Settings, Map SIS User to Talisma User page of CampusNexus CRM Business Administrator.
-